SpringBoot2.3整合redis缓存自定义序列化的实现

1.引言

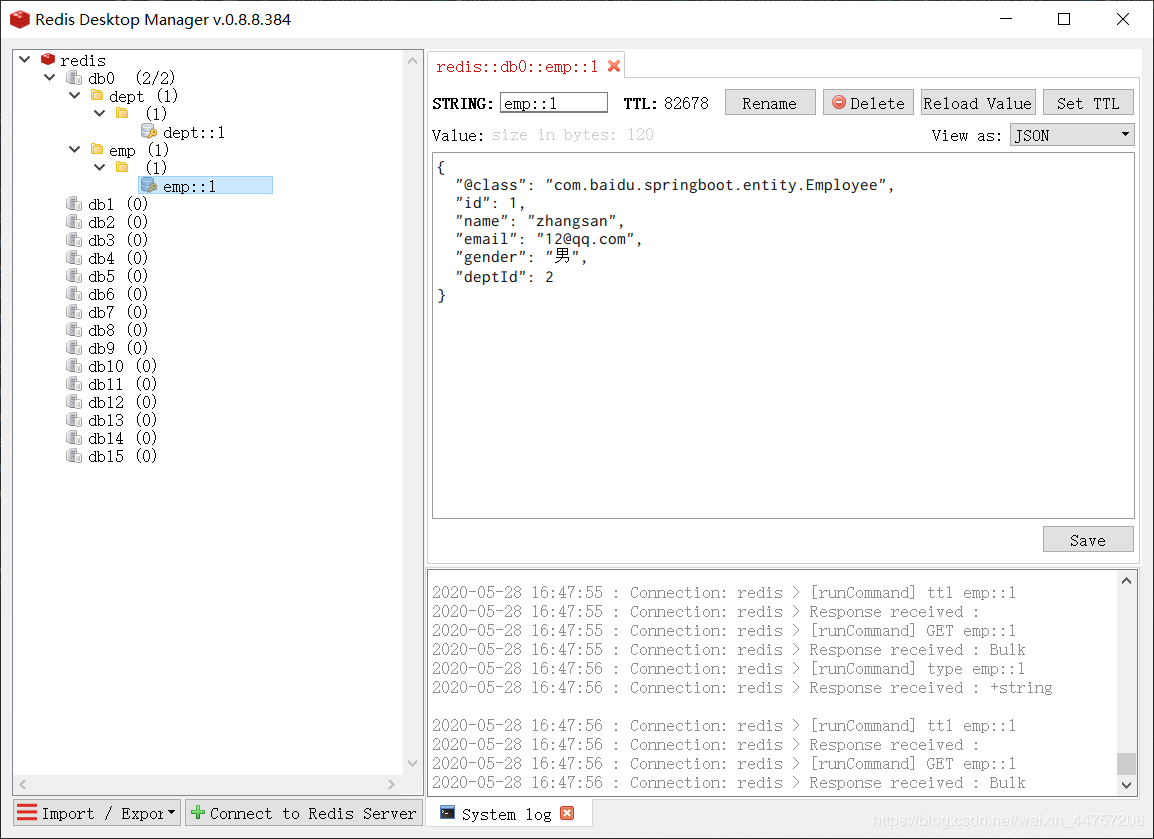
我们使用redis作为缓存中间件时,当我们第一次查询数据的时候,是去数据库查询,然后查到的数据封装到实体类中,实体类会被序列化存入缓存中,当第二次查数据时,会直接去缓存中查找被序列化的数据,然后反序列化被我们获取。我们在缓存中看到的序列化数据不直观,如果想看到类似json的数据格式,就需要自定义序列化规则。

2.整合redis

pom.xml:

<!--引入redis-->
    <dependency>
      <groupId>org.springframework.data</groupId>
      <artifactId>spring-data-redis</artifactId>
      <version>2.3.0.RELEASE</version>
    </dependency>
    <dependency>
      <groupId>redis.clients</groupId>
      <artifactId>jedis</artifactId>
    </dependency>

application.yml:

spring:
 redis:
  host: 192.168.85.130
  port: 6379
  database: 0

springboot主配置类要加上@EnableCaching注解

3.自定义序列化

@Configuration
public class MyRedisConfig {
  @Bean
  public RedisTemplate<Object, Object> empRedisTemplate(RedisConnectionFactory redisConnectionFactory)throws UnknownHostException {
    RedisTemplate<Object,Object> template = new RedisTemplate<>();
    template.setConnectionFactory(redisConnectionFactory);
    Jackson2JsonRedisSerializer<Object> serializer = new Jackson2JsonRedisSerializer<Object>(Object.class);
    template.setDefaultSerializer(serializer);
    return template;
  }

  @Bean
  public CacheManager cacheManager(RedisConnectionFactory factory){
    RedisCacheConfiguration cacheConfiguration = RedisCacheConfiguration.defaultCacheConfig()
        .entryTtl(Duration.ofDays(1))
        .disableCachingNullValues()
        .serializeKeysWith(RedisSerializationContext.SerializationPair
            .fromSerializer(new StringRedisSerializer()))
        .serializeValuesWith(RedisSerializationContext.SerializationPair.fromSerializer(new GenericJackson2JsonRedisSerializer()));
    return RedisCacheManager.builder(factory).cacheDefaults(cacheConfiguration).build();}
}

4.测试

DeptService:

@Service
public class DeptService {
  @Autowired
  DepartmentMapper departmentMapper;
  @Cacheable(value = "dept")
  public Department findById(Integer id){
  System.out.println("查询"+id+"号部门");
    Department department = departmentMapper.getDeptById(id);
    return department;
  }
}

EmployeeService:

@Service
public class EmployeeService {
  @Autowired
  EmployeeMapper employeeMapper;
 	@Cacheable(value = "emp")
  public Employee findById(Integer id){
    System.out.println("查询"+id+"号员工");
    Employee employee = employeeMapper.getEmpById(id);
    return employee;
  }
}

@Cacheable(value = “dept”) :该注解在方法上,方法传入参数默认为key值,方法返回值为value值,注解的参数value = "dept"是缓存的名子

结果:
到此这篇关于SpringBoot2.3整合redis缓存自定义序列化的实现的文章就介绍到这了,更多相关SpringBoot2.3 redis自定义序列化内容请搜索我们以前的文章或继续浏览下面的相关文章希望大家以后多多支持我们!

(0)

相关推荐

  • springBoot集成redis的key,value序列化的相关问题

    使用的是maven工程 springBoot集成redis默认使用的是注解,在官方文档中只需要2步; 1.在pom文件中引入即可 <dependency> <groupId>org.springframework.boot</groupId> <artifactId>spring-boot-starter-redis</artifactId> </dependency> 2.编写一个CacheService接口,使用redisCach

  • SpringBoot Redis配置Fastjson进行序列化和反序列化实现

    FastJson是阿里开源的一个高性能的JSON框架,FastJson数据处理速度快,无论序列化(把JavaBean对象转化成Json格式的字符串)和反序列化(把JSON格式的字符串转化为Java Bean对象),都是当之无愧的fast:功能强大(支持普通JDK类,包括javaBean, Collection, Date 或者enum):零依赖(没有依赖其他的任何类库). 1.写一个自定义序列化类 /** * 自定义序列化类 * @param <T> */ public class FastJ

  • SpringBoot2.3整合redis缓存自定义序列化的实现

    1.引言 我们使用redis作为缓存中间件时,当我们第一次查询数据的时候,是去数据库查询,然后查到的数据封装到实体类中,实体类会被序列化存入缓存中,当第二次查数据时,会直接去缓存中查找被序列化的数据,然后反序列化被我们获取.我们在缓存中看到的序列化数据不直观,如果想看到类似json的数据格式,就需要自定义序列化规则. 2.整合redis pom.xml: <!--引入redis--> <dependency> <groupId>org.springframework.d

  • 从零搭建SpringBoot2.X整合Redis框架的详细教程

    最近也不知道写啥,看之前写过Kafka整合Springboot的文章,大家反响还挺热烈的,嘿嘿嘿,就感觉帮助到大家了还挺好的,也算是达到了自己的目的,正好,今天业务模块是springboot整合redis,因为之前做过,所以有现成的代码,cv一下之后就可以了,所以时间比较多,那就给大家整理一下Springboot整合Redis的代码实现吧,从项目搭建到源码实现,下面全都有,耐心看完,相信会对你有所帮助的 好了,话不多说,我们开始吧,同样的,还是建议能够自己在自己的PC端实现一下 个人公众号:Ja

  • SpringBoot2.X整合Spring-Cache缓存开发的实现

    目录 引入依赖 配置 测试使用缓存 @Cacheable注解的使用 @CacheEvict注解的使用 @Caching注解的使用 @CachePut注解的使用 Spring-Cache的不足 读模式 写模式 总结 引入依赖 <!-- 引入redis --> <dependency> <groupId>org.springframework.boot</groupId> <artifactId>spring-boot-starter-data-re

  • SpringBoot详解整合Redis缓存方法

    目录 1.Spring Boot支持的缓存组件 2.基于注解的Redis缓存实现 3.基于API的Redis缓存实现 1.Spring Boot支持的缓存组件 在Spring Boot中,数据的缓存管理存储依赖于Spring框架中cache相关的org.springframework.cache.Cache和org.springframework.cache.CacheManager缓存管理器接口. 如果程序中没有定义类型为CacheManager的Bean组件或者是名为cacheResolve

  • SpringBoot详解如何整合Redis缓存验证码

    目录 1.简介 2.介绍 3.前期配置 3.1.坐标导入 3.2.配置文件 3.3.配置类 4.Java操作Redis 1.简介 Redis is an open source (BSD licensed), in-memory data structure store, used as a database, cache, and message broker. 翻译:Redis 是一个开源的内存中的数据结构存储系统,它可以用作:数据库.缓存和消息中间件. 官网链接:https://redis

  • SpringBoot2整合Redis缓存三步骤代码详解

    遵循SpringBoot三板斧 第一步加依赖 <!-- Redis --> <dependency> <groupId>org.springframework.boot</groupId> <artifactId>spring-boot-starter-data-redis</artifactId> </dependency> <!-- redis依赖commons-pool 这个依赖一定要添加 --> <

  • spring整合redis缓存并以注解(@Cacheable、@CachePut、@CacheEvict)形式使用

    maven项目中在pom.xml中依赖2个jar包,其他的spring的jar包省略: <dependency> <groupId>redis.clients</groupId> <artifactId>jedis</artifactId> <version>2.8.1</version> </dependency> <dependency> <groupId>org.springfra

  • springboot2.x整合redis知识点讲解

    pom文件 <!--springboot中的redis依赖--> <dependency> <groupId>org.springframework.boot</groupId> <artifactId>spring-boot-starter-data-redis</artifactId> </dependency> 配置 # Redis数据库索引(默认为0) spring.redis.database=0 # Redis

  • SpringBoot整合Redis入门之缓存数据的方法

    目录 前言 为什么要使用Redis呢? 相关依赖 配置 数据库 实体类 RedisConfig Mapper Service接口 Service实现类 测试Redis Controller 前言 Redis是一个开源的使用ANSI C语言编写.支持网络.可基于内存亦可持久化的日志型.Key-Value数据库,并提供多种语言的API.从2010年3月15日起,Redis的开发工作由VMware主持.从2013年5月开始,Redis的开发由Pivotal赞助. 为什么要使用Redis呢? 举个例子,

  • Springboot框架整合添加redis缓存功能

    目录 一:安装Redis 二:添加Redis依赖 三:添加Redis配置信息 四:创建RedisConfigurer 五:创建Redis常用方法 六:接口测试 Hello大家好,本章我们添加redis缓存功能 .另求各路大神指点,感谢 一:安装Redis 因本人电脑是windows系统,从https://github.com/ServiceStack/redis-windows下载了兼容windows系统的redis 下载后直接解压到自定义目录,运行cmd命令,进入到这个文件夹,在这个文件夹下运

随机推荐