springboot使用定时器@Scheduled不管用的解决

目录
  • 使用定时器@Scheduled不管用
  • 多个@Scheduled定时器不执行
    • 解决方法

使用定时器@Scheduled不管用

如果是一开始就不能用就是没写@EnableScheduling注解,如果是用着用着不管用了 是因为@Scheduled是单线程,有定时器在工作或者没有运行完毕,所以造成了线程堵塞所以导致下一个定时器不能运行增加一个方法类

package com.llt;
import org.springframework.boot.autoconfigure.batch.BatchProperties;
import org.springframework.context.annotation.Configuration;
import org.springframework.scheduling.annotation.Scheduled;
import org.springframework.scheduling.annotation.SchedulingConfigurer;
import org.springframework.scheduling.config.ScheduledTaskRegistrar;
import java.lang.reflect.Method;
import java.util.concurrent.Executors;
@Configuration
public class ScheduleConfig implements SchedulingConfigurer {
    @Override
    public void configureTasks(ScheduledTaskRegistrar taskRegistrar) {
        Method[] methods = BatchProperties.Job.class.getMethods();
        int defaultPoolSize = 3;
        int corePoolSize = 0;
        if (methods != null && methods.length > 0) {
            for (Method method : methods) {
                Scheduled annotation = method.getAnnotation(Scheduled.class);
                if (annotation != null) {
                    corePoolSize++;
                }
            }
            if (defaultPoolSize > corePoolSize)
                corePoolSize = defaultPoolSize;
        }
        taskRegistrar.setScheduler(Executors.newScheduledThreadPool(corePoolSize));
    }
}

就好了!

多个@Scheduled定时器不执行

最近项目中经常有用到@Scheduled注解,在内测时由于数据量小(没有进行压力测)所以每个线程执行都很快,但线上后发现部分功能无法使用,最后定位是部分的定时器没有执行,后查阅资料和Springboot源码后

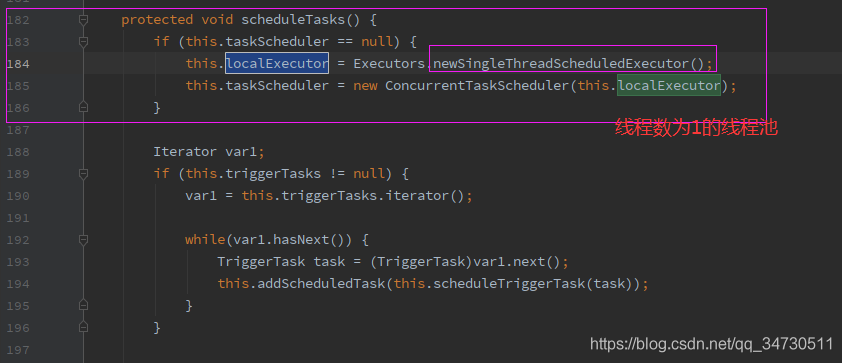
ScheduledTaskRegistrar在启动时,如果没有指定线程池的大小,默认会创建核心线程数为1的默认线程池,故而当项目中出现多个@Scheduled线程时,只能一个个的执行,从而导致个别线程执行时间过长(或长期执行)时,其他定时器不能按照指定的规则进行执行。

解决方法

1.在项目初始化时指定其执行线程池的大小

import org.springframework.boot.autoconfigure.batch.BatchProperties;
import org.springframework.context.annotation.Configuration;
import org.springframework.scheduling.annotation.Scheduled;
import org.springframework.scheduling.annotation.SchedulingConfigurer;
import org.springframework.scheduling.config.ScheduledTaskRegistrar;

import java.lang.reflect.Method;
import java.util.Arrays;
import java.util.Objects;
import java.util.concurrent.ScheduledThreadPoolExecutor;
import java.util.concurrent.atomic.AtomicInteger;

/**
 * 程序名 : ScheduledTaskConfiguration
 * 建立日期: 2021-02-23 9:33
 * 模块 : Scheduled任务线程池设置
 * 描述 : 读取项目中使用了@Scheduled注解的方法,默认所有方法在项目创建时都需要按照设定的规则执行
 * 备注 : //TODO
 * <p>
 * 修改历史
 * 序号 	       日期 		        修改人 		         修改原因
 */
@Configuration
public class ScheduledTaskConfiguration implements SchedulingConfigurer {
    @Override
    public void configureTasks(ScheduledTaskRegistrar taskRegistrar) {
        Method[] methods = BatchProperties.Job.class.getMethods();
        final AtomicInteger corePoolSize = new AtomicInteger();
        if (Objects.nonNull(methods) && methods.length > 0) {
            Arrays.stream(methods).forEach(method -> {
                final Scheduled annotation = method.getAnnotation(Scheduled.class);
                if (Objects.nonNull(annotation)) {
                    corePoolSize.incrementAndGet();
                }
            });
        }
        ScheduledThreadPoolExecutor executor = new ScheduledThreadPoolExecutor(corePoolSize.get());
        taskRegistrar.setScheduler(executor);
    }
}

2.将定时器设置为异步线程

/**
异步线程
定时器延迟1秒启动,每距上一次执行完成后间隔3秒执行一次
*/
@Async("taskExecutor")
@Scheduled(initialDelay = 1000L, fixedDelay = 3000L)
public void test(){
   System.out.println("---"+System.currentTimeMillis());
 //业务内容
}

以上为个人经验,希望能给大家一个参考,也希望大家多多支持我们。

(0)

相关推荐

  • SpringBoot 动态定时器的使用方法

    SpringBoot使用定时器使用方法添加@Scheduled注解 设计cron参数即可 package com.clsystem.Comm; import org.springframework.scheduling.annotation.Scheduled; /** * Created by pudding on 2017-11-10.(打卡记录定时任务) */ @Component public class ClockTiming { /** * 定时器 */ @Scheduled(cro

  • 使用springboot时,解决@Scheduled定时器遇到的问题

    目录 @Scheduled定时器遇到的问题 下面说一下@Scheduled 注解的几个参数 一.可以通过配置文件配置进来的 二.不可通过配置文件配置的 (作用相同) 定时任务@Scheduled使用的那些坑 一.使用的那些坑? 1.单线程 2.@Async和@EnableAsync 二.使用多线程 小结一下 @Scheduled定时器遇到的问题 @Scheduled 这个注解确实给我们带了很大的方便,我们只要加上该注解,并且根据需求设置好就可以使用定时任务了. 但是,我们需要注意的是,@Sche

  • SpringBoot开发实战系列之定时器

    前言 定时器功能在项目里面往往会用到,比如定时发送邮件.定时释放数据库资源:这里记录一下springboot对定时器的支持的简单实例 cron表达式 开始之前要先介绍一下cron表达式,这里当一下百度百科搬运工: Cron表达式是一个字符串,字符串以5或6个空格隔开,分为6或7个域,每一个域代表一个含义,Cron有如下两种语法格式: Seconds Minutes Hours DayofMonth Month DayofWeek Year或 Seconds Minutes Hours Dayof

  • Springboot集成定时器和多线程异步处理操作

    需求:用@schedule标签进行定时处理逻辑,由于业务处理速度慢,需要每次执行逻辑放在不同的线程里异步执行 springboot集成多线程异步,直接上配置: /** * 线程池异步配置 */ @Configuration @EnableAsync public class ThreadExecutorConfig implements AsyncConfigurer { @Override public Executor getAsyncExecutor() { ThreadPoolTaskE

  • springboot使用定时器@Scheduled不管用的解决

    目录 使用定时器@Scheduled不管用 多个@Scheduled定时器不执行 解决方法 使用定时器@Scheduled不管用 如果是一开始就不能用就是没写@EnableScheduling注解,如果是用着用着不管用了 是因为@Scheduled是单线程,有定时器在工作或者没有运行完毕,所以造成了线程堵塞所以导致下一个定时器不能运行增加一个方法类 package com.llt; import org.springframework.boot.autoconfigure.batch.Batch

  • 解决SpringBoot中的Scheduled单线程执行问题

    目录 问题描述 原因分析: 解决方案: 补充: 问题描述 在一次SpringBoot中使用Scheduled定时任务时,发现某一个任务出现执行占用大量资源,会导致其他任务也执行失败.类似于以下模拟场景,test1定时任务模拟有五秒钟执行时间,这时会同步影响到test2任务的执行,导致test2任务也变成五秒执行一次. @Scheduled(fixedRate = 1000) public void test1() throws InterruptedException { log.info(Th

  • SpringBoot中使用@Scheduled注解创建定时任务的实现

    在项目日常开发过程中,经常需要定时任务来帮我们做一些工作,如清理日志.定时任务的实现方法主要有 Timer.Quartz 以及 elastic-job Timer 实现定时任务 只执行一次的定时任务 Timer timer = new Timer(); timer.schedule(new TimerTask() { @Override public void run() { System.out.println("2000毫米后执行一次."); } }, 2000); timer.s

  • SpringBoot执行定时任务@Scheduled的方法

    在做项目时,需要一个定时任务来接收数据存入数据库,后端再写一个接口来提供该该数据的最新的那一条. 数据保持最新:设计字段sign的值(0,1)来设定是否最新 定时任务插入数据:首先进行更新,将所有为1即新数据设置过期,然后插入新数据,设置sign为1.这两个操作是原子操作.通过添加事务来进行控制. Java 定时任务的几种实现方式 基于 java.util.Timer 定时器,实现类似闹钟的定时任务 使用 Quartz.elastic-job.xxl-job 等开源第三方定时任务框架,适合分布式

  • SpringBoot中使用@scheduled定时执行任务的坑

    目录 解决办法 1.将@Scheduled注释的方法内部改成异步执行 2.把Scheduled配置成成多线程执行 要注意什么坑 不绕弯子了,直接说这个坑是啥: SpringBoot使用@scheduled定时执行任务的时候是在一个单线程中,如果有多个任务,其中一个任务执行时间过长,则有可能会导致其他后续任务被阻塞直到该任务执行完成.也就是会造成一些任务无法定时执行的错觉 可以通过如下代码进行测试:     @Scheduled(cron = "0/1 * * * * ? ")    

  • SpringBoot集成Swagger2实现Restful(类型转换错误解决办法)

    pom.xml增加依赖包 <dependency> <groupId>io.springfox</groupId> <artifactId>springfox-swagger2</artifactId> <version>2.2.2</version> </dependency> <dependency> <groupId>io.springfox</groupId> <

  • springboot 2.3之后消失的hibernate-validator解决方法

    项目升级到springboot2.3之后,参数校验的注解报错,发现spring-boot-starter-web的依赖项已经去除了依赖 点开spring-boot-starter-web源码看了下. <?xml version="1.0" encoding="UTF-8"?> <project xsi:schemaLocation="http://maven.apache.org/POM/4.0.0 http://maven.apache

  • springboot多模块包扫描问题的解决方法

    问题描述: springboot建立多个模块,当一个模块需要使用另一个模块的服务时,需要注入另一个模块的组件,如下面图中例子: memberservice模块中的MemberServiceApiImpl类需要注入common模块中的RedisService组件,该怎么注入呢? 解决: 在memberservice模块的启动类上加上RedisService类所在包的全路径的组件扫描,就像这样: 注意启动类上方的注解@ComponentScan(basePackages={"com.whu.comm

随机推荐