详解Android ConstraintLayout 约束布局的用法
前言
在2016年的Google I/O大会上 , Google 发布了Android Studio 2.2预览版,同时也发布了Android 新的布局方案 ConstraintLayout , 但是最近的一年也没有大规模的使用。2017年Google发布了 Android Studio 2.3 正式版,在 Android Studio 2.3 版本中新建的Module中默认的布局就是 ConstraintLayout 。如下所示:
<?xml version="1.0" encoding="utf-8"?>
<android.support.constraint.ConstraintLayout
  xmlns:android="http://schemas.android.com/apk/res/android"
  xmlns:app="http://schemas.android.com/apk/res-auto"
  xmlns:tools="http://schemas.android.com/tools"
  android:layout_width="match_parent"
  android:layout_height="match_parent"
  tools:context="com.constraintlayout.app.Main2Activity">
</android.support.constraint.ConstraintLayout>
在使用 ConstraintLayout 的布局方案,需要在 build.gradle 引入支持库:
dependencies {
  compile 'com.android.support.constraint:constraint-layout:1.0.1'
}
传统的Android开发当中,界面基本都是靠编写XML代码完成的,虽然Android Studio也支持可视化的方式来编写界面,但是操作起来并不方便,我也一直都不推荐使用可视化的方式来编写Android应用程序的界面。
而ConstraintLayout就是为了解决这一现状而出现的。它和传统编写界面的方式恰恰相反,ConstraintLayout非常适合使用可视化的方式来编写界面,但并不太适合使用XML的方式来进行编写。当然,可视化操作的背后仍然还是使用的XML代码来实现的,只不过这些代码是由Android Studio根据我们的操作自动生成的。
另外,ConstraintLayout 还有一个优点,它可以有效地解决布局嵌套过多的问题。我们平时编写界面,复杂的布局总会伴随着多层的嵌套,而嵌套越多,程序的性能也就越差。ConstraintLayout则是使用约束的方式来指定各个控件的位置和关系的,它有点类似于 RelativeLayout,但远比RelativeLayout要更强大。
ConstraintLayout向下兼容 API 9
关于 ConstraintLayout 的基本使用方法请参照郭神的博客:http://www.jb51.net/article/126440.htm
这篇文章说一些其他的特性。
常用方法总结
layout_constraintTop_toTopOf    // 将所需视图的顶部与另一个视图的顶部对齐。
layout_constraintTop_toBottomOf  // 将所需视图的顶部与另一个视图的底部对齐。
layout_constraintBottom_toTopOf  // 将所需视图的底部与另一个视图的顶部对齐。
layout_constraintBottom_toBottomOf // 将所需视图的底部与另一个视图的底部对齐。
layout_constraintLeft_toTopOf   // 将所需视图的左侧与另一个视图的顶部对齐。
layout_constraintLeft_toBottomOf  // 将所需视图的左侧与另一个视图的底部对齐。
layout_constraintLeft_toLeftOf   // 将所需视图的左边与另一个视图的左边对齐。
layout_constraintLeft_toRightOf  // 将所需视图的左边与另一个视图的右边对齐。
layout_constraintRight_toTopOf   // 将所需视图的右对齐到另一个视图的顶部。
layout_constraintRight_toBottomOf // 将所需视图的右对齐到另一个的底部。
layout_constraintRight_toLeftOf  // 将所需视图的右边与另一个视图的左边对齐。
layout_constraintRight_toRightOf  // 将所需视图的右边与另一个视图的右边对齐。
constraintDimensionRatio
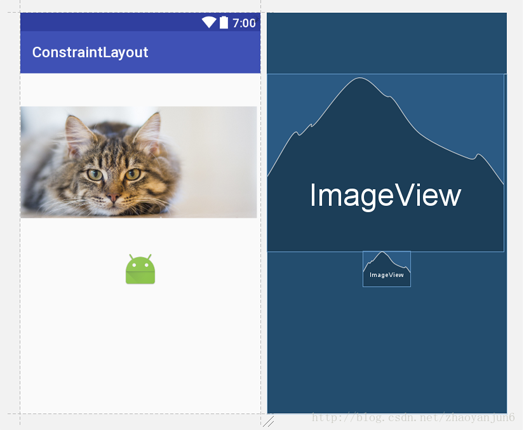
这个属性就是把一个View的尺寸设为特定的宽高比,比如设置一张图片的宽高比为 1:1,4:3, 16:9 等。通过使用ConstraintLayout,只需使用layout_constraintDimensionRatio属性即可。
<?xml version="1.0" encoding="utf-8"?>
<android.support.constraint.ConstraintLayout xmlns:android="http://schemas.android.com/apk/res/android"
  xmlns:app="http://schemas.android.com/apk/res-auto"
  xmlns:tools="http://schemas.android.com/tools"
  android:layout_width="match_parent"
  android:layout_height="match_parent"
  android:id="@+id/constraintLayout"
  tools:context="com.constraintlayout.app.MainActivity"
  >

  <ImageView
    android:id="@+id/cat_image"
    android:layout_width="0dp"
    android:layout_height="wrap_content"
    app:layout_constraintLeft_toLeftOf="parent"
    app:layout_constraintTop_toTopOf="parent"
    app:layout_constraintDimensionRatio="4:3"
    app:layout_constraintRight_toRightOf="parent"
    app:layout_constraintHorizontal_bias="0"
    android:src="@mipmap/cat"
    />

  <ImageView
    android:layout_width="0dp"
    android:layout_height="wrap_content"
    android:src="@mipmap/ic_launcher"
    app:layout_constraintDimensionRatio="4:3"
    app:layout_constraintBottom_toBottomOf="parent"
    app:layout_constraintLeft_toLeftOf="parent"
    app:layout_constraintTop_toBottomOf="@+id/cat_image"
    app:layout_constraintVertical_bias="0.0"
    app:layout_constraintRight_toRightOf="parent" />
</android.support.constraint.ConstraintLayout>
效果图如下:

偏移比例
当我们的布局文件是下面这样的时候:
<?xml version="1.0" encoding="utf-8"?>
<android.support.constraint.ConstraintLayout xmlns:android="http://schemas.android.com/apk/res/android"
  xmlns:app="http://schemas.android.com/apk/res-auto"
  xmlns:tools="http://schemas.android.com/tools"
  android:layout_width="match_parent"
  android:layout_height="match_parent"
  android:id="@+id/constraintLayout"
  tools:context="com.constraintlayout.app.MainActivity"
  >

  <Button
    android:id="@+id/button3"
    android:layout_width="wrap_content"
    android:layout_height="wrap_content"
    android:text="Button"
    app:layout_constraintBottom_toBottomOf="parent"
    app:layout_constraintRight_toRightOf="parent"
    app:layout_constraintLeft_toLeftOf="parent"
    app:layout_constraintTop_toTopOf="parent"
    />
</android.support.constraint.ConstraintLayout>
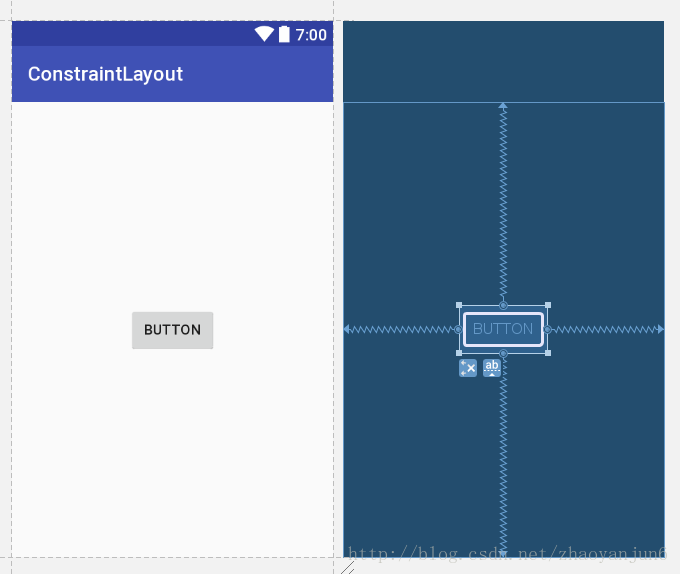
我们得到的布局效果如下:

那么我们有个疑问,为什么Button 是居中显示的?因为在上面的布局中有两个重要的属性没有写出来,但是却有默认的属性值,那就是水平、垂直的偏移比例。
layout_constraintHorizontal_bias //控件的水平偏移比例
layout_constraintVertical_bias  //控件的垂直偏移比例
如果在布局文件中没有明确的写出偏移比例,那么系统默认偏移比例值为:0.5 。
到这里我们已经清楚了,上面的布局文件就相当于:
<?xml version="1.0" encoding="utf-8"?>
<android.support.constraint.ConstraintLayout xmlns:android="http://schemas.android.com/apk/res/android"
  xmlns:app="http://schemas.android.com/apk/res-auto"
  xmlns:tools="http://schemas.android.com/tools"
  android:layout_width="match_parent"
  android:layout_height="match_parent"
  android:id="@+id/constraintLayout"
  tools:context="com.constraintlayout.app.MainActivity"
  >

  <Button
    android:id="@+id/button3"
    android:layout_width="wrap_content"
    android:layout_height="wrap_content"
    android:text="Button"
    app:layout_constraintBottom_toBottomOf="parent"
    app:layout_constraintRight_toRightOf="parent"
    app:layout_constraintLeft_toLeftOf="parent"
    app:layout_constraintTop_toTopOf="parent"
    app:layout_constraintHorizontal_bias="0.5"
    app:layout_constraintVertical_bias="0.5"
    />
</android.support.constraint.ConstraintLayout>
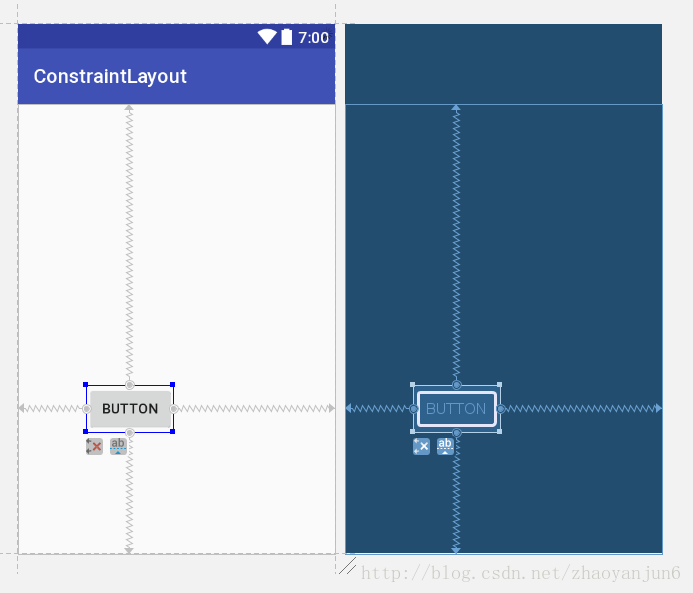
我们可以试试,更改Button 的偏移值试试看,比如,水平偏移0.3 , 垂直偏移0.7 , 看看效果:

可以看到很明显,Button 在水平方向向右偏移比例为 30% , 在垂直方向向下偏移比例为 70% 。
基线约束控键
该控键帮助你对齐任意两个widget的文字部分,与widget的大小无关。例如你有两个不同尺寸的widget但是你想要他们的文字部分对齐。
layout_constraintBaseline_toBaselineOf


以上就是本文的全部内容,希望对大家的学习有所帮助,也希望大家多多支持我们。
您可能感兴趣的文章:
- Android新特性ConstraintLayout完全解析
- Android新布局方式ConstraintLayout快速入门教程
- Android利用ConstraintLayout实现漂亮的动画详解

