在ASP.NET 2.0中操作数据之三十三:基于DataList和Repeater使用DropDownList过滤的主/从报表
导言
在前面的使用DropDownList过滤的主/从报表一章里我们使用GridView创建的主/从表,显示一些"主"记录.用户可以根据主记录来查看"从"(详细)的内容.主/从表在呈现一对多关系和含多列的表的信息时是一个好的选择.在前面我们已经学过如何使用GridView和DetailsView来实现.本章和后面两章我们将重新复习一下这些概念,但是主要学习使用DataList和Repeater来实现.本章我们将学习使用DropDownList包含主记录,而在DataList里显示从记录.
第一步: 增加主/从教程页
首先增加本教程会用到的文件夹(DataListRepeaterFiltering)和页.新建页的时候记得选择Site.master.
Default.aspx
FilterByDropDownList.aspx
CategoryListMaster.aspx
ProductsForCategoryDetails.aspx
CategoriesAndProducts.aspx
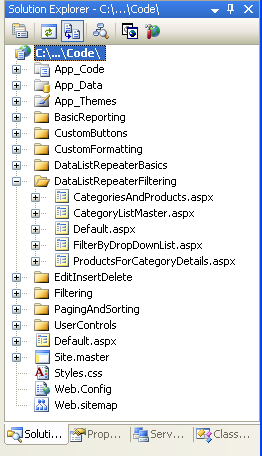
图 1: 创建DataListRepeaterFiltering文件夹和页
然后打开Default.aspx页,将SectionLevelTutorialListing.ascx用户控件拖进来.
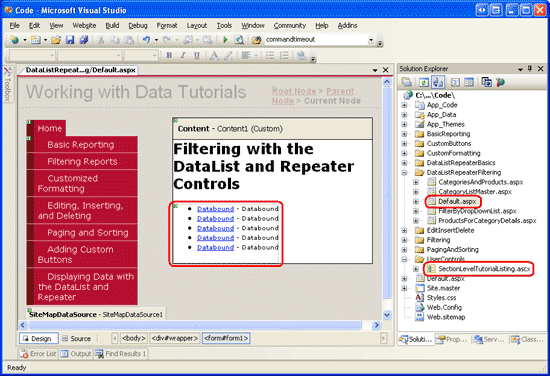
图2: 在Default.aspx页里增加SectionLevelTutorialListing.ascx
我们需要将主/从教程添加到site map里.打开Web.sitemap,将下面的标记添加到“Displaying Data with the DataList and Repeater”节点后:
<siteMapNode
 title="Master/Detail Reports with the DataList and Repeater"
 description="Samples of Reports that Use the DataList and Repeater Controls"
 url="~/DataListRepeaterFiltering/Default.aspx">

 <siteMapNode
 title="Filter by Drop-Down List"
 description="Filter results using a drop-down list."
 url="~/DataListRepeaterFiltering/FilterByDropDownList.aspx" />

 <siteMapNode
 title="Master/Detail Across Two Pages"
 description="Master records on one page, detail records on another."
 url="~/DataListRepeaterFiltering/CategoryListMaster.aspx" />

 <siteMapNode
 title="Maser/Detail on One Page"
 description="Master records in the left column, details on the right,
   both on the same page."
 url="~/DataListRepeaterFiltering/CategoriesAndProducts.aspx" />

</siteMapNode>
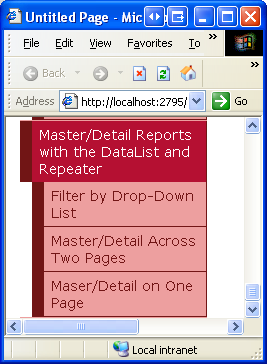
图 3: 更新之后的Site Map
第二步: 在DropDownList里显示Categories
我们的主/从表将在DropDownList里列出categories ,然后将选择的item的product用DataList显示出来.打开DataListRepeaterFiltering文件夹里的FilterByDropDownList.aspx页,拖一个DropDownList进来.将DropDownList的ID设为Categories.在智能标签上选择选择数据源,创建一个名为CategoriesDataSource的ObjectDataSource
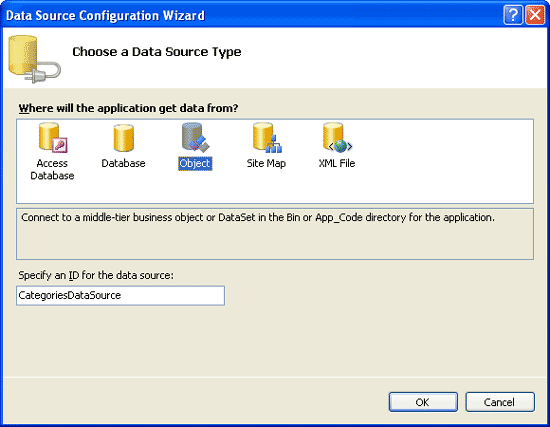
图 4: 添加一个名为CategoriesDataSource的 ObjectDataSource
使用CategoriesBLL类的GetCategories()方法配置ObjectDataSource.然后为DropDownList的text和value配置字段(分别为CategoryName和CategoryID).

图 5: 配置DropDownList的Text和Value
现在DropDownList里已经列出了Categories表里记录.见图6.
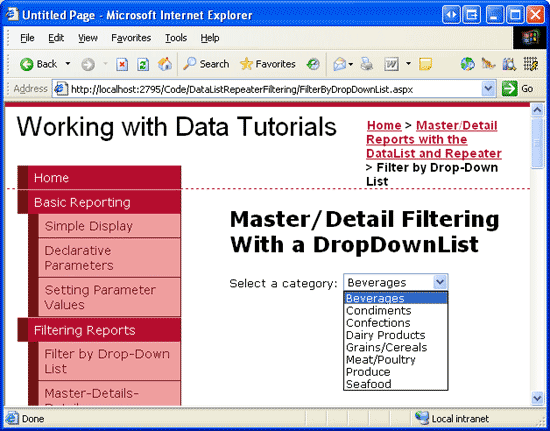
图 6: 完成后的DropDownList
第三步: 添加Products DataList
下面将选择的category关联的product列出来.添加一个DataList,创建一个名为ProductsByCategoryDataSource的ObjectDataSource.用ProductsBLL类的GetProductsByCategoryID(categoryID)来配置它.因为我们的报表是只读的,所以在INSERT,UPDATE和DELETE标签里选择None.
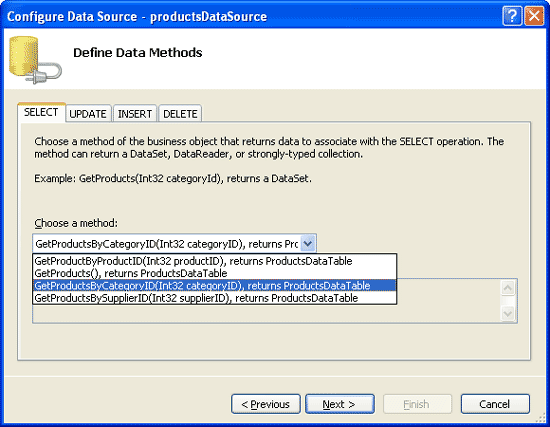
图 7: 选择GetProductsByCategoryID(categoryID)方法
点下一步,向导会提示我们为categoryID参数选择source.将Parameter source设为Control,ControlID设为Categories.
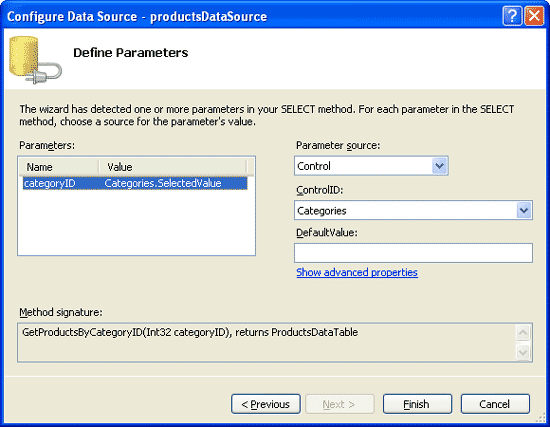
图 8: 设置categoryID参数为Categories DropDownList
完成上面的配置后,Visual Studio会为DataList自动生成一个ItemTemplate来显示每个字段的name和value.我们来做一些改进,只显示product的name,category,supplier,quantity和price,并在每个item之间加一个<hr>元素(SeoaratorTemplate).我们将使用DataList和Repeater来显示数据 的ItemTemplate例子.ObjectDataSource的标记语言应该和下面差不多:
<asp:DataList ID="DataList1" runat="server" DataKeyField="ProductID"
 DataSourceID="ProductsByCategoryDataSource" EnableViewState="False">
 <ItemTemplate>
 <h4>
  <asp:Label ID="ProductNameLabel" runat="server"
  Text='<%# Eval("ProductName") %>' />
 </h4>
 <table border="0">
  <tr>
  <td class="ProductPropertyLabel">Category:</td>
  <td><asp:Label ID="CategoryNameLabel" runat="server"
   Text='<%# Eval("CategoryName") %>' /></td>
  <td class="ProductPropertyLabel">Supplier:</td>
  <td><asp:Label ID="SupplierNameLabel" runat="server"
   Text='<%# Eval("SupplierName") %>' /></td>
  </tr>
  <tr>
  <td class="ProductPropertyLabel">Qty/Unit:</td>
  <td><asp:Label ID="QuantityPerUnitLabel" runat="server"
   Text='<%# Eval("QuantityPerUnit") %>' /></td>
  <td class="ProductPropertyLabel">Price:</td>
  <td><asp:Label ID="UnitPriceLabel" runat="server"
   Text='<%# Eval("UnitPrice", "{0:C}") %>' /></td>
  </tr>
 </table>
 </ItemTemplate>
 <SeparatorTemplate>
 <hr />
 </SeparatorTemplate>
</asp:DataList>

<asp:ObjectDataSource ID="ProductsByCategoryDataSource" runat="server"
 OldValuesParameterFormatString="original_{0}"
 SelectMethod="GetProductsByCategoryID" TypeName="ProductsBLL">
 <SelectParameters>
 <asp:ControlParameter ControlID="Categories" Name="categoryID"
  PropertyName="SelectedValue" Type="Int32" />
 </SelectParameters>
</asp:ObjectDataSource>
在浏览器里看一下页面.第一次访问时,和Beverager关联的product都显示出来了(图9),但是改变DropDownList不会更新数据,这是因为还更新DataList需要postback.我们将DropDownList的AutoPostBack属性设为true.
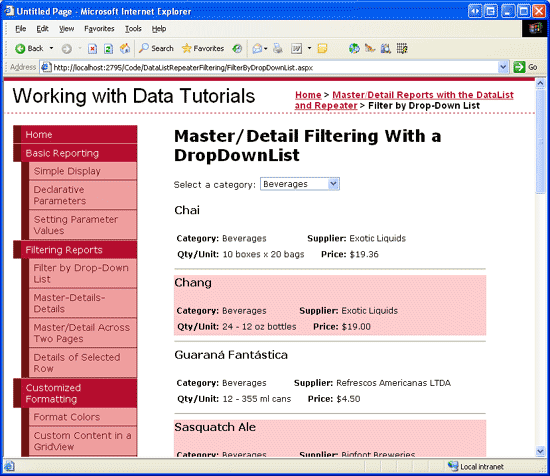
图 9: 第一次访问时, 显示Beverage的 Products
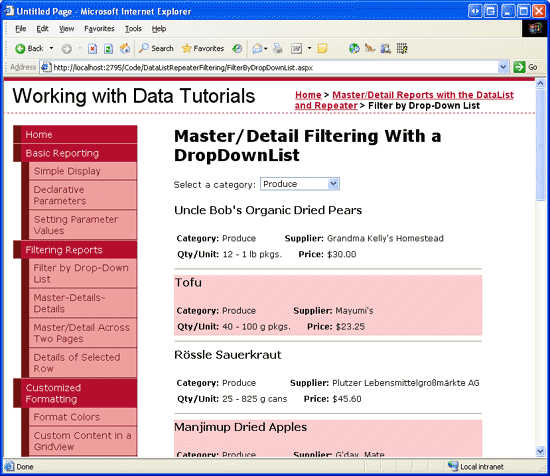
图 10: 选择一个新的category(Produce),更新DataList
添加一个 “-- Choose a Category --” List Item第一次访问页面时,Beveages默认被选中,并且在DataList里显示它的product.在使用DropDownList过滤的主/从报表 里我们添加了“-- Choose a Category --”选项(默认项),显示所有的product.在GridView里显示product时这样很方便.而对DataList而言,每个product要占很大一块屏幕,因此在选择“-- Choose a Category --”时底下将不显示product.在DropDownList的属性里选择Items属性,添加一个Text为“-- Choose a Category --”,Value为0的项.
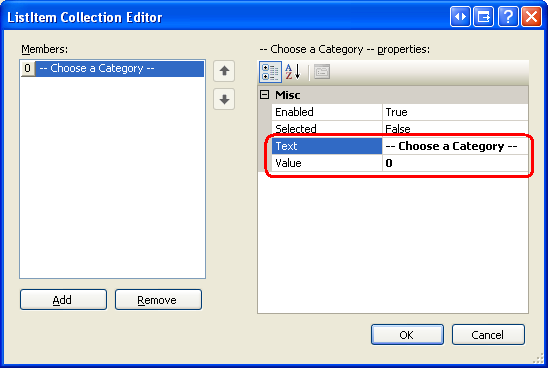
图 11: 添加 “-- Choose a Category --” 项
你也可以直接在DropDownList的标记语言里添加以下代码:
<asp:DropDownList ID="categories" runat="server" AutoPostBack="True"
 DataSourceID="CategoriesDataSource" DataTextField="CategoryName"
 DataValueField="CategoryID" EnableViewState="False">

 <asp:ListItem Value="0">-- Choose a Category --</asp:ListItem>

</asp:DropDownList>
另外我们需要将DropDownList的AppendDataBoundItems设为true.因为如果为false(默认),当categories绑定到DropDownList时将覆盖手工添加的list item.
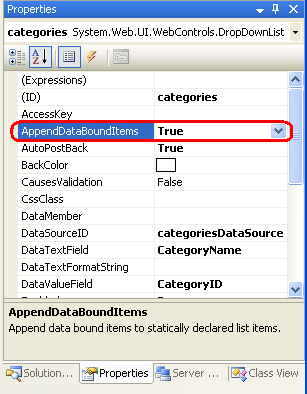
图 12: Set the AppendDataBoundItems Property to True
我们将“-- Choose a Category --” 的value设为0是因为系统里没有categories的value为0,因此当选择这条category时不会有product返回.浏览一下网页来确认这点.见图13.
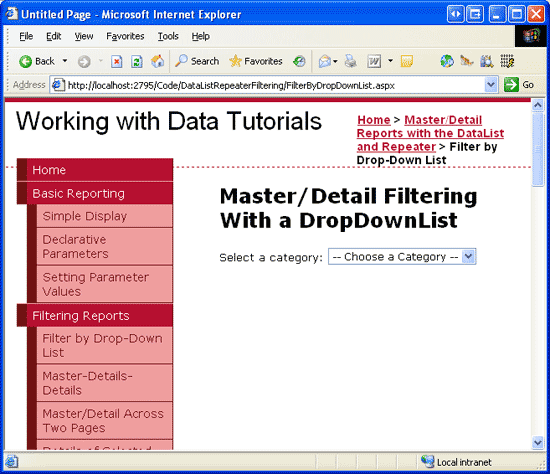
图 13: 选中“-- Choose a Category --” 时, 没有Products 被显示
如果你想在选择“-- Choose a Category --” 时显示所有的product,将它的value设为1.细心的读者会记起来在使用DropDownList过滤的主/从报表 里我们更新了ProductsBLL类的GetProductsByCategoryID(categoryID)方法,如果categoryID为1时所有的product记录会被返回.
总结
当显示层次关系的数据时,使用主/从表来展示数据很有帮助.用户可以通过它从最高层的数据开始,逐渐进入最细节的数据.在本章我们学习了一个简单的主/从表来显示选中的category下的product.我们用DropDownList列出dategory,DataList来显示product.在下章我们将学习将主/从记录分开到两个页面.在第一个页里,显示所有的"主"记录,并有一个链接到"从"信息的link.点这个link用户会看到显示细节信息的页.
祝编程愉快!
作者简介
Scott Mitchell,著有六本ASP/ASP.NET方面的书,是4GuysFromRolla.com的创始人,自1998年以来一直应用 微软Web技术。Scott是个独立的技术咨询顾问,培训师,作家,最近完成了将由Sams出版社出版的新作,24小时内精通ASP.NET 2.0。他的联系电邮为mitchell@4guysfromrolla.com,也可以通过他的博客http://ScottOnWriting.NET与他联系。

