解析android中include标签的使用
在一个项目中我们可能会需要用到相同的布局设计,如果都写在一个xml文件中,代码显得很冗余,并且可读性也很差,所以我们可以把相同布局的代码单独写成一个模块,然后用到的时候可以通过<include /> 标签来重用layout代码。
app_title.xml:
代码如下:
<?xml version="1.0" encoding="utf-8"?>
<RelativeLayout android:id="@+id/titleLayout" android:layout_width="fill_parent" android:layout_height="wrap_content"
android:background="@drawable/bt" xmlns:android="http://schemas.android.com/apk/res/android">
<TextView android:text="@string/login" android:id="@+id/title" android:textSize="20px" android:textColor="@color/white"
android:layout_width="wrap_content" android:layout_centerInParent="true" android:layout_height="wrap_content"/>
<Button android:text="返回" android:id="@+id/refresh" android:layout_width="wrap_content" android:layout_height="wrap_content"
android:layout_alignParentRight="true" android:focusable="false" android:textColor="@color/white"
android:background="@drawable/okbutton" android:layout_marginRight="3px"/>
</RelativeLayout>
<?xml version="1.0" encoding="utf-8"?>
<!-- android:layout_below与 android:layout_above 是必须设置的,否则界面不规则,不设置android:layout_above本界面没有滑动效果-->
<ScrollView android:layout_below="@+id/titleLayout" android:layout_above="@+id/appbottom" android:layout_width="fill_parent"
android:layout_height="fill_parent" android:layout_centerInParent="true" xmlns:android="http://schemas.android.com/apk/res/android">
<LinearLayout android:id="@+id/theWholeLinearLayout" android:orientation="vertical" android:layout_width="fill_parent"
android:layout_height="wrap_content" android:paddingLeft="10px" android:paddingTop="6px" android:paddingRight="10px" >
<LinearLayout android:id="@+id/linearLayoutLeft" android:orientation="vertical" android:layout_width="fill_parent" android:layout_height="wrap_content">
<TableLayout android:id="@+id/widget43" android:layout_width="fill_parent"
android:layout_height="fill_parent" android:orientation="vertical"
xmlns:android="http://schemas.android.com/apk/res/android" android:stretchColumns="1">
<TableRow >
<!-- 引用定义好的TextView样式,如果这里的属性和样式里定义的属性重复,则这里会替换样式里定义的属性-->
<TextView android:id="@+id/traderName" android:text="@string/traderName" style="@style/StyleTextInfo1" mce_style="@style/StyleTextInfo1"/>
<Spinner android:id="@+id/traderNameS" android:layout_width="fill_parent" android:layout_height="wrap_content">
</Spinner>
</TableRow>
<TableRow>
<TextView android:id="@+id/departName" android:text="@string/departName" style="@style/StyleTextInfo1" mce_style="@style/StyleTextInfo1"/>
<Spinner android:id="@+id/departNameS" android:layout_width="fill_parent" android:layout_height="wrap_content"/>
</TableRow>
<TableRow >
<TextView android:id="@+id/strComponyName" android:text="@string/accType" style="@style/StyleTextInfo1" mce_style="@style/StyleTextInfo1"/>
<Spinner android:id="@+id/accTyte" android:layout_width="fill_parent" android:layout_height="wrap_content"/>
</TableRow>
<TableRow >
<TextView android:id="@+id/strUserAcc" android:text="@string/userAcc" style="@style/StyleTextInfo1" mce_style="@style/StyleTextInfo1"/>
<EditText android:id="@+id/accEditText" android:text="" android:numeric="decimal" style="@style/StyleEditText1" mce_style="@style/StyleEditText1"/>
</TableRow>
<TableRow >
<TextView android:id="@+id/userPwd" android:text="@string/userPWD" style="@style/StyleTextInfo1" mce_style="@style/StyleTextInfo1"/>
<EditText android:id="@+id/userPwdET" android:text="" android:password="true" style="@style/StyleEditText1" mce_style="@style/StyleEditText1"/>
</TableRow>
<TableRow >
<TextView android:id="@+id/commPwd" android:text="@string/commPWD" style="@style/StyleTextInfo1" mce_style="@style/StyleTextInfo1"/>
<EditText android:id="@+id/commPwdET" android:text="" android:password="true" style="@style/StyleEditText1" mce_style="@style/StyleEditText1"/>
</TableRow>
</TableLayout>
</LinearLayout>
<LinearLayout android:orientation="vertical" android:layout_width="fill_parent" android:layout_height="wrap_content">
<LinearLayout android:id="@+id/linearLayoutTab1" android:layout_height="wrap_content"
android:layout_width="fill_parent" android:orientation="horizontal">
<LinearLayout android:id="@+id/linearLayoutTab2" android:layout_height="wrap_content"
android:layout_width="fill_parent" android:orientation="horizontal" android:layout_weight="1">
<CheckBox android:id="@+id/recordAcc" android:layout_width="wrap_content" android:layout_height="wrap_content"/>
<TextView android:id="@+id/commPwd" android:text="@string/saveUserAcc" style="@style/StyleTextInfo1" mce_style="@style/StyleTextInfo1"/>
</LinearLayout>
<LinearLayout android:id="@+id/linearLayoutTab2" android:layout_height="wrap_content"
android:layout_width="fill_parent" android:orientation="horizontal" android:layout_weight="1">
<CheckBox android:id="@+id/hideAcc" android:layout_width="wrap_content" android:layout_height="wrap_content"/>
<TextView android:id="@+id/commPwd" android:text="@string/ycUserAcc" style="@style/StyleTextInfo1" mce_style="@style/StyleTextInfo1"/>
</LinearLayout>
</LinearLayout>
<LinearLayout android:id="@+id/linearLayoutTab1" android:layout_height="wrap_content"
android:layout_width="fill_parent" android:orientation="horizontal">
<LinearLayout android:layout_width="220px" android:layout_height="wrap_content" android:orientation="horizontal"
android:gravity="center">
<Button android:id="@+id/confirmexch" android:gravity="center" android:layout_width="wrap_content"
android:layout_height="50px" android:textSize="22dp" android:text="@string/login" android:layout_weight="1"
android:focusable="false" android:textColor="@color/white" android:background="@drawable/buttonl"/>
</LinearLayout>
<LinearLayout android:id="@+id/linearLayoutTab" android:layout_height="wrap_content"
android:layout_width="fill_parent" android:gravity="center">
<ImageView android:layout_width="wrap_content" android:layout_height="50px" android:id="@+id/myImage"/>
</LinearLayout>
</LinearLayout>
</LinearLayout>
</LinearLayout>
</ScrollView>
<?xml version="1.0" encoding="utf-8"?>
<LinearLayout android:id="@+id/appbottom" android:orientation="vertical" android:layout_width="fill_parent"
android:layout_height="wrap_content" android:layout_alignParentBottom="true"
xmlns:android="http://schemas.android.com/apk/res/android">
<LinearLayout android:orientation="horizontal" android:layout_width="fill_parent"
android:layout_height="wrap_content" android:background="@drawable/light">
<ImageView android:id="@+id/about" android:layout_width="30px" android:layout_height="wrap_content" android:src="@drawable/ttt"
android:layout_alignParentLeft="true"/>
<TextView android:id="@+id/light" android:layout_width="fill_parent" android:layout_height="wrap_content" android:textColor="@color/black"/>
</LinearLayout>
<LinearLayout android:orientation="horizontal" android:layout_width="fill_parent"
android:layout_height="wrap_content" android:background="@drawable/mainmenu">
<Button android:id="@+id/quotButton" android:layout_weight="1" android:layout_width="52px" android:layout_height="wrap_content"
android:textColor="@color/white" android:text="" android:background="@drawable/button1"/>
<Button android:id="@+id/entrustButton" android:layout_weight="1" android:layout_width="52px" android:layout_height="wrap_content"
android:textColor="@color/white" android:text="" android:background="@drawable/button1"/>
<Button android:id="@+id/queryButton" android:layout_weight="1" android:layout_width="52px" android:layout_height="wrap_content"
android:textColor="@color/white" android:text="" android:background="@drawable/button1"/>
<Button android:id="@+id/yinZhengButton" android:layout_weight="1" android:layout_width="52px" android:layout_height="wrap_content"
android:textColor="@color/white" android:text="" android:background="@drawable/button1"/>
<Button android:id="@+id/recordButton" android:layout_weight="1" android:layout_width="52px" android:layout_height="wrap_content"
android:textColor="@color/white" android:text="" android:background="@drawable/button1"/>
<Button android:id="@+id/logoutButton" android:layout_weight="1" android:layout_width="52px" android:layout_height="wrap_content"
android:textColor="@color/white" android:text="" android:background="@drawable/button1"/>
</LinearLayout>
</LinearLayout>
tradelogin_portrait.xml:
代码如下:
<?xml version="1.0" encoding="utf-8"?>
<RelativeLayout android:layout_width="fill_parent" android:layout_height="fill_parent" style="@style/StyleLayoutMain" mce_style="@style/StyleLayoutMain"
xmlns:android="http://schemas.android.com/apk/res/android">
<!-- include标签内不能设置RelativeLayout属性,如android:layout_alignParentBottom,因为不起作用 -->
<!-- include标签内设置id属性后(android:id),其引用的布局layout内的id属性就不起作用了,怀疑是其引用的layout外层包裹了一层include标签
或者是覆盖了其内的属性id-->
<!-- 如果没有include标签,所有布局代码都写在一个xml文件中,界面会显得很冗余,可读性很差。而且界面加载的时候是按照顺序加载的,前面的布局不能
调用其后面的布局id。而采用include后,一个include中可以引用其后的include中的布局id属性 -->
<include android:id="@id/titleLayout" layout="@layout/app_title" />
<include layout="@layout/app_tradelogin"/>
<include layout="@layout/app_bottom"/>
</RelativeLayout>
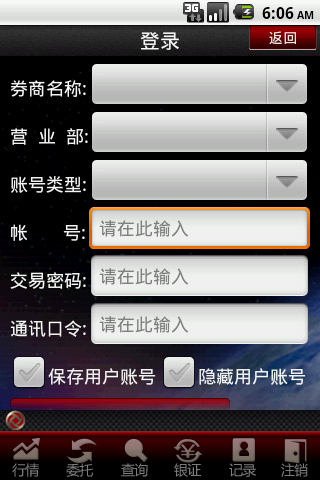
效果如下:


