uni-popup手写菜鸟上门取件时间选择器
目录
- 引言
- 兼容
- 菜鸟上门时间选择器
- 需求分析:
- 代码实现:
- 1.popup弹窗
- 2.日期+时间选择器
- 核心逻辑:
- 1、生成左侧日期列表
- 2、判断时间有没有过期
- 3、通过计算属性获取有效时间(即右侧列表展示即将过期的和未过期的时间)
- 4、通过计算属性获取有效日期
- 5、日期或时间选中函数
- 源码及使用
- 使用:
- 源码:
- TODO:
引言
近期做的项目有个需求是做一个类似菜鸟的取件时间选择器,去找了很久没找到合适的,没办法只能自己收撸,经过好几个小版本修改之后也算是定型了,这里总结一篇文档备忘,把源码贴出来后续方便后续copy
技术
uniapp + vue2 + uni-popup
兼容
因为目前我的项目只用到这三端,其他的都还没测,所以兼容不保证
- 支付宝小程序开发者工具popup弹出来会直接滚到最顶部,显示异常,但真机上面没问题,可以不用管
| 环境 | 兼容 |
|---|---|
| 支付宝小程序 | |
| 微信小程序 | |
| H5 |
菜鸟上门时间选择器

需求分析:
1、弹窗从底部弹出
- 点击蒙层不可关闭
- 弹窗header左侧title , 右侧关闭按钮
2、左侧日期选择器
- 显示近3天日期
- 显示(今天、明天、周一、周二等)
3、右侧时间选择器
- 可选时间可配置
- 过期时间显示 “已过期”
- 选中效果
- 当前已无可选时间,应该删除今天日期,只可以选未来日期
代码实现:
1.popup弹窗
先做一下基础布局,简单的分成上左右三大块,并做一些基础的配置
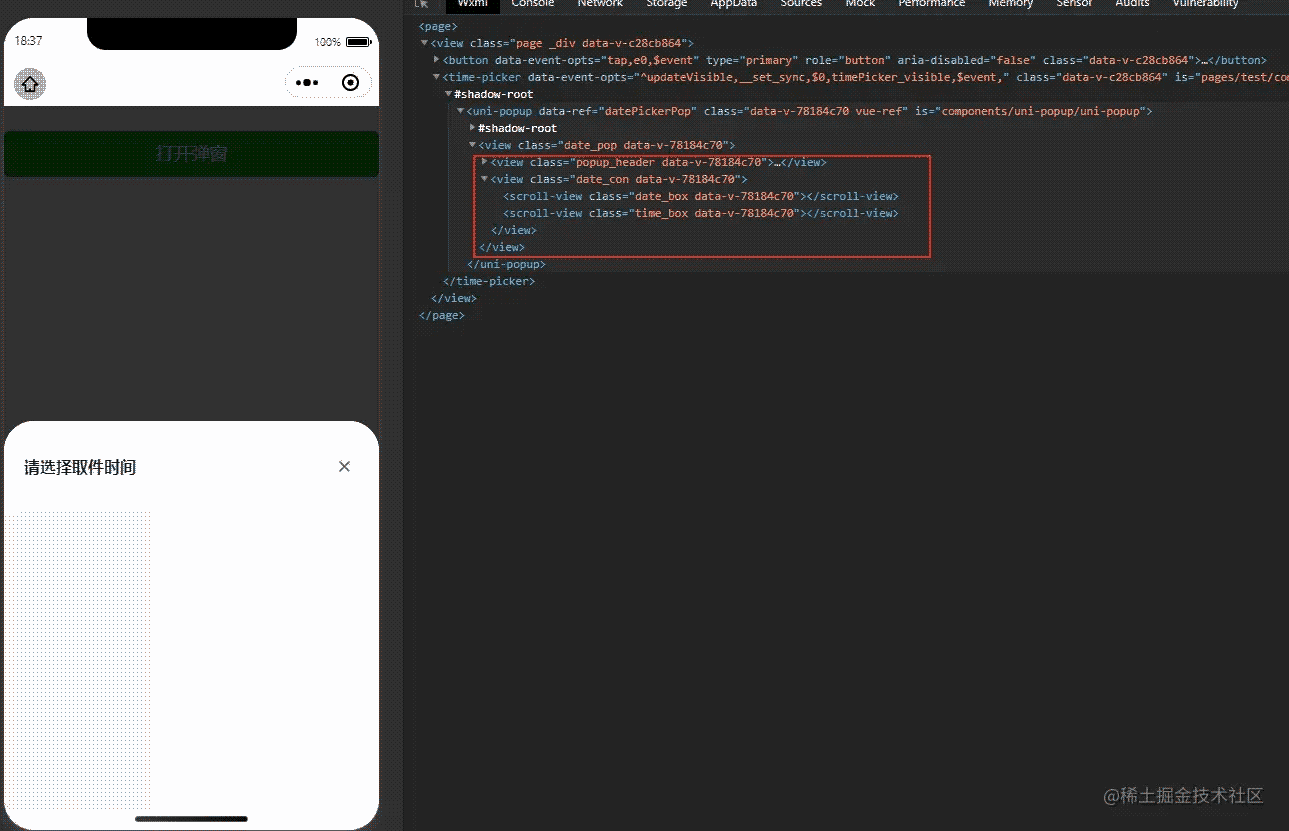
<template>
	<uni-popup
		mask-background-color="rgba(0, 0, 0, .8)"
		ref="datePickerPop"
		type="bottom"
		background-color="#fff"
		:is-mask-click="false"
	>
		<view class="date_pop">
			<view class="popup_header">
				<view class="pop_title">请选择取件时间</view>
				<view class="pop-close" @click="handleClose('datePop')" />
			</view>
			<!-- 日期 -->
			<view class="date_con">
				<scroll-view scroll-y="true" class="date_box">
				</scroll-view>
				<!-- 时间 -->
				<scroll-view scroll-y="true" class="time_box">
				</scroll-view>
			</view>
		</view>
	</uni-popup>
</template>
<script>
	export default {
		name: 'TimePicker',
		props: {
			visible: {
				required: true,
				default: false
			}
		},
		watch: {
			visible(newVal) {
				if (newVal) {
					if (!this.selectedDate.date_zh) {
						this.selectedDate = this.effectRecentDate[0];
					}
					this.$refs.datePickerPop.open();
				} else {
					this.$refs.datePickerPop.close();
				}
			}
		},
		methods: {
			handleClose() {
				this.$emit('update:visible', false);
			},
		}
	};
</script>
<style scoped lang="scss">
	.date_pop {
		padding: 0;
		height: 750rpx;
		.popup_header {
			display: flex;
			align-items: center;
			justify-content: space-between;
			box-sizing: border-box;
			padding: 60rpx 40rpx;
			.pop_title {
				font-weight: bold;
				font-size: 32rpx;
				width: 90%;
			}
			.pop-close {
				width: 60rpx;
				height: 60rpx;
				background: url('~@/static/images/close.png');
				background-size: 22rpx;
				background-position: center;
				background-repeat: no-repeat;
			}
		}
		.date_con {
			font-size: 28rpx;
			position: relative;
			height: 600rpx;
		}
		.date_box {
			position: absolute;
			top: 0;
			left: 0;
			width: 40%;
			height: 100%;
			background: #f7f7f9;
			overflow-y: scroll;
			.date_item {
				padding: 0 40rpx;
				line-height: 100rpx;
			}
		}
		.time_box {
			position: absolute;
			top: 0;
			right: 0;
			width: 60%;
			height: 100%;
		}
		.date_active {
			background: #fff;
		}
	}
</style>
2.日期+时间选择器
按照需求我重新设计了一下功能及交互
日期选择器
- 日期可配置,支持显示最近n天日期
- 显示今天、明天、后台及工作日
- 默认选中当日(今天)
时间选择器
基础功能
- 删除过期时间
- 今日所有可选日期都过期之后删除日期选框(今天)选项
- 选中时间后面打钩,并关闭弹窗
可选功能
- 显示已过期时间 (逻辑几个版本之前已经删除了,现在只剩类名,需要的同学可以大概看下代码把它加上或者评论区留个言我把给你找找代码 , 功能样式就类似菜鸟)
- 直接删除已过期时间
先看效果

核心逻辑:
1、生成左侧日期列表
// 生成时间选择器 最近n天的时间
/**
*@n {Number} : 生成的天数
*
*/
setRecentData(n) {
	const oneDaySeconds = 60 * 1000 * 60 * 24;
	const today = +new Date();
	let list = [];
	for (let i = 0; i < n; i++) {
		let formatTime = this.formatTime_zh(today + oneDaySeconds * i);
		list.push({
			...formatTime,
			week: i == 0 ? '今天' : i == 1 ? '明天' : formatTime.week
		});
	}
        //设置一下默认选中日期
	this.selectedDate = list[0];
	return list;
},
// 时间处理函数
formatTime_zh(date){
	date = new Date(date);
	const year = date.getFullYear();
	const month = date.getMonth() + 1;
	const day = date.getDate();
	const weekDay = date.getDay();
	const formatNumber = (n) => {
		n = n.toString();
		return n[1] ? n : '0' + n;
	};
        const numToTxt = ['周日', '周一', '周二', '周三', '周四', '周五', '周六'];
	return {
		date_zh: `${formatNumber(month)}月${formatNumber(day)}日`,
		date_en: `${year}/${formatNumber(month)}/${formatNumber(day)}`,
		week: numToTxt[weekDay]
	};
},
最终数据格式如图:

2、判断时间有没有过期
因为考虑到取件没有那么快,至少要提前半小时下单,所以就有了下面的逻辑(我这里是90分钟)
- 传入 09:00-10:00 格式时间区间
- 截取过期时间, 和当前时间做对比
- 判断已过期 、即将过期 、未过期
/**
* @return {Number} 1:已过期 , 2:即将过期 , 3:未过期
* @time   {String} 09:00-10:00
*/
checkRemainingMinute(time) {
	if (!time) return;
        //过期时间
	const outTime = time.toString().split('-')[1];
        // 这里兼容一下iphone,iphone不支持yyyy-mm-dd hh:mm 格式时间 ,分隔符换为 /
	const fullYearDate = formatMinute(new Date(), '/');
	const now = new Date(fullYearDate);
	const dateTime = this.currentDate + ' ' + outTime;
	const check = new Date(dateTime);
	const difference = check - now;
	const minutes = difference / (1000 * 60);
	// minutes <= 0  : 已过期    --> 1
	// minutes <= 90 : 即将过期  --> 2
	// minutes >  0  : 未过期     --> 3
	return minutes <= 0 ? 1 : minutes <= 90 ? 2 : 3;
}
  /**
   * @description yyyy-mm-dd hh:mm
   * @author wangxinu
   * @export
   * @param {*} cent
   * @returns
   */
  formatMinute: (date, separator = '-') => {
    date = new Date(date);
    const year = date.getFullYear();
    const month = date.getMonth() + 1;
    const day = date.getDate();
    const hour = date.getHours();
    const minute = date.getMinutes();
    const second = date.getSeconds();
    const formatNumber = (n) => {
      n = n.toString();
      return n[1] ? n : '0' + n;
    };
    return `${formatNumber(year)}${separator}${formatNumber(month)}${separator}${formatNumber(
      day,
    )} ${formatNumber(hour)}:${formatNumber(minute)}`;
  },
3、通过计算属性获取有效时间(即右侧列表展示即将过期的和未过期的时间)
data(){
    return {
    	appointment: [
		'08:00-09:00',
		'09:00-10:00',
		'10:00-11:00',
		'11:00-12:00',
		'12:00-13:00',
		'13:00-14:00',
		'14:00-15:00',
		'15:00-16:00',
		'16:00-17:00',
		'17:00-18:00',
		'18:00-19:00',
		'19:00-20:00'
	]
    }
},
computed: {
	// 有效取件时间
   effectAppointmentTime() {
        //取件时间列表
	const appointment = this.appointment;
	// 未来日期返回全部
	if (this.selectedDate.date_en != this.currentDate) {
		return appointment;
	}
        // 当日只返回有效时间
	let list = appointment.filter((item) => this.checkRemainingMinute(item) != 1);
	// 当天取件时间长度>0 添加立即上门
	if (list.length > 0) {
		list.unshift('立即上门');
	}
	return list;
   }
},
4、通过计算属性获取有效日期
computed: {
	// 有效日期
   effectRecentDate() {
        //查看有效时间列表
	const effectAppointmentTime = this.effectAppointmentTime;
	// 当日取件时间全部失效
            if (effectAppointmentTime.length == 0) {
                //删除(今日)
		this.recentDateList.splice(0, 1);
                //修改默认选中日期
		this.selectedDate = this.recentDateList[0];
		return this.recentDateList;
            } else {
		return this.recentDateList;
            }
	},
},
5、日期或时间选中函数
	// 时间选择器修改函数
	timeChange(date, type) {
		const dateList = this.recentDateList;
		if (type === 'date') {
			// 选择日期
			this.selectedDate = date;
			this.selectedTime = '';
		} else {
			// 选择时间
			this.selectedTime = date;
			if (this.selectedDate.date_zh == '') {
				this.selectedDate = dateList[0];
			}
                        this.handleClose();
                       	this.$emit('selectTime', this.selectedDate, this.selectedTime);
		}
	},
源码及使用
使用:
<template>
	<div class="page">
		<button @click="timePicker_visible = true" type="primary">打开弹窗</button>
		<TimePicker :visible.sync="timePicker_visible" @selectTime="selectTime"/>
	</div>
</template>
<script>
	import TimePicker from './components/TimePicker';
	export default {
		name: 'test',
		components: { TimePicker },
		mixins: [],
		props: {},
		data() {
			return {
				timePicker_visible: false
			};
		},
                methods:{
                    selectTime(date,time){
                        console.log('date',date)
                        console.log('time',time)
                   }
                }
	};
</script>
源码:
<template>
	<uni-popup
		mask-background-color="rgba(0, 0, 0, .8)"
		ref="datePickerPop"
		type="bottom"
		background-color="#fff"
		:is-mask-click="false"
	>
		<view class="date_pop">
			<view class="popup_header">
				<view class="pop_title">请选择取件时间</view>
				<view class="pop-close" @click="handleClose('datePop')" />
			</view>
			<!-- 日期 -->
			<view class="date_con">
				<scroll-view scroll-y="true" class="date_box">
					<view
						v-for="date in effectRecentDate"
						:key="date.date_zh"
						:class="[`date_item`, selectedDate.date_zh == date.date_zh ? `date_active` : ``]"
						@click="timeChange(date, 'date')"
					>
						{{ date.date_zh }}({{ date.week }})
					</view>
				</scroll-view>
				<!-- 时间 -->
				<scroll-view scroll-y="true" class="time_box">
					<view
						v-for="(time, index) in effectAppointmentTime"
						:key="index"
						:class="{
							bottom: true,
							time_item: true,
							time_active: selectedTime === time
						}"
						@click="timeChange(effectAppointmentTime[index], `time`)"
					>
						{{ time }}
					</view>
				</scroll-view>
			</view>
		</view>
	</uni-popup>
</template>
<script>
	import { formatDate, toFixed, formatMinute } from '@/public/utils/utils';
	export default {
		name: 'TimePicker',
		props: {
			visible: {
				required: true,
				default: false
			}
		},
		watch: {
			visible(newVal) {
				if (newVal) {
					if (!this.selectedDate.date_zh) {
						this.selectedDate = this.effectRecentDate[0];
					}
					this.$refs.datePickerPop.open();
				} else {
					this.$refs.datePickerPop.close();
				}
			}
		},
		data() {
			// 生成取件日期
			const recentDayNum = 5;
			this.toFixed = toFixed;
			return {
				currentDate: formatDate(new Date(), '/'),
				selectedTime: '',
				selectedDate: {},
				recentDateList: this.setRecentData(recentDayNum),
				appointment: [
					'08:00-09:00',
					'09:00-10:00',
					'10:00-11:00',
					'11:00-12:00',
					'12:00-13:00',
					'13:00-14:00',
					'14:00-15:00',
					'15:00-16:00',
					'16:00-17:00',
					'17:00-18:00',
					'18:00-19:00',
					'19:00-20:00'
				]
			};
		},
		computed: {
			// 有效日期
			effectRecentDate() {
				const effectAppointmentTime = this.effectAppointmentTime;
				// 当日取件时间全部失效
				if (effectAppointmentTime.length == 0) {
					this.recentDateList.splice(0, 1);
					this.selectedDate = this.recentDateList[0];
					console.log('this.selectedDate: ', this.selectedDate);
					return this.recentDateList;
				} else {
					return this.recentDateList;
				}
			},
			// 有效取件时间
			effectAppointmentTime() {
				const appointment = this.appointment;
				// 未来日期返回全部
				if (this.selectedDate.date_en != this.currentDate) {
					return appointment;
				}
				let list = appointment.filter((item) => this.checkRemainingMinute(item) != 1);
				// 当日只返回有效时间
				if (list.length > 0) {
					list.unshift('立即上门');
				}
				return list;
			}
		},
		methods: {
			handleClose() {
				this.$emit('update:visible', false);
			},
			// 生成时间选择器 最近n天的时间
			setRecentData(n) {
				const oneDayTime = 60 * 1000 * 60 * 24;
				const today = +new Date();
				let list = [];
				for (let i = 0; i < n; i++) {
					let formatTime = this.formatTime_zh(today + oneDayTime * i);
					list.push({
						...formatTime,
						week: i == 0 ? '今天' : i == 1 ? '明天' : formatTime.week
					});
				}
				this.selectedDate = list[0];
				return list;
			},
			// 时间处理函数
			formatTime_zh: (date) => {
				date = new Date(date);
				const year = date.getFullYear();
				const month = date.getMonth() + 1;
				const day = date.getDate();
				const weekDay = date.getDay();
				const formatNumber = (n) => {
					n = n.toString();
					return n[1] ? n : '0' + n;
				};
				const numToTxt = ['周日', '周一', '周二', '周三', '周四', '周五', '周六'];
				return {
					date_zh: `${formatNumber(month)}月${formatNumber(day)}日`,
					date_en: `${year}/${formatNumber(month)}/${formatNumber(day)}`,
					week: numToTxt[weekDay]
				};
			},
			// 时间选择器修改函数
			timeChange(date, type) {
				const dateList = this.recentDateList;
				if (type === 'date') {
					// 选择日期
					this.selectedDate = date;
					this.selectedTime = '';
				} else {
					// 选择时间
					this.selectedTime = date;
					if (this.selectedDate.date_zh == '') {
						this.selectedDate = dateList[0];
					}
					this.handleClose();
					this.$emit('selectTime', this.selectedDate, this.selectedTime);
				}
			},
			/**
			 * @return {Number} 1:已过期 , 2:即将过期 , 3:未过期
			 */
			checkRemainingMinute(time) {
				console.log('time: ', time);
				if (!time) return;
				const outTime = time.toString().split('-')[1];
				const fullYearDate = formatMinute(new Date(), '/');
				const now = new Date(fullYearDate);
				const dateTime = this.currentDate + ' ' + outTime;
				const check = new Date(dateTime);
				const difference = check - now;
				const minutes = difference / (1000 * 60);
				// minutes <= 0  : 已过期    --> 1
				// minutes <= 90 : 即将过期  --> 2
				// minutes >  0  : 未过期     --> 3
				return minutes <= 0 ? 1 : minutes <= 90 ? 2 : 3;
			}
		}
	};
</script>
<style scoped lang="scss">
	.date_pop {
		padding: 0;
		height: 750rpx;
		.popup_header {
			display: flex;
			align-items: center;
			justify-content: space-between;
			box-sizing: border-box;
			padding: 60rpx 40rpx;
			.pop_title {
				font-weight: bold;
				font-size: 32rpx;
				width: 90%;
			}
			.pop-close {
				width: 60rpx;
				height: 60rpx;
				background: url('~@/static/images/close.png');
				background-size: 22rpx;
				background-position: center;
				background-repeat: no-repeat;
			}
		}
		.date_con {
			font-size: 28rpx;
			position: relative;
			height: 600rpx;
		}
		.date_box {
			position: absolute;
			top: 0;
			left: 0;
			width: 40%;
			height: 100%;
			background: #f7f7f9;
			overflow-y: scroll;
			.date_item {
				padding: 0 40rpx;
				line-height: 100rpx;
			}
                        .date_active {
                            background: #fff;
                        }
		}
		.time_box {
			position: absolute;
			top: 0;
			right: 0;
			width: 60%;
			height: 100%;
			.disabled {
				color: #ccc;
				&::after {
					content: '已过期';
					margin-left: 130rpx;
				}
			}
			.outTime {
				color: #ccc;
				&::after {
					content: '即将过期';
					margin-left: 100rpx;
				}
			}
			.time_item {
				padding: 0 40rpx;
				line-height: 100rpx;
			}
		}
		.time_active {
			color: #ff5b29;
			position: relative;
			&::after {
				position: absolute;
				content: '';
				right: 15%;
				margin: auto;
			}
		}
	}
</style>
TODO:
- 时间区域打开显示对应选中时间位置
- 右侧时间列表改后台返回
以上就是uni-popup手撸了一个菜鸟上门取件时间选择器的详细内容,更多关于uni popup取件时间选择器的资料请关注我们其它相关文章!
相关推荐
-
uni-app调取接口的3种方式以及封装uni.request()详解
目录 一.uni-app中调取接口的三种方式 1.uni.request({}) 2.uni.request({}).then() 3.async/await 二.封装uni.request(); 1.创建一个对象,将该对象挂在Vue的原型下 2.进入main.js文件 3.在页面中调用 uni-app 封装接口request请求 第一步.根目录下新建 config.js 文件 第二步.根目录下新建 utils/http.js 文件 第三步. 创建model 层 根目录下新建 models/in
-

uniapp组件uni-popup弹出层的使用
目录 一.基本用法 二.自定义弹出层(dialog + message) 示例 三.提交信息 (input + 延迟关闭) 四.底部分享示例 官方示例:uni-popup 弹出层 - DCloud 插件市场 弹出层组件用于弹出一个覆盖到页面上的内容,使用场景如:底部弹出分享弹窗.页面插屏广告等 一.基本用法 <template> <view> <button type="primary" @click="toggle('top')"&g
-
uni-app配置APP自定义顶部标题栏设置方法与注意事项
目录 pages.json文件 页面部分或首页部分 注意: 附:uni-app如何动态设置页面的标题 1. 新建页面 2. js动态修改标题 总结 当设置 "navigationStyle":"custom" 取消原生导航栏后,由于窗体为沉浸式,占据了状态栏位置.此时可以使用一个高度为 var(--status-bar-height) 的 view 放在页面顶部,避免页面内容出现在状态栏 pages.json文件 代码块 //页面配置 "path"
-
uniapp下单选框的实现方法详解
uniapp官方虽然提供了uni-data-checkbox,含括了单选和多选框功能.但是它功能实在不能满足需求: 单选框不支持再次点击取消 无法与父组件的数据源进行联动,无法实现如多规格选择的那种联动 源码每次点击都是对数据源进行拷贝,然后再进行json解析等操作,看着就很不靠谱,数据量大必然有性能问题. 其实我放弃uni-data-checkbox,选择自己实现也是因为商品规格展示是比较复杂的,不自己实现的话无法达到目的: 看图中,三组规格选项是要相互联动的,选择了其中一个后,就得判断其余的
-
uniapp引用echarts的详细步骤(附柱状图实例)
相信很多小伙伴对于echarts这个东西应该不会陌生,我在网上看到很多文章,那么他到底是怎么用的呢,却是五花八门,我现在就来总结一下我的方法. 如果使用npm全局安装,太麻烦,这里推荐使用官网(ECharts 在线构建)定制下载,这样会方便我们使用. 选择柱状图,折线图,饼图:这三样是平常较常用到的: 坐标系选择直角坐标系: 组件可以全选,也可以选择自己所需要的,在这里个人建议除了工具栏不选,其他都选上:下载后的文件为echarts.min.js,建议把他放在static内. 好了,来到下一步,
-
uni-popup手写菜鸟上门取件时间选择器
目录 引言 兼容 菜鸟上门时间选择器 需求分析: 代码实现: 1.popup弹窗 2.日期+时间选择器 核心逻辑: 1.生成左侧日期列表 2.判断时间有没有过期 3.通过计算属性获取有效时间(即右侧列表展示即将过期的和未过期的时间) 4.通过计算属性获取有效日期 5.日期或时间选中函数 源码及使用 使用: 源码: TODO: 引言 近期做的项目有个需求是做一个类似菜鸟的取件时间选择器,去找了很久没找到合适的,没办法只能自己收撸,经过好几个小版本修改之后也算是定型了,这里总结一篇文档备忘,把源码贴
-
iOS开发中一些手写控件及其相关属性的使用
手写控件,frame,center和bounds属性 一.手写控件 1.手写控件的步骤 (1)使用相应的控件类创建控件对象 (2)设置该控件的各种属性 (3)添加控件到视图中 (4)如果是button等控件,还需考虑控件的单击事件等 (5)注意:View Contollor和view的关系 2.注意点 在OC开发中,Storyboard中的所有操作都可以通过代码实现,程序员一定要熟练掌握代码布局界面的能力! 设置控件监听方法的示例代码如下: 复制代码 代码如下: [btn addTarget:s
-
java简单手写版本实现时间轮算法
时间轮 关于时间轮的介绍,网上有很多,这里就不重复了 核心思想 一个环形数组存储时间轮的所有槽(看你的手表),每个槽对应当前时间轮的最小精度 超过当前时间轮最大表示范围的会被丢到上层时间轮,上层时间轮的最小精度即为下层时间轮能表达的最大时间(时分秒概念) 每个槽对应一个环形链表存储该时间应该被执行的任务 需要一个线程去驱动指针运转,获取到期任务 以下给出java 简单手写版本实现 代码实现 时间轮主数据结构 /** * @author apdoer * @version 1.0 * @date
-
手写redis@Cacheable注解 支持过期时间设置方式
目录 原理解释 实现方法 源代码 原理解释 友情链接 手写redis @ Cacheable注解参数java对象作为键值 @Cacheable注解作用,将带有该注解方法的返回值存放到redis的的中; 使用方法在方法上使用@Cacheable(键=“测试+#P0 + P1#...”) 表示键值为测试+方法第一个参数+方法第二个参数,值为该方法的返回值. 以下源代码表示获取人员列表,Redis的中存放的关键值为'领袖'+ leaderGroupId + UUID + yearDetailId @
-
利用Java手写一个简易的lombok的示例代码
目录 1.概述 2.lombok使用方法 3.lombok原理解析 4.手写简易lombok 1.概述 在面向对象编程中,必不可少的需要在代码中定义对象模型,而在基于Java的业务平台开发实践中尤其如此.相信大家在平时开发中也深有感触,本来是没有多少代码开发量的,但是因为定义的业务模型对象比较多,而需要重复写Getter/Setter.构造器方法.字符串输出的ToString方法.Equals/HashCode方法等.我们都知道Lombok能够替大家完成这些繁琐的操作,但是其背后的原理很少有人会
-
Angularjs 手写日历的实现代码(不用插件)
本文介绍了Angularjs 手写日历的实现代码(不用插件),分享给大家,具体如下: 效果: Html: <div class="plan_content_box" data-ng-init="showTime()"> <div class="field" style="width: 100%;"> <span class="field_label" style="w
-
浅谈时钟的生成(js手写简洁代码)
在生成时钟的过程中自己想到布置表盘的写法由这么几种: 当然利用那种模式都可以实现,所以我们要用一个最好理解,代码有相对简便的方法实现 1.利用三角函数 用js在三角函数布置表盘的过程中有遇见到这种情况:是在表盘的刻度处,利用三角函数计算具体的值时不能得到整数,需要向上或者向下取整,这样无形中就会存在些许偏差,而且这样的偏差难利用样式来调整到位,即使最终效果都可以实现,但是细微处的缝隙和角度的偏差都会影响整体的视觉体验,作为一名程序开发人员,这样的视觉体验很难让别人认可,放弃. 2.利用遮罩层 j
-
Android实现手写签名
本文实例为大家分享了Android手写签名的实现方法,产品要求用户可以在app上签协议..所以得弄个手写签名版,参考了一些资料自己写了个PaintView去继承View,实现签名功能. package com.****.*****.widget; import android.content.Context; import android.graphics.Bitmap; import android.graphics.Canvas; import android.graphics.Color;
-
Android拆轮子系列之写验证码控件的方法
前言 先看看效果 怎么样不错吧?别急下面我就一步一步的教你实现. 用到的知识点总结: 1.Canvas和pint的使用,我们用它画点,线,字 2.View的基本用法 其实做这个东西还是很简单的,总体思路步骤如下: 1.准备一个Canvas. 2.向Canvas里面画几条斜杠. 3.向canvas里面画100个小点. 4.随机生成4个数字,然后画在canvas里面. 其实就是这么简单,没什么深奥的. 开始写编码 1.首先我们要重写View 既然我们要画验证码,那么我们就需要准备画笔(paint)和
-
Python与人工神经网络:使用神经网络识别手写图像介绍
人体的视觉系统是一个相当神奇的存在,对于下面的一串手写图像,可以毫不费力的识别出他们是504192,轻松到让人都忘记了其实这是一个复杂的工作. 实际上在我们的大脑的左脑和右脑的皮层都有一个第一视觉区域,叫做V1,里面有14亿视觉神经元.而且,在我们识别上面的图像的时候,工作的不止有V1,还有V2.V3.V4.V5,所以这么一看,我们确实威武. 但是让计算机进行模式识别,就比较复杂了,主要困难在于我们如何给计算机描述一个数字9在图像上应该是怎样的,比如我们跟计算机说,9的上面是一个圈,下右边是1竖