spring boot整合redis主从sentinel方式
目录
- springboot整合redis主从sentinel
- 一主二从三sentinel配置
- 新建springboot工程,并加入Redis依赖
- 工程结构
- 修改application.properties配置文件
- 新建Redis服务
- 测试类
- 测试结果
- redis哨兵模式sentinel与springboot集成
- 安装Redis集群
springboot整合redis主从sentinel
一主二从三sentinel配置
- 1、master:127.0.0.1:6379
- 2、slave1:127.0.0.1:6380
- 3、slave2:127.0.0.1:6381
- 4、sentinel1:127.0.0.1:26379
- 5、sentinel2:127.0.0.1:26479
- 6、sentinel3:127.0.0.1:26579
- 7、监听的主机名:mymaster
- 8、附上sentinel1的配置
port 26379
sentinel monitor mymaster 127.0.0.1 6379 2
sentinel down-after-milliseconds mymaster 5000
sentinel parallel-syncs mymaster 1
sentinel failover-timeout mymaster 15000
新建spring boot工程,并加入Redis依赖
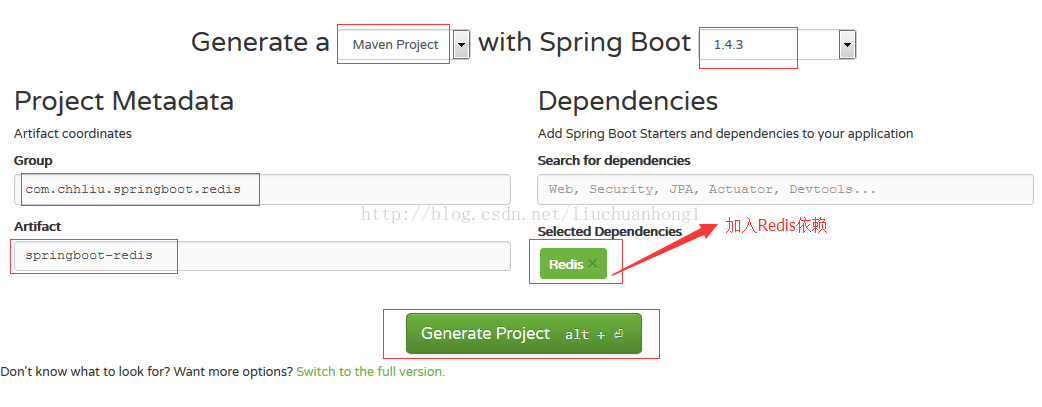
工程结构
如下:

pom文件如下:
<?xml version="1.0" encoding="UTF-8"?>
<project xmlns="http://maven.apache.org/POM/4.0.0" xmlns:xsi="http://www.w3.org/2001/XMLSchema-instance"
	xsi:schemaLocation="http://maven.apache.org/POM/4.0.0 http://maven.apache.org/xsd/maven-4.0.0.xsd">
	<modelVersion>4.0.0</modelVersion>

	<groupId>com.chhliu.springboot.redis</groupId>
	<artifactId>springboot-redis</artifactId>
	<version>0.0.1-SNAPSHOT</version>
	<packaging>jar</packaging>

	<name>springboot-redis</name>
	<description>Demo project for Spring Boot redis</description>

	<parent>
		<groupId>org.springframework.boot</groupId>
		<artifactId>spring-boot-starter-parent</artifactId>
		<version>1.4.3.RELEASE</version>
		<relativePath/> <!-- lookup parent from repository -->
	</parent>

	<properties>
		<project.build.sourceEncoding>UTF-8</project.build.sourceEncoding>
		<project.reporting.outputEncoding>UTF-8</project.reporting.outputEncoding>
		<java.version>1.7</java.version>
	</properties>

	<dependencies>
		<dependency>
			<groupId>org.springframework.boot</groupId>
			<artifactId>spring-boot-starter-data-redis</artifactId>
		</dependency>

		<dependency>
			<groupId>org.springframework.boot</groupId>
			<artifactId>spring-boot-starter-test</artifactId>
			<scope>test</scope>
		</dependency>
	</dependencies>

	<build>
		<plugins>
			<plugin>
				<groupId>org.springframework.boot</groupId>
				<artifactId>spring-boot-maven-plugin</artifactId>
			</plugin>
		</plugins>
	</build>
</project>
修改application.properties配置文件
配置文件添加内容如下:
########################################################
###REDIS (RedisProperties) redis基本配置;
########################################################
# database name
spring.redis.database=0
# server host1 单机使用,对应服务器ip
#spring.redis.host=127.0.0.1
# server password 密码,如果没有设置可不配
#spring.redis.password=
#connection port  单机使用,对应端口号
#spring.redis.port=6379
# pool settings ...池配置
spring.redis.pool.max-idle=8
spring.redis.pool.min-idle=0
spring.redis.pool.max-active=8
spring.redis.pool.max-wait=-1
# name of Redis server  哨兵监听的Redis server的名称
spring.redis.sentinel.master=mymaster
# comma-separated list of host:port pairs  哨兵的配置列表
spring.redis.sentinel.nodes=127.0.0.1:26379,127.0.0.1:26479,127.0.0.1:26579
新建Redis服务
package com.chhliu.springboot.redis;
import org.springframework.beans.factory.annotation.Autowired;
import org.springframework.data.redis.core.RedisTemplate;
import org.springframework.data.redis.core.StringRedisTemplate;
import org.springframework.stereotype.Service;

@Service("redisService")
public class RedisService {
	@Autowired //操作字符串的template,StringRedisTemplate是RedisTemplate的一个子集
	private StringRedisTemplate stringRedisTemplate;

	@Autowired  // RedisTemplate,可以进行所有的操作
        private RedisTemplate<Object,Object> redisTemplate;

	public void set(String key, String value){
		stringRedisTemplate.opsForValue().set(key, value);
	}

	public void set(Student s){
		redisTemplate.opsForValue().set(s.getId(), s);
	}

	public String get(String key){
		return stringRedisTemplate.opsForValue().get(key);
	}

	public Student getStudent(String key){
		return (Student) redisTemplate.opsForValue().get(key);
	}
}
依赖的vo如下:
package com.chhliu.springboot.redis;
import java.io.Serializable;
public class Student implements Serializable{
	/**
	 *
	 */
	private static final long serialVersionUID = 1L;
	private String id;
	private String name;
	private String age;
	private String grade;
       // 省略getter,setter
	/**
	 * attention:
	 * Details:TODO
	 * @author chhliu
	 * 创建时间:2017-1-18 下午2:24:39
	 * @return
	 */
	@Override
	public String toString() {
		return "Student [id=" + id + ", name=" + name + ", age=" + age
				+ ", grade=" + grade + "]";
	}
}
测试类
package com.chhliu.springboot.redis;
import org.junit.Test;
import org.junit.runner.RunWith;
import org.springframework.beans.factory.annotation.Autowired;
import org.springframework.boot.test.context.SpringBootTest;
import org.springframework.test.context.junit4.SpringRunner;

@RunWith(SpringRunner.class)
@SpringBootTest
public class SpringbootRedisApplicationTests {
	@Autowired
	private RedisService service;

	@Test
	public void contextLoads() {
		service.set("myname", "chhliu");
		Student s = new Student();
		s.setId("001");
		s.setName("chhliu");
		s.setGrade("一年级");
		s.setAge("28");
		service.set(s);

		String name = service.get("myname");
		System.out.println("name:"+name);

		Student stu = service.getStudent("001");
		System.out.println(stu);
	}
}
测试结果
name:chhliu
Student [id=001, name=chhliu, age=28, grade=一年级]
redis哨兵模式sentinel与springboot集成
Redis的哨兵模式是官方提供的一种高可用解决方案,而且配置非常简单。
安装Redis集群
本文使用redis-5.0.5,redis安装在/soft/redis目录下,需新建/soft/redis/data目录
主节点配置
vim config/redis-6379.conf
# bind 127.0.0.1
port 6379
protected-mode no
daemonize yes
pidfile "/var/run/redis_6379.pid"
dir "/soft/redis/data"
dbfilename "dump-6379.rdb"
logfile "log-6379.log"
从节点1配置
vim config/redis-6380.conf
# bind 127.0.0.1
port 6380
protected-mode no
daemonize yes
pidfile "/var/run/redis_6380.pid"
dir "/soft/redis/data"
dbfilename "dump-6380.rdb"
logfile "log-6380.log"

replicaof 192.168.4.176 6379
从节点2配置
vim config/redis-6381.conf
# bind 127.0.0.1
port 6381
protected-mode no
daemonize yes
pidfile "/var/run/redis_6381.pid"
dir "/soft/redis/data"
dbfilename "dump-6381.rdb"
logfile "log-6381.log"

replicaof 192.168.4.176 6379
配置说明
# bind 127.0.0.1 注释掉这配置,以便其他机器的能连接redis
protected-mode no 关闭保护模式,以便其他机器的能连接redis
daemonize后台模式启动
redis-v5版本使用replicaof替换旧的slaveof指令。
启动这3个节点,在/soft/redis目录下运行
redis-server config/redis-6379.conf
redis-server config/redis-6380.conf
redis-server config/redis-6381.conf
打开主节点客户端看看配置是否成功
redis-cli -p 6379
info replication

再配置3个哨兵,监控集群
哨兵节点1
vim config/redis-sentinel-26379.conf
port 26379
daemonize yes
pidfile "/var/run/redis-sentinel-26379.pid"
dir /tmp
logfile "log-sentinel-26379.log"
sentinel monitor mymaster 192.168.4.176 6379 2
sentinel down-after-milliseconds mymaster 30000
sentinel parallel-syncs mymaster 1
sentinel failover-timeout mymaster 180000
sentinel deny-scripts-reconfig yes
哨兵节点2
vim config/redis-sentinel-26380.conf
port 26380
daemonize yes
pidfile "/var/run/redis-sentinel-26380.pid"
dir /tmp
logfile "log-sentinel-26380.log"
sentinel monitor mymaster 192.168.4.176 6379 2
sentinel down-after-milliseconds mymaster 30000
sentinel parallel-syncs mymaster 1
sentinel failover-timeout mymaster 180000
sentinel deny-scripts-reconfig yes
哨兵节点3
vim config/redis-sentinel-26381.conf
port 26381
daemonize yes
pidfile "/var/run/redis-sentinel-26381.pid"
dir /tmp
logfile "log-sentinel-26381.log"
sentinel monitor mymaster 192.168.4.176 6379 2
sentinel down-after-milliseconds mymaster 30000
sentinel parallel-syncs mymaster 1
sentinel failover-timeout mymaster 180000
sentinel deny-scripts-reconfig yes
配置说明
monitor mymaster 192.168.4.176 6379 2
mymaster是master的名称,192.168.4.176是master主机ip。后面的2表示有2个sentinel认为master下线了,则线下master,建议设置为 sentinel节点数/2 + 1
down-after-milliseconds
发送ping请求给redis节点,在指定时间内未收到回复,则认为该节点应该被下线
parallel-syncs
在执行故障转移时,最多可以有多少个从节点同时对新的主服务器进行同步。
启动哨兵
redis-sentinel config/redis-sentinel-26379.conf
redis-sentinel config/redis-sentinel-26380.conf
redis-sentinel config/redis-sentinel-26381.conf
配置spring-boot
pom.xml中导入依赖
<dependency>
    <groupId>org.springframework.boot</groupId>
    <artifactId>spring-boot-starter-data-redis</artifactId>
</dependency>
application.properties加入两行配置
# 使用哨兵模式不能加以下两行配置,其他配置可以加
# spring.redis.host=192.168.4.176
# spring.redis.port=6379

spring.redis.sentinel.master=mymaster
spring.redis.sentinel.nodes=192.168.4.176:26379, 192.168.4.176:26380, 192.168.4.176:26381
写一个测试类运行
@RunWith(SpringRunner.class)
@SpringBootTest
public class Sentinel001 {
    @Autowired
    RedisTemplate redisTemplate;

    @Test
    public void test001() throws Exception{
        while (true){
            String key = "time:" + new Date().getTime();
            redisTemplate.opsForValue().set(key, new Date().getTime());
            TimeUnit.MILLISECONDS.sleep(100L);
            System.out.println(redisTemplate.opsForValue().get(key));
        }
    }
}
然后杀掉master实例(端口号为6379的redis)的进程
ps -ef|grep redis
kill -9 11110
观察代码编辑器控制台输出,经过短暂的时间(大概是50s)后,程序重新运行正常
在6380和6381节点执行info replication,发现6381变成了主节点

查看下6380、6381的配置文件
cat config/redis-6380.conf
replicaof 192.168.4.176 6381
replicaof 变成了192.168.4.176 6381,而不是刚开始配置时的192.168.4.176 6379
cat config/redis-6381.conf
replicaof 的配置被删除了
重启下6379这个redis实例
redis-server config/redis-6379.conf
6379变成了6381的从节点
有个比较坑爹的事情,RedisTemplate未实现读写分离,读写都是操作master节点。运行上面的代码,在3个redis客户端运行monitor发现,只有master会运行get、set命令,从节点只运行了set命令。
以上为个人经验,希望能给大家一个参考,也希望大家多多支持我们。
相关推荐
-
SpringBoot结合Redis哨兵模式的实现示例
Redis哨兵模式 Redis Sentinel介绍 Redis Sentinel是Redis高可用的实现方案.Sentinel是一个管理多个Redis实例的工具,它可以实现对Redis的监控.通知.自动故障转移. Redis Sentinel主要功能 Redis 的 Sentinel 系统用于管理多个 Redis 服务器(instance), 该系统执行以下三个任务: 监控(Monitoring):Sentinel 会不断地检查你的主服务器和从服务器是否运作正常. 提醒(Notificatio
-

SpringBoot集成Redis并实现主从架构的实践
目录 一.Windows环境下安装Redis 设置键值对 根据key获取value 二.SpringBoot连接Redis (1)使用Jedis类直接连接Redis服务器 (2)通过配置文件进行连接 三.使用连接池操作Redis 今天这篇文章来和大家分享一下在springboot中如何集成redis,并实现主从架构,进行数据的简单存储. 我的Redis是部署在Windows系统下面的,所以在这里附上Redis在Windows环境下的安装地址和安装说明. 一.Windows环境下安装Redis 首
-
Spring Boot整合Redis的完整步骤
前言 实际 开发 中 缓存 处理是必须的,不可能我们每次客户端去请求一次 服务器 ,服务器每次都要去 数据库 中进行查找,为什么要使用缓存?说到底是为了提高系统的运行速度.将用户频繁访问的内容存放在离用户最近,访问速度最 快的 地方,提高用户的响 应速度,今天先来讲下在 springboot 中整合 redis 的详细步骤. 一.Spring Boot对Redis的支持 Spring对Redis的支持是使用Spring Data Redis来实现的,一般使用Jedis或者lettuce(默认),
-
spring boot整合redis主从sentinel方式
目录 springboot整合redis主从sentinel 一主二从三sentinel配置 新建springboot工程,并加入Redis依赖 工程结构 修改application.properties配置文件 新建Redis服务 测试类 测试结果 redis哨兵模式sentinel与springboot集成 安装Redis集群 springboot整合redis主从sentinel 一主二从三sentinel配置 1.master:127.0.0.1:6379 2.slave1:127.0.
-
Spring Boot 整合Redis 实现优惠卷秒杀 一人一单功能
目录 一.什么是全局唯一ID 全局唯一ID Redis实现全局唯一ID 二.环境准备 三.实现秒杀下单 四.库存超卖问题 问题分析 乐观锁解决库存超卖 Jmeter 测试 五.优惠卷秒杀 实现一人一单 小结 一.什么是全局唯一ID 全局唯一ID 在分布式系统中,经常需要使用全局唯一ID查找对应的数据.产生这种ID需要保证系统全局唯一,而且要高性能以及占用相对较少的空间. 全局唯一ID在数据库中一般会被设成主键,这样为了保证数据插入时索引的快速建立,还需要保持一个有序的趋势. 这样全局唯一ID就需
-
微服务Spring Boot 整合Redis 阻塞队列实现异步秒杀下单思路详解
目录 引言 一.秒杀优化 - 异步秒杀思路 二.秒杀优化 - 基于Redis完成秒杀资格判断 三.基于阻塞队列完成异步秒杀下单 四.测试程序 五.源码地址 引言 本章节,介绍使用阻塞队列实现秒杀的优化,采用异步秒杀完成下单的优化! 一.秒杀优化 - 异步秒杀思路 当用户发起请求,此时会请求nginx,nginx会访问到tomcat,而tomcat中的程序,会进行串行操作,分成如下几个步骤 查询优惠卷 判断秒杀库存是否足够 查询订单 校验是否是一人一单 扣减库存 创建订单,完成 在以上6个步骤中,
-
spring boot整合redis实现RedisTemplate三分钟快速入门
引入依赖 <dependency> <groupId>org.springframework.boot</groupId> <artifactId>spring-boot-starter-data-redis</artifactId> </dependency> RedisTemplate五种数据结构的操作 redisTemplate.opsForValue(); //操作字符串 redisTemplate.opsForHash();
-
微服务Spring Boot 整合 Redis 实现好友关注功能
目录 引言 一.Redis 实现好友关注 – 关注与取消关注 二.Redis 实现好友关注 – 共同关注功能 小结 引言 本博文参考 黑马 程序员B站 Redis课程系列 在点评项目中,有这样的需求,如何实现笔记的好友关注.以及发布笔记后推送消息功能? 使用Redis 的 好友关注.以及发布笔记后推送消息功能 一.Redis 实现好友关注 – 关注与取消关注 需求:针对用户的操作,可以对用户进行关注和取消关注功能. 在探店图文的详情页面中,可以关注发布笔记的作者 具体实现思路:基于该表数据结构,
-
spring boot整合redis实现shiro的分布式session共享的方法
我们知道,shiro是通过SessionManager来管理Session的,而对于Session的操作则是通过SessionDao来实现的,默认的情况下,shiro实现了两种SessionDao,分别为CachingSessionDAO和MemorySessionDAO,当我们使用EhCache缓存时,则是使用的CachingSessionDAO,不适用缓存的情况下,就会选择基于内存的SessionDao.所以,如果我们想实现基于Redis的分布式Session共享,重点在于重写Session
-
Spring Boot整合 NoSQL 数据库 Redis详解
目录 引言 一.环境准备 二.构建Spring Boot项目 三.引入Redis依赖 四.Reds相关配置 五.添加Redis配置类 六.测试一下 引言 在日常的开发中,除了使用 Spring Boot 这个企业级快速构建项目的框架之外,随着业务数据量的大幅度增加,对元数据库造成的压力成倍剧增.在此背景下, Redis 这个 NoSQL 数据库已然整个项目架构中的不可或缺的一部分,懂得如何 Spring Boot 整合 Redis ,是当今开发人员必备的一项技能,接下来对整合步骤进行详细说明.
-
Spring Boot整合Spring Cache及Redis过程解析
这篇文章主要介绍了Spring Boot整合Spring Cache及Redis过程解析,文中通过示例代码介绍的非常详细,对大家的学习或者工作具有一定的参考学习价值,需要的朋友可以参考下 1.安装redis a.由于官方是没有Windows版的,所以我们需要下载微软开发的redis,网址: https://github.com/MicrosoftArchive/redis/releases b.解压后,在redis根目录打开cmd界面,输入:redis-server.exe redis.wind
-
关于spring boot整合kafka+注解方式
目录 spring boot自动配置方式整合 spring boot自动配置的不足 spring boot下手动配置kafka 批量消费消息 spring boot整合kafka报错 spring boot自动配置方式整合 spring boot具有许多自动化配置,对于kafka的自动化配置当然也包含在内,基于spring boot自动配置方式整合kafka,需要做以下步骤. 引入kafka的pom依赖包 <!-- https://mvnrepository.com/artifact/org.s