android 自定义圆角button效果的实例代码(自定义view Demo)
概述
在平时开发过程中经常会碰到需要使用圆角button的情况,一般也会包括很多其他小功能,比如要在里面添加img,设置不同的圆角大小等。
针对这样的场景,直接使用创建多个shape,定义多个xml文件也是可以实现的。但是如果使用非常频繁,那么直接自定义一个就会来的非常方便。
甚至在一些情况下,不是可以用shape定义的规则图形,比如需要用到贝塞尔曲线等。
如果全局需要这样风格的view,那么自定义一个View是非常必要的。
本文主要是个demo记录,如有需要的读者可以借鉴学习。
Demo
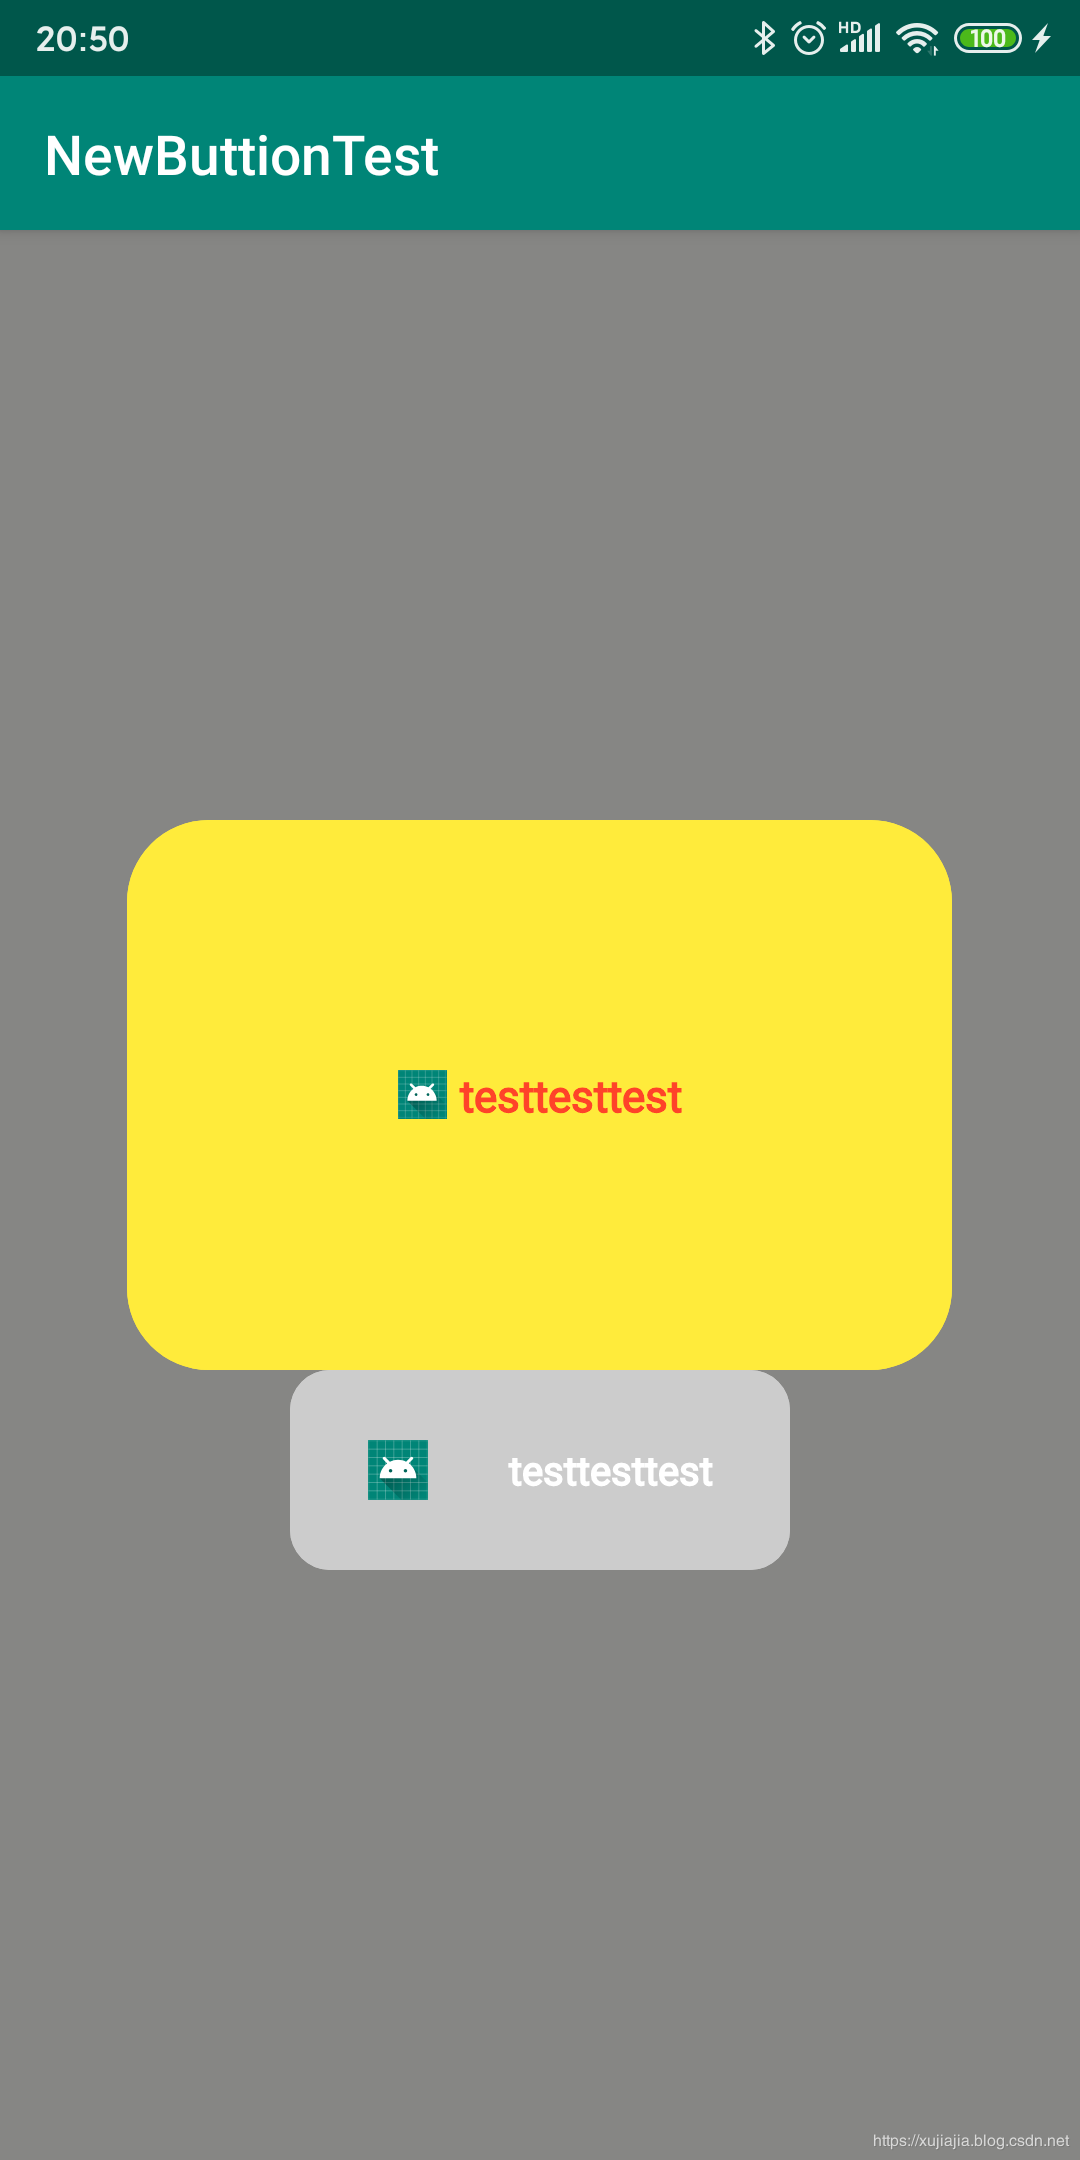
主要实现功能:
- 自定义圆角大小
- 支持设置leftDrawable,和自定义文字内容(文字和img默认居中)
- 支持点击效果

源码

RoundRadiusButton.java
/**
 * author: xujiajia
 * description:
 * 1、drawable只有在设置textString的时候才会生效(居中效果两个一起测量)
 */
public class RoundRadiusButton extends View {
 //data
 private int width = 0;
 private int height = 0;
 private int roundRadius = 16;
 private int bgColor = Color.LTGRAY;
 private boolean isTouching = false;
 //img and text
 private Drawable leftDrawable = null;
 private int drawableWidth = 20;
 private int drawableHeight = 20;
 private int leftDrawablePaddingRight = 0;
 private String textString;
 private int textSize = 30;
 private int textColor = Color.BLACK;
 //onDraw
 Paint paint;
 Path path;
 RectF rectF;
 Rect rect;
 public RoundRadiusButton(Context context, int width, int height) {
 super(context);
 this.width = width;
 this.height = height;
 this.setLayoutParams(new ViewGroup.LayoutParams(width, height));
 this.setClickable(true);
 }
 public RoundRadiusButton(Context context, AttributeSet attrs) {
 super(context, attrs);
 getDataFromAttrs(context, attrs);
 this.setClickable(true);
 }
 public RoundRadiusButton(Context context, AttributeSet attrs, int defStyleAttr) {
 super(context, attrs, defStyleAttr);
 getDataFromAttrs(context, attrs);
 this.setClickable(true);
 }
 private void getDataFromAttrs(Context context, AttributeSet attrs) {
 if (attrs == null) {
 return;
 }
 TypedArray ta = context.obtainStyledAttributes(attrs, R.styleable.RoundRadiusButton);
 roundRadius = ta.getDimensionPixelOffset(R.styleable.RoundRadiusButton_roundRadius, 16);
 bgColor = ta.getColor(R.styleable.RoundRadiusButton_bgColor, Color.LTGRAY);
 leftDrawable = ta.getDrawable(R.styleable.RoundRadiusButton_leftDrawable);
 drawableWidth = ta.getDimensionPixelOffset(R.styleable.RoundRadiusButton_drawableWidth, 0);
 drawableHeight = ta.getDimensionPixelOffset(R.styleable.RoundRadiusButton_drawableHeight, 0);
 leftDrawablePaddingRight =
 ta.getDimensionPixelOffset(R.styleable.RoundRadiusButton_leftDrawablePaddingRight, 0);
 textString = ta.getString(R.styleable.RoundRadiusButton_textString);
 textSize = ta.getDimensionPixelOffset(R.styleable.RoundRadiusButton_textSize, 0);
 textColor = ta.getColor(R.styleable.RoundRadiusButton_textColor, Color.BLACK);
 ta.recycle();
 }
 public void setRoundRadius(int roundRadius) {
 this.roundRadius = roundRadius;
 invalidate();
 }
 public void setBgColor(int bgColor) {
 this.bgColor = bgColor;
 invalidate();
 }
 public void setLeftDrawable(Drawable leftDrawable, int drawableWidth, int drawableHeight,
 int paddingRight) {
 this.leftDrawable = leftDrawable;
 this.drawableWidth = drawableWidth;
 this.drawableHeight = drawableHeight;
 this.leftDrawablePaddingRight = paddingRight;
 invalidate();
 }
 public void setTextString(String textString) {
 this.textString = textString;
 invalidate();
 }
 public void setTextColor(int textColor) {
 this.textColor = textColor;
 invalidate();
 }
 public void setTextSize(int textSize) {
 this.textSize = textSize;
 invalidate();
 }
 @Override public boolean onTouchEvent(MotionEvent event) {
 if (isClickable()) {
 switch (event.getAction()) {
 case MotionEvent.ACTION_DOWN:
  isTouching = true;
  invalidate();
  break;
 case MotionEvent.ACTION_UP:
  isTouching = false;
  invalidate();
  break;
 }
 }
 return super.onTouchEvent(event);
 }
 @Override protected void onDraw(Canvas canvas) {
 super.onDraw(canvas);
 if (width == 0 || height == 0) {
 width = getWidth();
 height = getHeight();
 }
 if (paint == null) {
 paint = new Paint();
 }
 if (path == null) {
 path = new Path();
 }
 if (rectF == null) {
 rectF = new RectF();
 }
 if (rect == null) {
 rect = new Rect();
 }
 paint.setColor(bgColor);
 paint.setAntiAlias(true);//抗锯齿
 paint.setStrokeWidth(0);//线的宽度设为0,避免画圆弧的时候部分圆弧与边界相切
 paint.setStyle(Paint.Style.FILL_AND_STROKE);
 path.setFillType(Path.FillType.WINDING);
 //左上圆角
 path.moveTo(0, roundRadius);
 rectF.set(0, 0, 2 * roundRadius,
 2 * roundRadius);
 path.addArc(rectF, 180, 90);
 //上边
 path.lineTo(width - roundRadius, 0);
 //右上圆角
 rectF.set(width - roundRadius * 2, 0, width, roundRadius * 2);
 path.addArc(rectF, -90, 90);
 //右边
 path.lineTo(width, height - roundRadius);
 //右下圆角
 rectF.set(width - roundRadius * 2, height - roundRadius * 2, width,
 height);
 path.addArc(rectF, 0, 90);
 //下边
 path.lineTo(roundRadius, height);
 //左下圆角
 rectF.set(0, height - roundRadius * 2, 2 * roundRadius,
 height);
 path.addArc(rectF, 90, 90);
 //左边
 path.lineTo(0, roundRadius);
 path.close();
 canvas.drawPath(path, paint);
 if (isTouching) {
 paint.setColor(getContext().getResources().getColor(R.color.black_tran_30));
 canvas.drawPath(path, paint);
 }
 //填充背景中间空白的部分
 path.moveTo(0, roundRadius);
 path.lineTo(width - roundRadius, 0);
 path.lineTo(width, height - roundRadius);
 path.lineTo(roundRadius, height);
 path.close();
 canvas.drawPath(path, paint);
 if (isTouching) {
 paint.setColor(getContext().getResources().getColor(R.color.black_tran_30));
 canvas.drawPath(path, paint);
 }
 //text, drawable两个一起计算位置
 if (!TextUtils.isEmpty(textString)) {
 paint.setStrokeWidth(1.5f);
 paint.setColor(textColor);
 paint.setTextSize(textSize);
 rect.setEmpty();
 paint.getTextBounds(textString, 0, textString.length(), rect);
 float leftBitmap = 0;
 float topBitmap = 0;
 if (leftDrawable != null) {
 if (leftDrawable != null) {
  leftBitmap = (1.0f * width - drawableWidth - rect.width() - leftDrawablePaddingRight) / 2;
  topBitmap = (1.0f * height - drawableHeight) / 2;
  leftDrawable.setBounds((int) leftBitmap, (int) topBitmap,
  (int) (leftBitmap + drawableWidth),
  (int) (topBitmap + drawableHeight));
  leftDrawable.draw(canvas);
 }
 }
 float textX = 0;
 float textY =
  1.0f * height / 2 + paint.getTextSize() / 2 - paint.getFontMetrics().descent / 2;
 if (leftBitmap == 0 && topBitmap == 0) {
 textX = width / 2 - rect.width() / 2;
 } else {
 textX = leftBitmap + drawableWidth + leftDrawablePaddingRight;
 }
 canvas.drawText(textString, textX, textY, paint);
 }
 }
}
MainActivity.java
public class MainActivity extends AppCompatActivity {
 private LinearLayout llContainer;
 @Override
 protected void onCreate(Bundle savedInstanceState) {
 super.onCreate(savedInstanceState);
 setContentView(R.layout.activity_main);
 initView();
 }
 private void initView() {
 llContainer = findViewById(R.id.ll_container);
 RoundRadiusButton roundRadiusButton = new RoundRadiusButton(this, 500, 200);
 roundRadiusButton.setBgColor(Color.LTGRAY);
 roundRadiusButton.setRoundRadius(40);
 //text
 roundRadiusButton.setTextString("testtesttest");
 roundRadiusButton.setTextColor(Color.WHITE);
 roundRadiusButton.setTextSize(40);
 //drawable
 roundRadiusButton.setLeftDrawable(getResources().getDrawable(R.mipmap.ic_launcher), 60, 60, 80);
 roundRadiusButton.setOnClickListener(new View.OnClickListener() {
 @Override public void onClick(View v) {
 Toast.makeText(MainActivity.this, "testest", Toast.LENGTH_LONG).show();
 }
 });
 roundRadiusButton.setClickable(false);
 llContainer.addView(roundRadiusButton);
 }
}
activity_main.xml
<?xml version="1.0" encoding="utf-8"?>
<LinearLayout xmlns:android="http://schemas.android.com/apk/res/android"
 xmlns:app="http://schemas.android.com/apk/res-auto"
 xmlns:tools="http://schemas.android.com/tools"
 android:id="@+id/ll_container"
 android:layout_width="match_parent"
 android:layout_height="match_parent"
 android:background="#868684"
 android:gravity="center"
 android:orientation="vertical"
 tools:context=".MainActivity"
 >
 <com.example.newbuttiontest.RoundRadiusButton
 android:layout_width="300dp"
 android:layout_height="200dp"
 app:bgColor="#FFEB3B"
 app:drawableHeight="18dp"
 app:drawableWidth="18dp"
 app:leftDrawable="@mipmap/ic_launcher"
 app:leftDrawablePaddingRight="5dp"
 app:roundRadius="30dp"
 app:textColor="#FF4329"
 app:textSize="16dip"
 app:textString="testtesttest"
 />
</LinearLayout>
attrs.xml
<?xml version="1.0" encoding="utf-8"?>
<resources>
 <declare-styleable name="RoundRadiusButton">
 <attr name="roundRadius" format="dimension" />
 <attr name="bgColor" format="color" />
 <attr name="leftDrawable" format="reference" />
 <attr name="leftDrawablePaddingRight" format="dimension" />
 <attr name="drawableWidth" format="dimension" />
 <attr name="drawableHeight" format="dimension" />
 <attr name="textString" format="string" />
 <attr name="textSize" format="dimension" />
 <attr name="textColor" format="color" />
 </declare-styleable>
</resources>
colors.xml
<resources>
 <color name="black_tran_30">#30000000</color>
</resources>
总结
以上所述是小编给大家介绍的android 自定义圆角button效果的实例代码,希望对大家有所帮助,如果大家有任何疑问请给我留言,小编会及时回复大家的。在此也非常感谢大家对我们网站的支持!
如果你觉得本文对你有帮助,欢迎转载,烦请注明出处,谢谢!
赞 (0)

