springboot-jpa的实现操作
JPA全称为Java Persistence API(Java持久层API),它是Sun公司在JavaEE 5中提出的Java持久化规范。
它为Java开发人员提供了一种对象/关联映射工具,来管理Java应用中的关系数据,JPA吸取了目前Java持久化技术的优点,旨在规范、简化Java对象的持久化工作。
JPA对于单表的或者简单的SQL查询非常友好,甚至可以说非常智能。他为你准备好了大量的拿来即用的持久层操作方法。甚至只要写findByName这样一个接口方法,他就能智能的帮你执行根据名称查找实体类对应的表数据,完全不用写SQL。
它相对于mybatis来说不用写xml等配置,简直方便的不行,对于我们开发者来说,谁更简单,开发效率更高,我们就喜欢谁(不喜欢不行,看看产品经理手里的菜刀)!!!
这时候mybatis就不服了,我确实需要写一大堆乱七八糟的xml,但是也可以用注解啊。
还不是要写sql,总是一写增删改查sql,有没有把这些常见的增删改查全部封装起来,我们直接调用api,sql让它们自动组装就好了,说实话我自己封装了一个基于mybatis的组件,常见的增删改查,自己组装成sql去查询,后来由于没有oracle,sqlserver的数据库环境,对这些数据库的时间等等函数支持不好,又有jpa和mybatisplus这些现有的,我也就偷懒了
好了我们之前有实现过springboot-mybatis
springboot-mybatisplus的整合,现在就来实现一下jpa的,你们看看哪个比较方便好用,可以自己用用看

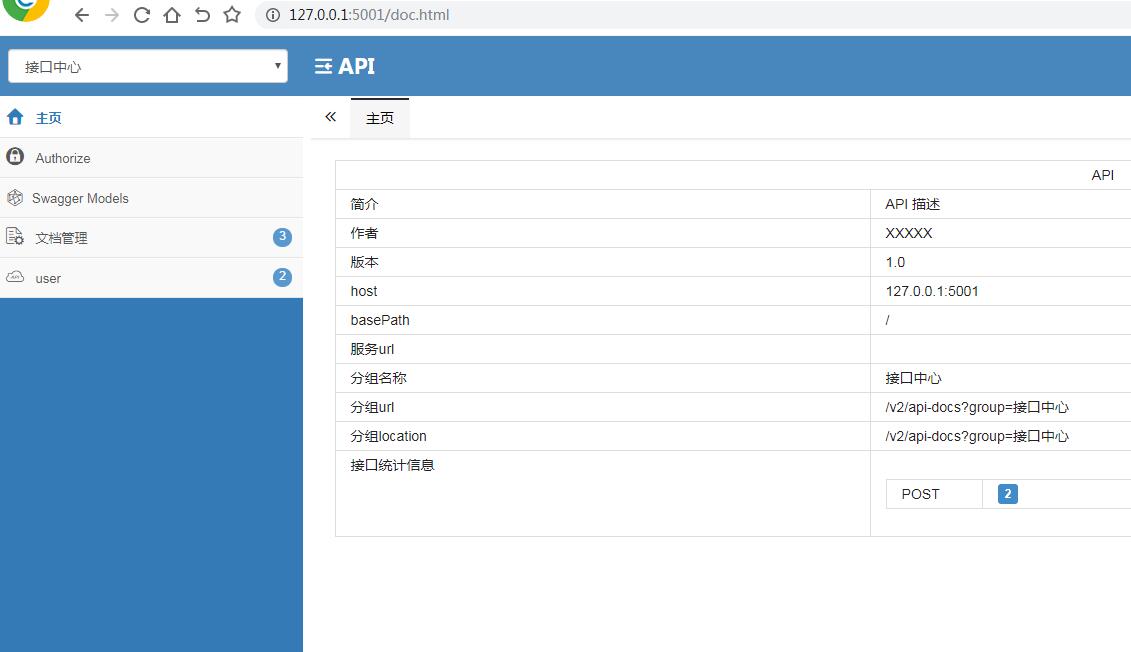
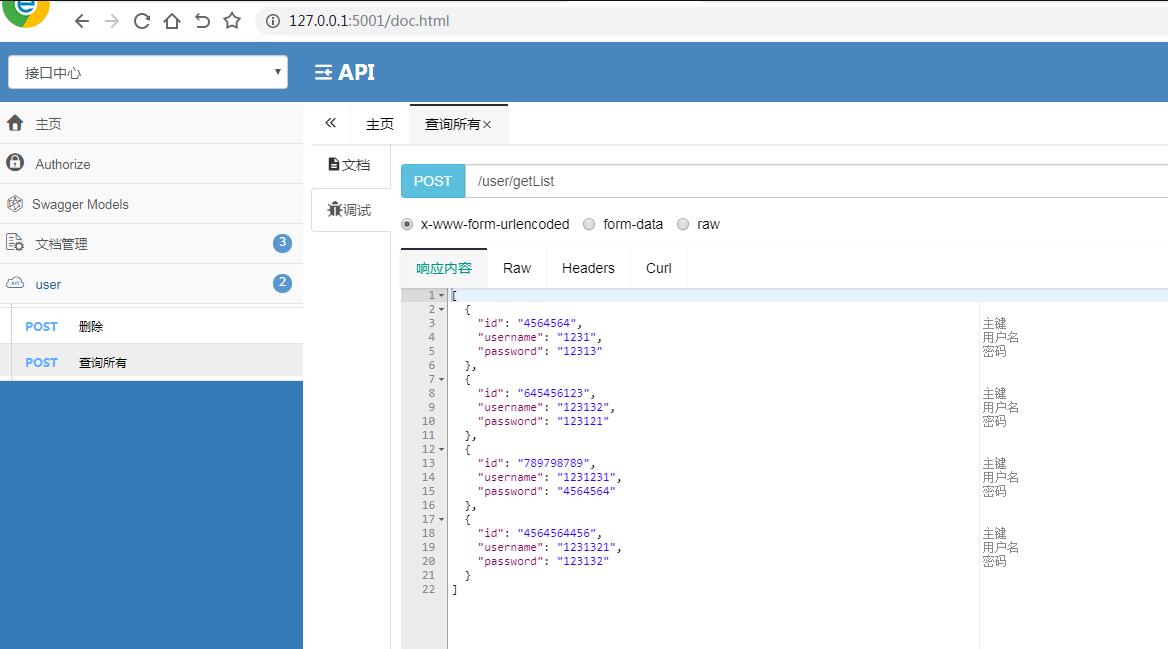
这是我实现的demo预览
由于我想看到效果,又不想装postman来测试,我就集成了swagger

最终效果如上图
好了,我直接放代码了
<?xml version="1.0" encoding="UTF-8"?>
<project xmlns="http://maven.apache.org/POM/4.0.0"
     xmlns:xsi="http://www.w3.org/2001/XMLSchema-instance"
     xsi:schemaLocation="http://maven.apache.org/POM/4.0.0 http://maven.apache.org/xsd/maven-4.0.0.xsd">
  <modelVersion>4.0.0</modelVersion>

  <groupId>com.zkb</groupId>
  <artifactId>spring-data-jpa</artifactId>
  <version>1.0-SNAPSHOT</version>
  <build>
    <plugins>
      <plugin>
        <groupId>org.apache.maven.plugins</groupId>
        <artifactId>maven-compiler-plugin</artifactId>
        <configuration>
          <source>8</source>
          <target>8</target>
        </configuration>
      </plugin>
    </plugins>
  </build>
  <dependencies>
    <dependency>
      <groupId>org.springframework.boot</groupId>
      <artifactId>spring-boot-starter-web</artifactId>
      <version>2.1.1.RELEASE</version>
    </dependency>

    <dependency>
      <groupId>org.springframework.boot</groupId>
      <artifactId>spring-boot-starter-data-jpa</artifactId>
      <version>2.1.1.RELEASE</version>
    </dependency>

    <dependency>
      <groupId>mysql</groupId>
      <artifactId>mysql-connector-java</artifactId>
      <version>8.0.18</version>
    </dependency>

    <dependency>
      <groupId>org.projectlombok</groupId>
      <artifactId>lombok</artifactId>
      <version>1.18.12</version>
    </dependency>

    <dependency>
      <groupId>org.springframework.boot</groupId>
      <artifactId>spring-boot-devtools</artifactId>
      <version>2.0.4.RELEASE</version>
    </dependency>

    <dependency>
      <groupId>org.springframework.boot</groupId>
      <artifactId>spring-boot-starter-test</artifactId>
      <version>2.1.2.RELEASE</version>
      <scope>test</scope>
    </dependency>
    <dependency>
      <groupId>com.alibaba</groupId>
      <artifactId>druid</artifactId>
      <version>1.0.31</version>
    </dependency>
    <dependency>
      <groupId>org.junit.jupiter</groupId>
      <artifactId>junit-jupiter</artifactId>
      <version>RELEASE</version>
      <scope>compile</scope>
    </dependency>
    <dependency>
      <groupId>org.junit.jupiter</groupId>
      <artifactId>junit-jupiter</artifactId>
      <version>RELEASE</version>
      <scope>compile</scope>
    </dependency>

    <dependency>
      <groupId>org.slf4j</groupId>
      <artifactId>slf4j-api</artifactId>
      <version>1.7.25</version>
    </dependency>
    <dependency>
      <groupId>org.springframework.boot</groupId>
      <artifactId>spring-boot-test</artifactId>
      <version>2.2.2.RELEASE</version>
      <scope>compile</scope>
    </dependency>

    <dependency>
      <groupId>io.springfox</groupId>
      <artifactId>springfox-swagger2</artifactId>
      <version>2.9.2</version>
      <exclusions>
        <exclusion>
          <groupId>io.swagger</groupId>
          <artifactId>swagger-annotations</artifactId>
        </exclusion>
        <exclusion>
          <groupId>io.swagger</groupId>
          <artifactId>swagger-models</artifactId>
        </exclusion>
      </exclusions>
    </dependency>
    <dependency>
      <groupId>io.swagger</groupId>
      <artifactId>swagger-annotations</artifactId>
      <version>1.5.22</version>
    </dependency>

    <dependency>
      <groupId>io.swagger</groupId>
      <artifactId>swagger-models</artifactId>
      <version>1.5.22</version>
    </dependency>
    <!-- swagger-ui -->
    <dependency>
      <groupId>io.springfox</groupId>
      <artifactId>springfox-swagger-ui</artifactId>
      <version>2.9.2</version>
    </dependency>

    <dependency>
      <groupId>com.github.xiaoymin</groupId>
      <artifactId>swagger-bootstrap-ui</artifactId>
      <version>1.9.1</version>
    </dependency>
  </dependencies>

</project>
server:
 port: 5001
spring:
 datasource:
  type: com.alibaba.druid.pool.DruidDataSource #Druid 是阿里巴巴开源平台上一个数据库连接池实现,结合了 C3P0、DBCP、PROXOOL 等 DB 池的优点,同时加入了日志监控
  driver-class-name: com.mysql.cj.jdbc.Driver
  url: jdbc:mysql://localhost:3306/test-demo?useUnicode=true&characterEncoding=utf-8&useSSL=false&serverTimezone=UTC&autoReconnect=true&failOverReadOnly=false&zeroDateTimeBehavior=convertToNull
  username: root
  password: root
  dbcp2:
   min-idle: 5
   initial-size: 5
   max-total: 5
   max-wait-millis: 200
 jpa:
  database: mysql
  database-platform: org.hibernate.dialect.MySQL5InnoDBDialect
  show-sql: true
  hibernate:
   ddl-auto: update
package com.zkb.entity;
import com.fasterxml.jackson.databind.annotation.JsonSerialize;
import com.fasterxml.jackson.databind.ser.std.ToStringSerializer;
import io.swagger.annotations.ApiModel;
import io.swagger.annotations.ApiModelProperty;
import lombok.Data;
import javax.persistence.*;
/**
 * 实体类
 */
@Entity
@Table(name = "t_user")
@Data
@ApiModel(value = "用户信息", description = "用户信息")
public class User {
  @Id
  @GeneratedValue(strategy = GenerationType.IDENTITY)
  @ApiModelProperty(value = "主键")
  @JsonSerialize(using = ToStringSerializer.class)
  private Long id;

  @Column(name = "username")
  @ApiModelProperty(value = "用户名")
  private String username;

  @Column(name = "password")
  @ApiModelProperty(value = "密码")
  private String password;

}
package com.zkb.dao;
import com.zkb.entity.User;
import org.springframework.data.jpa.repository.JpaRepository;
public interface UserRepository extends JpaRepository<User,Long> {
}
package com.zkb.service;
import com.zkb.entity.User;
import java.util.List;
public interface UserService {
  public void deleteUser(Long id);
  List<User> getList();
}
package com.zkb.service.impl;
import com.zkb.dao.UserRepository;
import com.zkb.entity.User;
import com.zkb.service.UserService;
import org.springframework.beans.factory.annotation.Autowired;
import org.springframework.stereotype.Service;
import java.util.List;
@Service
public class UserServiceImpl implements UserService {

  @Autowired
  private UserRepository userRepository;

  @Override
  public void deleteUser(Long id) {
    System.out.println(userRepository);
    userRepository.deleteById(id);
  }

  @Override
  public List<User> getList() {
    return userRepository.findAll();
  }
}
package com.zkb.controller;
import com.zkb.entity.User;
import com.zkb.service.UserService;
import io.swagger.annotations.Api;
import io.swagger.annotations.ApiOperation;
import org.springframework.beans.factory.annotation.Autowired;
import org.springframework.web.bind.annotation.PostMapping;
import org.springframework.web.bind.annotation.RequestMapping;
import org.springframework.web.bind.annotation.RequestParam;
import org.springframework.web.bind.annotation.RestController;
import java.util.List;
@RestController
@RequestMapping("/user")
@Api(value = "user",tags = "user")
public class UserController {

  @Autowired
  private UserService userService;

  @PostMapping("/del")
  @ApiOperation(value="删除",notes = "删除")
  public String delete(@RequestParam("id") Long id){
    userService.deleteUser(id);
    return "true";
  }

  @PostMapping("/getList")
  @ApiOperation(value="查询所有",notes = "查询所有")
  public List<User> getList(){
    return userService.getList();
  }
}
package com.zkb.conf;
import io.swagger.annotations.ApiOperation;
import io.swagger.models.auth.In;
import org.springframework.context.annotation.Bean;
import org.springframework.context.annotation.Configuration;
import springfox.documentation.builders.ApiInfoBuilder;
import springfox.documentation.builders.PathSelectors;
import springfox.documentation.builders.RequestHandlerSelectors;
import springfox.documentation.service.ApiInfo;
import springfox.documentation.service.ApiKey;
import springfox.documentation.service.Contact;
import springfox.documentation.spi.DocumentationType;
import springfox.documentation.spring.web.plugins.Docket;
import springfox.documentation.swagger2.annotations.EnableSwagger2;
import java.util.Arrays;
import java.util.List;
@Configuration
@EnableSwagger2
public class SwaggerApp {
  @Bean
  public Docket createRestApi1() {
    return new Docket(DocumentationType.SWAGGER_2).enable(true).apiInfo(apiInfo()).select()
        .apis(RequestHandlerSelectors.withMethodAnnotation(ApiOperation.class))
        .apis(RequestHandlerSelectors.basePackage("com.zkb.controller"))
        .paths(PathSelectors.any()).build().securitySchemes(apiKeyList()).groupName("接口中心");
  }

  private ApiInfo apiInfo() {
    return new ApiInfoBuilder()
        .title("API")
        .contact(new Contact("XXXXX", "http://XXXXXX.XXXX/", ""))
        .version("1.0")
        .description("API 描述")
        .build();
  }

  private List<ApiKey> apiKeyList() {
    return Arrays.asList(new ApiKey("登录token", "token", In.HEADER.name()),
        new ApiKey("设备类型(android,ios,pc)---必填", "deviceType", In.HEADER.name()));
  }
}
package com.zkb;
import org.springframework.boot.SpringApplication;
import org.springframework.boot.autoconfigure.SpringBootApplication;
import springfox.documentation.swagger2.annotations.EnableSwagger2;
@SpringBootApplication
@EnableSwagger2
public class App {
  public static void main(String[] args) {
    SpringApplication.run(App.class,args);
  }
}
CREATE TABLE `t_user` (
 `id` bigint NOT NULL AUTO_INCREMENT,
 `username` varchar(50) COLLATE utf8mb4_general_ci DEFAULT NULL,
 `password` varchar(50) COLLATE utf8mb4_general_ci DEFAULT NULL,
 PRIMARY KEY (`id`) USING BTREE
) ENGINE=InnoDB AUTO_INCREMENT=1214893367637352451 DEFAULT CHARSET=utf8mb4 COLLATE=utf8mb4_general_ci;
非常简单的一张表,注意数据库名称

到这里就已经实现了一个非常简单的jpa demo了
当然我这里只是指路,让知怎么用
补充:SpringBoot使用JPA实现增删查改
一、运行环境
SpringBoot2.3.0
JDK1.8
IDEA2020.1.2
MySQL5.7
二、依赖及应用程序配置
<dependency>
  <groupId>org.springframework.boot</groupId>
  <artifactId>spring-boot-starter-data-jpa</artifactId>
</dependency>
<dependency>
  <groupId>org.springframework.boot</groupId>
  <artifactId>spring-boot-starter-thymeleaf</artifactId>
</dependency>
<dependency>
  <groupId>org.springframework.boot</groupId>
  <artifactId>spring-boot-starter-validation</artifactId>
</dependency>
<dependency>
  <groupId>org.springframework.boot</groupId>
  <artifactId>spring-boot-starter-web</artifactId>
</dependency>
<dependency>
  <groupId>mysql</groupId>
  <artifactId>mysql-connector-java</artifactId>
  <scope>runtime</scope>
</dependency>
<dependency>
  <groupId>org.projectlombok</groupId>
  <artifactId>lombok</artifactId>
  <optional>true</optional>
</dependency>
<dependency>
  <groupId>org.springframework.boot</groupId>
  <artifactId>spring-boot-starter-test</artifactId>
  <scope>test</scope>
  <exclusions>
    <exclusion>
      <groupId>org.junit.vintage</groupId>
      <artifactId>junit-vintage-engine</artifactId>
    </exclusion>
  </exclusions>
</dependency>
1、升级到SpringBoot2.2,spring-boot-starter-test默认使用JUnit 5作为单元测试框架 ,写单元测试时注解@RunWith(Spring.class)升级为@ExtendWith(SpringExtension.class)
2、升级到SpringBoot2.3,hibernate-validator从spring-boot-starter-web移除,需要单独引入
3、升级到SpringBoot2.3,MySQL驱动由com.mysql.jdbc.Driver变更为com.mysql.cj.jdbc.Driver;同时,数据源url需要添加serverTimezone=UTC&useSSL=false参数
3、升级到SpringBoot2.x,默认不自动注入HiddenHttpMethodFilter,需要设置spring.mvc.hiddenmethod.filter.enabled=true开启PUT、DELETE方法支持
应用程序配置如下:
spring.application.name=springbootjpa
management.endpoints.jmx.exposure.include=*
management.endpoints.web.exposure.include=*
management.endpoint.health.show-details=always
# 应用服务 WEB 访问端口
server.port=8080
# Actuator Web 访问端口
management.server.port=8081
# mysql setting
spring.datasource.driver-class-name=com.mysql.cj.jdbc.Driver
spring.datasource.url=jdbc:mysql://localhost:3306/springbootjpa?serverTimezone=UTC&useSSL=false
spring.datasource.username=username
spring.datasource.password=password
# JPA setting
spring.jpa.properties.hibernate.hbm2ddl.auto=update
spring.jpa.properties.hibernate.dialect=org.hibernate.dialect.MySQL5InnoDBDialect
spring.jpa.show-sql=true
# thymeleaf setting
spring.thymeleaf.cache=false
# delete、put方法支持
spring.mvc.hiddenmethod.filter.enabled=true
三、定义实体
使用@Entity标记实体类
import lombok.Data;
import javax.persistence.*;
import javax.validation.constraints.NotEmpty;
import java.io.Serializable;
@Entity
@Data
public class Article extends BaseEntity implements Serializable {
  @Id
  @GeneratedValue(strategy = GenerationType.IDENTITY)
  private Long id;
  @Column(nullable = false, unique = true)
  @NotEmpty(message = "标题不能为空")
  private String title;
  @Column(nullable = false)
  private String body;
}
为了自动添加创建日期、修改日期、创建人及修改人,我们把创建、修改信息放到父类中由实体类继承,并开启SpringBoot的自动审计功能,将创建/修改信息自动注入
1、定义实体类的父类,@CreatedDate、@LastModifiedDate、@CreatedBy、@LastModifiedBy标注相应字段
import org.hibernate.annotations.Columns;
import org.springframework.data.annotation.CreatedBy;
import org.springframework.data.annotation.CreatedDate;
import org.springframework.data.annotation.LastModifiedBy;
import org.springframework.data.annotation.LastModifiedDate;
import org.springframework.data.jpa.domain.support.AuditingEntityListener;
import javax.persistence.Column;
import javax.persistence.EntityListeners;
import javax.persistence.MappedSuperclass;
@MappedSuperclass
@EntityListeners(AuditingEntityListener.class)
public class BaseEntity {
  @CreatedDate
  private Long createTime;
  @LastModifiedDate
  private Long updateTime;

  @Column(name = "create_by")
  @CreatedBy
  private String createBy;
  @Column(name = "lastmodified_by")
  @LastModifiedBy
  private String lastmodifiedBy;

  public Long getCreateTime() {
    return createTime;
  }
  public void setCreateTime(Long createTime) {
    this.createTime = createTime;
  }
  public Long getUpdateTime() {
    return updateTime;
  }
  public void setUpdateTime(Long updateTime) {
    this.updateTime = updateTime;
  }

  public String getCreateBy() {
    return createBy;
  }
  public void setCreateBy(String createBy) {
    this.createBy = createBy;
  }
  public String getLastmodifiedBy() {
    return lastmodifiedBy;
  }
  public void setLastmodifiedBy(String lastmodifiedBy) {
    this.lastmodifiedBy = lastmodifiedBy;
  }
}
@MappedSuperclass注解:
作用于实体类的父类上,父类不生成对应的数据库表
标注@MappedSuperclass的类不能再标注@Entity或@Table注解,也无需实现序列化接口
每个子类(实体类)对应一张数据库表,数据库表包含子类属性和父类属性
标注@MappedSuperclass的类可以直接标注@EntityListeners实体监听器
@EntityListeners(AuditingEntityListener.class)注解:
作用范围仅在标注@MappedSuperclass类的所有继承类中,并且实体监听器可以被其子类继承或重载
开启JPA的审计功能,需要在SpringBoot的入口类标注@EnableJpaAuditing
创建日期、修改日期有默认方法注入值,但创建人和修改人注入则需要手动实现AuditorAware接口:
@Configuration
public class BaseEntityAuditor implements AuditorAware<String> {
  @Override
  public Optional<String> getCurrentAuditor() {
    return "";
  }
}
四、DAO层实现
JPA支持通过约定方法名进行数据库查询、修改:
import org.springframework.data.jpa.repository.JpaRepository;
import springbootjpa.entity.Article;
public interface ArticleRepository extends JpaRepository<Article, Long> {
  Article findById(long id);
}
通过约定方法名查询,只需实现JpaRepository接口声明查询方法而不需要具体实现
此外,可以在方法上标注@Query实现JPQL或原生SQL查询
JpaRepository<T, ID>,T表示要操作的实体对象,ID表示主键。该接口继承了分页排序接口PadingAndSortRepository,通过构建Pageable实现分页查询:
@Autowired
private ArticleRepository articleRepository;
@RequestMapping("")
public ModelAndView articlelist(@RequestParam(value = "start", defaultValue = "0") Integer start, @RequestParam(value = "limit", defaultValue = "5") Integer limit) {
    start = start < 0 ? 0 : start;
    Sort sort = Sort.by(Sort.Direction.DESC, "id");
    Pageable pageable = PageRequest.of(start, limit, sort);
    Page<Article> page = articleRepository.findAll(pageable);
    ModelAndView modelAndView = new ModelAndView("article/list");
    modelAndView.addObject("page", page);
    return modelAndView;
}
如果根据某一字段排序,可以用Sort.by方法构建Sort对象;如果根据多个字段排序,首先构建Sort.Order数组List<Sort.Order>,然后再传入Sort.by方法构建Sort对象。
PageRequest.of方法生成Pageable对象
五、Contrller 控制器
import org.springframework.beans.factory.annotation.Autowired;
import org.springframework.data.domain.Page;
import org.springframework.data.domain.PageRequest;
import org.springframework.data.domain.Pageable;
import org.springframework.data.domain.Sort;
import org.springframework.stereotype.Controller;
import org.springframework.web.bind.annotation.*;
import org.springframework.web.servlet.ModelAndView;
import springbootjpa.entity.Article;
import springbootjpa.repository.ArticleRepository;
@Controller
@RequestMapping("/article")
public class ArticleController {
  @Autowired
  private ArticleRepository articleRepository;
  @RequestMapping("")
  public ModelAndView articlelist(@RequestParam(value = "start", defaultValue = "0") Integer start,
                  @RequestParam(value = "limit", defaultValue = "5") Integer limit) {
    start = start < 0 ? 0 : start;
    Sort sort = Sort.by(Sort.Direction.DESC, "id");
    Pageable pageable = PageRequest.of(start, limit, sort);
    Page<Article> page = articleRepository.findAll(pageable);
    ModelAndView modelAndView = new ModelAndView("article/list");
    modelAndView.addObject("page", page);
    return modelAndView;
  }
  @RequestMapping("/add")
  public String addArticle() {
    return "article/add";
  }
  @PostMapping("")
  public String saveArticle(Article article) {
    articleRepository.save(article);
    return "redirect:/article";
  }
  @GetMapping("/{id}")
  public ModelAndView getArticle(@PathVariable("id") Integer id) {
    Article article = articleRepository.findById(id);
    ModelAndView modelAndView = new ModelAndView("article/show");
    modelAndView.addObject("article", article);
    return modelAndView;
  }
  @DeleteMapping("/{id}")
  public String deleteArticle(@PathVariable("id") long id) {
    System.out.println("put 方法");
    articleRepository.deleteById(id);
    return "redirect:/article";
  }
  @GetMapping("edit/{id}")
  public ModelAndView editArticle(@PathVariable("id") Integer id) {
    Article article = articleRepository.findById(id);
    ModelAndView modelAndView = new ModelAndView("article/edit");
    modelAndView.addObject("article", article);
    return modelAndView;
  }
  @PutMapping("/{id}")
  public String editArticleSave(Article article, long id) {
    System.out.println("put 方法");
    article.setId(id);
    articleRepository.save(article);
    return "redirect:/article";
  }
}
因为<form>表单只能发送GET或POST请求,spring3引入一个监听器HiddenHttpMethodFilter来将POST请求转换为PUT或POST请求。
SpringBoot2.x开始默认不自动注入HiddenHttpMethodFilter,需要设置spring.mvc.hiddenmethod.filter.enabled=true开启PUT、DELETE方法支持
配置完后,前端页面需要在表单中加入隐藏域,表明实际请求方法:
<!-- DELETE 请求 -->
<form id="deletePost" method="POST" action="">
<input type="hidden" name="_method" value="delete">
</form>
<!-- PUT 请求 -->
<form id="putPost" method="POST" action="">
<input type="hidden" name="_method" value="put">
</form>
六、其他
th:value和th:field区别:
th:value解析成html,表现为:value="${th:value}"
th:field解析成html,表现为:name="${th:name}" value="${th:value}"
以上为个人经验,希望能给大家一个参考,也希望大家多多支持我们。如有错误或未考虑完全的地方,望不吝赐教。

