seata-1.4.0安装及在springcloud中使用详解
seata-1.4.0安装及使用
1、简介
Seata 是一款开源的分布式事务解决方案,致力于提供高性能和简单易用的分布式事务服务。Seata 将为用户提供了 AT、TCC、SAGA 和 XA 事务模式,为用户打造一站式的分布式解决方案。
详见官方文档:https://seata.io/zh-cn/docs/overview/what-is-seata.html
网上的多是0.9.0版本的安装方式,这里记录安装seata-1.4.0版本的方式,在win10环境下安装,centos7与此相同。
下载
需要下载seata-1.4.0.zip 和 seata-server-1.4.0.zip两个安装包
下载地址:https://github.com/seata/seata/releases
2.1、seata-server-1.4.0
安装配置
解压压缩包,修改conf内的配置文件
2.1.1、registry.conf修改:
我使用的nacos作为配置中心和注册中心,使用将配置文件改为nacos

registry {
# file 、nacos 、eureka、redis、zk、consul、etcd3、sofa
 type = "nacos"
 loadBalance = "RandomLoadBalance"
 loadBalanceVirtualNodes = 10

 nacos {
 application = "seata-server"
 serverAddr = "127.0.0.1:8848"
 group = "SEATA_GROUP"
 namespace = ""
 cluster = "default"
 username = "nacos"
 password = "nacos"
 }
}

config {
 # file、nacos 、apollo、zk、consul、etcd3
 type = "nacos"
 nacos {
 serverAddr = "127.0.0.1:8848"
 namespace = ""
 group = "SEATA_GROUP"
 username = "nacos"
 password = "nacos"
 }
}
2.1.2、file.conf修改:
修改数据库地址,注意mysql5/mysql8驱动不同

store {
 ## store mode: file、db、redis
 mode = "db"
	## database store property
	 db {
	 ## the implement of javax.sql.DataSource, such as DruidDataSource(druid)/BasicDataSource(dbcp)/HikariDataSource(hikari) etc.
	 datasource = "druid"
	 ## mysql/oracle/postgresql/h2/oceanbase etc.
	 dbType = "mysql"
	 driverClassName = "com.mysql.cj.jdbc.Driver"
	 url = "jdbc:mysql://127.0.0.1:3307/seata?serverTimezone=Asia/Shanghai&useUnicode=true&characterEncoding=utf8&useSSL=true"
	 user = "root"
	 password = "123456"
	 minConn = 5
	 maxConn = 100
	 globalTable = "global_table"
	 branchTable = "branch_table"
	 lockTable = "lock_table"
	 queryLimit = 100
	 maxWait = 5000
	 }
	}
2.1.3、创建数据库
	创建数据库seata,并建立下面三张表(branch_table, global_table, lock_table),创建undo_log表放到业务库中
-- the table to store GlobalSession data
drop table if exists `global_table`;
create table `global_table` (
 `xid` varchar(128) not null,
 `transaction_id` bigint,
 `status` tinyint not null,
 `application_id` varchar(32),
 `transaction_service_group` varchar(32),
 `transaction_name` varchar(128),
 `timeout` int,
 `begin_time` bigint,
 `application_data` varchar(2000),
 `gmt_create` datetime,
 `gmt_modified` datetime,
 primary key (`xid`),
 key `idx_gmt_modified_status` (`gmt_modified`, `status`),
 key `idx_transaction_id` (`transaction_id`)
);

-- the table to store BranchSession data
drop table if exists `branch_table`;
create table `branch_table` (
 `branch_id` bigint not null,
 `xid` varchar(128) not null,
 `transaction_id` bigint ,
 `resource_group_id` varchar(32),
 `resource_id` varchar(256) ,
 `lock_key` varchar(128) ,
 `branch_type` varchar(8) ,
 `status` tinyint,
 `client_id` varchar(64),
 `application_data` varchar(2000),
 `gmt_create` datetime,
 `gmt_modified` datetime,
 primary key (`branch_id`),
 key `idx_xid` (`xid`)
);

-- the table to store lock data
drop table if exists `lock_table`;
create table `lock_table` (
 `row_key` varchar(128) not null,
 `xid` varchar(96),
 `transaction_id` long ,
 `branch_id` long,
 `resource_id` varchar(256) ,
 `table_name` varchar(32) ,
 `pk` varchar(36) ,
 `gmt_create` datetime ,
 `gmt_modified` datetime,
 primary key(`row_key`)
);

-- the table to store seata xid data
-- 0.7.0+ add context
-- you must to init this sql for you business databese. the seata server not need it.
-- 此脚本必须初始化在你当前的业务数据库中,用于AT 模式XID记录。与server端无关(注:业务数据库)
-- 注意此处0.3.0+ 增加唯一索引 ux_undo_log
drop table `undo_log`;
CREATE TABLE `undo_log` (
 `id` bigint(20) NOT NULL AUTO_INCREMENT,
 `branch_id` bigint(20) NOT NULL,
 `xid` varchar(100) NOT NULL,
 `context` varchar(128) NOT NULL,
 `rollback_info` longblob NOT NULL,
 `log_status` int(11) NOT NULL,
 `log_created` datetime NOT NULL,
 `log_modified` datetime NOT NULL,
 `ext` varchar(100) DEFAULT NULL,
 PRIMARY KEY (`id`),
 UNIQUE KEY `ux_undo_log` (`xid`,`branch_id`)
) ENGINE=InnoDB AUTO_INCREMENT=1 DEFAULT CHARSET=utf8;
2.1.4、启动
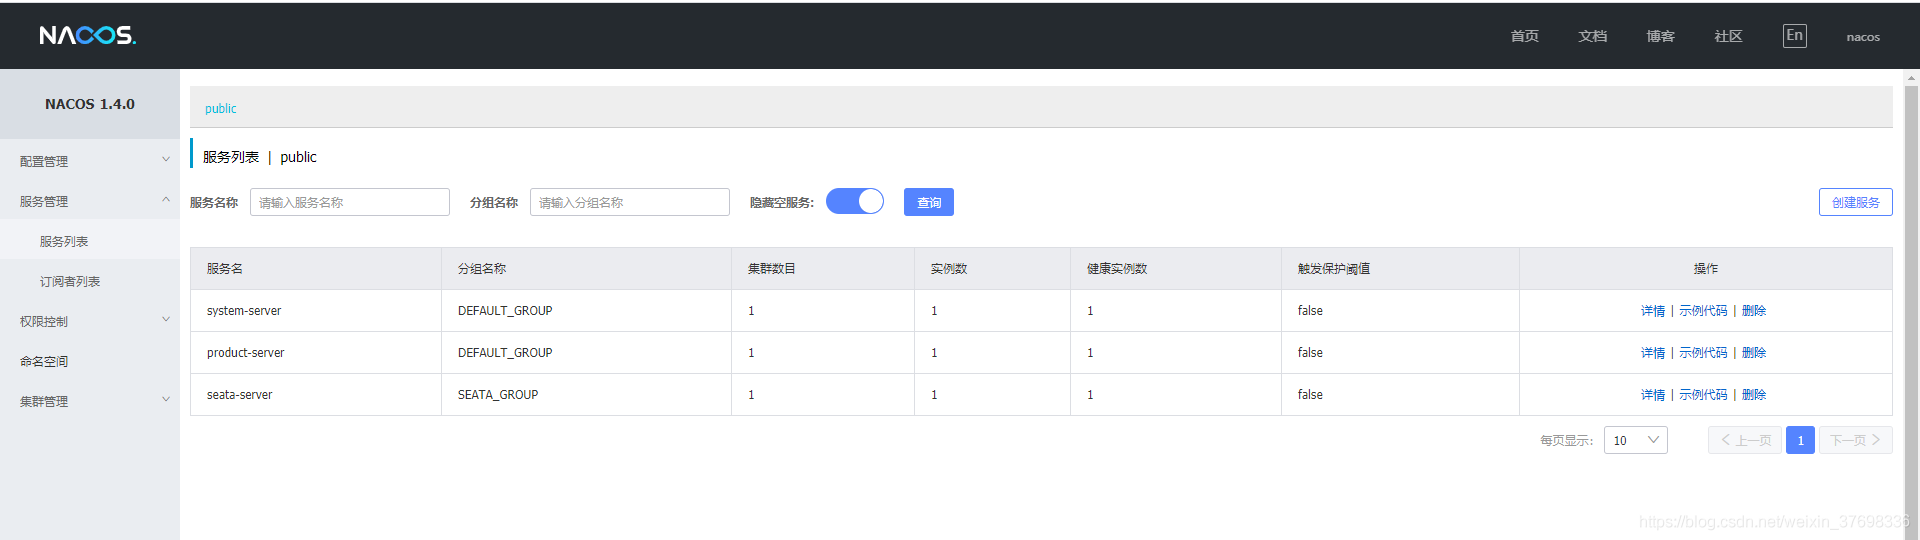
seata-1.4\bin目录下:双击 seata-server.bat
nacos中查看服务是否注册成功
2.2 seata-1.4.0.
配置
解压安装包,并修改配置
2.2.3 修改config.txt
路径:script\config-center
修改service.vgroupMapping和数据库地址
service.vgroupMapping.system-server-group=default
service.vgroupMapping.product-server-group=default
store.mode=db
store.db.datasource=druid
store.db.dbType=mysql
store.db.driverClassName=com.mysql.cj.jdbc.Driver
store.db.url=jdbc:mysql://192.168.111.130:3307/seata?serverTimezone=Asia/Shanghai&useUnicode=true&characterEncoding=utf8&useSSL=true
store.db.user=root
store.db.password=123456
store.db.minConn=5
store.db.maxConn=30
store.db.globalTable=global_table
store.db.branchTable=branch_table
store.db.queryLimit=100
store.db.lockTable=lock_table
store.db.maxWait=5000

注:
service.vgroupMapping.system-server-group=default
service.vgroupMapping.product-server-group=default
 #system-server-group、product-server-group 与项目模块中yml配置的seata.tx-service-group内容相同

2.2.3 启动nacos-config.sh,
将配置注入到nacos中
1、在seata-server-1.4.0\script\config-center\nacos目录下,右键 Git Bash Here
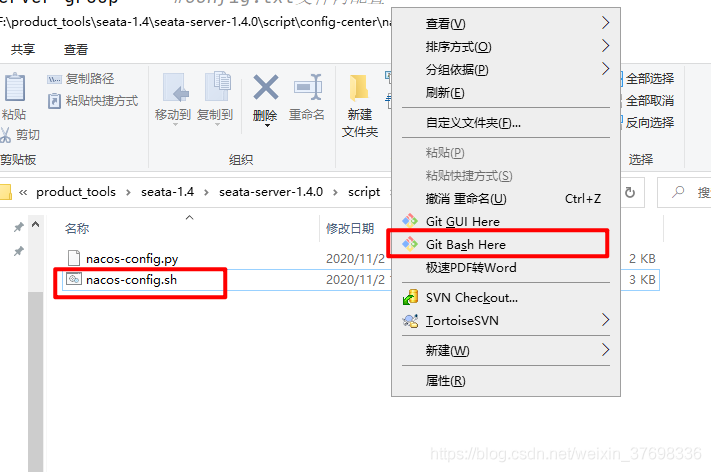
2、输入命令:
sh nacos-config.sh -h 127.0.0.1 -p 8848 -g SEATA_GROUP -u nacos -w nacos

返回成功
2.2.3、nacos中查看配置
在nacos配置列表中找到config.txt配置的vgroupMapping,即说明注入成功
3、SpringCloud 配置
3.1、pom添加依赖
<dependency>
 <groupId>com.alibaba.cloud</groupId>
 <artifactId>spring-cloud-starter-alibaba-seata</artifactId>
 <exclusions>
  <exclusion>
  <groupId>io.seata</groupId>
  <artifactId>seata-spring-boot-starter</artifactId>
  </exclusion>
 </exclusions>
 </dependency>
 <dependency>
 <groupId>io.seata</groupId>
 <artifactId>seata-spring-boot-starter</artifactId>
 <version>1.4.0</version>
 </dependency>
注:seata-spring-boot-starter的版本与安装版本一致
3.2、修改yml配置文件
seata:
 enabled: true
 application-id: product-server
 tx-service-group: product-server-group
 enable-auto-data-source-proxy: true
 config:
 type: nacos
 nacos:
 namespace:
 server-addr: 127.0.0.1:8848
 group: SEATA_GROUP
 userName: "nacos"
 password: "nacos"
 registry:
 type: nacos
 nacos:
 application: seata-server
 server-addr: 127.0.0.1:8848
 namespace:
 userName: "nacos"
 password: "nacos"
3.3、代码上添加注解:
application启动类上添加:
@EnableAutoDataSourceProxy
service上添加:
@GlobalTransactional(rollbackFor = Exception.class)
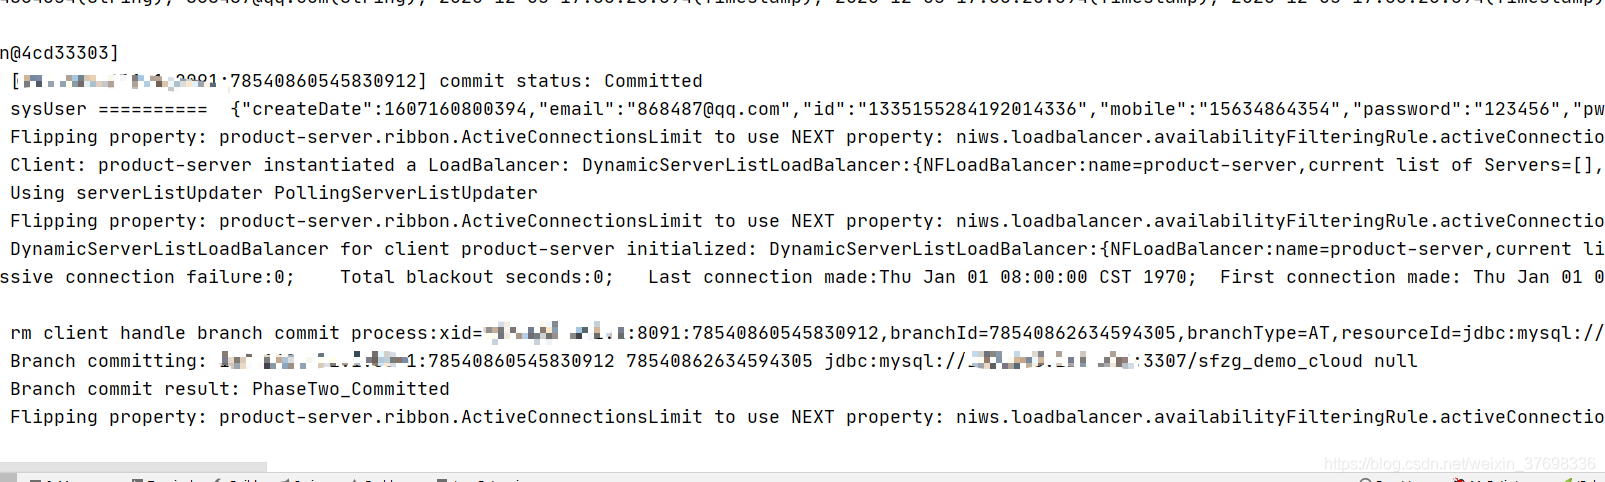
3.4、启动服务:
控制台输出:

3.5、测试
调用方控制台打印
被调用方异常控制台打印:

到此这篇关于seata-1.4.0安装及在springcloud中使用的文章就介绍到这了,更多相关springcloud seata安装使用内容请搜索我们以前的文章或继续浏览下面的相关文章希望大家以后多多支持我们!
相关推荐
-

Springcloud seata分布式事务实现代码解析
Seata 是一款开源的分布式事务解决方案,致力于提供高性能和简单易用的分布式事务服务.本篇不涉及其原理,只用代码构建项目简单试用一下其回滚的机制. 大致上seata分为TC,TM,RM三大构建成整体.它们之间的包含关系如下.即一(xid主键编码,记录信息)带三(TC,TM,RM) 下面之间构建项目进行测试. 1.下载seata并解压,然后改动配置文件. http://seata.io/zh-cn/blog/download.html官网下载. 解压之后到conf中修改file和registry
-
详解SpringCloud-Alibaba-Seata分布式事务
前言 Seata 是一款阿里巴巴开源的分布式事务解决方案,致力于在微服务架构下提供高性能和简单易用的分布式事务服务. Seata 是一款开源的分布式事务解决方案,致力于提供高性能和简单易用的分布式事务服务.Seata 将为用户提供了 AT.TCC.SAGA 和 XA 事务模式,为用户打造一站式的分布式解决方案. 术语 TC (Transaction Coordinator) - 事务协调者 维护全局和分支事务的状态,驱动全局事务提交或回滚. TM (Transaction Manager) -
-
Springcloud seata nacos环境搭建过程图解
最近学习了一下seata,由于nacos现在也挺火,于是学习了seata注册到nacos,然后集成springcloud 1.nacos配置(自行上官网下载) 将nacos/conf/nacos-mysql.sql导入自己的数据库 2.配置修改nacos/conf/application.properties spring.datasource.platform=mysql db.num=1 db.url.0=jdbc:mysql://127.0.0.1:3306/nacos?character
-
SpringCloud Alibaba Seata (收藏版)
一.简介 官网地址: http://seata.io/zh-cn/ 1,概念 Seata是一款开源的分布式事务解决方案,致力于在微服务架构在提供高性能和简单一样的分布式事务服务. 2,处理过程 Transaction ID XID:全局唯一的事务ID Transaction Coordinator(TC) :维护全局和分支事务的状态,驱动全局事务提交或回滚. Transaction Manager™ :定义全局事务的范围:开始全局事务.提交或回滚全局事务. Resource Manager(RM
-
seata-1.4.0安装及在springcloud中使用详解
seata-1.4.0安装及使用 1.简介 Seata 是一款开源的分布式事务解决方案,致力于提供高性能和简单易用的分布式事务服务.Seata 将为用户提供了 AT.TCC.SAGA 和 XA 事务模式,为用户打造一站式的分布式解决方案. 详见官方文档:https://seata.io/zh-cn/docs/overview/what-is-seata.html 网上的多是0.9.0版本的安装方式,这里记录安装seata-1.4.0版本的方式,在win10环境下安装,centos7与此相同. 下
-
Centos7 安装mysql 8.0.13(rpm)的教程详解
yum or rpm? yum安装方式很方便,但是下载mysql的时候从官网下载,速度较慢. rpm安装方式可以从国内镜像下载mysql的rpm包,比较快.rpm也适合离线安装. 环境说明 •操作系统:Centos7.4 (CentOS-7-x86_64-Minimal-1804.iso) •mysql:mysql8.0.13 •卸载系统自带的mariadb-lib •查看mariadb版本 rpm -qa|grep mariadb mariadb-libs-5.5.56-2.el7.x86_6
-
CenterOS 中安装Redis及开机启动设置详解
CenterOS 中安装Redis及开机启动设置详解 从官方下载最新Redis进行安装,官网地址:http://redis.io/download $ wget http://download.redis.io/releases/redis-3.2.3.tar.gz $ tar xzf redis-3.2.3.tar.gz $ cd redis-3.2.3 $ make $ make install Redis启动 RedisServer /path/to/redis.conf Redis关闭(
-
windows上安装Anaconda和python的教程详解
一提到数字图像处理编程,可能大多数人就会想到matlab,但matlab也有自身的缺点: 1.不开源,价格贵 2.软件容量大.一般3G以上,高版本甚至达5G以上. 3.只能做研究,不易转化成软件. 因此,我们这里使用Python这个脚本语言来进行数字图像处理. 要使用Python,必须先安装python,一般是2.7版本以上,不管是在windows系统,还是Linux系统,安装都是非常简单的. 要使用python进行各种开发和科学计算,还需要安装对应的包.这和matlab非常相似,只是matla
-
centos7安装mysql并jdbc测试实例详解
centos7安装mysql并jdbc测试实例详解 前言: 之前用rpm安装方式安装不成功,换成yum安装之后安装ok了,在网上搜索到很多的rmp安装和tar包安装的方式,但是是centos7.x与centos6.x做了很大的改变,可能别人的6.x不适合7.x的安装,尤其是对于像博主一样的新人来说,照搬教程可能导致安装不成功,如果你rmp安装失败,那么尝试跟着本教程来吧. 先卸载已经存在的MySQL. [root@shizongger bin]# rpm -qa|grep mysql [root
-
RedHat6.5/CentOS6.5安装Mysql5.7.20的教程详解
下载rpm安装包 Mysql官网:https://dev.mysql.com/downloads/mysql/ 选择版本下载: 可以使用wget命令下载: [root@localhost opt]#wget https://cdn.mysql.com//Downloads/MySQL-5.7/mysql-5.7.20-1.el6.x86_64.rpm-bundle.tar 注意RedHat的版本和系统位数. 查看依赖的库 [root@localhost opt]# yum search liba
-
ubuntu安装有道词典的教程详解
首先,前往有道词典官网下载deb安装包:http://cidian.youdao.com/index-linux.html 我选择的是64位ubuntu版本:youdao-dict_1.1.0-0-ubuntu_amd64.deb 进去你的deb包放置的目录,然后运行 sudo dpkg -i youdao-dict_1.1.0-0-ubuntu_amd64.deb 你会发现这个安装不了.因为有一些库与包的依赖需要先安装. $ sudo apt-get install python3-pyqt5
-
Centos7安装PHP及Nginx的教程详解
随着服务端centos的应用越来越普及,centos7的使用也越来越多,这两年来我从一个很少接触centos服务器端维护的小白,也越来越多的基础其维护操作,给我带来了不少困扰的同时也增加了不少centos服务器搭建和运维的知识,今天就来一步一步记录一下. 一.安装PHP 随着微信13年开始大火,php的运用也再次火了起来,市面上很多企业都选择使用php作为其应用后台,个人认为原因有 1.php的成本低 2.php的入门快 3.php的开发周期相对较短 4.tp5的诞生提高了php接口开发的效率.
-
centos6.5 安装hadoop1.2.1的教程详解【亲测版】
本篇只简单介绍安装步骤 1. 角色分配 10.11.84.4 web-crawler--1.novalocal master/slave 10.11.84.5 web-crawler--2.novalocal slave 10.11.84.6 web-crawler--3.novalocal slave 2.安装目录 /usr/local/hadoop (HADOOP_HOME) 3,创建group hadoop groupadd hadoop 4.创建用户hadoop useradd -d
-
LInux下安装MySQL5.6 X64版本步骤详解
环境: 1.CentOS6.5 X64 2.mysql-5.6.34-linux-glibc2.5-x86_64.tar.gz 3.下载地址:http://dev.mysql.com/downloads/mysql/ 安装步骤 1.再安装包的存放目录下执行命令解压文件 tar -zxvf mysql-5.6.34-linux-glibc2.5-x86_64.tar.gz -C /opt/ 2.删除安装包,重命名解压后的文件 rm -rf mysql-5.6.34-linux-glibc2.5-x