教你利用springboot集成swagger并生成接口文档
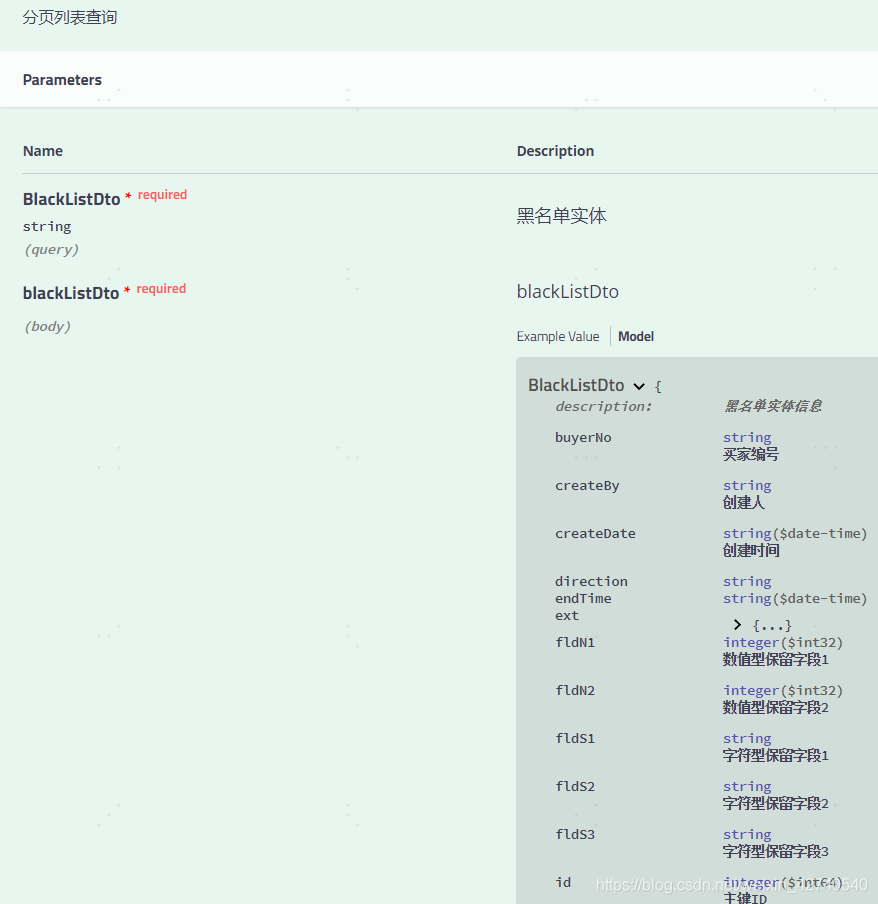
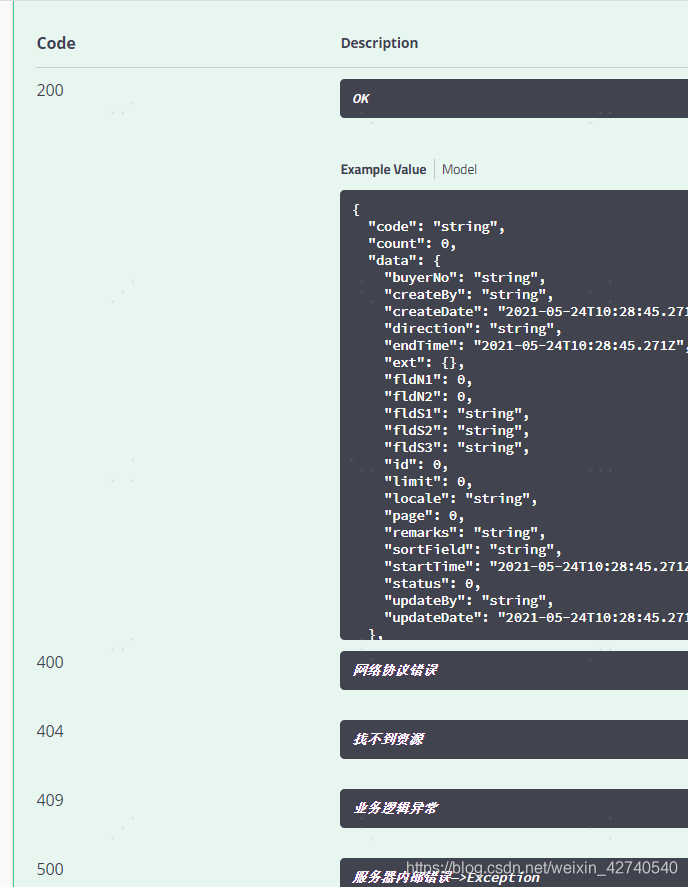
效果图


实现步骤
1.maven中引入jar包,不同版本的swagger可能页面效果不一样。
<dependency>
            <groupId>io.springfox</groupId>
            <artifactId>springfox-swagger2</artifactId>
            <version>2.9.1</version>
        </dependency>

        <dependency>
            <groupId>io.springfox</groupId>
            <artifactId>springfox-swagger-ui</artifactId>
            <version>2.9.1</version>
        </dependency>
2.启动类加上@EnableSwagger2注解,并在同路径下创建全局配置类。
import org.springframework.context.annotation.Bean;
import org.springframework.context.annotation.Configuration;
import org.springframework.web.bind.annotation.RequestMethod;
import springfox.documentation.builders.ApiInfoBuilder;
import springfox.documentation.builders.PathSelectors;
import springfox.documentation.builders.RequestHandlerSelectors;
import springfox.documentation.builders.ResponseMessageBuilder;
import springfox.documentation.schema.ModelRef;
import springfox.documentation.service.ApiInfo;
import springfox.documentation.service.ResponseMessage;
import springfox.documentation.spi.DocumentationType;
import springfox.documentation.spring.web.plugins.Docket;

import java.util.ArrayList;
import java.util.List;

@Configuration
public class Swagger2Config {

    @Bean
    public Docket createRestApi() {
        //这块是定义全局返回码
        List<ResponseMessage> responseMessageList = new ArrayList<>();
        responseMessageList.add(new ResponseMessageBuilder().code(404).message("找不到资源").build());
        responseMessageList.add(new ResponseMessageBuilder().code(409).message("业务逻辑异常").build());
        responseMessageList.add(new ResponseMessageBuilder().code(400).message("网络协议错误").build());
        responseMessageList.add(new ResponseMessageBuilder().code(500).message("服务器内部错误--->Exception").build());
        responseMessageList.add(new ResponseMessageBuilder().code(502).message("nginx异常").build());
        return new Docket(DocumentationType.SWAGGER_2).globalResponseMessage(RequestMethod.GET, responseMessageList)
                .globalResponseMessage(RequestMethod.POST, responseMessageList)
                .globalResponseMessage(RequestMethod.PUT, responseMessageList)
                .globalResponseMessage(RequestMethod.DELETE, responseMessageList)
                .apiInfo(apiInfo())
                .select()
                .apis(RequestHandlerSelectors.basePackage("order.controller"))//包的根路径
                .paths(PathSelectors.any())
                .build();
    }

    private ApiInfo apiInfo() {
        return new ApiInfoBuilder()
                .title("ORDER-PROVIDER")//接口文档标题设置
                .description("API接口列表")//描述
                .version("1.0")//版本号
                .build();
    }
}
3.在相应的controller层写对应注解。一般来说接口文档关注的几点,网络协议,接口入参,接口出参,方法类型。拿一个conteller举例。分几步:
(1)对整个controller类加上@Api注解标识为一个swagger管理的类。
(2)方法修饰,加上@ApiOperation对方法进行说明。主要参数如图
(3)入参修饰。使用@ApiImplicitParams和@ApiImplicitParam一起封装。如果入参参数含有实体对象,其中@ApiImplicitParam的name属性就定义为类的类型,这样才能展示。如果为基本类型,name即为属性名称。
(4)出参修饰。可以使用@ApiResponses和@ApiResponse一起封装。如果返回中含有泛型实体(目前来说接口返回都是一个基本返回对象包装实例数据对象)。此时想要展现出来,就需要在接口方法处指定返回的泛型,然后在@ApiResponse注解中不要使用Response属性指定返回类型。
@RestController
@RequestMapping("/manager/blacklist")
@Api("黑名单管理")
public class BlackListController{
    @Autowired
    private BlackListService blackListService;

    /**
     * 分页列表
     */
    @ApiOperation(value = "list",notes = "分页列表查询",httpMethod = "POST")
    @ApiImplicitParams({
            @ApiImplicitParam(paramType = "query",name = "BlackListDto",value = "黑名单实体",required = true)
            @ApiImplicitParam(paramType = "query",name = "tokenId",value = "鉴权Id",required = true)
    })
    @ApiResponses({
            @ApiResponse(code = 200,message = "成功" ),
            @ApiResponse(code= 500,message = "服务错误")
    })
    @PostMapping("/list")
    public ResponeModel<BlackListDto> list(@RequestBody BlackListDto blackListDto,String tokenId){
        PageInfo<BlackListDto> list = blackListService.pageList(blackListDto);
        return ResponeModel.ok(list);
    }
}
(5)实体修饰。要想在swagger界面展现出每个字段对应的说明。最后还需要在实体类中定义一层。使用@ApiModel定义类和@ApiModelProperty定义属性。
import com.fasterxml.jackson.annotation.JsonFormat;
import io.swagger.annotations.ApiModel;
import io.swagger.annotations.ApiModelProperty;
import io.swagger.annotations.ApiParam;
import lombok.Data;

import java.util.Date;

/**
 * 黑名单表
 *
 * @email ${email}
 * @date 2021-05-13 14:24:39
 */
@Data
@ApiModel(value = "BlackListDto",description = "黑名单实体信息")
public class BlackListDto  {
	private static final long serialVersionUID = 1L;

	/**
	 * 主键id
	 */
	@ApiModelProperty(value = "主键ID",name = "id")
	private Long id;
	/**
	 * 买家编号
	 */
	@ApiModelProperty(value = "买家编号",name = "buyerNo")
	private String buyerNo;
	/**
	 * 备注,进入黑名单的原因
	 */
	@ApiModelProperty(value = "备注",name = "remarks")
	private String remarks;
	/**
	 * 黑名单状态:1未恢复  2已恢复
	 */
	@ApiModelProperty(value = "黑名单状态",dataType = "Integer")
	private Integer status;
	/**
	 * 字符型保留字段1.
	 */
	@ApiModelProperty(value = "字符型保留字段1",name = "fldS1")
	private String fldS1;
	/**
	 * 字符型保留字段2.
	 */
	@ApiModelProperty(value = "字符型保留字段2",name = "fldS2")
	private String fldS2;
	/**
	 * 字符型保留字段3.
	 */
	@ApiModelProperty(value = "字符型保留字段3",name = "fldS3")
	private String fldS3;
	/**
	 * 数值型保留字段
	 */
	@ApiModelProperty(value = "数值型保留字段1",name = "fldN1")
	private Integer fldN1;
	/**
	 * 数值型保留字段
	 */
	@ApiModelProperty(value = "数值型保留字段2",name = "fldN2")
	private Integer fldN2;
	/**
	 * 创建时间
	 */
	@JsonFormat(pattern = "yyyy-MM-dd HH:mm:ss",timezone = "GMT+8",locale = "zh")
	@ApiModelProperty(value = "创建时间",name = "createDate")
	private Date createDate;
	/**
	 * 修改人
	 */
	@ApiModelProperty(value = "修改人",name = "updateBy")
	private String updateBy;
	/**
	 * 修改时间
	 */
	@JsonFormat(pattern = "yyyy-MM-dd HH:mm:ss",timezone = "GMT+8",locale = "zh")
	@ApiModelProperty(value = "修改时间",name = "updateDate")
	private Date updateDate;
	/**
	 * 创建人ID
	 */
	@ApiModelProperty(value = "创建人",name = "createBy")
	private String createBy;
}
到此这篇关于教你利用springboot集成swagger并生成接口文档的文章就介绍到这了,更多相关springboot集成swagger内容请搜索我们以前的文章或继续浏览下面的相关文章希望大家以后多多支持我们!
赞 (0)

