springboot与vue实现简单的CURD过程详析
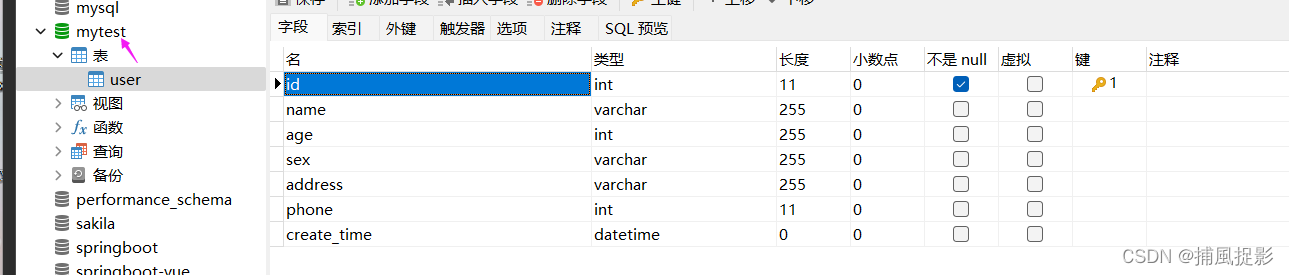
数据库
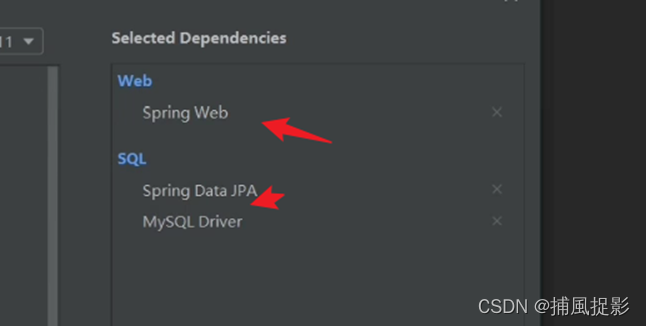
后端项目搭建:

entity

dao层
@Repository
public interface UserRepository extends JpaRepository<User, Long> {

    @Query(value = "select * from user where name like %?1%", nativeQuery = true)
    Page<User> findByNameLike(String name, Pageable pageRequest);
}
service
@SpringBootApplication
public class Demo33Application {

    public static void main(String[] args) {
        SpringApplication.run(Demo33Application.class, args);
    }

}
controller
@RestController
@RequestMapping("/user")
public class UserController {

    @Resource
    private UserService userService;

    // 新增用户
    @PostMapping
    public Result add(@RequestBody User user) {
        userService.save(user);
        return Result.success();
    }

    // 修改用户
    @PutMapping
    public Result update(@RequestBody User user) {
        userService.save(user);
        return Result.success();
    }

    // 删除用户
    @DeleteMapping("/{id}")
    public void delete(@PathVariable("id") Long id) {
        userService.delete(id);
    }

    // 根据id查询用户
    @GetMapping("/{id}")
    public Result<User> findById(@PathVariable Long id) {
        return Result.success(userService.findById(id));
    }

    // 查询所有用户
    @GetMapping
    public Result<List<User>> findAll() {
        return Result.success(userService.findAll());
    }

    // 分页查询用户
    @GetMapping("/page")
    public Result<Page<User>> findPage(@RequestParam(defaultValue = "1") Integer pageNum,
                                       @RequestParam(defaultValue = "10") Integer pageSize,
                                       @RequestParam(required = false) String name) {
        return Result.success(userService.findPage(pageNum, pageSize, name));
    }

}
结果封装类
package com.example.common;

public class Result<T> {
    private String code;
    private String msg;
    private T data;

    public String getCode() {
        return code;
    }

    public void setCode(String code) {
        this.code = code;
    }

    public String getMsg() {
        return msg;
    }

    public void setMsg(String msg) {
        this.msg = msg;
    }

    public T getData() {
        return data;
    }

    public void setData(T data) {
        this.data = data;
    }

    public Result() {
    }

    public Result(T data) {
        this.data = data;
    }

    public static Result success() {
        Result result = new Result<>();
        result.setCode("0");
        result.setMsg("成功");
        return result;
    }

    public static <T> Result<T> success(T data) {
        Result<T> result = new Result<>(data);
        result.setCode("0");
        result.setMsg("成功");
        return result;
    }

    public static Result error(String code, String msg) {
        Result result = new Result();
        result.setCode(code);
        result.setMsg(msg);
        return result;
    }
}
处理跨域
package com.example.common;

public class Result<T> {
    private String code;
    private String msg;
    private T data;

    public String getCode() {
        return code;
    }

    public void setCode(String code) {
        this.code = code;
    }

    public String getMsg() {
        return msg;
    }

    public void setMsg(String msg) {
        this.msg = msg;
    }

    public T getData() {
        return data;
    }

    public void setData(T data) {
        this.data = data;
    }

    public Result() {
    }

    public Result(T data) {
        this.data = data;
    }

    public static Result success() {
        Result result = new Result<>();
        result.setCode("0");
        result.setMsg("成功");
        return result;
    }

    public static <T> Result<T> success(T data) {
        Result<T> result = new Result<>(data);
        result.setCode("0");
        result.setMsg("成功");
        return result;
    }

    public static Result error(String code, String msg) {
        Result result = new Result();
        result.setCode(code);
        result.setMsg(msg);
        return result;
    }
}
***yml
spring:
  datasource:
    driver-class-name: com.mysql.cj.jdbc.Driver
    username: root
    password: 123456
    url: jdbc:mysql://localhost:3306/mytest?useUnicode=true&characterEncoding=utf-8&allowMultiQueries=true&useSSL=false&serverTimezone=GMT%2b8
vue 部分

只需要编写index.html
<!DOCTYPE html>
<html lang="en">
<head>
    <meta charset="UTF-8">
    <title>用户信息</title>
    <!-- 引入样式 -->
    <link rel="stylesheet" href="element.css" rel="external nofollow" >
</head>
<body>
<div id="app" style="width: 80%; margin: 0 auto">
    <h2>用户信息表</h2>

    <el-row>
        <el-col :span="6" style="margin-bottom: 10px">
            <el-button type="primary" @click="add">新增</el-button>
            <el-input v-model="name" style="width: 70%" @keyup.enter.native="loadTable(1)"></el-input>
        </el-col>
    </el-row>

    <el-table
            :data="page.content"
            stripe
            border
            style="width: 100%">
        <el-table-column
                prop="name"
                label="用户名"
        >
        </el-table-column>
        <el-table-column
                prop="age"
                label="年龄"
                width="180">
        </el-table-column>
        <el-table-column
                prop="sex"
                label="性别">
        </el-table-column>
        <el-table-column
                prop="address"
                label="地址">
        </el-table-column>
        <el-table-column
                prop="phone"
                label="电话">
        </el-table-column>
        <el-table-column
                fixed="right"
                label="操作"
                width="100">
            <template slot-scope="scope">
                <el-button type="primary" icon="el-icon-edit" size="small" circle @click="edit(scope.row)"></el-button>
                <el-button type="danger" icon="el-icon-delete" size="small" circle @click="del(scope.row.id)"></el-button>
            </template>
        </el-table-column>
    </el-table>
    <el-row type="flex" justify="center" style="margin-top: 10px">
        <el-pagination
                layout="prev, pager, next"
                :page-size="pageSize"
                :current-page="pageNum"
                @prev-click="loadTable"
                @current-change="loadTable"
                @next-click="loadTable"
                :total="page.totalElements">
        </el-pagination>
    </el-row>

    <el-dialog
            title="用户信息"
            :visible.sync="dialogVisible"
            width="30%">
        <el-form ref="form" :model="form" label-width="80px">
            <el-form-item label="用户名">
                <el-input v-model="form.name"></el-input>
            </el-form-item>
            <el-form-item label="年龄">
                <el-input v-model="form.age"></el-input>
            </el-form-item>
            <el-form-item label="性别">
                <el-radio v-model="form.sex" label="男">男</el-radio>
                <el-radio v-model="form.sex" label="女">女</el-radio>
            </el-form-item>
            <el-form-item label="地址">
                <el-input v-model="form.address"></el-input>
            </el-form-item>
            <el-form-item label="电话">
                <el-input v-model="form.phone"></el-input>
            </el-form-item>
        </el-form>
        <span slot="footer" class="dialog-footer">
            <el-button @click="dialogVisible = false">取 消</el-button>
            <el-button type="primary" @click="save">确 定</el-button>
        </span>
    </el-dialog>

</div>

<script src="jquery.min.js"></script>
<script src="vue.js"></script>
<!-- 引入组件库 -->
<script src="element.js"></script>

<script>
    new Vue({
        el: '#app',
        data: {
            page: {},
            name: '',
            pageNum: 1,
            pageSize: 8,
            dialogVisible: false,
            form: {}
        },
        created() {
            this.loadTable(this.pageNum);
        },
        methods: {
            loadTable(num) {
                this.pageNum = num;
                $.get("/user/page?pageNum=" + this.pageNum + "&pageSize=" + this.pageSize + "&name=" + this.name).then(res => {
                    this.page = res.data;
                });
            },
            add() {
                this.dialogVisible = true;
                this.form = {};
            },
            edit(row) {
                this.form = row;
                this.dialogVisible = true;
            },
            save() {
                let data = JSON.stringify(this.form);
                if (this.form.id) {
                    // 编辑
                    $.ajax({
                        url: '/user',
                        type: 'put',
                        contentType: 'application/json',
                        data: data
                    }).then(res => {
                        this.dialogVisible = false;
                        this.loadTable(1);
                    })
                } else {
                    // 新增
                    $.ajax({
                        url: '/user',
                        type: 'post',
                        contentType: 'application/json',
                        data: data
                    }).then(res => {
                        this.dialogVisible = false;
                        this.loadTable(1);
                    })
                }
            },
            del(id) {
                $.ajax({
                    url: '/user/' + id,
                    type: 'delete',
                    contentType: 'application/json'
                }).then(res => {
                    this.loadTable(1);
                })
            }
        }
    })
</script>
</body>
</html>
项目展示:

到此这篇关于springboot与vue实现简单的CURD过程详析的文章就介绍到这了,更多相关springboot与vue实现简单的CURD内容请搜索我们以前的文章或继续浏览下面的相关文章希望大家以后多多支持我们!
相关推荐
-

SpringBoot+Vue+Axios+BootStrap实现图书的增删改查功能示例
目录 一.开发工具 二.项目结构 三.编写项目 四.运行项目 由于是初学Vue.Axios,可能在界面和功能上存在着一些问题,但这些并不妨碍使用.如果有对编程感兴趣的朋友,可以试着做一做.这个由于是第一次做,不太熟练.在后续的过程中会不断的完善. 一.开发工具 IntelliJ IDEA Ultimate 2021.1 apache-maven-3.5.4 MySQL5.7 JDK 1.8.0_281 二.项目结构 三.编写项目 1.创建数据库 SET NAMES utf8mb4; SET FO
-
SpringBoot+mybatis+Vue实现前后端分离项目的示例
目录 一.SpringBoot环境搭建 1.项目的数据库 2.项目所需依赖 3.application.yml文件 4.入口类 二.vue实现前后端分离 1.前端页面 2.springBoot控制层 3.mapper文件 4.项目完整源代码 vue前后端分离实现功能:员工的增删改(先实现数据回显之后,再进行修改)查 一.SpringBoot环境搭建 1.项目的数据库 /* Navicat Premium Data Transfer Source Server : windows Source S
-
springboot与vue实现简单的CURD过程详析
数据库 后端项目搭建: entity dao层 @Repository public interface UserRepository extends JpaRepository<User, Long> { @Query(value = "select * from user where name like %?1%", nativeQuery = true) Page<User> findByNameLike(String name, Page
-
vue实现简单表格组件实例详解
本来想这一周做一个关于vuex的总结的,但是由于朋友反应说还不知道如何用vue去写一个组件,所以在此写写一篇文章来说明下如何去写vue页面或者组件.vue的核心思想就是组件,什么是组件呢?按照我的理解组件就是装配页面的零件,比如一辆车有大大小小许多零件组成,那么同样的一个页面,也是有许多组件构成的比如说头部组件 按钮组件等等,vue三大核心组件 路由 状态管理,路由控制页面的渲染,页面由组件组成,数据有vuex进行管理和改变.下面我会以一个简单的案例来说 第一步:构建一个简单的vue项目,老规矩
-
springboot使用logback文件查看错误日志过程详解
这篇文章主要介绍了springboot使用logback文件查看错误日志过程详解,文中通过示例代码介绍的非常详细,对大家的学习或者工作具有一定的参考学习价值,需要的朋友可以参考下 <?xml version="1.0" encoding="UTF-8"?> <!-- 从高到地低 OFF . FATAL . ERROR . WARN . INFO . DEBUG . TRACE . ALL --> <!-- 日志输出规则 根据当前ROOT
-
Spring-boot集成pg、mongo多数据源过程详解
这篇文章主要介绍了Spring-boot集成pg.mongo多数据源过程详解,文中通过示例代码介绍的非常详细,对大家的学习或者工作具有一定的参考学习价值,需要的朋友可以参考下 修改POM文件,增加相应Jar包 <dependency> <groupId>org.springframework.boot</groupId> <artifactId>spring-boot-starter-data-mongodb</artifactId> </
-
springboot jpa分库分表项目实现过程详解
这篇文章主要介绍了springboot jpa分库分表项目实现过程详解,文中通过示例代码介绍的非常详细,对大家的学习或者工作具有一定的参考学习价值,需要的朋友可以参考下 分库分表场景 关系型数据库本身比较容易成为系统瓶颈,单机存储容量.连接数.处理能力都有限.当单表的数据量达到1000W或100G以后,由于查询维度较多,即使添加从库.优化索引,做很多操作时性能仍下降严重.此时就要考虑对其进行切分了,切分的目的就在于减少数据库的负担,缩短查询时间. 分库分表用于应对当前互联网常见的两个场景--大数
-
实现一个VUE响应式属性装饰器详析
目录 前言 不使用任何的响应Api 使用 reactive 实现 使用 ref 实现 使用装饰器实现 实现Reactive装饰器 实现Watch装饰器 总结 前言 使用面向对象的开发思想难免会用到类,既然有了类,那就应该有实例,然而我们使用类的时候可能需要实例中的某个属性是vue的响应属性,也可能里面的某个方法也可以被vue的watch监听.我就开始琢磨如何通过 Composition API 来实现这个类属性装饰器 不使用任何的响应Api // TestReactive.ts export c
-
Python Django 实现简单注册功能过程详解
项目创建略,可参考Python Django Vue 项目创建. 目录结构如下 编辑views.py from django.shortcuts import render # Create your views here. from django.http import HttpResponse from django.shortcuts import render from common.DBHandle import DataBaseHandle import time def djang
-
springboot学习之构建简单项目搭建步骤详解
概述 相信对于Java开发者而言,spring和springMvc两个框架一定不陌生,这两个框架需要我们手动配置的地方非常多,各种的xml文件,properties文件,构建一个项目还是挺复杂的,在这种情况下,springboot应运而生,他能够快速的构建spring项目,而且让项目正常运行起来的配置文件非常少,甚至只需要几个注解就可以运行整个项目. 总的说来,springboot项目可以打成jar包独立运行部署,因为它内嵌servlet容器,之前spring,springMvc需要的大量依赖,
-
基于vue+element实现全局loading过程详解
项目中使用的是vue+element实现的全局loading 1.引入所需组件,这里主要就是router和element组件,element组件引入可以参考element官网 2.下面就是重点及代码实现了 首先是全局的一个变量配置参数,代码如下: //全局页面跳转是否启用loading export const routerLoading = true; //全局api接口调用是否启用loading export const apiLoading = true; //loading参数配置 ex
-
springboot 使用poi进行数据的导出过程详解
使用的是idea+restful风格 第一:引入依赖为: <!--poi--> <dependency> <groupId>org.apache.xmlbeans</groupId> <artifactId>xmlbeans</artifactId> <version>2.6.0</version> </dependency> <dependency> <groupId>do