vue中ant-design-vue组件的安装与使用
目录
- 1. 安装
- 2. 引入组件库
- 3. 使用
- 3.1 按钮样式
- 3.2 导航栏样式
- 3.3 表单样式
- 补充:ant-design-vue的兼容问题
- 总结
官方地址:Ant Design Vue
1. 安装
首先使用vue-cli创建项目,然后进入项目,使用npm安装ant-design-vue库:
npm i --save ant-design-vue@next
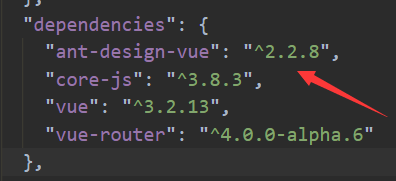
然后在package.json文件中的dependencies中看见刚刚下载的库:

2. 引入组件库
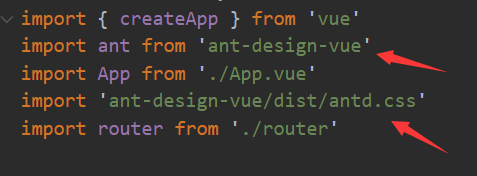
然后在main.js中引入,注意要按照顺序:
# 引入组件库
import ant from 'ant-design-vue'
# 引入样式表
import 'ant-design-vue/dist/antd.css'
引入顺序如图所示:

接着需要use该组件库的句柄:

然后在要使用的vue文件中也引入组件库,比如我要在项目默认的App.vue中使用组件库:
import 'ant-design-vue/dist/antd'

3. 使用
3.1 按钮样式
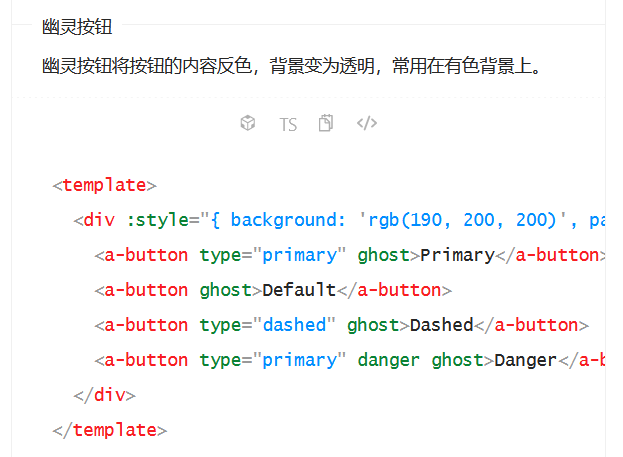
直接将代码复制到component标签中即可,要注意component标签中只能允许有一个根标签。


3.2 导航栏样式
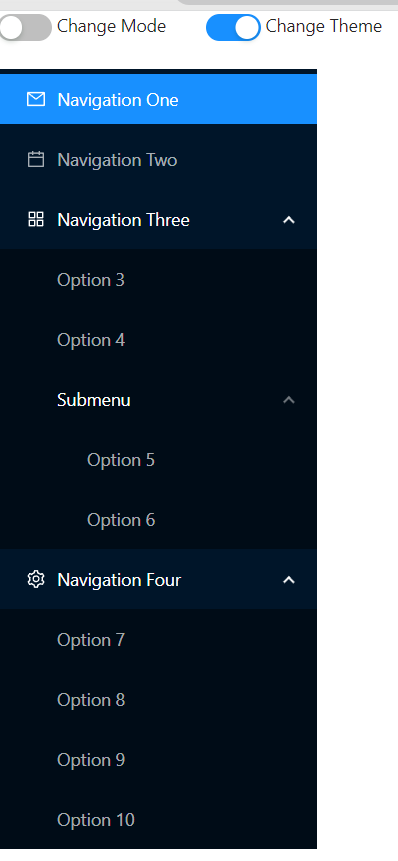
可以选择颜色的导航栏
<template>
  <div>
    <a-switch :checked="mode === 'vertical'" @change="changeMode" />
    Change Mode
    <span class="ant-divider" style="margin: 0 1em" />
    <a-switch :checked="theme === 'dark'" @change="changeTheme" />
    Change Theme
    <br />
    <br />
    <a-menu
      style="width: 256px"
      v-model:openKeys="openKeys"
      v-model:selectedKeys="selectedKeys"
      :mode="mode"
      :theme="theme"
    >
      <a-menu-item key="1">
        <template #icon>
          <MailOutlined />
        </template>
        Navigation One
      </a-menu-item>
      <a-menu-item key="2">
        <template #icon>
          <CalendarOutlined />
        </template>
        Navigation Two
      </a-menu-item>
      <a-sub-menu key="sub1">
        <template #icon>
          <AppstoreOutlined />
        </template>
        <template #title>Navigation Three</template>
        <a-menu-item key="3">Option 3</a-menu-item>
        <a-menu-item key="4">Option 4</a-menu-item>
        <a-sub-menu key="sub1-2" title="Submenu">
          <a-menu-item key="5">Option 5</a-menu-item>
          <a-menu-item key="6">Option 6</a-menu-item>
        </a-sub-menu>
      </a-sub-menu>
      <a-sub-menu key="sub2">
        <template #icon>
          <SettingOutlined />
        </template>

        <template #title>Navigation Four</template>
        <a-menu-item key="7">Option 7</a-menu-item>
        <a-menu-item key="8">Option 8</a-menu-item>
        <a-menu-item key="9">Option 9</a-menu-item>
        <a-menu-item key="10">Option 10</a-menu-item>
      </a-sub-menu>
    </a-menu>
  </div>
</template>
<script>
import { defineComponent, reactive, toRefs } from 'vue';
import {
  MailOutlined,
  CalendarOutlined,
  AppstoreOutlined,
  SettingOutlined,
} from '@ant-design/icons-vue';
export default defineComponent({
  setup() {
    const state = reactive({
      mode: 'inline',
      theme: 'light',
      selectedKeys: ['1'],
      openKeys: ['sub1'],
    });

    const changeMode = checked => {
      state.mode = checked ? 'vertical' : 'inline';
    };

    const changeTheme = checked => {
      state.theme = checked ? 'dark' : 'light';
    };

    return { ...toRefs(state), changeMode, changeTheme };
  },

  components: {
    MailOutlined,
    CalendarOutlined,
    AppstoreOutlined,
    SettingOutlined,
  },
});
</script>

顶部导航栏
<template>
  <a-menu v-model:selectedKeys="current" mode="horizontal">
    <a-menu-item key="mail">
      <template #icon>
        <mail-outlined />
      </template>
      Navigation One
    </a-menu-item>
    <a-menu-item key="app" disabled>
      <template #icon>
        <appstore-outlined />
      </template>
      Navigation Two
    </a-menu-item>
    <a-sub-menu>
      <template #icon>
        <setting-outlined />
      </template>
      <template #title>Navigation Three - Submenu</template>
      <a-menu-item-group title="Item 1">
        <a-menu-item key="setting:1">Option 1</a-menu-item>
        <a-menu-item key="setting:2">Option 2</a-menu-item>
      </a-menu-item-group>
      <a-menu-item-group title="Item 2">
        <a-menu-item key="setting:3">Option 3</a-menu-item>
        <a-menu-item key="setting:4">Option 4</a-menu-item>
      </a-menu-item-group>
    </a-sub-menu>
    <a-menu-item key="alipay">
      <a href="https://antdv.com" target="_blank" rel="noopener noreferrer">
        Navigation Four - Link
      </a>
    </a-menu-item>
  </a-menu>
</template>
<script>
import { defineComponent, ref } from 'vue';
import { MailOutlined, AppstoreOutlined, SettingOutlined } from '@ant-design/icons-vue';
export default defineComponent({
  setup() {
    const current = ref(['mail']);
    return {
      current,
    };
  },

  components: {
    MailOutlined,
    AppstoreOutlined,
    SettingOutlined,
  },
});
</script>

3.3 表单样式
内联登录栏
<template>
  <a-form
    layout="inline"
    :model="formState"
    @finish="handleFinish"
    @finishFailed="handleFinishFailed"
  >
    <a-form-item>
      <a-input v-model:value="formState.user" placeholder="Username">
        <template #prefix><UserOutlined style="color: rgba(0, 0, 0, 0.25)" /></template>
      </a-input>
    </a-form-item>
    <a-form-item>
      <a-input v-model:value="formState.password" type="password" placeholder="Password">
        <template #prefix><LockOutlined style="color: rgba(0, 0, 0, 0.25)" /></template>
      </a-input>
    </a-form-item>
    <a-form-item>
      <a-button
        type="primary"
        html-type="submit"
        :disabled="formState.user === '' || formState.password === ''"
      >
        Log in
      </a-button>
    </a-form-item>
  </a-form>
</template>
<script>
import { UserOutlined, LockOutlined } from '@ant-design/icons-vue';
import { defineComponent, reactive } from 'vue';
export default defineComponent({
  setup() {
    const formState = reactive({
      user: '',
      password: '',
    });

    const handleFinish = values => {
      console.log(values, formState);
    };

    const handleFinishFailed = errors => {
      console.log(errors);
    };

    return {
      formState,
      handleFinish,
      handleFinishFailed,
    };
  },

  components: {
    UserOutlined,
    LockOutlined,
  },
});
</script>

补充:ant-design-vue的兼容问题
问题:ant-design-vue不兼容ie浏览器
要求:ie兼容 >= 9
环境:vue cli3搭建项目,ant-design-vue@1.3.8
babel.config.js文件
module.exports = {
  presets: [
    '@vue/app',
    // 兼容配置
    [
      '@babel/preset-env',
      {
        'useBuiltIns': 'entry'
      }
    ]
  ],
  // 按需加载配置
  plugins: [
    [
      'import',
      {
        libraryName: 'ant-design-vue',
        libraryDirectory: 'es',
        style: 'css'
      },
    ]
  ]
}
main.js文件(项目入口)
// 引入@babel/polyfill处理兼容
import '@babel/polyfill'

import Vue from 'vue'
import App from './App.vue'
import router from './router/router'
import store from './store/store'
import './plugins/antd.js'
new Vue({
  router,
  store,
  render: h => h(App)
}).$mount('#app')
总结
到此这篇关于vue中ant-design-vue组件安装与使用的文章就介绍到这了,更多相关vue ant-design-vue组件使用内容请搜索我们以前的文章或继续浏览下面的相关文章希望大家以后多多支持我们!
赞 (0)

