React Context源码实现原理详解
目录
- 什么是 Context
- Context 使用示例
- createContext
- Context 的设计非常特别
- useContext
- useContext 相关源码
- debugger 查看调用栈
什么是 Context
目前来看 Context 是一个非常强大但是很多时候不会直接使用的 api。大多数项目不会直接使用 createContext 然后向下面传递数据,而是采用第三方库(react-redux)。
想想项目中是不是经常会用到 @connect(...)(Comp) 以及 <Provider value={store}><App /></Provider>?
Context 提供了一个无需为每层组件手动添加 props,就能在组件树间进行数据传递的方法。
一个顶层数据,想要传递到某些深层组件,通过 props 逐层传递将会非常繁琐,使用 Context 可避免显式地通过组件树逐层传递 props。
Context 使用示例
import React, { Component, createContext, useConText } from 'react'
const ColorContext = createContext(null)
const { Provider, Consumer } = ColorContext
console.log('ColorContext', ColorContext)
console.log('Provider', Provider)
console.log('Consumer', Consumer)
class App extends Component {
  constructor(props) {
    super(props)
    this.state = {
      color: 'red',
      background: 'cyan',
    }
  }
  render() {
    return <Provider value={this.state}>{this.props.children}</Provider>
  }
}
function Article({ children }) {
  return (
    <App>
      <h1>Context</h1>
      <p>hello world</p>
      {children}    </App>
  )
}
function Paragraph({ color, background }) {
  return (
    <div style={{ backgroundColor: background }}>
      <span style={{ color }}>text</span>
    </div>
  )
}
function TestContext() {
  return (
    <Article>
      <Consumer>{state => <Paragraph {...state} />}</Consumer>
    </Article>
  )
}
export default TestContext
页面呈现出的效果

打印 ColorContext、Provider、Consumer

createContext
// createContext 可以让我们实现状态管理
// 还能够解决传递 Props drilling 的问题
// 假如一个子组件需要父组件的一个属性,但是中间间隔了好几层,这就会出现开发和维护的一个成本。这时候就可以通过这个 API 来解决
function createContext(defaultValue, calculateChangedBits) {
  var context = {
    ?typeof: REACT_CONTEXT_TYPE,
    _calculateChangedBits: calculateChangedBits,
    // As a workaround to support multiple concurrent renderers, we categorize
    // some renderers as primary and others as secondary. We only expect
    // there to be two concurrent renderers at most: React Native (primary) and
    // Fabric (secondary); React DOM (primary) and React ART (secondary).
    // Secondary renderers store their context values on separate fields.
    // 以下两个属性是为了适配多平台
    _currentValue: defaultValue,
    _currentValue2: defaultValue,
    // Used to track how many concurrent renderers this context currently
    // supports within in a single renderer. Such as parallel server rendering.
    _threadCount: 0,
    // These are circular
    Provider: null,
    Consumer: null
  };
  // 以下的代码很简单,就是在 context 上挂载 Provider 和 Consumer,让外部去使用
  context.Provider = {
    ?typeof: REACT_PROVIDER_TYPE,
    _context: context
  };
  var Consumer = {
    ?typeof: REACT_CONTEXT_TYPE,
    _context: context,
    _calculateChangedBits: context._calculateChangedBits
  };
  context.Consumer = Consumer;
  context._currentRenderer = null;
  context._currentRenderer2 = null;
  return context;
}
在 react 包里面仅仅是生成了几个对象,比较简单,接下来看看它发挥作用的地方。
在 Consumer children 的匿名函数里面打 debugger。

查看调用栈

主要是 newChildren = render(newValue);,newChildren 是 Consumer 的 children 被调用之后的返回值,render 就是 children,newValue 是从 Provider value 属性的赋值。
newProps

newValue

接下来看 readContext 的实现
let lastContextDependency: ContextDependency<mixed> | null = null;
let currentlyRenderingFiber: Fiber | null = null;
// 在 prepareToReadContext 函数
currentlyRenderingFiber = workInProgress;
export function readContext<T>(
  context: ReactContext<T>,
  observedBits: void | number | boolean,
): T {
    let contextItem = {
      context: ((context: any): ReactContext<mixed>),
      observedBits: resolvedObservedBits,
      next: null,
    };
    if (lastContextDependency === null) {
      // This is the first dependency for this component. Create a new list.
      lastContextDependency = contextItem;
      currentlyRenderingFiber.contextDependencies = {
        first: contextItem,
        expirationTime: NoWork,
      };
    } else {
      // Append a new context item.
      lastContextDependency = lastContextDependency.next = contextItem;
    }
  }
  // isPrimaryRenderer 为 true,定义的就是 true
  // 实际就是一直会返回  context._currentValue
  return isPrimaryRenderer ? context._currentValue : context._currentValue2;
}
跳过中间,最后一句 return context._currentValue,而

就把顶层传下来的 context 的值取到了
context 为什么从上层可以一直往下面传这点现在还没有看懂,后面熟悉跨组件传递的实现之后再写一篇文章解释,囧。
Context 的设计非常特别
Provider Consumer 是 context 的两个属性。
  var context = {
    ?typeof: REACT_CONTEXT_TYPE,
    _currentValue: defaultValue,
    _currentValue2: defaultValue,
    Provider: null,
    Consumer: null
  };
Provider 的 ?typeof 是 REACT_PROVIDER_TYPE,它带有一个 _context 属性,指向的就是 context 本身,也就是自己的儿子有一个属性指向自己!!!
  context.Provider = {
    ?typeof: REACT_PROVIDER_TYPE,
    _context: context
  };
Consumer 的 ?typeof 是 REACT_CONTEXT_TYPE,它带也有一个 _context 属性,也是自己的儿子有一个属性指向自己!!!
  var Consumer = {
    ?typeof: REACT_CONTEXT_TYPE,
    _context: context,
    _calculateChangedBits: context._calculateChangedBits
  };
所以可以做一个猜想, Provider 的 value 属性赋予的新值肯定通过 _context 属性传到了 context 上,修改了 _currentValue。同样,Consumer 也是依据 _context 拿到了 context 的 _currentValue,然后 render(newValue) 执行 children 函数。
useContext
useContext 是 react hooks 提供的一个功能,可以简化 context 值得获取。
下面看使用代码
import React, { useContext, createContext } from 'react'
const NameCtx = createContext({ name: 'yuny' })
function Title() {
  const { name } = useContext(NameCtx)
  return <h1># {name}</h1>
}
function App() {
  return (
    <NameCtx.Provider value={{ name: 'lxfriday' }}>
      <Title />
    </NameCtx.Provider>
  )
}
export default App
我么初始值给的是 {name: 'yuny'},实际又重新赋值 {name: 'lxfriday'},最终页面显示的是 lxfriday。

useContext 相关源码
先看看 react 包中导出的 useContext
/** * useContext * @param Context {ReactContext} createContext 返回的结果 * @param unstable_observedBits {number | boolean | void} 计算新老 context 变化相关的,useContext() second argument is reserved for future  * @returns {*} 返回的是 context 的值 */
export function useContext<T>(
  Context: ReactContext<T>,  unstable_observedBits: number | boolean | void,
) {
  const dispatcher = resolveDispatcher();
  return dispatcher.useContext(Context, unstable_observedBits);
}
// Invalid hook call. Hooks can only be called inside of the body of a function component.
function resolveDispatcher() {
  const dispatcher = ReactCurrentDispatcher.current;
  return dispatcher;
}
/** * Keeps track of the current dispatcher. */
const ReactCurrentDispatcher = {
  /**   * @internal
   * @type {ReactComponent}   */
  current: (null: null | Dispatcher),
};
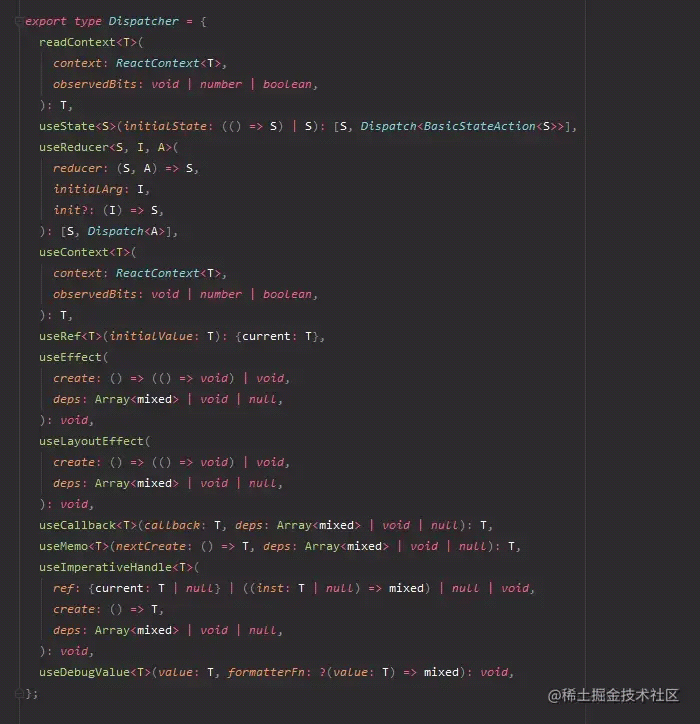
看看 Dispatcher,都是和 React Hooks 相关的。

再到 react-reconciler/src/ReactFiberHooks.js 中,有 HooksDispatcherOnMountInDEV 和 HooksDispatcherOnMount,带 InDEV 的应该是在 development 环境会使用到的,不带的是在 `production 会使用到。
const HooksDispatcherOnMount: Dispatcher = {
  readContext,
  useCallback: mountCallback,
  useContext: readContext,
  useEffect: mountEffect,
  useImperativeHandle: mountImperativeHandle,
  useLayoutEffect: mountLayoutEffect,
  useMemo: mountMemo,
  useReducer: mountReducer,
  useRef: mountRef,
  useState: mountState,
  useDebugValue: mountDebugValue,
};
HooksDispatcherOnMountInDEV = {
   // ...
   useContext<T>(
      context: ReactContext<T>,
      observedBits: void | number | boolean,
    ): T {
      return readContext(context, observedBits);
    },
}
在上面 useContext 经过 readContext 返回了 context 的值,readContext 在上面有源码介绍。
debugger 查看调用栈
初始的 useContext

在 HooksDispatcherOnMountInDEV 中

readContext 中

经过上面源码的详细分析, 大家对 context 的创建和 context 取值应该了解了,context 设计真的非常妙!!
以上就是React Context源码实现原理详解的详细内容,更多关于React Context 源码实现的资料请关注我们其它相关文章!

