基于React路由跳转的几种方式
目录
- React路由跳转的几种方式
- 1. params形式
- 2. 使用state的形式
- React路由跳转传参问题
- 使用Link传参
- url传参
- 隐式传参
React路由跳转的几种方式
注意: 这里使用的react-router-dom是版本5以上,路由形式是history模式
react-router-dom文档,其中依赖包history的github地址
1. params形式
路由跳转后,参数会显示在地址栏

跳转的方法是使用
history.push({pathname: '/personal', search: 'test=22222'})
其中search键对应的值就是拼接在地址栏的数据
import React from 'react'
import { useHistory } from 'react-router-dom'
export default ()=> {
	const history = useHistory()
	// 页面跳转方法
	history.push({pathname: '/personal', search: 'test=22222'})
	return 123
}
接收的方法。数据都是存储在useLocation中的search获取
import React from 'react'
import { useLocation } from 'react-router-dom'
export default ()=> {
	const location = useLocation()
	// 页面跳转方法
	console.log(location, 'props')
	return 123
}

2. 使用state的形式
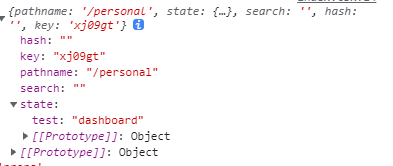
页面刷新不会丢失数据,并且地址栏也看不到数据 跳转的方法是使用
history.push({pathname: '/personal', state: {test: 'dashboard'}})
其中search键对应的值就是拼接在地址栏的数据
import React from 'react'
import { useHistory } from 'react-router-dom'
export default ()=> {
	const history = useHistory()
	// 页面跳转方法
	history.push({pathname: '/personal', state: { test: 'dashboard' }})
	return 123
}
接收的方法。数据都是存储在useLocation中的search获取
import React from 'react'
import { useLocation } from 'react-router-dom'
export default ()=> {
	const location = useLocation()
	// 页面跳转方法
	console.log(location, 'props')
	return 123
}

React路由跳转传参问题
使用Link传参
1.引入Link
import { Link } from “react-router-dom”
2.Llink上携带传递的参数,携带的参数以对象形式
<Link to={
            { pathname: "/XXX", //xxx为跳转到的路径
              state: { title: this.state.exam.title, actionCode: this.state.exam.actionCode }
            }
          } >切换考试科目 <i className="iconfont icon-jiantou"></i></Link>
2.1 接收参数(类组件)
componentDidMount() {
        console.log(this.props.location.state.XXX);   //xxx指state对象中的键名
    }
2.2接收参数(函数式组件)
function Fast(props) {
     ...
    useEffect(() => {
        console.log(props.location.state.XXX);//xxx指state对象中的键名
    })
}
url传参
1.url带参传参
<button onClick={()=>{this.props.history.push('/detail/88')}}>跳往详情页</button>`
2.接收参数
//  react-router-dom是通过“/:”去匹配url传递的参数 ,即id获取到上面的url传过来的88
<Route exact path="/detail/:id" component={Detail}></Route>
//页面接收参数
componentDidMount(){
  console.log(this.props.match.params);
}
隐式传参
3.1 state方法
页面传参
state方法传参:参数地址栏不显示,刷新地址栏,参数不丢失
<button onClick={()=>{this.props.history.push({
    pathname: '/detail', //要跳转到的路径
    state: {  //参数地址栏不显示,刷新地址栏,参数不丢失
      id: 456
    }
  })}}>去详情页</button>
接收参数
<Route exact path="/detail" component={Detail}></Route>
//页面接收参数
componentDidMount(){
    console.log(this.props.history.location.state);
}
3.2 query方法
页面传参
query方法传参:参数地址栏不显示,刷新地址栏,参数丢失
<button onClick={()=>{this.props.history.push({
    pathname: '/detail', //要跳转到的路径
    query: {
      id: 456
    }
  })}}>去详情页</button>
接收参数
<Route exact path="/detail" component={Detail}></Route>
//页面接收参数
componentDidMount(){
    console.log(this.props.history.location.query);
}
以上为个人经验,希望能给大家一个参考,也希望大家多多支持我们。
赞 (0)

