浅谈Node.js ORM框架Sequlize之表间关系
Sequelize模型之间存在关联关系,这些关系代表了数据库中对应表之间的主/外键关系。基于模型关系可以实现关联表之间的连接查询、更新、删除等操作。本文将通过一个示例,介绍模型的定义,创建模型关联关系,模型与关联关系同步数据库,及关系模型的增、删、改、查操作。
数据库中的表之间存在一定的关联关系,表之间的关系基于主/外键进行关联、创建约束等。关系表中的数据分为1对1(1:1)、1对多(1:M)、多对多(N:M)三种关联关系。
在Sequelize中建立关联关系,通过调用模型(源模型)的belongsTo、hasOne、hasMany、belongsToMany方法,再将要建立关系的模型(目标模型)做为参数传入即可。这些方法会按以下规则创建关联关系:
hasOne - 与目标模型建立1:1关联关系,关联关系(外键)存在于目标模型中。
belongsTo - 与目标模型建立1:1关联关系,关联关系(外键)存在于源模型中。
hasMany - 与目标模型建立1:N关联关系,关联关系(外键)存在于目标模型中。
belongsToMany - 与目标模型建立N:M关联关系,会通过sourceId和targetId创建交叉表。
为了能够清楚说明模型关系的定义及关系模型的使用,我们定义如下4个模型对象:
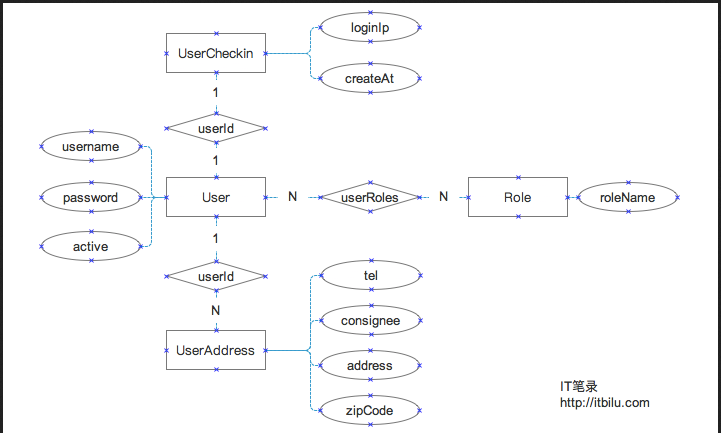
用户(User)-与其它模型存在1:1、1:N、N:M
用户登录信息(UserCheckin)-与User存在1:1关系
用户地址(UserAddress)-与User存在N:1关系
角色(Role)-与User存在N:M关系
这几个模型的E-R结构如下:

接下来上代码,代码和瓷土不符,请注意!
代码写的有点low,没办法,!
/**
 * 大家就按照我的步骤来,一点一点,要有耐心哦
 * 我相信,最后肯定有你想要的!加油
 */
//引入框架
const Sequelize = require('sequelize');
//创建ORM实例
const sequelize = new Sequelize('sequlizedb', 'root', 'guoguo',
 {
  'dialect': 'mysql', // 数据库使用mysql
 }
);
//验证连接
sequelize
 .authenticate()
 .then(() => {
  console.log('链接成功');
 })
 .catch((error) => {
  console.log('链接失败' + error);
 })
//模型的创建

const User = sequelize.define('user', {
 name: Sequelize.STRING,
 age: Sequelize.INTEGER,
}, {
  freezeTableName: true,
 });

// User.create({
//  name: 'guo',
//  age: 25
// })
//  .then((result) => {
//   console.log('=======添加成功===================');
//   console.log(result);
//   console.log('==========================');

//  })
//  .catch((error) => {
//   console.log('==========================');
//   console.log('添加失败' + error);
//   console.log('==========================');

//  });

// const Role=sequelize.define('role',{
//  name:{
//   type:sequelize.STRING,
//  }
// },
// {freezeTableName:true});

const Message = sequelize.define('message', {
 text: Sequelize.STRING,
}, {
  freezeTableName: true,
 });

const Image = sequelize.define('image', {
 url: Sequelize.STRING,
}, {
  freezeTableName: true,
 });
//删除表
// sequelize.drop()
// .then((logging)=>{
//  console.log('==========================');
//  console.log('删除成功!'+logging);
//  console.log('==========================');

// })
// .catch((error)=>{
//  console.log('==========================');
//  console.log('删除失败'+error);
//  console.log('==========================');

// });

//建立关系
// Message.belongsTo(User);
// Message.hasMany(Image);
//同步到数据库
// sequelize.sync({
//  force: true,
// }).then(() => {
//  console.log('==========================');
//  console.log('同步成功');
//  console.log('==========================');

// }).catch(() => {
//  console.log('==========================');
//  console.log('同步失败');
//  console.log('==========================');

// });

//cudr
function addUers(name, age) {
 User.create({
  name: name,
  age: age,
 }).then((log) => {
  log = JSON.stringify(log);
  console.log('==========================');
  console.log('增加用户成功' + log);
  console.log('==========================');

 }).catch((error) => {
  console.log('==========================');
  console.log('增加用户失败' + error);
  console.log('==========================');

 });

}
function addMessage(userId, text) {
 Message.create({
  text: text,
  userId: userId,
 }).then((log) => {
  log = JSON.stringify(log);
  console.log('==========================');
  console.log('增加成功!' + log);
  console.log('==========================');

 }).catch((error) => {
  console.log('==========================');
  console.log('增加失败!' + error);
  console.log('==========================');

 });
}
function addImage(messageId, imageUrl) {
 Image.create({
  url: imageUrl,
  messageId: messageId,
 }).then((log) => {
  log = JSON.stringify(log);
  console.log('==========================');
  console.log('添加图片成功' + log);
  console.log('==========================');

 }).catch((error) => {
  console.log('==========================');
  console.log('添加图片失败' + error);
  console.log('==========================');

 });
}
//测试
//addUers('杨雪娇',22);
//addMessage(2, '杨雪娇发来的消息3');

// addImage(5,'http://3.png');
// addImage(6,'http://4.png');
// addImage(2,'http://2.png');
// //
function getAllMessage() {
 Message.findAll({
  where: {
   userId: 2
  },
  include: [
   {
    model: User,
    attributes: [
     'id',
     'name',
    ],
   },
   {
    model: Image,
    attributes: [
     'id',
     'url'
    ]
   }
  ],
 }).then((result) => {
  result = JSON.stringify(result);
  console.log('==========================');
  console.log(result);
  console.log('==========================');

 }).catch((error) => {
  console.log('==========================');
  console.log('查询失败' + error);
  console.log('==========================');

 });
}
//测试
//getAllMessage();
//删除消息
function delMessage(userId, messageId) {
 Message.destroy({
  where: {
   userId: userId,
   id: messageId,
  },

 }).then((log) => {
  log = JSON.stringify(log);
  console.log('==========================');
  console.log('删除消息成功!' + log);
  console.log('==========================');

 }).catch((error) => {
  console.log('==========================');
  console.log('删除消息失败!' + error);
  console.log('==========================');

 });
}
//测试
//测试发现问题 如果不设置级联 则,从属message表的image表记录不会删除,而只是出现对应messageId 为NULL的现象
//delMessage(2,4);

const Role = sequelize.define('role', {
 name: {
  type: Sequelize.STRING, allowNull: true,
 }
}, {
  freezeTableName: true,
 });

//对于单个模型的同步
// Role.sync().then((log) => {
//  log = JSON.stringify(log);
//  console.log('==========================');
//  console.log('Role表数据同步成功' + log);
//  console.log('==========================');
//  Role.create({
//   name: '管理员'
//  }).then((log) => {
//   log = JSON.stringify(log);
//   console.log('==========================');
//   console.log('添加的数据为' + log);
//   console.log('==========================');

//  }).catch((error) => {
//   console.log('==========================');
//   console.log('添加数据失败' + error);
//   console.log('==========================');

//  });

// }).catch((error) => {
//  console.log('==========================');
//  console.log('Role模型与表数据同步失败' + error);
//  console.log('==========================');

// });

//定义User1模型
const User1 = sequelize.define('user1', {
 name: {
  type: Sequelize.STRING,
  validate: {
   notEmpty: true,
   len: [2, 30],
  }
 },
 age: {
  type: Sequelize.STRING,
  defaultValue: 21,
  validate: {
   isInt: {
    msg: '年龄必须是整数!',
   }
  }

 },
 email: {
  type: Sequelize.STRING,
  validate: {
   isEmail: true,
  }
 },
 userpicture: Sequelize.STRING,
}, {
  freezeTableName: true,
 });
//
//同步User1模型
// User1.sync().then((log) => {
//  log = JSON.stringify(log);
//  console.log('==========================');
//  console.log('User1表数据同步成功' + log);
//  console.log('==========================');
// }).catch((error) => {
//  console.log('==========================');
//  console.log('User1模型与表数据同步失败' + error);
//  console.log('==========================');
// });

function addUser1(userInfo) {
 User1.create({
  name: userInfo.name,
  age:userInfo.age,
  email:userInfo.email,
 }).then((log) => {
  log = JSON.stringify(log);
  console.log('==========================');
  console.log('添加的数据为' + log);
  console.log('==========================');

 }).catch((error) => {
  console.log('==========================');
  console.log('添加数据失败' + error);
  console.log('==========================');

 });
}
const userInfo={
 name:'郭东生',
 //age:0.1,//Validation error: 年龄必须是整数!
 age:22,
 email:'7758@qq.com',
 //email:'7758',//Validation error: Validation isEmail on email failed
}
addUser1(userInfo);
以上这篇浅谈Node.js ORM框架Sequlize之表间关系就是小编分享给大家的全部内容了,希望能给大家一个参考,也希望大家多多支持我们。

