Springboot-Shiro基本使用详情介绍
目录
- 一、依据官网快速搭建Quickstart
- 1.1 配置pom.xml依赖
- 1.2配置log4j.properties
- 1.3 配置shiro.ini
- 1.4启动类
- 二、springboot结合shiro使用
- 2.1准备数据库
- 2.2配置yaml
- 三、实体类
- 3.1UserMapper即UserMapper.xml
- 四、shiro的配置类
- 五、启动类
- 5.1SecurityUtils. getSubject()
Apache Shiro官网:https://shiro.apache.org/spring-boot.html.
一、依据官网快速搭建Quickstart

1.1 配置pom.xml依赖
 <dependency>
            <groupId>org.apache.shiro</groupId>
            <artifactId>shiro-core</artifactId>
            <version>1.7.1</version>
        </dependency>
        <!-- configure logging-->
        <dependency>
            <groupId>org.slf4j</groupId>
            <artifactId>jcl-over-slf4j</artifactId>
            <version>1.7.21</version>
        </dependency>
        <!--调用日志框架-->
        <dependency>
            <groupId>org.slf4j</groupId>
            <artifactId>slf4j-log4j12</artifactId>
            <version>1.7.21</version>
        </dependency>
        <dependency>
            <groupId>log4j</groupId>
            <artifactId>log4j</artifactId>
            <version>1.2.17</version>
        </dependency>
1.2配置log4j.properties
log4j.rootLogger=INFO, stdout

log4j.appender.stdout=org.apache.log4j.ConsoleAppender
log4j.appender.stdout.layout=org.apache.log4j.PatternLayout
log4j.appender.stdout.layout.ConversionPattern=%d %p [%c] - %m %n

# General Apache libraries
log4j.logger.org.apache=WARN

# Spring
log4j.logger.org.springframework=WARN

# Default Shiro logging
log4j.logger.org.apache.shiro=INFO

# Disable verbose logging
log4j.logger.org.apache.shiro.util.ThreadContext=WARN
log4j.logger.org.apache.shiro.cache.ehcache.EhCache=WARN
1.3 配置shiro.ini
[users]
# user 'root' with password 'secret' and the 'admin' role
root = secret, admin
# user 'guest' with the password 'guest' and the 'guest' role
guest = guest, guest
# user 'presidentskroob' with password '12345' ("That's the same combination on
# my luggage!!!" ;)), and role 'president'
presidentskroob = 12345, president
# user 'darkhelmet' with password 'ludicrousspeed' and roles 'darklord' and 'schwartz'
darkhelmet = ludicrousspeed, darklord, schwartz
# user 'lonestarr' with password 'vespa' and roles 'goodguy' and 'schwartz'
lonestarr = vespa, goodguy, schwartz

# -----------------------------------------------------------------------------
# Roles with assigned permissions
#
# Each line conforms to the format defined in the
# org.apache.shiro.realm.text.TextConfigurationRealm#setRoleDefinitions JavaDoc
# -----------------------------------------------------------------------------
[roles]
# 'admin' role has all permissions, indicated by the wildcard '*'
admin = *
# The 'schwartz' role can do anything (*) with any lightsaber:
schwartz = lightsaber:*
# The 'goodguy' role is allowed to 'drive' (action) the winnebago (type) with
# license plate 'eagle5' (instance specific id)
goodguy = winnebago:drive:eagle5
1.4启动类
import org.apache.shiro.SecurityUtils;
import org.apache.shiro.authc.*;
import org.apache.shiro.config.IniSecurityManagerFactory;
import org.apache.shiro.mgt.SecurityManager;
import org.apache.shiro.session.Session;
import org.apache.shiro.subject.Subject;
import org.apache.shiro.util.Factory;
import org.slf4j.Logger;
import org.slf4j.LoggerFactory;

public class Quickstart {

    private static final transient Logger log = LoggerFactory.getLogger(Quickstart.class);

    public static void main(String[] args) {

        //使用shiro.ini文件在类路径的根目录
        // (file:和url:前缀分别从文件和url加载):
        Factory<SecurityManager> factory = new IniSecurityManagerFactory("classpath:shiro.ini");
        SecurityManager securityManager = factory.getInstance();

        SecurityUtils.setSecurityManager(securityManager);

        //获取当前的用户对象Subject
        Subject currentUser = SecurityUtils.getSubject();

        //通过当前用户拿到session
        Session session = currentUser.getSession();
        session.setAttribute("someKey", "aValue");
        String value = (String) session.getAttribute("someKey");
        if (value.equals("aValue")) {
//            log.info("Retrieved the correct value! [" + value + "]");
            log.info("Subject=>session [" + value + "]");
        }

        //判断当前的用户是否被认证
        if (!currentUser.isAuthenticated()) {
            //Token :令牌,没有获取,随机
            UsernamePasswordToken token = new UsernamePasswordToken("lonestarr", "vespa");
            token.setRememberMe(true);//记住我
            try {
                currentUser.login(token);//执行登录操作~
            } catch (UnknownAccountException uae) {//用户名不存在
                log.info("There is no user with username of " + token.getPrincipal());
            } catch (IncorrectCredentialsException ice) {//密码不对
                log.info("Password for account " + token.getPrincipal() + " was incorrect!");
            } catch (LockedAccountException lae) {//用户被锁定的
                log.info("The account for username " + token.getPrincipal() + " is locked.  " +
                        "Please contact your administrator to unlock it.");
            }
            // ... catch more exceptions here (maybe custom ones specific to your application?
            catch (AuthenticationException ae) {//认证异常
                //unexpected condition?  error?
            }
        }

        //say who they are:
        //print their identifying principal (in this case, a username):
        log.info("User [" + currentUser.getPrincipal() + "] logged in successfully.");

        //test a role:
        if (currentUser.hasRole("schwartz")) {
            log.info("May the Schwartz be with you!");
        } else {
            log.info("Hello, mere mortal.");
        }
//粗粒度
        //test a typed permission (not instance-level)
        if (currentUser.isPermitted("lightsaber:wield")) {
            log.info("You may use a lightsaber ring.  Use it wisely.");
        } else {
            log.info("Sorry, lightsaber rings are for schwartz masters only.");
        }
//细粒度
        //a (very powerful) Instance Level permission:
        if (currentUser.isPermitted("winnebago:drive:eagle5")) {
            log.info("You are permitted to 'drive' the winnebago with license plate (id) 'eagle5'.  " +
                    "Here are the keys - have fun!");
        } else {
            log.info("Sorry, you aren't allowed to drive the 'eagle5' winnebago!");
        }

        //all done - log out!
        currentUser.logout();

        System.exit(0);
    }
}
二、springboot结合shiro使用
2.1准备数据库
pom.xml添加依赖:
  <dependencies>
        <!--
        Subject 用户
        SecurityManager 管理所有用户
        Realm 连接数据
        -->
        <dependency>
            <groupId>org.apache.shiro</groupId>
            <artifactId>shiro-core</artifactId>
            <version>1.7.1</version>
        </dependency>
        <!-- configure logging-->
        <dependency>
            <groupId>org.slf4j</groupId>
            <artifactId>jcl-over-slf4j</artifactId>
            <version>1.7.21</version>
        </dependency>
        <!--调用日志框架-->
        <dependency>
            <groupId>org.slf4j</groupId>
            <artifactId>slf4j-log4j12</artifactId>
            <version>1.7.21</version>
        </dependency>
        <dependency>
            <groupId>log4j</groupId>
            <artifactId>log4j</artifactId>
            <version>1.2.17</version>
        </dependency>
        <dependency>
            <groupId>com.github.theborakompanioni</groupId>
            <artifactId>thymeleaf-extras-shiro</artifactId>
            <version>2.0.0</version>
        </dependency>
        <!--连接数据-->
        <dependency>
            <groupId>mysql</groupId>
            <artifactId>mysql-connector-java</artifactId>
        </dependency>
        <dependency>
            <groupId>com.alibaba</groupId>
            <artifactId>druid</artifactId>
            <version>1.2.5</version>
        </dependency>
        <dependency>
            <groupId>org.mybatis.spring.boot</groupId>
            <artifactId>mybatis-spring-boot-starter</artifactId>
            <version>2.2.0</version>
        </dependency>
        <!--shiro整合spring的包-->
        <!--https://mvnrepository.com/artifact/org.apache.shiro/shiro-spring-->
        <dependency>
            <groupId>org.apache.shiro</groupId>
            <artifactId>shiro-spring</artifactId>
            <version>1.7.1</version>
        </dependency>
        <dependency>
            <groupId>org.springframework.boot</groupId>
            <artifactId>spring-boot-starter-web</artifactId>
        </dependency>
        <dependency>
            <groupId>org.thymeleaf</groupId>
            <artifactId>thymeleaf-spring5</artifactId>
        </dependency>
        <dependency>
            <groupId>org.thymeleaf.extras</groupId>
            <artifactId>thymeleaf-extras-java8time</artifactId>
        </dependency>
        <dependency>
            <groupId>org.projectlombok</groupId>
            <artifactId>lombok</artifactId>
            <version>1.18.16</version>
        </dependency>
    </dependencies>
2.2配置yaml
spring:
  datasource:
    username: root
    password: 123456
    #假如时区报错了就增减一个时区的配置就ok了:servletTimezone=UTC
    url: jdbc:mysql://localhost:3306/security?servletTimezone=UTC&useUnicode=true&characterEncodeing=utf-8
    driver-class-name: com.mysql.cj.jdbc.Driver
    type: com.alibaba.druid.pool.DruidDataSource

    #Spring Boot 默认是不注入这些属性值的,需要自己绑定
    #druid 数据源专有配置
    initialSize: 5
    minIdle: 5
    maxActive: 20
    maxWait: 60000
    timeBetweenEvictionRunsMillis: 60000
    minEvictableIdleTimeMillis: 300000
    validationQuery: SELECT 1 FROM DUAL
    testWhileIdle: true
    testOnBorrow: false
    testOnReturn: false
    poolPreparedStatements: true

    #配置监控统计拦截的filters,stat:监控日志,log4j:日志记录,wall,预防sql注入
    #如果允许时报错 java.lang.ClassNotFoundException: org.apache.log4j.Priority
    #则导入log4j 依赖即可,Maven 地址:https://mvnrepository.com/artifact/log4j/log4j

    filters: stat,wall,log4j
    maxPoolPreparedStatementPerConnectionSize: 20
    useGlobalDataSourceStat: true
    connectionProperties: durid.stat.mergeSql=true;druid.stat.slowSqlMillis=500
mybatis:
  mapper-locations: classpath:mapper/*.xml
使用thymeleaf写几个页面:

index.html
<!DOCTYPE html>
<html lang="en" xmlns:th="http://www.thymeleaf.org"
xmlns:shiro="http://www.thymeleaf.org/thymeleaf-extras-shiro">
<head>
<meta charset="UTF-8">
<title>首页</title>
</head>
<body>
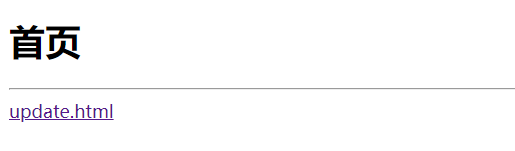
<h1>首页</h1>
<p>[[${msg}]]</p>
<div th:if="session.LoginUser==null"><a th:href="@{toLogin}" rel="external nofollow" >登录</a></div>
<hr>
<div shiro:hasPermission="user:add">
<a th:href="@{/user/add}" rel="external nofollow" >add.html</a></div>
<div shiro:hasPermission="user:update">
<a th:href="@{/user/update}" rel="external nofollow" >update.html</a>
</div>
</body>
</html>
login.html
<!DOCTYPE html>
<html lang="en" xmlns:th="http://www.thymeleaf.org">
<head>
<head>
    <meta charset="UTF-8">
    <title>Title</title>
</head>
<body>
<h1>登录</h1>
<hr>
<p th:text="${msg}" style="color:red"></p>
<form th:action="@{/login}">
    <p>用户名<input type="text" name="username"></p>
    <p>密码<input type="text" name="password"></p>
    <p><input type="submit" value="登录"></p>
</form>
</body>
</html>
add.html
<!DOCTYPE html>
<html lang="en">
<head>
    <meta charset="UTF-8">
    <title>Title</title>
</head>
<body>
<h4>add</h4>
</body>
</html>
update.html
<!DOCTYPE html>
<html lang="en">
<head>
    <meta charset="UTF-8">
    <title>Title</title>
</head>
<body>
<h4>update</h4>
</body>
</html>
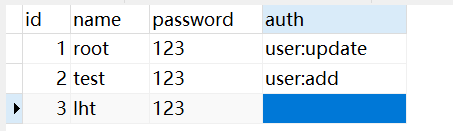
三、实体类
package com.jsxl.pojo;

import lombok.AllArgsConstructor;
import lombok.Data;
import lombok.NoArgsConstructor;

@Data
@AllArgsConstructor
@NoArgsConstructor
public class User {
    private int id;
    private String name;
    private String password;
    private String auth;
}
3.1UserMapper即UserMapper.xml
package com.jsxl.mapper;

import com.jsxl.pojo.User;
import org.apache.ibatis.annotations.Mapper;
import org.springframework.stereotype.Repository;

@Repository
@Mapper
public interface UserMapper {
    public User queryUserByName(String name);
}
<?xml version="1.0" encoding="UTF-8" ?>
<!DOCTYPE mapper
        PUBLIC "-//mybatis.org//DTD Mapper 3.0//EN"
        "http://mybatis.org/dtd/mybatis-3-mapper.dtd" >
<mapper namespace="com.jsxl.mapper.UserMapper" >
    <select id="queryUserByName" parameterType="String" resultType="com.jsxl.pojo.User">
        select * from security.user where name=#{name}
    </select>

</mapper>
UserController(简单使用这里直接调用Mapper):
package com.jsxl.controller;

import org.apache.shiro.SecurityUtils;
import org.apache.shiro.authc.IncorrectCredentialsException;
import org.apache.shiro.authc.UnknownAccountException;
import org.apache.shiro.authc.UsernamePasswordToken;
import org.apache.shiro.subject.Subject;
import org.springframework.stereotype.Controller;
import org.springframework.ui.Model;
import org.springframework.ui.ModelMap;
import org.springframework.web.bind.annotation.RequestMapping;
import org.springframework.web.bind.annotation.ResponseBody;

@Controller
public class UserController {

    @RequestMapping({"/","/index"})
    public String toIndex(ModelMap map){
        map.put("msg","hello shiro");
        return "index";
    }
    @RequestMapping("user/add")
    public String add(){
        return "user/add";
    }

    @RequestMapping("user/update")
    public String update(){
        return "user/update";
    }

    @RequestMapping("/toLogin")
    public String toLogin(){
        return "login";
    }

    @RequestMapping("/login")
    public String login(String username, String password, Model model){
        //获取当前用户
        Subject subject = SecurityUtils.getSubject();
        //封装用户的登录数据
        UsernamePasswordToken token = new UsernamePasswordToken(username, password);
        //这边用了会存在整个的类里面
        try{
            subject.login(token);//执行登录的方法,如果没有异常就说明ok了
            return "index";
        }catch(UnknownAccountException e){//用户名不存在
            model.addAttribute("msg","用户名不存在");
            return "login";
        }catch(IncorrectCredentialsException e){//密码不对
            model.addAttribute("msg","密码错误");
            return "login";
        }
    }
    @RequestMapping("/noauth")
    @ResponseBody
        public String unauthorized(){
            return "未经授权无法访问此页面";
        }
}
四、shiro的配置类
package com.jsxl.config;

import at.pollux.thymeleaf.shiro.dialect.ShiroDialect;
import org.apache.shiro.spring.web.ShiroFilterFactoryBean;
import org.apache.shiro.web.mgt.DefaultWebSecurityManager;
import org.springframework.beans.factory.annotation.Qualifier;
import org.springframework.context.annotation.Bean;
import org.springframework.context.annotation.Configuration;

import java.util.LinkedHashMap;
import java.util.Map;

@Configuration
public class ShiroConfig {
    //ShiroFilterFactoryBean
    @Bean
    public ShiroFilterFactoryBean getShiroFilterFactoryBean(@Qualifier("securityManager")
                                                                    DefaultWebSecurityManager defaultWebSecurityManager){
        ShiroFilterFactoryBean bean = new ShiroFilterFactoryBean();
        //设置安全管理器
        bean.setSecurityManager(defaultWebSecurityManager);
        //添加shiro内置过滤器
        /*
        anon :无需认证就可以访问
        autho:必须认证了才能访问
        user:必须拥有 记住我 功能才能用
        perms:拥有对某个资源的权限才能访问
        role: 拥有某个角色权限才能访问
         */

        //设置一个过滤器链 点击源码看需要什么参数,由于是链表用LinkedHashMap    拦截
        Map<String, String> filterChainDefinitionMap = new LinkedHashMap<>();

        //授权  正常情况下 没有授权会跳到未授权的页面
        filterChainDefinitionMap.put("/user/add","perms[user:add]");
        filterChainDefinitionMap.put("/user/update","perms[user:update]");
//        filterChainDefinitionMap.put("/user/add","authc");
//        filterChainDefinitionMap.put("/user/update","authc");
        filterChainDefinitionMap.put("/user/*","authc");
        bean.setFilterChainDefinitionMap(filterChainDefinitionMap);

        //设置登录请求
        bean.setLoginUrl("/toLogin");
        //未授权页面
        bean.setUnauthorizedUrl("/noauth");
        return bean;

    }
    //DefaultWebSecurityManager 2
    @Bean(name = "securityManager")
    public DefaultWebSecurityManager getDefaultWebSecurityManager(@Qualifier("userRealm") UserRealm userRealm){
        DefaultWebSecurityManager securityManager = new DefaultWebSecurityManager();
        //关联UserRealm
         securityManager.setRealm(userRealm);
         return securityManager;
    }

    //创建realm 对象 ,需要自定义类 1
    @Bean(name = "userRealm")//正常情况下我们的方法名就是他
    public UserRealm userRealm(){
        return new UserRealm();
    }

    @Bean
    public ShiroDialect getShiroDialect(){
        return new ShiroDialect();
    }
}
package com.jsxl.config;

import com.jsxl.mapper.UserMapper;
import com.jsxl.pojo.User;
import com.jsxl.service.UserServiceImpl;
import org.apache.shiro.SecurityUtils;
import org.apache.shiro.authc.*;
import org.apache.shiro.authz.AuthorizationInfo;
import org.apache.shiro.authz.SimpleAuthorizationInfo;
import org.apache.shiro.realm.AuthorizingRealm;
import org.apache.shiro.session.Session;
import org.apache.shiro.subject.PrincipalCollection;
import org.apache.shiro.subject.Subject;
import org.springframework.beans.factory.annotation.Autowired;

//自定义的UserRealm
public class UserRealm extends AuthorizingRealm {

    @Autowired
    UserMapper userMapper;

    @Override//授权
    protected AuthorizationInfo doGetAuthorizationInfo(PrincipalCollection principalCollection) {
        System.out.println("执行了=>授权doGrtAuthorizationInfo");
        SimpleAuthorizationInfo info = new SimpleAuthorizationInfo();
//        info.addStringPermission("user:add");
        //拿到当前登录的这个对象
        Subject subject = SecurityUtils.getSubject();
        User currentUser = (User)subject.getPrincipal();//拿到user对象
        //设置当前登录的用户的权限
        info.addStringPermission(currentUser.getAuth());

        return info;//授权不能return null
    }

    @Override//认证
    protected AuthenticationInfo doGetAuthenticationInfo(AuthenticationToken authenticationToken) throws AuthenticationException {
        System.out.println("执行了=>认证doGrtAuthorizationInfo");

        UsernamePasswordToken userToken = (UsernamePasswordToken) authenticationToken;//获取信息 全局关系

        User user = userMapper.queryUserByName(userToken.getUsername());
        Subject currentSubject = SecurityUtils.getSubject();
        Session session = currentSubject.getSession();
        session.setAttribute("LoginUser",user);

        if(user==null){
            return null;//抛出异常 UnknownAccountException
        }
        //密码验证  shiro做 有可能会泄露 加密了
        return new SimpleAuthenticationInfo(user,user.getPassword(),"");
    }
}
五、启动类
package com.jsxl;

import org.springframework.boot.SpringApplication;
import org.springframework.boot.autoconfigure.SpringBootApplication;

@SpringBootApplication
public class ShiroSpringbootApplication {

    public static void main(String[] args) {
        SpringApplication.run(ShiroSpringbootApplication.class, args);
    }

}
测试:
root用户
test用户

5.1SecurityUtils. getSubject()
SecurityUtils. getSubject(),可以获得当前正在执行的Subject. 一个Subject就是一个应用程序的用户的安全。实际上称它为“User”,但太多的应用程序拥有已经拥有自己的 User 类/框架的现有 API,我们不想与它们发生冲突。此外,在安全领域,该术语Subject实际上是公认的术语。
getSubject()独立应用程序中的调用可能会Subject在特定于应用程序的位置返回基于用户数据的 ,并且在服务器环境(例如 Web 应用程序)中,它Subject根据与当前线程或传入请求关联的用户数据获取。
Session session = currentUser.getSession();
session.setAttribute( "someKey", "aValue" );
这Session是一个特定于 Shiro 的实例,它提供了您习惯于使用常规 HttpSessions 的大部分内容,但还有一些额外的好处和一个很大的区别:它不需要 HTTP 环境!
到此这篇关于Springboot-Shiro基本使用详情介绍的文章就介绍到这了,更多相关Springboot-Shiro使用 内容请搜索我们以前的文章或继续浏览下面的相关文章希望大家以后多多支持我们!
相关推荐
-

springboot使用shiro-整合redis作为缓存的操作
说在前面 本来的整合过程是顺着博客的顺序来的,越往下,集成的越多,由于之前是使用ehcache缓存,现在改为redis,限制登录人数 以及 限制登录次数等 都需要改动,本篇为了简单,目前先将这两个功能下线,配置暂时是注销的,原类保存,在下篇博客中改. 还有之前是使用SessionListener监听session创建来统计在线人数,在本篇中也将改为统计redis中的key数目. 如果是单机,使用ehcache是最快的,项目一般都不是单节点,为了方便之后使用sso单点登录,以及多节点部署,所以使用
-
springboot整合shiro之thymeleaf使用shiro标签的方法
thymeleaf介绍 简单说, Thymeleaf 是一个跟 Velocity.FreeMarker 类似的模板引擎,它可以完全替代 JSP .相较与其他的模板引擎,它有如下三个极吸引人的特点: 1.Thymeleaf 在有网络和无网络的环境下皆可运行,即它可以让美工在浏览器查看页面的静态效果,也可以让程序员在服务器查看带数据的动态页面效果.这是由于它支持 html 原型,然后在 html 标签里增加额外的属性来达到模板+数据的展示方式.浏览器解释 html 时会忽略未定义的标签属性,所以 t
-
springboot下使用shiro自定义filter的个人经验分享
目录 目标 步骤 1.在pom.xml中添加shiro的依赖 2.创建ShiroRealm.java 3.创建ShiroConfiguration.java 4.创建自定义的过滤器MyFilter.java 5.步骤3中使用了自定义密码验证的方式 6.步骤3中放开了对登录页/loginController的过滤 个人经验 在springboot中使用shiro,由于没有了xml配置文件,因此使用的方法与spring中有些区别.在踩了无数个坑后,在此将springboot下使用shiro的步骤总结
-
详解springboot shiro jwt实现权限管理
springboot + shiro + jwt (详情解析+代码实现)加密接口 设置权限 首先需要把shiro的几个配置类给下载好(我已经把需要的配置类给放到了github和网盘之中) 先讲完各个配置类的作用,后面讲具体流程 ShiroConfig.java 类主要是设置了过滤器 和shiro自己的session,假如这个类没有放行就只有token才能访问后端接口 UserRealm.java 类主要是检测用户权限和授予权限,对用户名的验证 JWTFilter.java 类主要是防止别人访问你
-
Springboot-Shiro基本使用详情介绍
目录 一.依据官网快速搭建Quickstart 1.1 配置pom.xml依赖 1.2配置log4j.properties 1.3 配置shiro.ini 1.4启动类 二.springboot结合shiro使用 2.1准备数据库 2.2配置yaml 三.实体类 3.1UserMapper即UserMapper.xml 四.shiro的配置类 五.启动类 5.1SecurityUtils. getSubject() Apache Shiro官网:https://shiro.apache.org/
-
vue+springboot+shiro+jwt实现登录功能
目录 1.导入依赖 2.JWTToken 替换 Shiro 原生 Token 3.JWT token 工具类,提供JWT生成.校验.获取token存储的信息 4.JWTFilter请求拦截 5.登录授权realm 6.shiro配置 7.登录web端 8.异常处理 9.缓存调用登录接口传过来的token 10.请求头设置,带上token 11.生产环境nginx配置 公司开发的系统原先的用户信息是基于shiro session 进行管理,但是session不适用于app端,并且服务器重启后需要重
-
SpringBoot Shiro授权实现过程解析
这篇文章主要介绍了SpringBoot Shiro授权实现过程解析,文中通过示例代码介绍的非常详细,对大家的学习或者工作具有一定的参考学习价值,需要的朋友可以参考下 使用Shiro过滤器实现授权 设置好授权拦截跳转的请求地址 /** * 创建ShiroFilterFactoryBean */ @Bean public ShiroFilterFactoryBean getShiroFilterFactoryBean(@Qualifier("securityManager") Defaul
-
Springboot+Shiro记录用户登录信息并获取当前登录用户信息的实现代码
由于最近做项目需要,在用户登陆后有一个功能是需要用户的信息,进行写入数据库的操作.但是目前还用不到Shiro的高级权限,只为了简单获取用户信息,自己整合了一个只记录用户,获取用户信息的功能. 导入Shiro依赖 <!-- Shiro --> <dependency> <groupId>org.apache.shiro</groupId> <artifactId>shiro-spring</artifactId> <version
-
SpringBoot+Shiro+LayUI权限管理系统项目源码
1.项目介绍 本项目旨在打造一个基于RBAC架构模式的通用的.并不复杂但易用的权限管理系统.通过本项目可以较好的理解权限系统的常见业务同时学习掌握Springboot和Shiro等诸多技术点. 2.项目源码 百度网盘链接: 链接: https://pan.baidu.com/s/1GGTe_uf0H7CvMQBP_NCRxg 提取码: 1jwr 3.功能介绍 部门管理 对于一个公司来说,下设众多部门.此处以组织机构树形式动态扩展. 角色管理 包括角色信息的增删改查.权限授予.取消操作. 权限管理
-
解决Vue+SpringBoot+Shiro跨域问题
相信大家刚开始做都会遇到这个问题,在网上找了好多也不管用,都写的不全, 在这里记录一下,希望对大家有所帮助 一.配置Vue前端 在config下index.js中配置代理信息 注意:这里的跨域配置只在开发环境中有效,打包部署后,这个跨域就不起作用了,本人也是这里卡了好久,Vue前端打包后,最好部署到nginx上,用nginx可以直接解决跨域问题 1.开发跨域配置 proxyTable: { '/api': { target: 'http://xxxx.com', //地址 changeOrigi
-
SpringBoot Shiro 权限注解不起作用的解决方法
最近在学习springboot结合shiro做权限管理时碰到一个问题. 问题如下: 我在userRealm中的doGetAuthorizationInfo方法中给用户添加了权限,然后在Controller中写了下面的代码.其中URL为/listArticle的方法必须要有article:over权限才能通过.我在doGetAuthorizationInfo方法中给该用户添加的权限并没有article:over,但是当前端向该URL发送请求时,@RequiresPermissions注解不起作用,
-
SpringBoot Mail邮件任务详情
目录 一.引言 二.简单使用 1.pom包配置 2.在application.properties中添加邮箱配置 3.编写mailService,这里只提出实现类. 4.编写test类进行测试 三.加点料 3.发送html格式邮件 3.发送带附件的邮件 4.在测试类中添加测试方法 5.发送带静态资源的邮件 四.pom中导入thymeleaf的包 五.在resorces/templates下创建emailTemplate.html 六.解析模板并发送 1.发送失败 七.异步发送 一.引言 发送邮件
-
SpringBoot中的HATEOAS详情
目录 简介 链接Links URI templates Link relations Representation models 总结 简介 SpringBoot提供了HATEOAS的便捷使用方式,本文详细讲解SpringBoot提供的这些基本方法. 链接Links HATEOAS的一个非常重要的特征就是在resources资源中包含超媒体,而超媒体最简单的表示就是链接. Spring HATEOAS为我们简化了封装Links的功能. 我们看一个HTML中的link标签的例子: <head>