springboot实现单文件和多文件上传
本文实例为大家分享了springboot实现单文件/多文件上传的具体代码,供大家参考,具体内容如下
package com.heeexy.example.controller;

import com.alibaba.fastjson.JSONObject;
import com.heeexy.example.util.CommonUtil;
import org.springframework.web.bind.annotation.*;
import org.springframework.web.multipart.MultipartFile;
import org.springframework.web.multipart.MultipartHttpServletRequest;

import javax.servlet.http.HttpServletRequest;
import java.io.*;
import java.util.*;

@RestController
@RequestMapping("/common")
public class UploadController {
 //设置上传文件夹
 File uploadPath = null;

 //单文件上传
 @PostMapping("/upload")
 public JSONObject upload(@RequestParam(value = "file", required = false)MultipartFile file,HttpServletRequest request) throws Exception{
  //定义返回客户端json对象
  JSONObject returnData = new JSONObject();
  //定义处理流对象
  BufferedOutputStream out = null;

  //将request对象转成JSONObject对象
  JSONObject jsonObject = CommonUtil.request2Json(request);
  //验证必填字段
  CommonUtil.hasAllRequired(jsonObject,"user_id,equi_id,upload_type");

  //获取当前用户id
  String user_id = jsonObject.getString("user_id");
  //获取当前设备id
  String equi_id = jsonObject.getString("equi_id");
  //获取上传文件的类型 1:巡检 2:维保
  String upload_type = jsonObject.getString("upload_type");

  //判断上传文件类型并设置前置路径
  File uploadPath = null;
  String basePath = "/root/img";     //基础文件上传路径
  String inspection = "/inspection";    //巡检文件夹路径
  String maintenance = "/maintenance";   //维保文件夹路径

  switch (upload_type){
   case "1":
    uploadPath = new File(basePath+inspection);
    break;
   case "2":
    uploadPath = new File(basePath+maintenance);
    break;
   default:
    uploadPath = new File(basePath);
  }
  //判断服务器上传文件夹是否存在
  if(!uploadPath.exists()){
   uploadPath.mkdirs();
  }
  //判断上传的文件是否为空
  if (file!=null) {
   //获取上传文件后缀
   String houzhui = file.getOriginalFilename().split("\\.")[1];
   //拼接上传文件保存路径(当前用户id+设备id+时间戳.后缀名)
   File fil = new File(uploadPath+"/"+user_id+equi_id+new Date().getTime()+"."+houzhui);
   try {
    //将上传文件保存到服务器上传文件夹目录下
    out = new BufferedOutputStream(new FileOutputStream(fil));
    out.write(file.getBytes());
    out.flush();
    out.close();
    //返回上传文件的访问路径 getAbsolutePath()返回文件上传的绝对路径
    returnData.put("message",fil.getName());
   } catch (FileNotFoundException e) {
    e.printStackTrace();
    returnData.put("message", "文件上传失败:" + e.getMessage());
   } catch (IOException e) {
    e.printStackTrace();
    returnData.put("message", "文件上传失败:" + e.getMessage());
   }finally {
    //关闭处理流
    if(out!=null){out.close();}
   }
  } else {
   returnData.put("message", "文件上传失败,文件为空");
  }
  return CommonUtil.successJson(returnData);
 }

 //多文件上传
 @PostMapping("/batchUpload")
 public JSONObject handleFileUpload(HttpServletRequest request) throws Exception{
  //定义返回客户端json对象
  JSONObject returnData = new JSONObject();
  //定义处理流对象,处理文件上传
  BufferedOutputStream stream = null;
  //定义map存储返回结果集
  Map<String,String> returnfileMap = new HashMap<String, String>();

  //获取前端上传的文件列表
  List<MultipartFile> files = ((MultipartHttpServletRequest) request).getFiles("file");
  MultipartFile file = null;

  //将request对象转成JSONObject对象
  JSONObject jsonObject = CommonUtil.request2Json(request);
  //验证必填字段,用户id,设备id,上传文件类型
  CommonUtil.hasAllRequired(jsonObject,"user_id,equi_id,upload_type");

  //获取当前用户id
  String user_id = jsonObject.getString("user_id");
  //获取当前设备id
  String equi_id = jsonObject.getString("equi_id");
  //获取上传文件的类型 1:巡检 2:维保
  String upload_type = jsonObject.getString("upload_type");

  //判断上传文件类型并设置前置路径
  File uploadPath = null;
  String basePath = "/root/img"; //基础文件上传路径
  String inspection = "/inspection"; //巡检文件夹路径
  String maintenance = "/maintenance"; //维保文件夹路径

  switch (upload_type){
   case "1":
    uploadPath = new File(basePath+inspection);
    break;
   case "2":
    uploadPath = new File(basePath+maintenance);
    break;
   default:
    uploadPath = new File(basePath);
  }
  //判断服务器上传文件夹是否存在
  if(!uploadPath.exists()){
   uploadPath.mkdirs();
  }

  //遍历客户端上传文件列表
  for (int i = 0; i < files.size(); ++i) {
   //获取到每个文件
   file = files.get(i);
    try {
     //获取上传文件后缀
     String houzhui = file.getOriginalFilename().split("\\.")[1];
     //拼接上传文件保存在服务器的路径(当前用户id+设备id+时间戳.后缀名)
     File fil = new File(uploadPath+"/"+user_id+equi_id+new Date().getTime()+"."+houzhui);
     //将上传文件保存到服务器上传文件夹目录下
     byte[] bytes = file.getBytes();
     stream = new BufferedOutputStream(new FileOutputStream(fil));
     stream.write(bytes);
     stream.close();
     //每成功上传一个文件,将上传文件名作为key,服务器保存路径作为value存入returnfileMap中
     switch (upload_type){
      case "1":
       returnfileMap.put(file.getOriginalFilename(),inspection+"/"+fil.getName());
       break;
      case "2":
       returnfileMap.put(file.getOriginalFilename(),maintenance+"/"+fil.getName());
       break;
     }
    } catch (Exception e) {
     stream = null;
     //保存上传失败的文件信息,将上传文件名作为key,value值为"fail",存入returnfileMap中
     returnfileMap.put(file.getOriginalFilename(),"fail");
    }finally {
     //关闭处理流
     if(stream!=null){stream.close();}
    }
  }
  //返回returnfileMap集合到客户端
  returnData.put("message",returnfileMap);
  return CommonUtil.successJson(returnData);
  }
 }
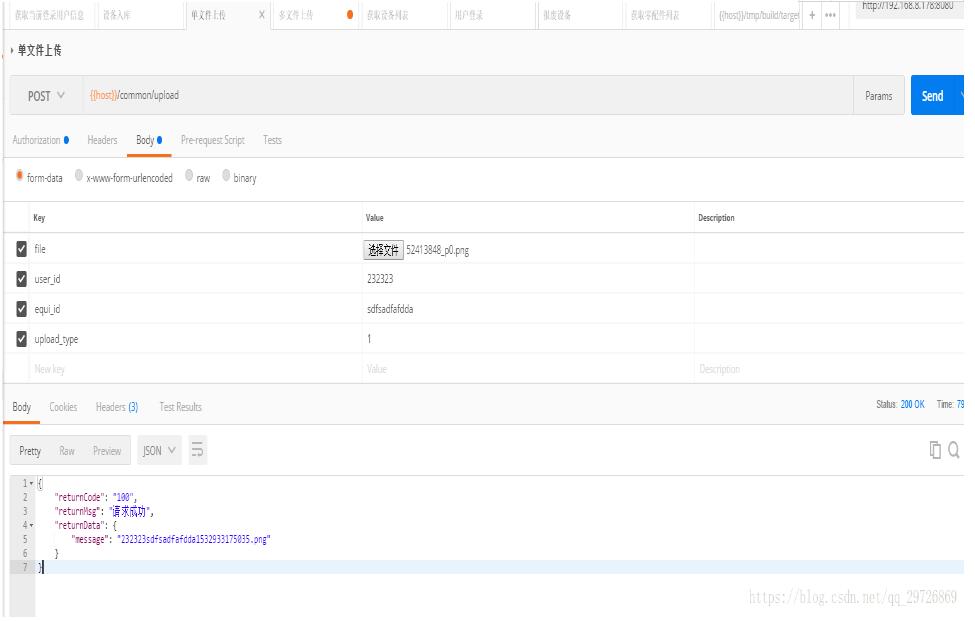
单文件文件结果

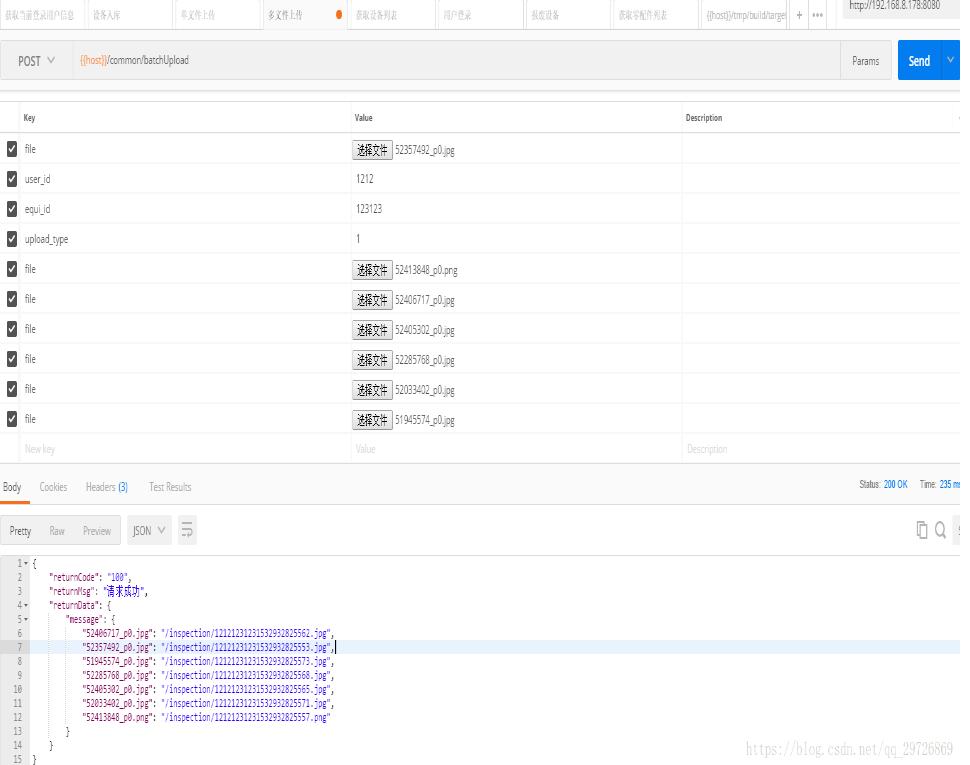
多文件上传结果

以上就是本文的全部内容,希望对大家的学习有所帮助,也希望大家多多支持我们。
赞 (0)

