探索Visual C++下创建WPF项目的方法示例
C++/CLI 下创建WPF项目的方法
由于WPF不仅仅支持C#/VB开发,还支持其他语言,比如: C++、F#等开发,于是大白我最近花了点时间摸索了一下,本文主要介绍 C++/CLI 下创建WPF项目的方法。
我使用的开发环境是: Win10 x64 + Visual Studio 2019 (16.6.1版本)。
今天我们需要使用 C++/CLI ,算是C++的一个子集吧。
要能正常使用 C++/CLI ,首先需要确保你安装了 C++/CLI build套件(见下图),同时还需要确保你安装好了Visual C++相应版本的运行库。
进入 控制面板 ,找到 Visual Studio 2019,右击"修改",然后切换到"独立组件"(Individual components)这个选项卡。

如果没安装,勾选后安装一下即可。
接下来我们可以创建项目了,建议选用模板 CLR Empty Project (.NET Framework) ,解决方案和项目名可以都用 CppWpfDemo 。

这时一个空项目就创建完成了。
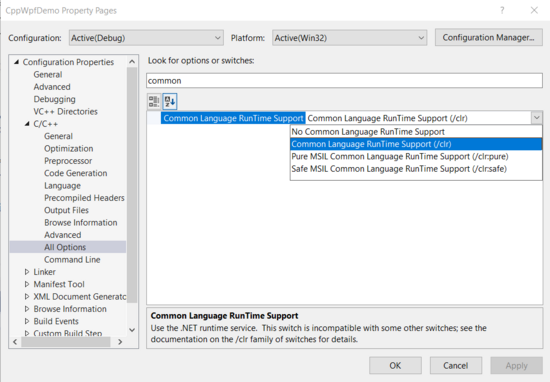
此时查看 Project的属性, Configration Properties -> "C/C++" -> "All Options",输入 "common"进行搜索,确保选中的是 Common Language Runtime Suppor(/clr) .
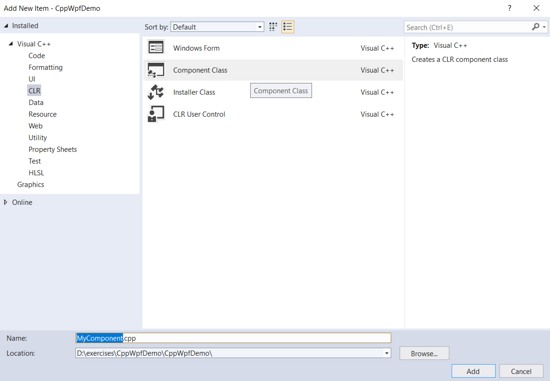
接下来我们鼠标右击项目下的文件夹"Resource Files",点"Add" -> "new item",类型选"Component Class",可使用默认的名字 MyComponent 。
此时, MyComponent.cpp 中的代码如下:
#include "MyComponent.h"
为了正确引用到 WPF 中的各种库,我们还需要加入 WPF中 3 个核心的 dll,操作方法是:
右键点击项目中的 References ,然后点 Add Reference ,勾选上:
- PresentationCore
- PresentationFramework
- WindowsBase

接下来,进行了一番倒腾,我改成了这个,做成了一个简单的界面:
此时 MyComponent.cpp 的内容如下:
#include "MyComponent.h"

using namespace CppWpfDemo;
using namespace System::Windows;
using namespace System::Windows::Controls;
using namespace System::Windows::Media;

[System::STAThreadAttribute]
int main(array<System::String^>^ args)
{
  Application^ app = gcnew Application();
  Window^ window = gcnew Window();
  window->Title = "C++/CLI WPF demo";

  TextBlock^ tb = gcnew TextBlock();
  tb->Text = "Hello WPF";

  // Add root Grid
  Grid^ rootGrid = gcnew Grid();
  rootGrid->Width = 120;
  rootGrid->Height = 120;
  RowDefinition^ myRowDef1 = gcnew RowDefinition();
  rootGrid->RowDefinitions->Add(myRowDef1);

  DataGrid^ grid = gcnew DataGrid();
  grid->Background = Brushes::LightBlue;
  grid->Width = 80;
  grid->Height = 100;

  // Define the Canvas
  Canvas^ mainCanvas = gcnew Canvas();
  mainCanvas->Children->Add(tb);
  mainCanvas->Children->Add(grid);

  Canvas::SetTop(tb, 20);
  Canvas::SetLeft(tb, 20);

  Canvas::SetTop(grid, 50);
  Canvas::SetLeft(grid, 20);

  rootGrid->Children->Add(mainCanvas);
  Grid::SetRow(mainCanvas, 0);

  window->Content = rootGrid;
  app->Run(window);

  return 0;
}
代码中的 [STAThread] 是需要的,等价于 [System::STAThread] 或 [System::STAThreadAttribute] .
还有个朋友说需要在项目属性中设置"Entry Point"的值为"main",测试过了填与不填没影响,建议别填。

接下来,可以build了。
如果出现 VCRUNTIME140.dll missing 的问题,安装一下Visual C++ Redistributable for Visual Studio 2015和 Microsoft Visual C++ 2015 Redistributable Update 3 RC可以解决,x64和x86的运行库都需要安装。
如果还不行,
- 下载VCRUNTIME140.DLL
- 以管理员权限复制这个 dll 到
C:\Windows\System32 - 检查该 dll 的文件读写权限是否为
只读,如果是只读,去掉前面的勾勾.
此时按F5(或 Ctrl + F5),运行结果如下:

美中不足的是后面一直有个命令行窗口。
网上找了下解决方案,发现将目前用的 int main() 改为 int WINAPI WinMain() 可以解决,要能使用 WinMain() 则需要引入 windows.h 头文件。
当把 #include windows.h 加到 #include "MyComponent.h" 下一行时,发现如下错误:

原因在于命令空间冲突,使得 Window 的引用出现起义。
解决方法是: 将 #include windows.h 放在代码的第一行。
此时,此时 MyComponent.cpp 的内容如下:
#include "windows.h"
#include "MyComponent.h"

using namespace System::Windows;
using namespace System::Windows::Controls;
using namespace System::Windows::Media;

[STAThread]
int WINAPI WinMain(HINSTANCE hInstance, HINSTANCE hPrevInstance,
  LPSTR lpCmd, int nCmd)
{
  Application^ app = gcnew Application();
  Window^ window = gcnew Window();
  window->Title = "C++/CLI WPF demo";

  TextBlock^ tb = gcnew TextBlock();
  tb->Text = "Hello WPF";

  // Add root Grid
  Grid^ rootGrid = gcnew Grid();
  rootGrid->Width = 120;
  rootGrid->Height = 120;
  RowDefinition^ myRowDef1 = gcnew RowDefinition();
  rootGrid->RowDefinitions->Add(myRowDef1);

  DataGrid^ grid = gcnew DataGrid();
  grid->Background = Brushes::LightBlue;
  grid->Width = 80;
  grid->Height = 100;

  // Define the Canvas
  Canvas^ mainCanvas = gcnew Canvas();
  mainCanvas->Children->Add(tb);
  mainCanvas->Children->Add(grid);

  Canvas::SetTop(tb, 20);
  Canvas::SetLeft(tb, 20);

  Canvas::SetTop(grid, 50);
  Canvas::SetLeft(grid, 20);

  rootGrid->Children->Add(mainCanvas);
  Grid::SetRow(mainCanvas, 0);

  window->Content = rootGrid;
  app->Run(window);

  return 0;
}
而运行结果为:

大白今天躺坑完毕,总算解决了问题,先酱~
第一个版本代码已上传到 github : https://github.com/yanglr/CppWpfDemo/tree/master/CppWpfDemo/CppWpfDemo .
到此这篇关于Visual C++下创建WPF项目的方法探索的文章就介绍到这了,更多相关Visual C++下创建WPF项目的方法探索内容请搜索我们以前的文章或继续浏览下面的相关文章希望大家以后多多支持我们!
相关推荐
-

在Visual Studio中用C++语言创建DLL动态链接库图文教程
什么是DLL(动态链接库)? DLL是一个包含可由多个程序同时使用的代码和数据的库.例如:在Windows操作系统中,Comdlg32 DLL执行与对话框有关的常见函数.因此,每个程序都可以使用该DLL中包含的功能来实现"打开"对话框.这有助于促进代码重用和内存的有效使用.这篇文章的目的就是让你一次性就能了解和掌握DLL. 为什么要使用DLL(动态链接库)? 代码复用是提高软件开发效率的重要途径.一般而言,只要某部分代码具有通用性,就可以将它构造成相对独立的功能模块并在之后的项目中重复
-
VS2019如何创建C++项目的实现示例
打开VS2019,选择空项目后,点击下一步(如果没有找到空项目,说明你下载的时候没勾选C++模块) 输入项目名,更改项目存放路径后,选择下一步 选择C++文件,修改程序名称,点击添加 找到"解决方案资源管理器",右键点击源文件,选择添加新建项 此时可以开始编写C++程序了 到此这篇关于VS2019如何创建C++项目的实现示例的文章就介绍到这了,更多相关VS2019创建C++项目内容请搜索我们以前的文章或继续浏览下面的相关文章希望大家以后多多支持我们!
-
VC++创建msi文件的方法
采用VC++可以编写自己软件的安装程序.这里只是创建安装程序类型的msi文件,用orca打开是正确的文件格式,值得自己记录一下了,msi数据库里面的各种表关系复杂,不是一时半刻能研究清楚的.本文仅作一浅析,实现写一个程序附到软件程序的后面,这样可以在编译完成后直接会有安装程序msi文件.就像平常下载的软件,可以写注册表,创建桌面快捷方式,注册各种软件用到的组件和功能. 具体示例程序如下: #pragma once //CRT headers. #include <TCHAR.H> //wind
-
如何使用visual studio2019创建简单的MFC窗口(使用C++)
本文介绍了如何使用visual studio2019创建简单的MFC窗口(使用C++) ```cpp 使用visual studio 2019 创建过程请参考Bili的上一篇文章⬇⬇ →!使用visual studio 2019 创建简单的MFC窗口「使用底层的C语言」 #include<windows.h> //底层实现窗口的头文件 //6.处理窗口过程 //CALLBACK 代表_stdcall 参数的传递顺序:从右到左依次入栈,并且函数返回前清空堆栈 LRESULT CALLBACK W
-
Visual Studio 2019创建C++ Hello World项目的方法
最近准备入坑c++ 使用visual studio来配c++环境,虽然visual studio很笨重,但轻松啊~~,安装后什么都不用管,就能跑c++代码了:P 不过启动项目就有一个很尴尬的问题,记录简单一下. 1.新建一个空项目 由于visual studio写代码,一定要新建工程,我们这边选择空的项目 即可 2.新建源文件 注意:只要这样创,源文件才进该项目,才能启动.调试 3.编写代码 4.启动调试 快捷键Ctrl + F5 进行编译和运行,或者点击箭头图标 到此这篇关于Visual St
-
探索Visual C++下创建WPF项目的方法示例
C++/CLI 下创建WPF项目的方法 由于WPF不仅仅支持C#/VB开发,还支持其他语言,比如: C++.F#等开发,于是大白我最近花了点时间摸索了一下,本文主要介绍 C++/CLI 下创建WPF项目的方法. 我使用的开发环境是: Win10 x64 + Visual Studio 2019 (16.6.1版本). 今天我们需要使用 C++/CLI ,算是C++的一个子集吧. 要能正常使用 C++/CLI ,首先需要确保你安装了 C++/CLI build套件(见下图),同时还需要确保你安装好
-
Visual Studio创建WPF项目
一.简介 WPF(Windows Presentation Foundation)是微软推出的基于Windows 的用户界面框架,属于.NET Framework 3.0的一部分.它提供了统一的编程模型.语言和框架,真正做到了分离界面设计人员与开发人员的工作:同时它提供了全新的多媒体交互用户图形界面. 学习WPF的基础知识:(1)WPF是微软提供的一种用来开发“桌面应用”的技术(框架),这项技术本身和C#没有关系,必须会的是xaml语法.(2)对XML.HTML.XHTML.ASP.NET之类的
-
ubuntu16.04在python3 下创建Django项目并运行的操作方法
第一步:创建django项目 打开终端,切换到期望所写项目的地址:cd python3_django_projects; 输入命令:django-admin.py startproject Hello;(即创建好了一个名为Hello的项目) 第二步:启动项目 进入Hello目录:cd Hello; 输入命令python manage.py runserver; 或 python3 manage.py runserver;(自己对应python版本) 第三步:在浏览器中输入http://127.0
-
详解pycharm的newproject左侧没有出现项目选项的情况下创建Django项目的解决方法/社区版pycharm创建django项目的方法
首先,我当时出现的问题是newproject创建的时候没有django的选项,查了半天发现我安装的pycharm是社区版本.所以需要用终端命令行的方式创建django项目. 首先,随便打开一个项目,然后在pycharm界面的左下角有Terminal终端的图标,点开. cd返回根目录 在终端输入你PycharmProjects的目录,由于我是mac 端,我输入的是:cd /Users/apple/PycharmProjects 进入目录后,输入:django-admin startproject
-
Visual Studio Code搭建django项目的方法步骤
之前我们使用VSCode搭建C#项目,今天写一篇关于django项目的搭建,其实以其说是搭建django框架,不如说是如何通过vscode开发django项目:django官网:https://www.djangoproject.com/ 安装django django安装命令:pip install django,参考:https://docs.djangoproject.com/en/3.0/topics/install/ 查看django的安装版本:python -m django --v
-
idea2020.1.3 手把手教你创建web项目的方法步骤
首先: IDEA中的项目(project)与eclipse中的项目(project)是不同的概念,IDEA的project 相当于之前eclipse的workspace,IDEA的Module是相当于eclipse的项目(project). 第一步:配置tomcat (1)点击run下面的edit configuration (2)点击template左边的三角 (3)找到Tomcat Server,有两个选项,第一个表示本地的,第二个表示远程的.这里我们因为在自己电脑,选择本地的 (4)点击c
-
社区版pycharm创建django项目的方法(pycharm的newproject左侧没有项目选项)
首先,我当时出现的问题是newproject创建的时候没有django的选项,查了半天发现我安装的pycharm是社区版本.所以需要用终端命令行的方式创建django项目. 首先,随便打开一个项目,然后在pycharm界面的左下角有Terminal终端的图标,点开. cd返回根目录 在终端输入你PycharmProjects的目录,由于我是mac 端,我输入的是:cd /Users/apple/PycharmProjects 进入目录后,输入:django-admin startproject
-
通过命令行创建vue项目的方法
最近想要学习vue,正好看到资料,如何通过命令创建vue项目的方法,就留个笔记 环境要求: 安装有 Node.js. vue.vue-cli . 创建项目: vue init webpack projectName 进入项目,下载依赖: npm install 或者 cnpm install 运行项目: npm run dev 效果如下: 创建项目 进入项目,下载依赖 启动项目 浏览器查看效果 以上就是本文的全部内容,希望对大家的学习有所帮助,也希望大家多多支持我们.
-
Linux下部署springboot项目的方法步骤
最近在研究将springboot项目部署到Linux服务器上,由于springboot是内嵌了tomcat,所以可以直接将项目打包上传至服务器上. 1.在pom文件中添加springboot的maven插件 <build> <plugins> <plugin> <groupid>org.springframework.boot</groupid> spring-boot-maven-plugin</artifactid> </p
-
vue-cli4.x创建企业级项目的方法步骤
安装脚手架(vue-cli) $ npm install @vue/cli -g //全局安装最新的脚手架 创建项目 $ vue create vue-demo 在创建项目的时候可以使用 $ vue ui 来进行创建,两种方式在创建的时候,直接选择上router和vuex,来进行项目创建 移动端Vant # 通过 npm 安装 $ npm i vant -S # 通过 yarn 安装 $ yarn add vant 我这里都是使用的按需引入,用了 babel-plugin-import 是一款