springboot植入pagerHelper的超详细教程
简介
前面个已经讲过mybatis的批量更新操作。批量操作还有时分页查询,针对项目的完善性,来讲解一下分页工具的植入pagerHelper和tk.mybatis使用。其实官网已经有具体代码,代价有空可以多多参考官网操作。链接地址MyBatis-Spring-Boot
技术方案
maven jar导入
查看官方说明引入依赖,如下:
<!--mybatis-->
<dependency>
  <groupId>org.mybatis.spring.boot</groupId>
  <artifactId>mybatis-spring-boot-starter</artifactId>
  <version>1.3.1</version>
</dependency>
<!--mapper-->
<dependency>
  <groupId>tk.mybatis</groupId>
  <artifactId>mapper-spring-boot-starter</artifactId>
  <version>1.2.4</version>
</dependency>
<!--pagehelper-->
<dependency>
  <groupId>com.github.pagehelper</groupId>
  <artifactId>pagehelper-spring-boot-starter</artifactId>
  <version>1.2.3</version>
</dependency>
maven plugin配置
引入完jar依赖之后,配置plugin插件,插件时根据maven来识别的,可以直接拷贝官网的配置即可,如下:
<plugin>
        <groupId>org.mybatis.generator</groupId>
        <artifactId>mybatis-generator-maven-plugin</artifactId>
        <version>1.3.2</version>
        <configuration>
          <configurationFile>${basedir}/src/main/resources/generator/generatorConfig.xml</configurationFile>
          <overwrite>true</overwrite>
          <verbose>true</verbose>
        </configuration>
        <dependencies>
          <dependency>
            <groupId>mysql</groupId>
            <artifactId>mysql-connector-java</artifactId>
            <version>${mysql.version}</version>
          </dependency>
          <dependency>
            <groupId>tk.mybatis</groupId>
            <artifactId>mapper-generator</artifactId>
            <version>1.0.0</version>
          </dependency>
        </dependencies>
      </plugin>
配置generatorConfig.xml
根据自己喜欢,可以定制化配置generatorConfig.xml,下面是我个人基本配置,更多配置说明,请查看官方说明MyBatis Generator 详解
<?xml version="1.0" encoding="UTF-8"?>
<!DOCTYPE generatorConfiguration
    PUBLIC "-//mybatis.org//DTD MyBatis Generator Configuration 1.0//EN"
    "http://mybatis.org/dtd/mybatis-generator-config_1_0.dtd">

<generatorConfiguration>
  <properties resource="generator/application-dev.properties"/>

  <context id="Mysql" targetRuntime="MyBatis3Simple" defaultModelType="flat">
    <property name="beginningDelimiter" value="`"/>
    <property name="endingDelimiter" value="`"/>
    <plugin type="tk.mybatis.mapper.generator.MapperPlugin">
      <property name="mappers" value="com.lgh.common.util.MyMapper"/>
    </plugin>

    <jdbcConnection driverClass="${spring.datasource.driver-class-name}"
            connectionURL="${spring.datasource.url}"
            userId="${spring.datasource.username}"
            password="${spring.datasource.password}">
    </jdbcConnection>

    <javaModelGenerator targetPackage="com.lgh.model" targetProject="src/main/java"/>

    <sqlMapGenerator targetPackage="mapper" targetProject="src/main/resources"/>

    <javaClientGenerator targetPackage="com.lgh.mapper" targetProject="src/main/java"
               type="XMLMAPPER"/>

    <!-- 数据库表 以及实体类命名 -->
    <!-- <table schema="CL_DEMO" tableName="tb_user" domainObjectName="User"
        enableCountByExample="false" enableDeleteByExample="false"
        enableSelectByExample="false" enableUpdateByExample="false"
        selectByExampleQueryId="false" />
    <table schema="CL_DEMO" tableName="tb_role" domainObjectName="Role"
        enableCountByExample="false" enableDeleteByExample="false"
        enableSelectByExample="false" enableUpdateByExample="false"
        selectByExampleQueryId="false" />
    <table schema="CL_DEMO" tableName="tb_menu" domainObjectName="Menu"
        enableCountByExample="false" enableDeleteByExample="false"
        enableSelectByExample="false" enableUpdateByExample="false"
        selectByExampleQueryId="false" />
    <table schema="CL_DEMO" tableName="tb_resource" domainObjectName="Resource"
        enableCountByExample="false" enableDeleteByExample="false"
        enableSelectByExample="false" enableUpdateByExample="false"
        selectByExampleQueryId="false" />
    <table schema="CL_DEMO" tableName="user_role" domainObjectName="UserRole"
        enableCountByExample="false" enableDeleteByExample="false"
        enableSelectByExample="false" enableUpdateByExample="false"
        selectByExampleQueryId="false" />
    <table schema="CL_DEMO" tableName="role_menu" domainObjectName="RoleMenu"
        enableCountByExample="false" enableDeleteByExample="false"
        enableSelectByExample="false" enableUpdateByExample="false"
        selectByExampleQueryId="false" />
    <table schema="CL_DEMO" tableName="menu_resource" domainObjectName="MenuResource"
        enableCountByExample="false" enableDeleteByExample="false"
        enableSelectByExample="false" enableUpdateByExample="false"
        selectByExampleQueryId="false" />
    <table schema="CL_DEMO" tableName="role_resource" domainObjectName="RoleResource"
        enableCountByExample="false" enableDeleteByExample="false"
        enableSelectByExample="false" enableUpdateByExample="false"
        selectByExampleQueryId="false" />
    <table schema="CL_DEMO" tableName="logon" domainObjectName="Logon"
        enableCountByExample="false" enableDeleteByExample="false"
        enableSelectByExample="false" enableUpdateByExample="false"
        selectByExampleQueryId="false" />-->
  </context>
</generatorConfiguration>
测试样例

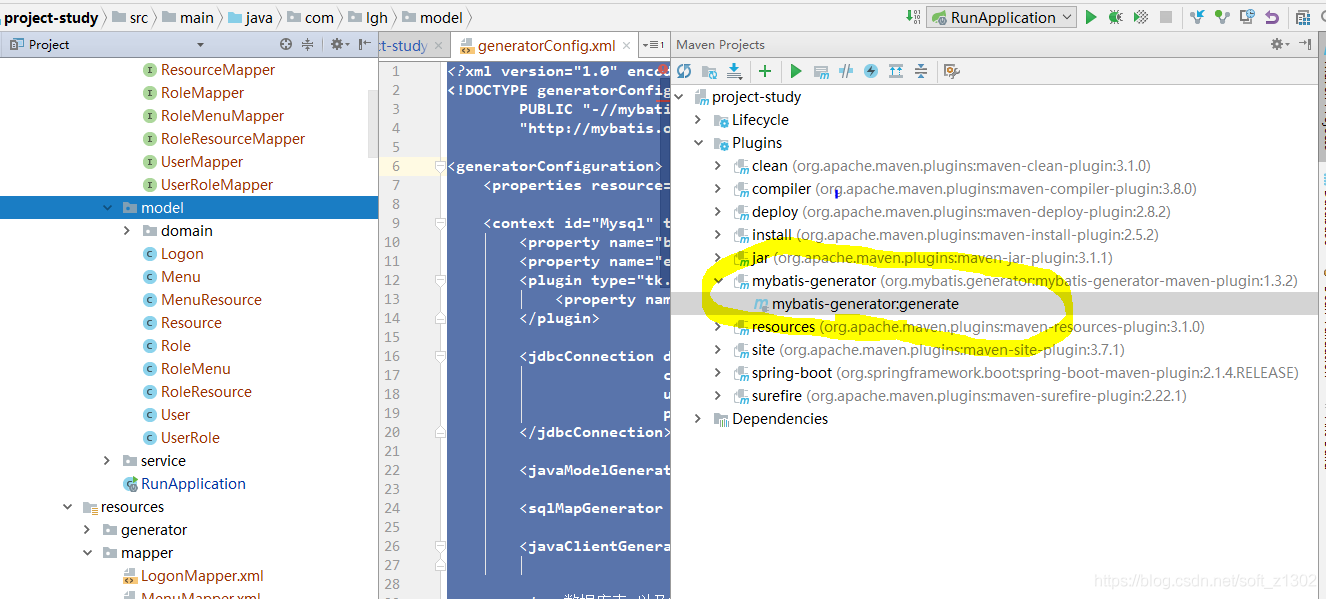
点击mybatis-generator:generate即可生成对象和映射文件,具体如上图
一般分页个人喜好建议用jdk8的lambda表达式,如://对应的lambda用法更多请查看官网分页使用方式
pageInfo = PageHelper.startPage(1, 10).doSelectPageInfo(() -> userMapper.selectGroupBy());,
总结&反思
基本操作对象,我们不要再手动一个一个的写啦,直接用mybatis插件生成。基本curd不要再自己编写xml,直接用tk.mysql操作即可。一对多情况,分页无法实现谨慎使用
源码地址
到此这篇关于springboot植入pagerHelper的文章就介绍到这了,更多相关springboot植入pagerHelper内容请搜索我们以前的文章或继续浏览下面的相关文章希望大家以后多多支持我们!
赞 (0)

