Pytorch搭建yolo3目标检测平台实现源码
目录
- yolo3实现思路
- 一、预测部分
- 1、主题网络darknet53介绍
- 2、从特征获取预测结果
- 3、预测结果的解码
- 4、在原图上进行绘制
- 二、训练部分
- 1、计算loss所需参数
- 2、pred是什么
- 3、target是什么。
- 4、loss的计算过程
- 训练自己的YoloV3模型
- 一、数据集的准备
- 二、数据集的处理
- 三、开始网络训练
- 四、训练结果预测
yolo3实现思路
一起来看看yolo3的Pytorch实现吧,顺便训练一下自己的数据。
源码下载
一、预测部分
1、主题网络darknet53介绍

YoloV3所使用的主干特征提取网络为Darknet53,它具有两个重要特点:
1、Darknet53具有一个重要特点是使用了残差网络Residual,Darknet53中的残差卷积就是首先进行一次卷积核大小为3X3、步长为2的卷积,该卷积会压缩输入进来的特征层的宽和高,此时我们可以获得一个特征层,我们将该特征层命名为layer。之后我们再对该特征层进行一次1X1的卷积和一次3X3的卷积,并把这个结果加上layer,此时我们便构成了残差结构。通过不断的1X1卷积和3X3卷积以及残差边的叠加,我们便大幅度的加深了网络。残差网络的特点是容易优化,并且能够通过增加相当的深度来提高准确率。其内部的残差块使用了跳跃连接,缓解了在深度神经网络中增加深度带来的梯度消失问题。
2、Darknet53的每一个卷积部分使用了特有的DarknetConv2D结构,每一次卷积的时候进行l2正则化,完成卷积后进行BatchNormalization标准化与LeakyReLU。普通的ReLU是将所有的负值都设为零,Leaky ReLU则是给所有负值赋予一个非零斜率。以数学的方式我们可以表示为:

实现代码为:
import math
from collections import OrderedDict
import torch.nn as nn
#---------------------------------------------------------------------#
#   残差结构
#   利用一个1x1卷积下降通道数,然后利用一个3x3卷积提取特征并且上升通道数
#   最后接上一个残差边
#---------------------------------------------------------------------#
class BasicBlock(nn.Module):
    def __init__(self, inplanes, planes):
        super(BasicBlock, self).__init__()
        self.conv1  = nn.Conv2d(inplanes, planes[0], kernel_size=1, stride=1, padding=0, bias=False)
        self.bn1    = nn.BatchNorm2d(planes[0])
        self.relu1  = nn.LeakyReLU(0.1)
        self.conv2  = nn.Conv2d(planes[0], planes[1], kernel_size=3, stride=1, padding=1, bias=False)
        self.bn2    = nn.BatchNorm2d(planes[1])
        self.relu2  = nn.LeakyReLU(0.1)
    def forward(self, x):
        residual = x
        out = self.conv1(x)
        out = self.bn1(out)
        out = self.relu1(out)
        out = self.conv2(out)
        out = self.bn2(out)
        out = self.relu2(out)
        out += residual
        return out
class DarkNet(nn.Module):
    def __init__(self, layers):
        super(DarkNet, self).__init__()
        self.inplanes = 32
        # 416,416,3 -> 416,416,32
        self.conv1  = nn.Conv2d(3, self.inplanes, kernel_size=3, stride=1, padding=1, bias=False)
        self.bn1    = nn.BatchNorm2d(self.inplanes)
        self.relu1  = nn.LeakyReLU(0.1)
        # 416,416,32 -> 208,208,64
        self.layer1 = self._make_layer([32, 64], layers[0])
        # 208,208,64 -> 104,104,128
        self.layer2 = self._make_layer([64, 128], layers[1])
        # 104,104,128 -> 52,52,256
        self.layer3 = self._make_layer([128, 256], layers[2])
        # 52,52,256 -> 26,26,512
        self.layer4 = self._make_layer([256, 512], layers[3])
        # 26,26,512 -> 13,13,1024
        self.layer5 = self._make_layer([512, 1024], layers[4])
        self.layers_out_filters = [64, 128, 256, 512, 1024]
        # 进行权值初始化
        for m in self.modules():
            if isinstance(m, nn.Conv2d):
                n = m.kernel_size[0] * m.kernel_size[1] * m.out_channels
                m.weight.data.normal_(0, math.sqrt(2. / n))
            elif isinstance(m, nn.BatchNorm2d):
                m.weight.data.fill_(1)
                m.bias.data.zero_()
    #---------------------------------------------------------------------#
    #   在每一个layer里面,首先利用一个步长为2的3x3卷积进行下采样
    #   然后进行残差结构的堆叠
    #---------------------------------------------------------------------#
    def _make_layer(self, planes, blocks):
        layers = []
        # 下采样,步长为2,卷积核大小为3
        layers.append(("ds_conv", nn.Conv2d(self.inplanes, planes[1], kernel_size=3, stride=2, padding=1, bias=False)))
        layers.append(("ds_bn", nn.BatchNorm2d(planes[1])))
        layers.append(("ds_relu", nn.LeakyReLU(0.1)))
        # 加入残差结构
        self.inplanes = planes[1]
        for i in range(0, blocks):
            layers.append(("residual_{}".format(i), BasicBlock(self.inplanes, planes)))
        return nn.Sequential(OrderedDict(layers))
    def forward(self, x):
        x = self.conv1(x)
        x = self.bn1(x)
        x = self.relu1(x)
        x = self.layer1(x)
        x = self.layer2(x)
        out3 = self.layer3(x)
        out4 = self.layer4(out3)
        out5 = self.layer5(out4)
        return out3, out4, out5
def darknet53():
    model = DarkNet([1, 2, 8, 8, 4])
    return model
2、从特征获取预测结果

从特征获取预测结果的过程可以分为两个部分,分别是:
构建FPN特征金字塔进行加强特征提取。
利用Yolo Head对三个有效特征层进行预测。
a、构建FPN特征金字塔进行加强特征提取
在特征利用部分,YoloV3提取多特征层进行目标检测,一共提取三个特征层。三个特征层位于主干部分Darknet53的不同位置,分别位于中间层,中下层,底层,三个特征层的shape分别为(52,52,256)、(26,26,512)、(13,13,1024)。
在获得三个有效特征层后,我们利用这三个有效特征层进行FPN层的构建,构建方式为:
- 13x13x1024的特征层进行5次卷积处理,处理完后利用YoloHead获得预测结果,一部分用于进行上采样UmSampling2d后与26x26x512特征层进行结合,结合特征层的shape为(26,26,768)。
- 结合特征层再次进行5次卷积处理,处理完后利用YoloHead获得预测结果,一部分用于进行上采样UmSampling2d后与52x52x256特征层进行结合,结合特征层的shape为(52,52,384)。
- 结合特征层再次进行5次卷积处理,处理完后利用YoloHead获得预测结果。
特征金字塔可以将不同shape的特征层进行特征融合,有利于提取出更好的特征。
b、利用Yolo Head获得预测结果
利用FPN特征金字塔,我们可以获得三个加强特征,这三个加强特征的shape分别为(13,13,512)、(26,26,256)、(52,52,128),然后我们利用这三个shape的特征层传入Yolo Head获得预测结果。
Yolo Head本质上是一次3x3卷积加上一次1x1卷积,3x3卷积的作用是特征整合,1x1卷积的作用是调整通道数。
对三个特征层分别进行处理,假设我们预测是的VOC数据集,我们的输出层的shape分别为(13,13,75),(26,26,75),(52,52,75),最后一个维度为75是因为该图是基于voc数据集的,它的类为20种,YoloV3针对每一个特征层的每一个特征点存在3个先验框,所以预测结果的通道数为3x25;如果使用的是coco训练集,类则为80种,最后的维度应该为255 = 3x85,三个特征层的shape为(13,13,255),(26,26,255),(52,52,255)
其实际情况就是,输入N张416x416的图片,在经过多层的运算后,会输出三个shape分别为(N,13,13,255),(N,26,26,255),(N,52,52,255)的数据,对应每个图分为13x13、26x26、52x52的网格上3个先验框的位置。
实现代码如下:
from collections import OrderedDict
import torch
import torch.nn as nn
from nets.darknet import darknet53
def conv2d(filter_in, filter_out, kernel_size):
    pad = (kernel_size - 1) // 2 if kernel_size else 0
    return nn.Sequential(OrderedDict([
        ("conv", nn.Conv2d(filter_in, filter_out, kernel_size=kernel_size, stride=1, padding=pad, bias=False)),
        ("bn", nn.BatchNorm2d(filter_out)),
        ("relu", nn.LeakyReLU(0.1)),
    ]))
#------------------------------------------------------------------------#
#   make_last_layers里面一共有七个卷积,前五个用于提取特征。
#   后两个用于获得yolo网络的预测结果
#------------------------------------------------------------------------#
def make_last_layers(filters_list, in_filters, out_filter):
    m = nn.Sequential(
        conv2d(in_filters, filters_list[0], 1),
        conv2d(filters_list[0], filters_list[1], 3),
        conv2d(filters_list[1], filters_list[0], 1),
        conv2d(filters_list[0], filters_list[1], 3),
        conv2d(filters_list[1], filters_list[0], 1),
        conv2d(filters_list[0], filters_list[1], 3),
        nn.Conv2d(filters_list[1], out_filter, kernel_size=1, stride=1, padding=0, bias=True)
    )
    return m
class YoloBody(nn.Module):
    def __init__(self, anchors_mask, num_classes):
        super(YoloBody, self).__init__()
        #---------------------------------------------------#
        #   生成darknet53的主干模型
        #   获得三个有效特征层,他们的shape分别是:
        #   52,52,256
        #   26,26,512
        #   13,13,1024
        #---------------------------------------------------#
        self.backbone = darknet53()
        #---------------------------------------------------#
        #   out_filters : [64, 128, 256, 512, 1024]
        #---------------------------------------------------#
        out_filters = self.backbone.layers_out_filters
        #------------------------------------------------------------------------#
        #   计算yolo_head的输出通道数,对于voc数据集而言
        #   final_out_filter0 = final_out_filter1 = final_out_filter2 = 75
        #------------------------------------------------------------------------#
        self.last_layer0            = make_last_layers([512, 1024], out_filters[-1], len(anchors_mask[0]) * (num_classes + 5))
        self.last_layer1_conv       = conv2d(512, 256, 1)
        self.last_layer1_upsample   = nn.Upsample(scale_factor=2, mode='nearest')
        self.last_layer1            = make_last_layers([256, 512], out_filters[-2] + 256, len(anchors_mask[1]) * (num_classes + 5))
        self.last_layer2_conv       = conv2d(256, 128, 1)
        self.last_layer2_upsample   = nn.Upsample(scale_factor=2, mode='nearest')
        self.last_layer2            = make_last_layers([128, 256], out_filters[-3] + 128, len(anchors_mask[2]) * (num_classes + 5))
    def forward(self, x):
        #---------------------------------------------------#
        #   获得三个有效特征层,他们的shape分别是:
        #   52,52,256;26,26,512;13,13,1024
        #---------------------------------------------------#
        x2, x1, x0 = self.backbone(x)
        #---------------------------------------------------#
        #   第一个特征层
        #   out0 = (batch_size,255,13,13)
        #---------------------------------------------------#
        # 13,13,1024 -> 13,13,512 -> 13,13,1024 -> 13,13,512 -> 13,13,1024 -> 13,13,512
        out0_branch = self.last_layer0[:5](x0)
        out0        = self.last_layer0[5:](out0_branch)
        # 13,13,512 -> 13,13,256 -> 26,26,256
        x1_in = self.last_layer1_conv(out0_branch)
        x1_in = self.last_layer1_upsample(x1_in)
        # 26,26,256 + 26,26,512 -> 26,26,768
        x1_in = torch.cat([x1_in, x1], 1)
        #---------------------------------------------------#
        #   第二个特征层
        #   out1 = (batch_size,255,26,26)
        #---------------------------------------------------#
        # 26,26,768 -> 26,26,256 -> 26,26,512 -> 26,26,256 -> 26,26,512 -> 26,26,256
        out1_branch = self.last_layer1[:5](x1_in)
        out1        = self.last_layer1[5:](out1_branch)
        # 26,26,256 -> 26,26,128 -> 52,52,128
        x2_in = self.last_layer2_conv(out1_branch)
        x2_in = self.last_layer2_upsample(x2_in)
        # 52,52,128 + 52,52,256 -> 52,52,384
        x2_in = torch.cat([x2_in, x2], 1)
        #---------------------------------------------------#
        #   第一个特征层
        #   out3 = (batch_size,255,52,52)
        #---------------------------------------------------#
        # 52,52,384 -> 52,52,128 -> 52,52,256 -> 52,52,128 -> 52,52,256 -> 52,52,128
        out2 = self.last_layer2(x2_in)
        return out0, out1, out2
3、预测结果的解码
由第二步我们可以获得三个特征层的预测结果,shape分别为:
- (N,13,13,255)
- (N,26,26,255)
- (N,52,52,255)
在这里我们简单了解一下每个有效特征层到底做了什么:每一个有效特征层将整个图片分成与其长宽对应的网格,如(N,13,13,255)的特征层就是将整个图像分成13x13个网格;然后从每个网格中心建立多个先验框,这些框是网络预先设定好的框,网络的预测结果会判断这些框内是否包含物体,以及这个物体的种类。
由于每一个网格点都具有三个先验框,所以上述的预测结果可以reshape为:
- (N,13,13,3,85)
- (N,26,26,3,85)
- (N,52,52,3,85)
其中的85可以拆分为4+1+80,其中的4代表先验框的调整参数,1代表先验框内是否包含物体,80代表的是这个先验框的种类,由于coco分了80类,所以这里是80。如果YoloV3只检测两类物体,那么这个85就变为了4+1+2 = 7。
即85包含了4+1+80,分别代表x_offset、y_offset、h和w、置信度、分类结果。
但是这个预测结果并不对应着最终的预测框在图片上的位置,还需要解码才可以完成。
YoloV3的解码过程分为两步:
- 先将每个网格点加上它对应的x_offset和y_offset,加完后的结果就是预测框的中心。
- 然后再利用 先验框和h、w结合 计算出预测框的宽高。这样就能得到整个预测框的位置了。
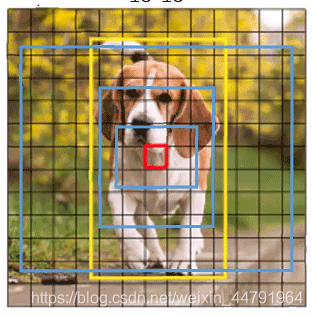
得到最终的预测结果后还要进行得分排序与非极大抑制筛选。
这一部分基本上是所有目标检测通用的部分。其对于每一个类进行判别:
1、取出每一类得分大于self.obj_threshold的框和得分。
2、利用框的位置和得分进行非极大抑制。
实现代码如下
import torch
import torch.nn as nn
from torchvision.ops import nms
import numpy as np
class DecodeBox():
    def __init__(self, anchors, num_classes, input_shape, anchors_mask = [[6,7,8], [3,4,5], [0,1,2]]):
        super(DecodeBox, self).__init__()
        self.anchors        = anchors
        self.num_classes    = num_classes
        self.bbox_attrs     = 5 + num_classes
        self.input_shape    = input_shape
        #-----------------------------------------------------------#
        #   13x13的特征层对应的anchor是[116,90],[156,198],[373,326]
        #   26x26的特征层对应的anchor是[30,61],[62,45],[59,119]
        #   52x52的特征层对应的anchor是[10,13],[16,30],[33,23]
        #-----------------------------------------------------------#
        self.anchors_mask   = anchors_mask
    def decode_box(self, inputs):
        outputs = []
        for i, input in enumerate(inputs):
            #-----------------------------------------------#
            #   输入的input一共有三个,他们的shape分别是
            #   batch_size, 255, 13, 13
            #   batch_size, 255, 26, 26
            #   batch_size, 255, 52, 52
            #-----------------------------------------------#
            batch_size      = input.size(0)
            input_height    = input.size(2)
            input_width     = input.size(3)
            #-----------------------------------------------#
            #   输入为416x416时
            #   stride_h = stride_w = 32、16、8
            #-----------------------------------------------#
            stride_h = self.input_shape[0] / input_height
            stride_w = self.input_shape[1] / input_width
            #-------------------------------------------------#
            #   此时获得的scaled_anchors大小是相对于特征层的
            #-------------------------------------------------#
            scaled_anchors = [(anchor_width / stride_w, anchor_height / stride_h) for anchor_width, anchor_height in self.anchors[self.anchors_mask[i]]]
            #-----------------------------------------------#
            #   输入的input一共有三个,他们的shape分别是
            #   batch_size, 3, 13, 13, 85
            #   batch_size, 3, 26, 26, 85
            #   batch_size, 3, 52, 52, 85
            #-----------------------------------------------#
            prediction = input.view(batch_size, len(self.anchors_mask[i]),
                                    self.bbox_attrs, input_height, input_width).permute(0, 1, 3, 4, 2).contiguous()
            #-----------------------------------------------#
            #   先验框的中心位置的调整参数
            #-----------------------------------------------#
            x = torch.sigmoid(prediction[..., 0])
            y = torch.sigmoid(prediction[..., 1])
            #-----------------------------------------------#
            #   先验框的宽高调整参数
            #-----------------------------------------------#
            w = prediction[..., 2]
            h = prediction[..., 3]
            #-----------------------------------------------#
            #   获得置信度,是否有物体
            #-----------------------------------------------#
            conf        = torch.sigmoid(prediction[..., 4])
            #-----------------------------------------------#
            #   种类置信度
            #-----------------------------------------------#
            pred_cls    = torch.sigmoid(prediction[..., 5:])
            FloatTensor = torch.cuda.FloatTensor if x.is_cuda else torch.FloatTensor
            LongTensor  = torch.cuda.LongTensor if x.is_cuda else torch.LongTensor
            #----------------------------------------------------------#
            #   生成网格,先验框中心,网格左上角
            #   batch_size,3,13,13
            #----------------------------------------------------------#
            grid_x = torch.linspace(0, input_width - 1, input_width).repeat(input_height, 1).repeat(
                batch_size * len(self.anchors_mask[i]), 1, 1).view(x.shape).type(FloatTensor)
            grid_y = torch.linspace(0, input_height - 1, input_height).repeat(input_width, 1).t().repeat(
                batch_size * len(self.anchors_mask[i]), 1, 1).view(y.shape).type(FloatTensor)
            #----------------------------------------------------------#
            #   按照网格格式生成先验框的宽高
            #   batch_size,3,13,13
            #----------------------------------------------------------#
            anchor_w = FloatTensor(scaled_anchors).index_select(1, LongTensor([0]))
            anchor_h = FloatTensor(scaled_anchors).index_select(1, LongTensor([1]))
            anchor_w = anchor_w.repeat(batch_size, 1).repeat(1, 1, input_height * input_width).view(w.shape)
            anchor_h = anchor_h.repeat(batch_size, 1).repeat(1, 1, input_height * input_width).view(h.shape)
            #----------------------------------------------------------#
            #   利用预测结果对先验框进行调整
            #   首先调整先验框的中心,从先验框中心向右下角偏移
            #   再调整先验框的宽高。
            #----------------------------------------------------------#
            pred_boxes          = FloatTensor(prediction[..., :4].shape)
            pred_boxes[..., 0]  = x.data + grid_x
            pred_boxes[..., 1]  = y.data + grid_y
            pred_boxes[..., 2]  = torch.exp(w.data) * anchor_w
            pred_boxes[..., 3]  = torch.exp(h.data) * anchor_h
            #----------------------------------------------------------#
            #   将输出结果归一化成小数的形式
            #----------------------------------------------------------#
            _scale = torch.Tensor([input_width, input_height, input_width, input_height]).type(FloatTensor)
            output = torch.cat((pred_boxes.view(batch_size, -1, 4) / _scale,
                                conf.view(batch_size, -1, 1), pred_cls.view(batch_size, -1, self.num_classes)), -1)
            outputs.append(output.data)
        return outputs
    def yolo_correct_boxes(self, box_xy, box_wh, input_shape, image_shape, letterbox_image):
        #-----------------------------------------------------------------#
        #   把y轴放前面是因为方便预测框和图像的宽高进行相乘
        #-----------------------------------------------------------------#
        box_yx = box_xy[..., ::-1]
        box_hw = box_wh[..., ::-1]
        input_shape = np.array(input_shape)
        image_shape = np.array(image_shape)
        if letterbox_image:
            #-----------------------------------------------------------------#
            #   这里求出来的offset是图像有效区域相对于图像左上角的偏移情况
            #   new_shape指的是宽高缩放情况
            #-----------------------------------------------------------------#
            new_shape = np.round(image_shape * np.min(input_shape/image_shape))
            offset  = (input_shape - new_shape)/2./input_shape
            scale   = input_shape/new_shape
            box_yx  = (box_yx - offset) * scale
            box_hw *= scale
        box_mins    = box_yx - (box_hw / 2.)
        box_maxes   = box_yx + (box_hw / 2.)
        boxes  = np.concatenate([box_mins[..., 0:1], box_mins[..., 1:2], box_maxes[..., 0:1], box_maxes[..., 1:2]], axis=-1)
        boxes *= np.concatenate([image_shape, image_shape], axis=-1)
        return boxes
    def non_max_suppression(self, prediction, num_classes, input_shape, image_shape, letterbox_image, conf_thres=0.5, nms_thres=0.4):
        #----------------------------------------------------------#
        #   将预测结果的格式转换成左上角右下角的格式。
        #   prediction  [batch_size, num_anchors, 85]
        #----------------------------------------------------------#
        box_corner          = prediction.new(prediction.shape)
        box_corner[:, :, 0] = prediction[:, :, 0] - prediction[:, :, 2] / 2
        box_corner[:, :, 1] = prediction[:, :, 1] - prediction[:, :, 3] / 2
        box_corner[:, :, 2] = prediction[:, :, 0] + prediction[:, :, 2] / 2
        box_corner[:, :, 3] = prediction[:, :, 1] + prediction[:, :, 3] / 2
        prediction[:, :, :4] = box_corner[:, :, :4]
        output = [None for _ in range(len(prediction))]
        for i, image_pred in enumerate(prediction):
            #----------------------------------------------------------#
            #   对种类预测部分取max。
            #   class_conf  [num_anchors, 1]    种类置信度
            #   class_pred  [num_anchors, 1]    种类
            #----------------------------------------------------------#
            class_conf, class_pred = torch.max(image_pred[:, 5:5 + num_classes], 1, keepdim=True)
            #----------------------------------------------------------#
            #   利用置信度进行第一轮筛选
            #----------------------------------------------------------#
            conf_mask = (image_pred[:, 4] * class_conf[:, 0] >= conf_thres).squeeze()
            #----------------------------------------------------------#
            #   根据置信度进行预测结果的筛选
            #----------------------------------------------------------#
            image_pred = image_pred[conf_mask]
            class_conf = class_conf[conf_mask]
            class_pred = class_pred[conf_mask]
            if not image_pred.size(0):
                continue
            #-------------------------------------------------------------------------#
            #   detections  [num_anchors, 7]
            #   7的内容为:x1, y1, x2, y2, obj_conf, class_conf, class_pred
            #-------------------------------------------------------------------------#
            detections = torch.cat((image_pred[:, :5], class_conf.float(), class_pred.float()), 1)
            #------------------------------------------#
            #   获得预测结果中包含的所有种类
            #------------------------------------------#
            unique_labels = detections[:, -1].cpu().unique()
            if prediction.is_cuda:
                unique_labels = unique_labels.cuda()
                detections = detections.cuda()
            for c in unique_labels:
                #------------------------------------------#
                #   获得某一类得分筛选后全部的预测结果
                #------------------------------------------#
                detections_class = detections[detections[:, -1] == c]
                #------------------------------------------#
                #   使用官方自带的非极大抑制会速度更快一些!
                #------------------------------------------#
                keep = nms(
                    detections_class[:, :4],
                    detections_class[:, 4] * detections_class[:, 5],
                    nms_thres
                )
                max_detections = detections_class[keep]
                # # 按照存在物体的置信度排序
                # _, conf_sort_index = torch.sort(detections_class[:, 4]*detections_class[:, 5], descending=True)
                # detections_class = detections_class[conf_sort_index]
                # # 进行非极大抑制
                # max_detections = []
                # while detections_class.size(0):
                #     # 取出这一类置信度最高的,一步一步往下判断,判断重合程度是否大于nms_thres,如果是则去除掉
                #     max_detections.append(detections_class[0].unsqueeze(0))
                #     if len(detections_class) == 1:
                #         break
                #     ious = bbox_iou(max_detections[-1], detections_class[1:])
                #     detections_class = detections_class[1:][ious < nms_thres]
                # # 堆叠
                # max_detections = torch.cat(max_detections).data
                # Add max detections to outputs
                output[i] = max_detections if output[i] is None else torch.cat((output[i], max_detections))
            if output[i] is not None:
                output[i]           = output[i].cpu().numpy()
                box_xy, box_wh      = (output[i][:, 0:2] + output[i][:, 2:4])/2, output[i][:, 2:4] - output[i][:, 0:2]
                output[i][:, :4]    = self.yolo_correct_boxes(box_xy, box_wh, input_shape, image_shape, letterbox_image)
        return output
4、在原图上进行绘制
通过第三步,我们可以获得预测框在原图上的位置,而且这些预测框都是经过筛选的。
这些筛选后的框可以直接绘制在图片上,就可以获得结果了。
二、训练部分
1、计算loss所需参数
在计算loss的时候,实际上是pred和target之间的对比:
pred就是网络的预测结果。
target就是网络的真实框情况。
2、pred是什么
对于yolo3的模型来说,网络最后输出的内容就是三个特征层每个网格点对应的预测框及其种类,即三个特征层分别对应着图片被分为不同size的网格后,每个网格点上三个先验框对应的位置、置信度及其种类。
输出层的shape分别为(13,13,75),(26,26,75),(52,52,75),最后一个维度为75是因为是基于voc数据集的,它的类为20种,yolo3只有针对每一个特征层存在3个先验框,所以最后维度为3x25;
如果使用的是coco训练集,类则为80种,最后的维度应该为255 = 3x85,三个特征层的shape为(13,13,255),(26,26,255),(52,52,255)
现在的y_pre还是没有解码的,解码了之后才是真实图像上的情况。
3、target是什么。
target就是一个真实图像中,真实框的情况。第一个维度是batch_size,第二个维度是每一张图片里面真实框的数量,第三个维度内部是真实框的信息,包括位置以及种类。
4、loss的计算过程
拿到pred和target后,不可以简单的减一下作为对比,需要进行如下步骤。
- 判断真实框在图片中的位置,判断其属于哪一个网格点去检测。判断真实框和这个特征点的哪个先验框重合程度最高。计算该网格点应该有怎么样的预测结果才能获得真实框,与真实框重合度最高的先验框被用于作为正样本。
- 根据网络的预测结果获得预测框,计算预测框和所有真实框的重合程度,如果重合程度大于一定门限,则将该预测框对应的先验框忽略。其余作为负样本。
- 最终损失由三个部分组成:a、正样本,编码后的长宽与xy轴偏移量与预测值的差距。b、正样本,预测结果中置信度的值与1对比;负样本,预测结果中置信度的值与0对比。c、实际存在的框,种类预测结果与实际结果的对比。
import torch
import torch.nn as nn
import math
import numpy as np
class YOLOLoss(nn.Module):
    def __init__(self, anchors, num_classes, input_shape, cuda, anchors_mask = [[6,7,8], [3,4,5], [0,1,2]]):
        super(YOLOLoss, self).__init__()
        #-----------------------------------------------------------#
        #   13x13的特征层对应的anchor是[116,90],[156,198],[373,326]
        #   26x26的特征层对应的anchor是[30,61],[62,45],[59,119]
        #   52x52的特征层对应的anchor是[10,13],[16,30],[33,23]
        #-----------------------------------------------------------#
        self.anchors        = anchors
        self.num_classes    = num_classes
        self.bbox_attrs     = 5 + num_classes
        self.input_shape    = input_shape
        self.anchors_mask   = anchors_mask
        self.ignore_threshold = 0.7
        self.cuda = cuda
    def clip_by_tensor(self, t, t_min, t_max):
        t = t.float()
        result = (t >= t_min).float() * t + (t < t_min).float() * t_min
        result = (result <= t_max).float() * result + (result > t_max).float() * t_max
        return result
    def MSELoss(self, pred, target):
        return torch.pow(pred - target, 2)
    def BCELoss(self, pred, target):
        epsilon = 1e-7
        pred    = self.clip_by_tensor(pred, epsilon, 1.0 - epsilon)
        output  = - target * torch.log(pred) - (1.0 - target) * torch.log(1.0 - pred)
        return output
    def forward(self, l, input, targets=None):
        #----------------------------------------------------#
        #   l代表的是,当前输入进来的有效特征层,是第几个有效特征层
        #   input的shape为  bs, 3*(5+num_classes), 13, 13
        #                   bs, 3*(5+num_classes), 26, 26
        #                   bs, 3*(5+num_classes), 52, 52
        #   targets代表的是真实框。
        #----------------------------------------------------#
        #--------------------------------#
        #   获得图片数量,特征层的高和宽
        #   13和13
        #--------------------------------#
        bs      = input.size(0)
        in_h    = input.size(2)
        in_w    = input.size(3)
        #-----------------------------------------------------------------------#
        #   计算步长
        #   每一个特征点对应原来的图片上多少个像素点
        #   如果特征层为13x13的话,一个特征点就对应原来的图片上的32个像素点
        #   如果特征层为26x26的话,一个特征点就对应原来的图片上的16个像素点
        #   如果特征层为52x52的话,一个特征点就对应原来的图片上的8个像素点
        #   stride_h = stride_w = 32、16、8
        #   stride_h和stride_w都是32。
        #-----------------------------------------------------------------------#
        stride_h = self.input_shape[0] / in_h
        stride_w = self.input_shape[1] / in_w
        #-------------------------------------------------#
        #   此时获得的scaled_anchors大小是相对于特征层的
        #-------------------------------------------------#
        scaled_anchors  = [(a_w / stride_w, a_h / stride_h) for a_w, a_h in self.anchors]
        #-----------------------------------------------#
        #   输入的input一共有三个,他们的shape分别是
        #   bs, 3*(5+num_classes), 13, 13 => batch_size, 3, 13, 13, 5 + num_classes
        #   batch_size, 3, 26, 26, 5 + num_classes
        #   batch_size, 3, 52, 52, 5 + num_classes
        #-----------------------------------------------#
        prediction = input.view(bs, len(self.anchors_mask[l]), self.bbox_attrs, in_h, in_w).permute(0, 1, 3, 4, 2).contiguous()
        #-----------------------------------------------#
        #   先验框的中心位置的调整参数
        #-----------------------------------------------#
        x = torch.sigmoid(prediction[..., 0])
        y = torch.sigmoid(prediction[..., 1])
        #-----------------------------------------------#
        #   先验框的宽高调整参数
        #-----------------------------------------------#
        w = prediction[..., 2]
        h = prediction[..., 3]
        #-----------------------------------------------#
        #   获得置信度,是否有物体
        #-----------------------------------------------#
        conf = torch.sigmoid(prediction[..., 4])
        #-----------------------------------------------#
        #   种类置信度
        #-----------------------------------------------#
        pred_cls = torch.sigmoid(prediction[..., 5:])
        #-----------------------------------------------#
        #   获得网络应该有的预测结果
        #-----------------------------------------------#
        y_true, noobj_mask, box_loss_scale = self.get_target(l, targets, scaled_anchors, in_h, in_w)
        #---------------------------------------------------------------#
        #   将预测结果进行解码,判断预测结果和真实值的重合程度
        #   如果重合程度过大则忽略,因为这些特征点属于预测比较准确的特征点
        #   作为负样本不合适
        #----------------------------------------------------------------#
        noobj_mask = self.get_ignore(l, x, y, h, w, targets, scaled_anchors, in_h, in_w, noobj_mask)
        if self.cuda:
            y_true          = y_true.cuda()
            noobj_mask      = noobj_mask.cuda()
            box_loss_scale  = box_loss_scale.cuda()
        #-----------------------------------------------------------#
        #   reshape_y_true[...,2:3]和reshape_y_true[...,3:4]
        #   表示真实框的宽高,二者均在0-1之间
        #   真实框越大,比重越小,小框的比重更大。
        #-----------------------------------------------------------#
        box_loss_scale = 2 - box_loss_scale
        #-----------------------------------------------------------#
        #   计算中心偏移情况的loss,使用BCELoss效果好一些
        #-----------------------------------------------------------#
        loss_x = torch.sum(self.BCELoss(x, y_true[..., 0]) * box_loss_scale * y_true[..., 4])
        loss_y = torch.sum(self.BCELoss(y, y_true[..., 1]) * box_loss_scale * y_true[..., 4])
        #-----------------------------------------------------------#
        #   计算宽高调整值的loss
        #-----------------------------------------------------------#
        loss_w = torch.sum(self.MSELoss(w, y_true[..., 2]) * 0.5 * box_loss_scale * y_true[..., 4])
        loss_h = torch.sum(self.MSELoss(h, y_true[..., 3]) * 0.5 * box_loss_scale * y_true[..., 4])
        #-----------------------------------------------------------#
        #   计算置信度的loss
        #-----------------------------------------------------------#
        loss_conf   = torch.sum(self.BCELoss(conf, y_true[..., 4]) * y_true[..., 4]) + \
                      torch.sum(self.BCELoss(conf, y_true[..., 4]) * noobj_mask)
        loss_cls    = torch.sum(self.BCELoss(pred_cls[y_true[..., 4] == 1], y_true[..., 5:][y_true[..., 4] == 1]))
        loss        = loss_x  + loss_y + loss_w + loss_h + loss_conf + loss_cls
        num_pos = torch.sum(y_true[..., 4])
        num_pos = torch.max(num_pos, torch.ones_like(num_pos))
        return loss, num_pos
    def calculate_iou(self, _box_a, _box_b):
        #-----------------------------------------------------------#
        #   计算真实框的左上角和右下角
        #-----------------------------------------------------------#
        b1_x1, b1_x2 = _box_a[:, 0] - _box_a[:, 2] / 2, _box_a[:, 0] + _box_a[:, 2] / 2
        b1_y1, b1_y2 = _box_a[:, 1] - _box_a[:, 3] / 2, _box_a[:, 1] + _box_a[:, 3] / 2
        #-----------------------------------------------------------#
        #   计算先验框获得的预测框的左上角和右下角
        #-----------------------------------------------------------#
        b2_x1, b2_x2 = _box_b[:, 0] - _box_b[:, 2] / 2, _box_b[:, 0] + _box_b[:, 2] / 2
        b2_y1, b2_y2 = _box_b[:, 1] - _box_b[:, 3] / 2, _box_b[:, 1] + _box_b[:, 3] / 2
        #-----------------------------------------------------------#
        #   将真实框和预测框都转化成左上角右下角的形式
        #-----------------------------------------------------------#
        box_a = torch.zeros_like(_box_a)
        box_b = torch.zeros_like(_box_b)
        box_a[:, 0], box_a[:, 1], box_a[:, 2], box_a[:, 3] = b1_x1, b1_y1, b1_x2, b1_y2
        box_b[:, 0], box_b[:, 1], box_b[:, 2], box_b[:, 3] = b2_x1, b2_y1, b2_x2, b2_y2
        #-----------------------------------------------------------#
        #   A为真实框的数量,B为先验框的数量
        #-----------------------------------------------------------#
        A = box_a.size(0)
        B = box_b.size(0)
        #-----------------------------------------------------------#
        #   计算交的面积
        #-----------------------------------------------------------#
        max_xy  = torch.min(box_a[:, 2:].unsqueeze(1).expand(A, B, 2), box_b[:, 2:].unsqueeze(0).expand(A, B, 2))
        min_xy  = torch.max(box_a[:, :2].unsqueeze(1).expand(A, B, 2), box_b[:, :2].unsqueeze(0).expand(A, B, 2))
        inter   = torch.clamp((max_xy - min_xy), min=0)
        inter   = inter[:, :, 0] * inter[:, :, 1]
        #-----------------------------------------------------------#
        #   计算预测框和真实框各自的面积
        #-----------------------------------------------------------#
        area_a = ((box_a[:, 2]-box_a[:, 0]) * (box_a[:, 3]-box_a[:, 1])).unsqueeze(1).expand_as(inter)  # [A,B]
        area_b = ((box_b[:, 2]-box_b[:, 0]) * (box_b[:, 3]-box_b[:, 1])).unsqueeze(0).expand_as(inter)  # [A,B]
        #-----------------------------------------------------------#
        #   求IOU
        #-----------------------------------------------------------#
        union = area_a + area_b - inter
        return inter / union  # [A,B]
    def get_target(self, l, targets, anchors, in_h, in_w):
        #-----------------------------------------------------#
        #   计算一共有多少张图片
        #-----------------------------------------------------#
        bs              = len(targets)
        #-----------------------------------------------------#
        #   用于选取哪些先验框不包含物体
        #-----------------------------------------------------#
        noobj_mask      = torch.ones(bs, len(self.anchors_mask[l]), in_h, in_w, requires_grad = False)
        #-----------------------------------------------------#
        #   让网络更加去关注小目标
        #-----------------------------------------------------#
        box_loss_scale  = torch.zeros(bs, len(self.anchors_mask[l]), in_h, in_w, requires_grad = False)
        #-----------------------------------------------------#
        #   batch_size, 3, 13, 13, 5 + num_classes
        #-----------------------------------------------------#
        y_true          = torch.zeros(bs, len(self.anchors_mask[l]), in_h, in_w, self.bbox_attrs, requires_grad = False)
        for b in range(bs):
            if len(targets[b])==0:
                continue
            batch_target = torch.zeros_like(targets[b])
            #-------------------------------------------------------#
            #   计算出正样本在特征层上的中心点
            #-------------------------------------------------------#
            batch_target[:, [0,2]] = targets[b][:, [0,2]] * in_w
            batch_target[:, [1,3]] = targets[b][:, [1,3]] * in_h
            batch_target[:, 4] = targets[b][:, 4]
            batch_target = batch_target.cpu()
            #-------------------------------------------------------#
            #   将真实框转换一个形式
            #   num_true_box, 4
            #-------------------------------------------------------#
            gt_box          = torch.FloatTensor(torch.cat((torch.zeros((batch_target.size(0), 2)), batch_target[:, 2:4]), 1))
            #-------------------------------------------------------#
            #   将先验框转换一个形式
            #   9, 4
            #-------------------------------------------------------#
            anchor_shapes   = torch.FloatTensor(torch.cat((torch.zeros((len(anchors), 2)), torch.FloatTensor(anchors)), 1))
            #-------------------------------------------------------#
            #   计算交并比
            #   self.calculate_iou(gt_box, anchor_shapes) = [num_true_box, 9]每一个真实框和9个先验框的重合情况
            #   best_ns:
            #   [每个真实框最大的重合度max_iou, 每一个真实框最重合的先验框的序号]
            #-------------------------------------------------------#
            best_ns = torch.argmax(self.calculate_iou(gt_box, anchor_shapes), dim=-1)
            for t, best_n in enumerate(best_ns):
                if best_n not in self.anchors_mask[l]:
                    continue
                #----------------------------------------#
                #   判断这个先验框是当前特征点的哪一个先验框
                #----------------------------------------#
                k = self.anchors_mask[l].index(best_n)
                #----------------------------------------#
                #   获得真实框属于哪个网格点
                #----------------------------------------#
                i = torch.floor(batch_target[t, 0]).long()
                j = torch.floor(batch_target[t, 1]).long()
                #----------------------------------------#
                #   取出真实框的种类
                #----------------------------------------#
                c = batch_target[t, 4].long()
                #----------------------------------------#
                #   noobj_mask代表无目标的特征点
                #----------------------------------------#
                noobj_mask[b, k, j, i] = 0
                #----------------------------------------#
                #   tx、ty代表中心调整参数的真实值
                #----------------------------------------#
                y_true[b, k, j, i, 0] = batch_target[t, 0] - i.float()
                y_true[b, k, j, i, 1] = batch_target[t, 1] - j.float()
                y_true[b, k, j, i, 2] = math.log(batch_target[t, 2] / anchors[best_n][0])
                y_true[b, k, j, i, 3] = math.log(batch_target[t, 3] / anchors[best_n][1])
                y_true[b, k, j, i, 4] = 1
                y_true[b, k, j, i, c + 5] = 1
                #----------------------------------------#
                #   用于获得xywh的比例
                #   大目标loss权重小,小目标loss权重大
                #----------------------------------------#
                box_loss_scale[b, k, j, i] = batch_target[t, 2] * batch_target[t, 3] / in_w / in_h
        return y_true, noobj_mask, box_loss_scale
    def get_ignore(self, l, x, y, h, w, targets, scaled_anchors, in_h, in_w, noobj_mask):
        #-----------------------------------------------------#
        #   计算一共有多少张图片
        #-----------------------------------------------------#
        bs = len(targets)
        FloatTensor = torch.cuda.FloatTensor if x.is_cuda else torch.FloatTensor
        LongTensor  = torch.cuda.LongTensor if x.is_cuda else torch.LongTensor
        #-----------------------------------------------------#
        #   生成网格,先验框中心,网格左上角
        #-----------------------------------------------------#
        grid_x = torch.linspace(0, in_w - 1, in_w).repeat(in_h, 1).repeat(
            int(bs * len(self.anchors_mask[l])), 1, 1).view(x.shape).type(FloatTensor)
        grid_y = torch.linspace(0, in_h - 1, in_h).repeat(in_w, 1).t().repeat(
            int(bs * len(self.anchors_mask[l])), 1, 1).view(y.shape).type(FloatTensor)
        # 生成先验框的宽高
        scaled_anchors_l = np.array(scaled_anchors)[self.anchors_mask[l]]
        anchor_w = FloatTensor(scaled_anchors_l).index_select(1, LongTensor([0]))
        anchor_h = FloatTensor(scaled_anchors_l).index_select(1, LongTensor([1]))
        anchor_w = anchor_w.repeat(bs, 1).repeat(1, 1, in_h * in_w).view(w.shape)
        anchor_h = anchor_h.repeat(bs, 1).repeat(1, 1, in_h * in_w).view(h.shape)
        #-------------------------------------------------------#
        #   计算调整后的先验框中心与宽高
        #-------------------------------------------------------#
        pred_boxes_x    = torch.unsqueeze(x.data + grid_x, -1)
        pred_boxes_y    = torch.unsqueeze(y.data + grid_y, -1)
        pred_boxes_w    = torch.unsqueeze(torch.exp(w.data) * anchor_w, -1)
        pred_boxes_h    = torch.unsqueeze(torch.exp(h.data) * anchor_h, -1)
        pred_boxes      = torch.cat([pred_boxes_x, pred_boxes_y, pred_boxes_w, pred_boxes_h], dim = -1)
        for b in range(bs):
            #-------------------------------------------------------#
            #   将预测结果转换一个形式
            #   pred_boxes_for_ignore      num_anchors, 4
            #-------------------------------------------------------#
            pred_boxes_for_ignore = pred_boxes[b].view(-1, 4)
            #-------------------------------------------------------#
            #   计算真实框,并把真实框转换成相对于特征层的大小
            #   gt_box      num_true_box, 4
            #-------------------------------------------------------#
            if len(targets[b]) > 0:
                batch_target = torch.zeros_like(targets[b])
                #-------------------------------------------------------#
                #   计算出正样本在特征层上的中心点
                #-------------------------------------------------------#
                batch_target[:, [0,2]] = targets[b][:, [0,2]] * in_w
                batch_target[:, [1,3]] = targets[b][:, [1,3]] * in_h
                batch_target = batch_target[:, :4]
                #-------------------------------------------------------#
                #   计算交并比
                #   anch_ious       num_true_box, num_anchors
                #-------------------------------------------------------#
                anch_ious = self.calculate_iou(batch_target, pred_boxes_for_ignore)
                #-------------------------------------------------------#
                #   每个先验框对应真实框的最大重合度
                #   anch_ious_max   num_anchors
                #-------------------------------------------------------#
                anch_ious_max, _    = torch.max(anch_ious, dim = 0)
                anch_ious_max       = anch_ious_max.view(pred_boxes[b].size()[:3])
                noobj_mask[b][anch_ious_max > self.ignore_threshold] = 0
        return noobj_mask
训练自己的YoloV3模型
首先前往Github下载对应的仓库,下载完后利用解压软件解压,之后用编程软件打开文件夹。注意打开的根目录必须正确,否则相对目录不正确的情况下,代码将无法运行。一定要注意打开后的根目录是文件存放的目录。
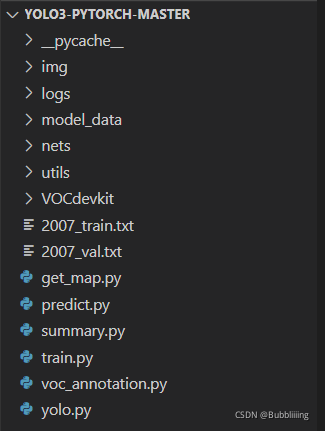
一、数据集的准备
本文使用VOC格式进行训练,训练前需要自己制作好数据集,如果没有自己的数据集,可以通过Github连接下载VOC12+07的数据集尝试下。
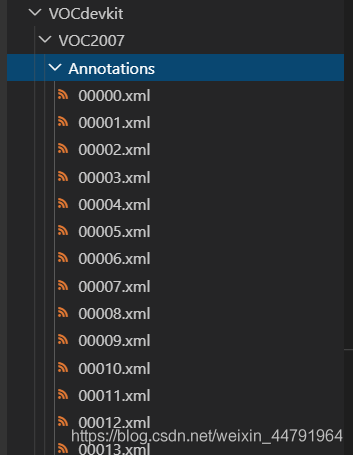
训练前将标签文件放在VOCdevkit文件夹下的VOC2007文件夹下的Annotation中。
训练前将图片文件放在VOCdevkit文件夹下的VOC2007文件夹下的JPEGImages中。
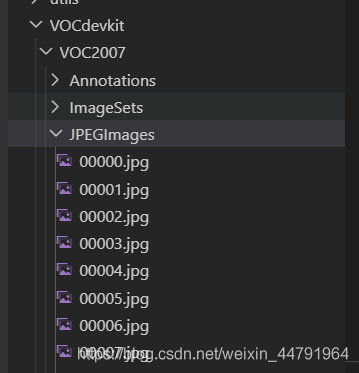
此时数据集的摆放已经结束。
二、数据集的处理
在完成数据集的摆放之后,我们需要对数据集进行下一步的处理,目的是获得训练用的2007_train.txt以及2007_val.txt,需要用到根目录下的voc_annotation.py。
voc_annotation.py里面有一些参数需要设置。
分别是annotation_mode、classes_path、trainval_percent、train_percent、VOCdevkit_path,第一次训练可以仅修改classes_path
import torch
import torch.nn as nn
import math
import numpy as np
class YOLOLoss(nn.Module):
    def __init__(self, anchors, num_classes, input_shape, cuda, anchors_mask = [[6,7,8], [3,4,5], [0,1,2]]):
        super(YOLOLoss, self).__init__()
        #-----------------------------------------------------------#
        #   13x13的特征层对应的anchor是[116,90],[156,198],[373,326]
        #   26x26的特征层对应的anchor是[30,61],[62,45],[59,119]
        #   52x52的特征层对应的anchor是[10,13],[16,30],[33,23]
        #-----------------------------------------------------------#
        self.anchors        = anchors
        self.num_classes    = num_classes
        self.bbox_attrs     = 5 + num_classes
        self.input_shape    = input_shape
        self.anchors_mask   = anchors_mask
        self.ignore_threshold = 0.7
        self.cuda = cuda
    def clip_by_tensor(self, t, t_min, t_max):
        t = t.float()
        result = (t >= t_min).float() * t + (t < t_min).float() * t_min
        result = (result <= t_max).float() * result + (result > t_max).float() * t_max
        return result
    def MSELoss(self, pred, target):
        return torch.pow(pred - target, 2)
    def BCELoss(self, pred, target):
        epsilon = 1e-7
        pred    = self.clip_by_tensor(pred, epsilon, 1.0 - epsilon)
        output  = - target * torch.log(pred) - (1.0 - target) * torch.log(1.0 - pred)
        return output
    def forward(self, l, input, targets=None):
        #----------------------------------------------------#
        #   l代表的是,当前输入进来的有效特征层,是第几个有效特征层
        #   input的shape为  bs, 3*(5+num_classes), 13, 13
        #                   bs, 3*(5+num_classes), 26, 26
        #                   bs, 3*(5+num_classes), 52, 52
        #   targets代表的是真实框。
        #----------------------------------------------------#
        #--------------------------------#
        #   获得图片数量,特征层的高和宽
        #   13和13
        #--------------------------------#
        bs      = input.size(0)
        in_h    = input.size(2)
        in_w    = input.size(3)
        #-----------------------------------------------------------------------#
        #   计算步长
        #   每一个特征点对应原来的图片上多少个像素点
        #   如果特征层为13x13的话,一个特征点就对应原来的图片上的32个像素点
        #   如果特征层为26x26的话,一个特征点就对应原来的图片上的16个像素点
        #   如果特征层为52x52的话,一个特征点就对应原来的图片上的8个像素点
        #   stride_h = stride_w = 32、16、8
        #   stride_h和stride_w都是32。
        #-----------------------------------------------------------------------#
        stride_h = self.input_shape[0] / in_h
        stride_w = self.input_shape[1] / in_w
        #-------------------------------------------------#
        #   此时获得的scaled_anchors大小是相对于特征层的
        #-------------------------------------------------#
        scaled_anchors  = [(a_w / stride_w, a_h / stride_h) for a_w, a_h in self.anchors]
        #-----------------------------------------------#
        #   输入的input一共有三个,他们的shape分别是
        #   bs, 3*(5+num_classes), 13, 13 => batch_size, 3, 13, 13, 5 + num_classes
        #   batch_size, 3, 26, 26, 5 + num_classes
        #   batch_size, 3, 52, 52, 5 + num_classes
        #-----------------------------------------------#
        prediction = input.view(bs, len(self.anchors_mask[l]), self.bbox_attrs, in_h, in_w).permute(0, 1, 3, 4, 2).contiguous()
        #-----------------------------------------------#
        #   先验框的中心位置的调整参数
        #-----------------------------------------------#
        x = torch.sigmoid(prediction[..., 0])
        y = torch.sigmoid(prediction[..., 1])
        #-----------------------------------------------#
        #   先验框的宽高调整参数
        #-----------------------------------------------#
        w = prediction[..., 2]
        h = prediction[..., 3]
        #-----------------------------------------------#
        #   获得置信度,是否有物体
        #-----------------------------------------------#
        conf = torch.sigmoid(prediction[..., 4])
        #-----------------------------------------------#
        #   种类置信度
        #-----------------------------------------------#
        pred_cls = torch.sigmoid(prediction[..., 5:])
        #-----------------------------------------------#
        #   获得网络应该有的预测结果
        #-----------------------------------------------#
        y_true, noobj_mask, box_loss_scale = self.get_target(l, targets, scaled_anchors, in_h, in_w)
        #---------------------------------------------------------------#
        #   将预测结果进行解码,判断预测结果和真实值的重合程度
        #   如果重合程度过大则忽略,因为这些特征点属于预测比较准确的特征点
        #   作为负样本不合适
        #----------------------------------------------------------------#
        noobj_mask = self.get_ignore(l, x, y, h, w, targets, scaled_anchors, in_h, in_w, noobj_mask)
        if self.cuda:
            y_true          = y_true.cuda()
            noobj_mask      = noobj_mask.cuda()
            box_loss_scale  = box_loss_scale.cuda()
        #-----------------------------------------------------------#
        #   reshape_y_true[...,2:3]和reshape_y_true[...,3:4]
        #   表示真实框的宽高,二者均在0-1之间
        #   真实框越大,比重越小,小框的比重更大。
        #-----------------------------------------------------------#
        box_loss_scale = 2 - box_loss_scale
        #-----------------------------------------------------------#
        #   计算中心偏移情况的loss,使用BCELoss效果好一些
        #-----------------------------------------------------------#
        loss_x = torch.sum(self.BCELoss(x, y_true[..., 0]) * box_loss_scale * y_true[..., 4])
        loss_y = torch.sum(self.BCELoss(y, y_true[..., 1]) * box_loss_scale * y_true[..., 4])
        #-----------------------------------------------------------#
        #   计算宽高调整值的loss
        #-----------------------------------------------------------#
        loss_w = torch.sum(self.MSELoss(w, y_true[..., 2]) * 0.5 * box_loss_scale * y_true[..., 4])
        loss_h = torch.sum(self.MSELoss(h, y_true[..., 3]) * 0.5 * box_loss_scale * y_true[..., 4])
        #-----------------------------------------------------------#
        #   计算置信度的loss
        #-----------------------------------------------------------#
        loss_conf   = torch.sum(self.BCELoss(conf, y_true[..., 4]) * y_true[..., 4]) + \
                      torch.sum(self.BCELoss(conf, y_true[..., 4]) * noobj_mask)
        loss_cls    = torch.sum(self.BCELoss(pred_cls[y_true[..., 4] == 1], y_true[..., 5:][y_true[..., 4] == 1]))
        loss        = loss_x  + loss_y + loss_w + loss_h + loss_conf + loss_cls
        num_pos = torch.sum(y_true[..., 4])
        num_pos = torch.max(num_pos, torch.ones_like(num_pos))
        return loss, num_pos
    def calculate_iou(self, _box_a, _box_b):
        #-----------------------------------------------------------#
        #   计算真实框的左上角和右下角
        #-----------------------------------------------------------#
        b1_x1, b1_x2 = _box_a[:, 0] - _box_a[:, 2] / 2, _box_a[:, 0] + _box_a[:, 2] / 2
        b1_y1, b1_y2 = _box_a[:, 1] - _box_a[:, 3] / 2, _box_a[:, 1] + _box_a[:, 3] / 2
        #-----------------------------------------------------------#
        #   计算先验框获得的预测框的左上角和右下角
        #-----------------------------------------------------------#
        b2_x1, b2_x2 = _box_b[:, 0] - _box_b[:, 2] / 2, _box_b[:, 0] + _box_b[:, 2] / 2
        b2_y1, b2_y2 = _box_b[:, 1] - _box_b[:, 3] / 2, _box_b[:, 1] + _box_b[:, 3] / 2
        #-----------------------------------------------------------#
        #   将真实框和预测框都转化成左上角右下角的形式
        #-----------------------------------------------------------#
        box_a = torch.zeros_like(_box_a)
        box_b = torch.zeros_like(_box_b)
        box_a[:, 0], box_a[:, 1], box_a[:, 2], box_a[:, 3] = b1_x1, b1_y1, b1_x2, b1_y2
        box_b[:, 0], box_b[:, 1], box_b[:, 2], box_b[:, 3] = b2_x1, b2_y1, b2_x2, b2_y2
        #-----------------------------------------------------------#
        #   A为真实框的数量,B为先验框的数量
        #-----------------------------------------------------------#
        A = box_a.size(0)
        B = box_b.size(0)
        #-----------------------------------------------------------#
        #   计算交的面积
        #-----------------------------------------------------------#
        max_xy  = torch.min(box_a[:, 2:].unsqueeze(1).expand(A, B, 2), box_b[:, 2:].unsqueeze(0).expand(A, B, 2))
        min_xy  = torch.max(box_a[:, :2].unsqueeze(1).expand(A, B, 2), box_b[:, :2].unsqueeze(0).expand(A, B, 2))
        inter   = torch.clamp((max_xy - min_xy), min=0)
        inter   = inter[:, :, 0] * inter[:, :, 1]
        #-----------------------------------------------------------#
        #   计算预测框和真实框各自的面积
        #-----------------------------------------------------------#
        area_a = ((box_a[:, 2]-box_a[:, 0]) * (box_a[:, 3]-box_a[:, 1])).unsqueeze(1).expand_as(inter)  # [A,B]
        area_b = ((box_b[:, 2]-box_b[:, 0]) * (box_b[:, 3]-box_b[:, 1])).unsqueeze(0).expand_as(inter)  # [A,B]
        #-----------------------------------------------------------#
        #   求IOU
        #-----------------------------------------------------------#
        union = area_a + area_b - inter
        return inter / union  # [A,B]
    def get_target(self, l, targets, anchors, in_h, in_w):
        #-----------------------------------------------------#
        #   计算一共有多少张图片
        #-----------------------------------------------------#
        bs              = len(targets)
        #-----------------------------------------------------#
        #   用于选取哪些先验框不包含物体
        #-----------------------------------------------------#
        noobj_mask      = torch.ones(bs, len(self.anchors_mask[l]), in_h, in_w, requires_grad = False)
        #-----------------------------------------------------#
        #   让网络更加去关注小目标
        #-----------------------------------------------------#
        box_loss_scale  = torch.zeros(bs, len(self.anchors_mask[l]), in_h, in_w, requires_grad = False)
        #-----------------------------------------------------#
        #   batch_size, 3, 13, 13, 5 + num_classes
        #-----------------------------------------------------#
        y_true          = torch.zeros(bs, len(self.anchors_mask[l]), in_h, in_w, self.bbox_attrs, requires_grad = False)
        for b in range(bs):
            if len(targets[b])==0:
                continue
            batch_target = torch.zeros_like(targets[b])
            #-------------------------------------------------------#
            #   计算出正样本在特征层上的中心点
            #-------------------------------------------------------#
            batch_target[:, [0,2]] = targets[b][:, [0,2]] * in_w
            batch_target[:, [1,3]] = targets[b][:, [1,3]] * in_h
            batch_target[:, 4] = targets[b][:, 4]
            batch_target = batch_target.cpu()
            #-------------------------------------------------------#
            #   将真实框转换一个形式
            #   num_true_box, 4
            #-------------------------------------------------------#
            gt_box          = torch.FloatTensor(torch.cat((torch.zeros((batch_target.size(0), 2)), batch_target[:, 2:4]), 1))
            #-------------------------------------------------------#
            #   将先验框转换一个形式
            #   9, 4
            #-------------------------------------------------------#
            anchor_shapes   = torch.FloatTensor(torch.cat((torch.zeros((len(anchors), 2)), torch.FloatTensor(anchors)), 1))
            #-------------------------------------------------------#
            #   计算交并比
            #   self.calculate_iou(gt_box, anchor_shapes) = [num_true_box, 9]每一个真实框和9个先验框的重合情况
            #   best_ns:
            #   [每个真实框最大的重合度max_iou, 每一个真实框最重合的先验框的序号]
            #-------------------------------------------------------#
            best_ns = torch.argmax(self.calculate_iou(gt_box, anchor_shapes), dim=-1)
            for t, best_n in enumerate(best_ns):
                if best_n not in self.anchors_mask[l]:
                    continue
                #----------------------------------------#
                #   判断这个先验框是当前特征点的哪一个先验框
                #----------------------------------------#
                k = self.anchors_mask[l].index(best_n)
                #----------------------------------------#
                #   获得真实框属于哪个网格点
                #----------------------------------------#
                i = torch.floor(batch_target[t, 0]).long()
                j = torch.floor(batch_target[t, 1]).long()
                #----------------------------------------#
                #   取出真实框的种类
                #----------------------------------------#
                c = batch_target[t, 4].long()
                #----------------------------------------#
                #   noobj_mask代表无目标的特征点
                #----------------------------------------#
                noobj_mask[b, k, j, i] = 0
                #----------------------------------------#
                #   tx、ty代表中心调整参数的真实值
                #----------------------------------------#
                y_true[b, k, j, i, 0] = batch_target[t, 0] - i.float()
                y_true[b, k, j, i, 1] = batch_target[t, 1] - j.float()
                y_true[b, k, j, i, 2] = math.log(batch_target[t, 2] / anchors[best_n][0])
                y_true[b, k, j, i, 3] = math.log(batch_target[t, 3] / anchors[best_n][1])
                y_true[b, k, j, i, 4] = 1
                y_true[b, k, j, i, c + 5] = 1
                #----------------------------------------#
                #   用于获得xywh的比例
                #   大目标loss权重小,小目标loss权重大
                #----------------------------------------#
                box_loss_scale[b, k, j, i] = batch_target[t, 2] * batch_target[t, 3] / in_w / in_h
        return y_true, noobj_mask, box_loss_scale
    def get_ignore(self, l, x, y, h, w, targets, scaled_anchors, in_h, in_w, noobj_mask):
        #-----------------------------------------------------#
        #   计算一共有多少张图片
        #-----------------------------------------------------#
        bs = len(targets)
        FloatTensor = torch.cuda.FloatTensor if x.is_cuda else torch.FloatTensor
        LongTensor  = torch.cuda.LongTensor if x.is_cuda else torch.LongTensor
        #-----------------------------------------------------#
        #   生成网格,先验框中心,网格左上角
        #-----------------------------------------------------#
        grid_x = torch.linspace(0, in_w - 1, in_w).repeat(in_h, 1).repeat(
            int(bs * len(self.anchors_mask[l])), 1, 1).view(x.shape).type(FloatTensor)
        grid_y = torch.linspace(0, in_h - 1, in_h).repeat(in_w, 1).t().repeat(
            int(bs * len(self.anchors_mask[l])), 1, 1).view(y.shape).type(FloatTensor)
        # 生成先验框的宽高
        scaled_anchors_l = np.array(scaled_anchors)[self.anchors_mask[l]]
        anchor_w = FloatTensor(scaled_anchors_l).index_select(1, LongTensor([0]))
        anchor_h = FloatTensor(scaled_anchors_l).index_select(1, LongTensor([1]))
        anchor_w = anchor_w.repeat(bs, 1).repeat(1, 1, in_h * in_w).view(w.shape)
        anchor_h = anchor_h.repeat(bs, 1).repeat(1, 1, in_h * in_w).view(h.shape)
        #-------------------------------------------------------#
        #   计算调整后的先验框中心与宽高
        #-------------------------------------------------------#
        pred_boxes_x    = torch.unsqueeze(x.data + grid_x, -1)
        pred_boxes_y    = torch.unsqueeze(y.data + grid_y, -1)
        pred_boxes_w    = torch.unsqueeze(torch.exp(w.data) * anchor_w, -1)
        pred_boxes_h    = torch.unsqueeze(torch.exp(h.data) * anchor_h, -1)
        pred_boxes      = torch.cat([pred_boxes_x, pred_boxes_y, pred_boxes_w, pred_boxes_h], dim = -1)
        for b in range(bs):
            #-------------------------------------------------------#
            #   将预测结果转换一个形式
            #   pred_boxes_for_ignore      num_anchors, 4
            #-------------------------------------------------------#
            pred_boxes_for_ignore = pred_boxes[b].view(-1, 4)
            #-------------------------------------------------------#
            #   计算真实框,并把真实框转换成相对于特征层的大小
            #   gt_box      num_true_box, 4
            #-------------------------------------------------------#
            if len(targets[b]) > 0:
                batch_target = torch.zeros_like(targets[b])
                #-------------------------------------------------------#
                #   计算出正样本在特征层上的中心点
                #-------------------------------------------------------#
                batch_target[:, [0,2]] = targets[b][:, [0,2]] * in_w
                batch_target[:, [1,3]] = targets[b][:, [1,3]] * in_h
                batch_target = batch_target[:, :4]
                #-------------------------------------------------------#
                #   计算交并比
                #   anch_ious       num_true_box, num_anchors
                #-------------------------------------------------------#
                anch_ious = self.calculate_iou(batch_target, pred_boxes_for_ignore)
                #-------------------------------------------------------#
                #   每个先验框对应真实框的最大重合度
                #   anch_ious_max   num_anchors
                #-------------------------------------------------------#
                anch_ious_max, _    = torch.max(anch_ious, dim = 0)
                anch_ious_max       = anch_ious_max.view(pred_boxes[b].size()[:3])
                noobj_mask[b][anch_ious_max > self.ignore_threshold] = 0
        return noobj_mask
classes_path用于指向检测类别所对应的txt,以voc数据集为例,我们用的txt为:
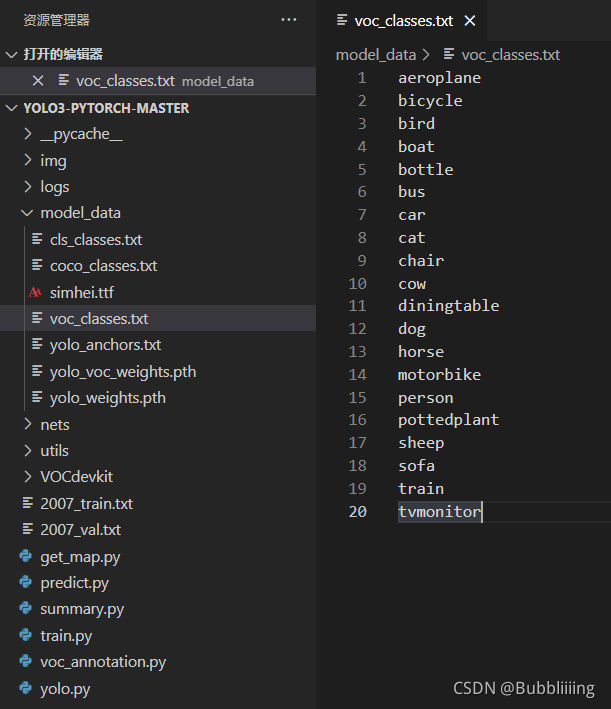
训练自己的数据集时,可以自己建立一个cls_classes.txt,里面写自己所需要区分的类别。
三、开始网络训练
通过voc_annotation.py我们已经生成了2007_train.txt以及2007_val.txt,此时我们可以开始训练了。
训练的参数较多,大家可以在下载库后仔细看注释,其中最重要的部分依然是train.py里的classes_path。
classes_path用于指向检测类别所对应的txt,这个txt和voc_annotation.py里面的txt一样!训练自己的数据集必须要修改!
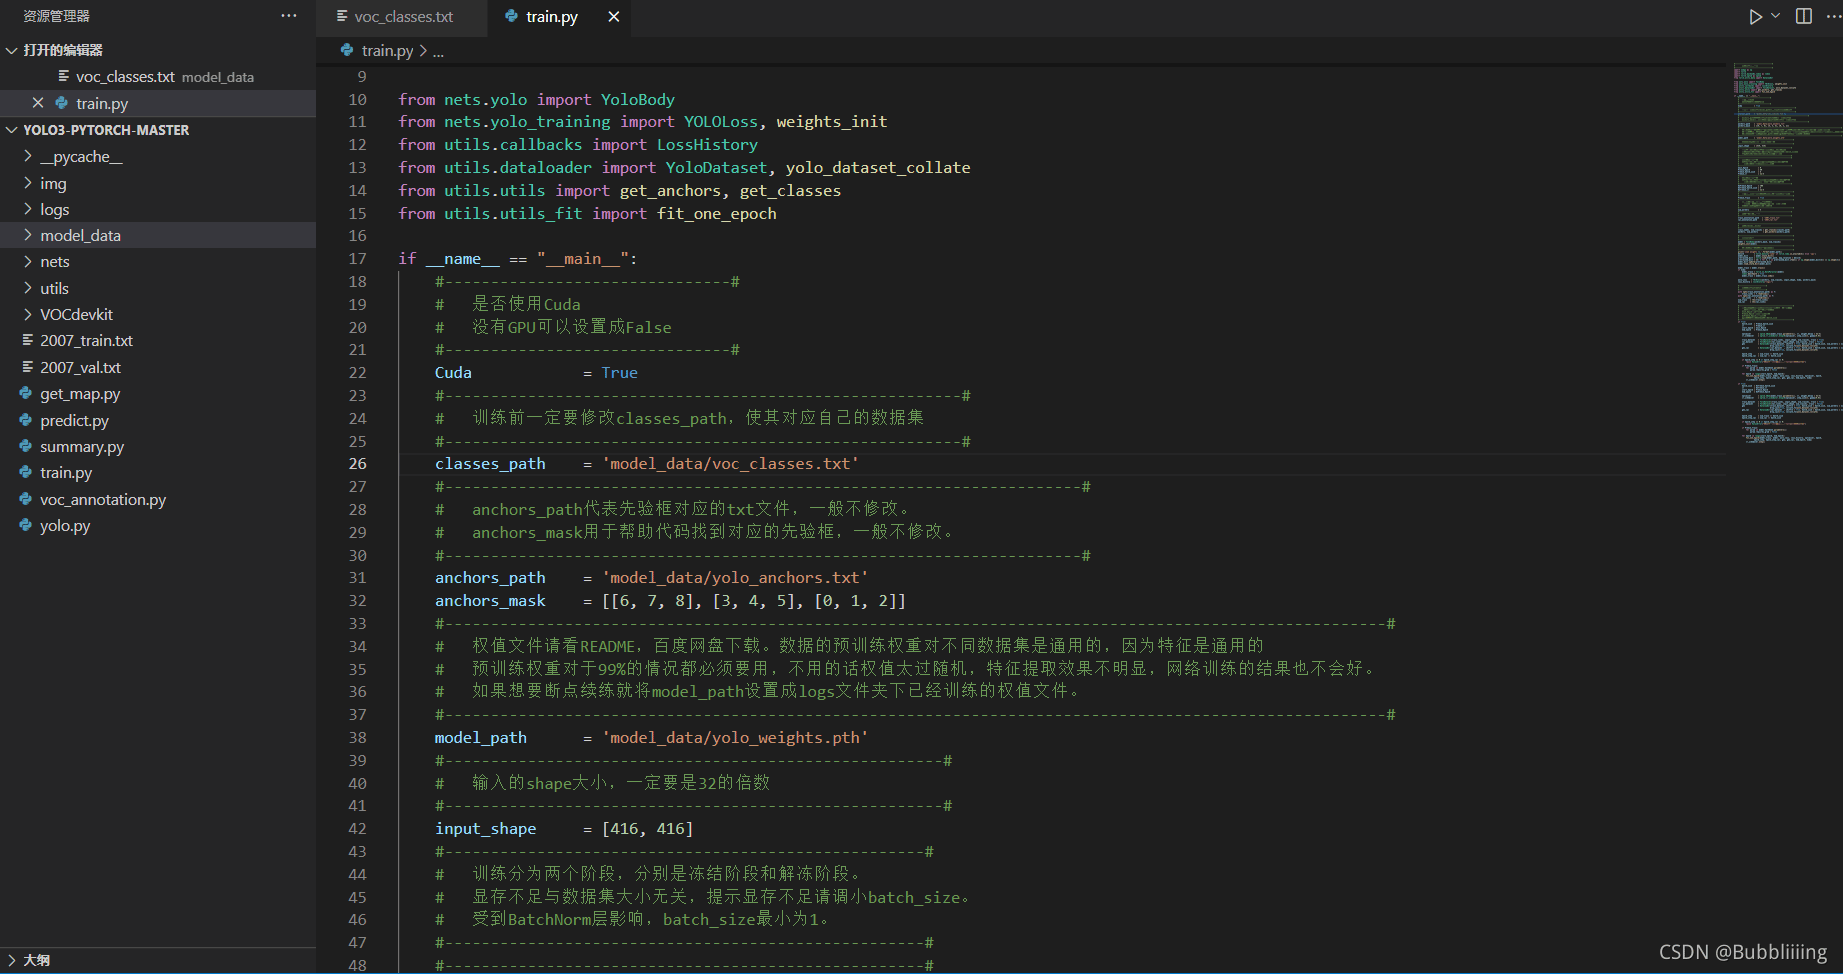
修改完classes_path后就可以运行train.py开始训练了,在训练多个epoch后,权值会生成在logs文件夹中。
其它参数的作用如下:
#-------------------------------#
#   是否使用Cuda
#   没有GPU可以设置成False
#-------------------------------#
Cuda            = True
#--------------------------------------------------------#
#   训练前一定要修改classes_path,使其对应自己的数据集
#--------------------------------------------------------#
classes_path    = 'model_data/voc_classes.txt'
#---------------------------------------------------------------------#
#   anchors_path代表先验框对应的txt文件,一般不修改。
#   anchors_mask用于帮助代码找到对应的先验框,一般不修改。
#---------------------------------------------------------------------#
anchors_path    = 'model_data/yolo_anchors.txt'
anchors_mask    = [[6, 7, 8], [3, 4, 5], [0, 1, 2]]
#------------------------------------------------------------------------------------------------------#
#   权值文件请看README,百度网盘下载。数据的预训练权重对不同数据集是通用的,因为特征是通用的
#   预训练权重对于99%的情况都必须要用,不用的话权值太过随机,特征提取效果不明显,网络训练的结果也不会好。
#   如果想要断点续练就将model_path设置成logs文件夹下已经训练的权值文件。
#------------------------------------------------------------------------------------------------------#
model_path      = 'model_data/yolo_weights.pth'
#------------------------------------------------------#
#   输入的shape大小,一定要是32的倍数
#------------------------------------------------------#
input_shape     = [416, 416]
#----------------------------------------------------#
#   训练分为两个阶段,分别是冻结阶段和解冻阶段。
#   显存不足与数据集大小无关,提示显存不足请调小batch_size。
#   受到BatchNorm层影响,batch_size最小为1。
#----------------------------------------------------#
#----------------------------------------------------#
#   冻结阶段训练参数
#   此时模型的主干被冻结了,特征提取网络不发生改变
#   占用的显存较小,仅对网络进行微调
#----------------------------------------------------#
Init_Epoch          = 0
Freeze_Epoch        = 50
Freeze_batch_size   = 8
Freeze_lr           = 1e-3
#----------------------------------------------------#
#   解冻阶段训练参数
#   此时模型的主干不被冻结了,特征提取网络会发生改变
#   占用的显存较大,网络所有的参数都会发生改变
#----------------------------------------------------#
UnFreeze_Epoch      = 100
Unfreeze_batch_size = 4
Unfreeze_lr         = 1e-4
#------------------------------------------------------#
#   是否进行冻结训练,默认先冻结主干训练后解冻训练。
#------------------------------------------------------#
Freeze_Train        = True
#------------------------------------------------------#
#   用于设置是否使用多线程读取数据
#   开启后会加快数据读取速度,但是会占用更多内存
#   内存较小的电脑可以设置为2或者0
#------------------------------------------------------#
num_workers         = 4
#----------------------------------------------------#
#   获得图片路径和标签
#----------------------------------------------------#
train_annotation_path   = '2007_train.txt'
val_annotation_path     = '2007_val.txt'
四、训练结果预测
训练结果预测需要用到两个文件,分别是yolo.py和predict.py。
我们首先需要去yolo.py里面修改model_path以及classes_path,这两个参数必须要修改。
model_path指向训练好的权值文件,在logs文件夹里。
classes_path指向检测类别所对应的txt。
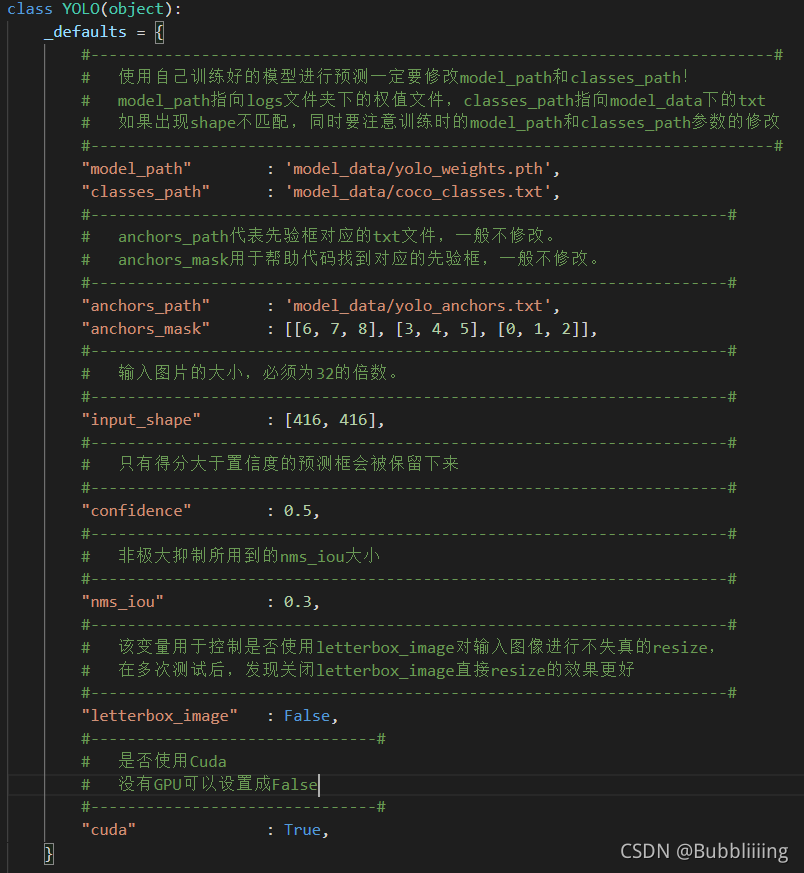
完成修改后就可以运行predict.py进行检测了。运行后输入图片路径即可检测。
以上就是Pytorch搭建yolo3目标检测平台实现源码的详细内容,更多关于Pytorch yolo3目标检测的资料请关注我们其它相关文章!

