手把手教你vue-cli单页到多页应用的方法
vue-cli到多页应用
前言:我有一个cli创建的vue项目,但是我想做成多页应用,怎么办,废话不多说,直接开撸~
约定:新增代码部分在//add和//end中间 删除(注释)代码部分在//del和//end中间,很多东西都写在注释里
第一步:cli一个vue项目
新建一个vue项目 官网 vue init webpack demo
cli默认使用webpack的dev-server服务,这个服务是做不了单页的,需要手动建一个私服叫啥你随意 一般叫dev.server或者dev.client
第二步:添加两个方法处理出口入口文件(SPA默认写死的)
进入刚刚创建vue项目 cd demo
在目录下面找到build/utils.js文件
修改部分:
utils.js
'use strict'
const path = require('path')
const config = require('../config')
const ExtractTextPlugin = require('extract-text-webpack-plugin')
const packageConfig = require('../package.json')

//add
const glob = require('glob');
const HtmlWebpackPlugin = require('html-webpack-plugin');  //功能:生成html文件及js文件并把js引入html
const pagePath = path.resolve(__dirname, '../src/views/'); //页面的路径,比如这里我用的views,那么后面私服加入的文件监控器就会从src下面的views下面开始监控文件
//end

exports.assetsPath = function (_path) {
 const assetsSubDirectory = process.env.NODE_ENV === 'production'
  ? config.build.assetsSubDirectory
  : config.dev.assetsSubDirectory

 return path.posix.join(assetsSubDirectory, _path)
}

exports.cssLoaders = function (options) {
 options = options || {}

 const cssLoader = {
  loader: 'css-loader',
  options: {
   sourceMap: options.sourceMap
  }
 }

 const postcssLoader = {
  loader: 'postcss-loader',
  options: {
   sourceMap: options.sourceMap
  }
 }

 // generate loader string to be used with extract text plugin
 function generateLoaders (loader, loaderOptions) {
  const loaders = options.usePostCSS ? [cssLoader, postcssLoader] : [cssLoader]

  if (loader) {
   loaders.push({
    loader: loader + '-loader',
    options: Object.assign({}, loaderOptions, {
     sourceMap: options.sourceMap
    })
   })
  }

  // Extract CSS when that option is specified
  // (which is the case during production build)
  if (options.extract) {
   return ExtractTextPlugin.extract({
    use: loaders,
    fallback: 'vue-style-loader'
   })
  } else {
   return ['vue-style-loader'].concat(loaders)
  }
 }

 // https://vue-loader.vuejs.org/en/configurations/extract-css.html
 return {
  css: generateLoaders(),
  postcss: generateLoaders(),
  less: generateLoaders('less'),
  sass: generateLoaders('sass', { indentedSyntax: true }),
  scss: generateLoaders('sass'),
  stylus: generateLoaders('stylus'),
  styl: generateLoaders('stylus')
 }
}

// Generate loaders for standalone style files (outside of .vue)
exports.styleLoaders = function (options) {
 const output = []
 const loaders = exports.cssLoaders(options)

 for (const extension in loaders) {
  const loader = loaders[extension]
  output.push({
   test: new RegExp('\\.' + extension + '$'),
   use: loader
  })
 }

 return output
}

exports.createNotifierCallback = () => {
 const notifier = require('node-notifier')

 return (severity, errors) => {
  if (severity !== 'error') return

  const error = errors[0]
  const filename = error.file && error.file.split('!').pop()

  notifier.notify({
   title: packageConfig.name,
   message: severity + ': ' + error.name,
   subtitle: filename || '',
   icon: path.join(__dirname, 'logo.png')
  })
 }
}

//add 新增一个方法处理入口文件(单页应用的入口都是写死,到时候替换成这个方法)
exports.createEntry = () => {
 let files = glob.sync(pagePath + '/**/*.js');
 let entries = {};
 let basename;
 let foldername;

 files.forEach(entry => {
  // Filter the router.js
  basename = path.basename(entry, path.extname(entry), 'router.js');
  foldername = path.dirname(entry).split('/').splice(-1)[0];

  // If foldername not equal basename, doing nothing
  // The folder maybe contain more js files, but only the same name is main
  if (basename === foldername) {
   entries[basename] = [
    'webpack-hot-middleware/client?noInfo=true&reload=true&path=/__webpack_hmr&timeout=20000',
    entry];
  }
 });
 return entries;
};
//end

//add 新增出口文件
exports.createHtmlWebpackPlugin = () => {
 let files = glob.sync(pagePath + '/**/*.html', {matchBase: true});
 let entries = exports.createEntry();
 let plugins = [];
 let conf;
 let basename;
 let foldername;

 files.forEach(file => {
  basename = path.basename(file, path.extname(file));
  foldername = path.dirname(file).split('/').splice(-1).join('');

  if (basename === foldername) {
   conf = {
    template: file,
    filename: basename + '.html',
    inject: true,
    chunks: entries[basename] ? [basename] : []
   };
   if (process.env.NODE_ENV !== 'development') {
    conf.chunksSortMode = 'dependency';
    conf.minify = {
     removeComments: true,
     collapseWhitespace: true,
     removeAttributeQuotes: true
    };
   }

   plugins.push(new HtmlWebpackPlugin(conf));
  }
 });
 return plugins;
};
//end
第三步:创建私服(不使用dev-server服务,自己建一个)
从express新建私服并配置(build文件夹下新建 我这里叫webpack.dev.client.js)
webpack.dev.client.js
/**
 * created by qbyu2 on 2018-05-30
 * express 私服
 * */
'use strict';

const fs = require('fs');
const path = require('path');
const express = require('express');
const webpack = require('webpack');
const webpackDevMiddleware = require('webpack-dev-middleware');  //文件监控(前面配置了从views下面监控)
const webpackHotMiddleware = require('webpack-hot-middleware');  //热加载
const config = require('../config');
const devWebpackConfig = require('./webpack.dev.conf');
const proxyMiddleware = require('http-proxy-middleware');  //跨域

const proxyTable = config.dev.proxyTable;

const PORT = config.dev.port;
const HOST = config.dev.host;
const assetsRoot = config.dev.assetsRoot;
const app = express();
const router = express.Router();
const compiler = webpack(devWebpackConfig);

let devMiddleware = webpackDevMiddleware(compiler, {
 publicPath: devWebpackConfig.output.publicPath,
 quiet: true,
 stats: {
  colors: true,
  chunks: false
 }
});

let hotMiddleware = webpackHotMiddleware(compiler, {
 path: '/__webpack_hmr',
 heartbeat: 2000
});

app.use(hotMiddleware);
app.use(devMiddleware);

Object.keys(proxyTable).forEach(function (context) {
 let options = proxyTable[context];
 if (typeof options === 'string') {
  options = {
   target: options
  };
 }
 app.use(proxyMiddleware(context, options));
});

//双路由  私服一层控制私服路由  vue的路由控制该页面下的路由
app.use(router)
app.use('/static', express.static(path.join(assetsRoot, 'static')));

let sendFile = (viewname, response, next) => {
 compiler.outputFileSystem.readFile(viewname, (err, result) => {
  if (err) {
   return (next(err));
  }
  response.set('content-type', 'text/html');
  response.send(result);
  response.end();
 });
};

//拼接方法
function pathJoin(patz) {
 return path.join(assetsRoot, patz);
}

/**
 * 定义路由(私服路由 非vue路由)
 * */

// favicon
router.get('/favicon.ico', (req, res, next) => {
 res.end();
});

// http://localhost:8080/
router.get('/', (req, res, next)=>{
 sendFile(pathJoin('index.html'), res, next);
});

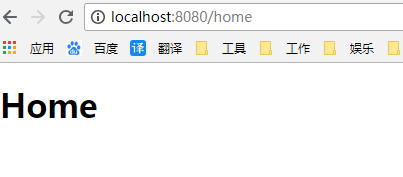
// http://localhost:8080/home
router.get('/:home', (req, res, next) => {
 sendFile(pathJoin(req.params.home + '.html'), res, next);
});

// http://localhost:8080/index
router.get('/:index', (req, res, next) => {
 sendFile(pathJoin(req.params.index + '.html'), res, next);
});

module.exports = app.listen(PORT, err => {
 if (err){
  return
 }
 console.log(`Listening at http://${HOST}:${PORT}\n`);
})
私服创建好了 安装下依赖
有坑。。。
webpack和热加载版本太高太低都不行
npm install webpack@3.10.0 --save-dev
npm install webpack-dev-middleware --save-dev
npm install webpack-hot-middleware@2.21.0 --save-dev
npm install http-proxy-middleware --save-dev
第四步:修改配置webpack.base.conf.js
'use strict'
const utils = require('./utils')
const webpack = require('webpack')
const config = require('../config')
const merge = require('webpack-merge')
const path = require('path')
const baseWebpackConfig = require('./webpack.base.conf')
const CopyWebpackPlugin = require('copy-webpack-plugin')
const HtmlWebpackPlugin = require('html-webpack-plugin')
const FriendlyErrorsPlugin = require('friendly-errors-webpack-plugin')
const portfinder = require('portfinder')

const HOST = process.env.HOST
const PORT = process.env.PORT && Number(process.env.PORT)

const devWebpackConfig = merge(baseWebpackConfig, {
 module: {
  rules: utils.styleLoaders({ sourceMap: config.dev.cssSourceMap, usePostCSS: true })
 },
 // cheap-module-eval-source-map is faster for development
 devtool: config.dev.devtool,

 // these devServer options should be customized in /config/index.js
 devServer: {
  clientLogLevel: 'warning',
  historyApiFallback: {
   rewrites: [
    { from: /.*/, to: path.posix.join(config.dev.assetsPublicPath, 'index.html') },
   ],
  },
  hot: true,
  contentBase: false, // since we use CopyWebpackPlugin.
  compress: true,
  host: HOST || config.dev.host,
  port: PORT || config.dev.port,
  open: config.dev.autoOpenBrowser,
  overlay: config.dev.errorOverlay
   ? { warnings: false, errors: true }
   : false,
  publicPath: config.dev.assetsPublicPath,
  proxy: config.dev.proxyTable,
  quiet: true, // necessary for FriendlyErrorsPlugin
  watchOptions: {
   poll: config.dev.poll,
  }
 },
 plugins: [
  new webpack.DefinePlugin({
   'process.env': require('../config/dev.env')
  }),
  new webpack.HotModuleReplacementPlugin(),
  new webpack.NamedModulesPlugin(), // HMR shows correct file names in console on update.
  new webpack.NoEmitOnErrorsPlugin(),
  // https://github.com/ampedandwired/html-webpack-plugin
  //del  注释掉spa固定的单页出口 末尾动态配上出口
  // new HtmlWebpackPlugin({
  //  filename: 'index.html',
  //  template: 'index.html',
  //  inject: true
  // }),
  //end
  // copy custom static assets
  new CopyWebpackPlugin([
   {
    from: path.resolve(__dirname, '../static'),
    to: config.dev.assetsSubDirectory,
    ignore: ['.*']
   }
  ])
 ]
 //add
  .concat(utils.createHtmlWebpackPlugin())
 //end
})
//del
// module.exports = new Promise((resolve, reject) => {
//  portfinder.basePort = process.env.PORT || config.dev.port
//  portfinder.getPort((err, port) => {
//   if (err) {
//    reject(err)
//   } else {
//    // publish the new Port, necessary for e2e tests
//    process.env.PORT = port
//    // add port to devServer config
//    devWebpackConfig.devServer.port = port
//
//    // Add FriendlyErrorsPlugin
//    devWebpackConfig.plugins.push(new FriendlyErrorsPlugin({
//     compilationSuccessInfo: {
//      messages: [`Your application is running here: http://${devWebpackConfig.devServer.host}:${port}`],
//     },
//     onErrors: config.dev.notifyOnErrors
//     ? utils.createNotifierCallback()
//     : undefined
//    }))
//
//    resolve(devWebpackConfig)
//   }
//  })
// })
//end
webpack.dev.conf.js
'use strict'
const utils = require('./utils')
const webpack = require('webpack')
const config = require('../config')
const merge = require('webpack-merge')
const path = require('path')
const baseWebpackConfig = require('./webpack.base.conf')
const CopyWebpackPlugin = require('copy-webpack-plugin')
const HtmlWebpackPlugin = require('html-webpack-plugin')
const FriendlyErrorsPlugin = require('friendly-errors-webpack-plugin')
const portfinder = require('portfinder')

const HOST = process.env.HOST
const PORT = process.env.PORT && Number(process.env.PORT)

const devWebpackConfig = merge(baseWebpackConfig, {
 module: {
  rules: utils.styleLoaders({ sourceMap: config.dev.cssSourceMap, usePostCSS: true })
 },
 // cheap-module-eval-source-map is faster for development
 devtool: config.dev.devtool,

 // these devServer options should be customized in /config/index.js
 //del 注掉SPA的服务器
 // devServer: {
 //  clientLogLevel: 'warning',
 //  historyApiFallback: {
 //   rewrites: [
 //    { from: /.*/, to: path.posix.join(config.dev.assetsPublicPath, 'index.html') },
 //   ],
 //  },
 //  hot: true,
 //  contentBase: false, // since we use CopyWebpackPlugin.
 //  compress: true,
 //  host: HOST || config.dev.host,
 //  port: PORT || config.dev.port,
 //  open: config.dev.autoOpenBrowser,
 //  overlay: config.dev.errorOverlay
 //   ? { warnings: false, errors: true }
 //   : false,
 //  publicPath: config.dev.assetsPublicPath,
 //  proxy: config.dev.proxyTable,
 //  quiet: true, // necessary for FriendlyErrorsPlugin
 //  watchOptions: {
 //   poll: config.dev.poll,
 //  }
 // },
 //end
 plugins: [
  new webpack.DefinePlugin({
   'process.env': require('../config/dev.env')
  }),
  new webpack.HotModuleReplacementPlugin(),
  new webpack.NamedModulesPlugin(), // HMR shows correct file names in console on update.
  new webpack.NoEmitOnErrorsPlugin(),
  // https://github.com/ampedandwired/html-webpack-plugin
  //del  注释掉spa固定的单页出口 末尾动态配上出口
  // new HtmlWebpackPlugin({
  //  filename: 'index.html',
  //  template: 'index.html',
  //  inject: true
  // }),
  //end
  // copy custom static assets
  new CopyWebpackPlugin([
   {
    from: path.resolve(__dirname, '../static'),
    to: config.dev.assetsSubDirectory,
    ignore: ['.*']
   }
  ])
 ]
 //add
  .concat(utils.createHtmlWebpackPlugin())
 //end
})
//del
// module.exports = new Promise((resolve, reject) => {
//  portfinder.basePort = process.env.PORT || config.dev.port
//  portfinder.getPort((err, port) => {
//   if (err) {
//    reject(err)
//   } else {
//    // publish the new Port, necessary for e2e tests
//    process.env.PORT = port
//    // add port to devServer config
//    devWebpackConfig.devServer.port = port
//
//    // Add FriendlyErrorsPlugin
//    devWebpackConfig.plugins.push(new FriendlyErrorsPlugin({
//     compilationSuccessInfo: {
//      messages: [`Your application is running here: http://${devWebpackConfig.devServer.host}:${port}`],
//     },
//     onErrors: config.dev.notifyOnErrors
//     ? utils.createNotifierCallback()
//     : undefined
//    }))
//
//    resolve(devWebpackConfig)
//   }
//  })
// })
//end
module.exports = devWebpackConfig;
webpack.prod.conf.js
plugins最后加上.concat(utils.createHtmlWebpackPlugin())
test环境一样
第五步:修改package.json 指令配置
scripts下面'dev':
这样执行的时候就不会走默认的dev-server而走你的私服了
"scripts": {
  "dev": "node build/webpack.dev.client.js",
  "start": "npm run dev",
  "build": "node build/build.js"
 },
第六步:创建测试文件
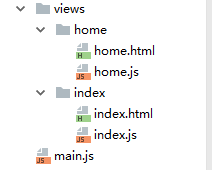
src目录下新建 views文件夹 (代码注释里有 当时配的目录跟这个一致就可以 随便你命名 遵循命名规范就行)
views 文件夹下新建两个文件夹index和home 代表多页 每页单独一个文件夹 文件夹下建对应文件

最后,npm run dev
这个时候你会发现,特么的什么鬼文章 报错了啊
稍安勿躁~
两个地方,
1.webpack.dev.client.js
//双路由  私服一层控制私服路由  vue的路由控制该页面下的路由
app.use(router)
app.use('/static', express.static(path.join(assetsRoot, 'static')));
这个assetsRoot cli创建的时候是没有的 在config/index.js 下面找到dev加上
assetsRoot: path.resolve(__dirname, '../dist'),

顺便把dev和build的assetsPublicPath 路径都改成相对路径'./'
2.还是版本问题
webpack-dev-middleware 默认是3.1.3版本但是会报错
具体哪个版本不报错我也不知道
context.compiler.hooks.invalid.tap('WebpackDevMiddleware', invalid);
找不到invalid 源码里面是有的
卸载webpack-dev-middleware
npm uninstall webpack-dev-middleware
使用dev-server自带的webpack-dev-middleware (cli单页应用是有热加载的)
重新install dev-server
npm install webpack-dev-server@2.10.0 --save-dev
npm run dev


总结:核心点就在创建并配置私服和修改出口入口配置,坑就在版本不兼容
建议:cli一个vue的demo项目 从头撸一遍 再在实际项目里使用,而不是copy一下运行没问题搞定~
建议而已,你怎么打人,呜呜呜~
以上就是本文的全部内容,希望对大家的学习有所帮助,也希望大家多多支持我们。

