spring-cloud Sleuth的使用方法
一直没弄明白sleuth的tracerContext是如何创建和传递的,闲来无事研究了一下。由于对sleuth的源码不熟悉,准备通过debug brave.Tracer的nextId()方法,查看方法调用栈来找来龙去脉。
首先创建两个service A和B,记作srvA、srvB,在srvA中添加testA controller,sevB中添加testB controller,testA中通过Feign调用testB。

先看当用户通过浏览器调用srvA的时候,srvA是作为server的。
configuration:
TraceWebServletAutoConfiguration==>TracingFilter
TraceHttpAutoConfiguration==>HttpTracing
TraceAutoConfiguration==>Tracing
SleuthLogAutoConfiguration.Slf4jConfiguration==>CurrentTraceContext
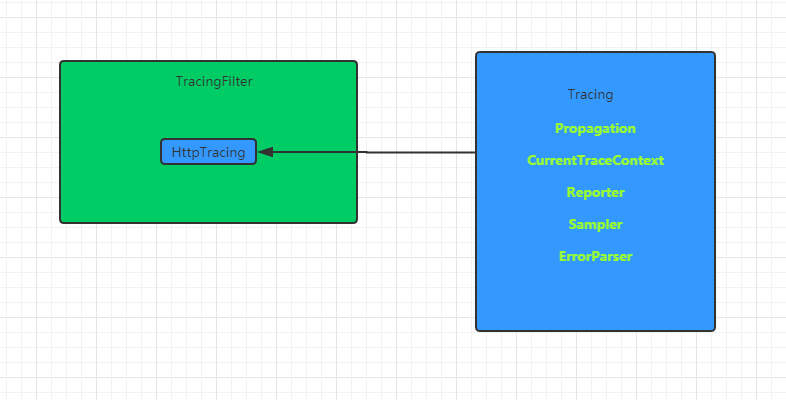
配置中,TracingFilter在实例化时需要一个HttpTracing:
 public static Filter create(HttpTracing httpTracing) {
  return new TracingFilter(httpTracing);
 }

 //Servlet运行时类
 final ServletRuntime servlet = ServletRuntime.get();
 //Slf4jCurrentTraceContext
 final CurrentTraceContext currentTraceContext;
 final Tracer tracer;
 final HttpServerHandler<HttpServletRequest, HttpServletResponse> handler;
 //TraceContext的数据提取器
 final TraceContext.Extractor<HttpServletRequest> extractor;

 TracingFilter(HttpTracing httpTracing) {
  tracer = httpTracing.tracing().tracer();
  currentTraceContext = httpTracing.tracing().currentTraceContext();
  handler = HttpServerHandler.create(httpTracing, ADAPTER);
  extractor = httpTracing.tracing().propagation().extractor(GETTER);
 }
HttpTracing Builder模式构造时接收一个Tracing:
  Tracing tracing;
  //客户端span解析器
  HttpClientParser clientParser;
  String serverName;
  //服务端span解析器
  HttpServerParser serverParser;
  HttpSampler clientSampler, serverSampler;

  Builder(Tracing tracing) {
   if (tracing == null) throw new NullPointerException("tracing == null");
   final ErrorParser errorParser = tracing.errorParser();
   this.tracing = tracing;
   this.serverName = "";
   // override to re-use any custom error parser from the tracing component
   this.clientParser = new HttpClientParser() {
    @Override protected ErrorParser errorParser() {
     return errorParser;
    }
   };
   this.serverParser = new HttpServerParser() {
    @Override protected ErrorParser errorParser() {
     return errorParser;
    }
   };
   this.clientSampler = HttpSampler.TRACE_ID;
   this.serverSampler(HttpSampler.TRACE_ID);
  }
Tracing实例化:
  @Bean
  @ConditionalOnMissingBean
  // NOTE: stable bean name as might be used outside sleuth
  Tracing tracing(@Value("${spring.zipkin.service.name:${spring.application.name:default}}") String serviceName,
      Propagation.Factory factory,
      CurrentTraceContext currentTraceContext,
      Reporter<zipkin2.Span> reporter,
      Sampler sampler,
      ErrorParser errorParser,
      SleuthProperties sleuthProperties
  ) {
    return Tracing.newBuilder()
        .sampler(sampler)
        .errorParser(errorParser)
        .localServiceName(serviceName)
        //ExtraFieldPropagation.Factory
        .propagationFactory(factory)
        .currentTraceContext(currentTraceContext)
        .spanReporter(adjustedReporter(reporter))
        .traceId128Bit(sleuthProperties.isTraceId128())
        .supportsJoin(sleuthProperties.isSupportsJoin())
        .build();
  }
下面看TracingFilter的doFilter:
  Span span = handler.handleReceive(extractor, httpRequest);

  // Add attributes for explicit access to customization or span context
  request.setAttribute(SpanCustomizer.class.getName(), span.customizer());
  request.setAttribute(TraceContext.class.getName(), span.context());

  Throwable error = null;
  Scope scope = currentTraceContext.newScope(span.context());
  try {
   // any downstream code can see Tracer.currentSpan() or use Tracer.currentSpanCustomizer()
   chain.doFilter(httpRequest, httpResponse);
  } catch (IOException | ServletException | RuntimeException | Error e) {
   error = e;
   throw e;
  } finally {
   scope.close();
   if (servlet.isAsync(httpRequest)) { // we don't have the actual response, handle later
    servlet.handleAsync(handler, httpRequest, httpResponse, span);
   } else { // we have a synchronous response, so we can finish the span
    handler.handleSend(ADAPTER.adaptResponse(httpRequest, httpResponse), error, span);
   }
  }
 }
在SleuthLogAutoConfiguration中如果有slfj的包,则注入CurrentTraceContext:
 @Configuration
  @ConditionalOnClass(MDC.class)
  @EnableConfigurationProperties(SleuthSlf4jProperties.class)
  protected static class Slf4jConfiguration {

    @Bean
    @ConditionalOnProperty(value = "spring.sleuth.log.slf4j.enabled", matchIfMissing = true)
    @ConditionalOnMissingBean
    public CurrentTraceContext slf4jSpanLogger() {
      return Slf4jCurrentTraceContext.create();
    }

    ...
   }
Slf4jCurrentTraceContext中,delegate就是CurrentTraceContext.Default.inheritable():
 public static final class Default extends CurrentTraceContext {
  static final ThreadLocal<TraceContext> DEFAULT = new ThreadLocal<>();
  // Inheritable as Brave 3's ThreadLocalServerClientAndLocalSpanState was inheritable
  static final InheritableThreadLocal<TraceContext> INHERITABLE = new InheritableThreadLocal<>();

  final ThreadLocal<TraceContext> local;

  //静态方法create,local对象为ThreadLocal类型
  /** Uses a non-inheritable static thread local */
  public static CurrentTraceContext create() {
   return new Default(DEFAULT);
  }

  //local对象为InheritableThreadLocal类型
  //官方文档指出,inheritable方法在线程池的环境中需谨慎使用,可能会取出错误的TraceContext,这样会导致Span等信息会记录并关联到错误的traceId上
  /**
   * Uses an inheritable static thread local which allows arbitrary calls to {@link
   * Thread#start()} to automatically inherit this context. This feature is available as it is was
   * the default in Brave 3, because some users couldn't control threads in their applications.
   *
   * <p>This can be a problem in scenarios such as thread pool expansion, leading to data being
   * recorded in the wrong span, or spans with the wrong parent. If you are impacted by this,
   * switch to {@link #create()}.
   */
  public static CurrentTraceContext inheritable() {
   return new Default(INHERITABLE);
  }

  Default(ThreadLocal<TraceContext> local) {
   if (local == null) throw new NullPointerException("local == null");
   this.local = local;
  }

  @Override public TraceContext get() {
   return local.get();
  }

  //替换当前TraceContext,close方法将之前的TraceContext设置回去
  //Scope接口继承了Closeable接口,在try中使用会自动调用close方法,为了避免用户忘记close方法,还提供了Runnable,Callable,Executor,ExecutorService包装方法
  @Override public Scope newScope(@Nullable TraceContext currentSpan) {
   final TraceContext previous = local.get();
   local.set(currentSpan);
   class DefaultCurrentTraceContextScope implements Scope {
    @Override public void close() {
     local.set(previous);
    }
   }
   return new DefaultCurrentTraceContextScope();
  }
 }
Slf4jCurrentTraceContext的delegate使用的就是一个InheritableThreadLocal,InheritableThreadLocal在创建子线程的时候,会将父线程的inheritableThreadLocals继承下来。这样就实现了TraceContext在父子线程中的传递。
看一下CurrentTraceContext的maybeScope:
 //返回一个新的scope,如果当前scope就是传入的scope,返回一个空scope
 public Scope maybeScope(@Nullable TraceContext currentSpan) {
  //获取当前TraceContext
  TraceContext currentScope = get();
  //如果传入的TraceContext为空,且当前TraceContext为空返回空scope
  if (currentSpan == null) {
   if (currentScope == null) return Scope.NOOP;
   return newScope(null);
  }
  return currentSpan.equals(currentScope) ? Scope.NOOP : newScope(currentSpan);
 }
TracingFilter中HttpServerHandler解析Request:请输入代码
2.srvA请求到servB时作为Client。
TraceLoadBalancerFeignClient-->LoadBalancerFeignClient-->FeignLoadBalancer-->LazyTracingFeignClient-->Client
以上就是本文的全部内容,希望对大家的学习有所帮助,也希望大家多多支持我们。
相关推荐
-

浅谈Spring-cloud 之 sleuth 服务链路跟踪
这篇文章主要讲述服务追踪组件zipkin,Spring Cloud Sleuth集成了zipkin组件. 一.简介 Add sleuth to the classpath of a Spring Boot application (see below for Maven and Gradle examples), and you will see the correlation data being collected in logs, as long as you are logging re
-
Spring Cloud Sleuth整合zipkin过程解析
这篇文章主要介绍了Spring Cloud Sleuth整合zipkin过程解析,文中通过示例代码介绍的非常详细,对大家的学习或者工作具有一定的参考学习价值,需要的朋友可以参考下 SpringCloud Sleuth 简介 Spring Cloud Sleuth为Spring Cloud实现了分布式跟踪解决方案. Spring Cloud Sleuth借鉴了Dapper的术语. Span:基本的工作单元.Span包括一个64位的唯一ID,一个64位trace码,描述信息,时间戳事件,key-va
-
Spring Cloud Sleuth 和 Zipkin 进行分布式跟踪使用小结
目录 什么是分布式跟踪? 分布式跟踪的关键概念 带有SpringCloudSleuth的SpringBoot示例 使用Zipkin可视化跟踪 分布式跟踪允许您跟踪分布式系统中的请求.本文通过了解如何使用 Spring Cloud Sleuth 和 Zipkin 来做到这一点. 对于一个做所有事情的大型应用程序(我们通常将其称为单体应用程序),跟踪应用程序内的传入请求很容易.我们可以跟踪日志,然后弄清楚请求是如何处理的.除了应用程序日志本身之外,我们无需查看其他任何内容. 随着时间的推移,单体应用
-
Spring Cloud Ribbon负载均衡器处理方法
接下来撸一撸负载均衡器的内部,看看是如何获取服务实例,获取以后做了哪些处理,处理后又是如何选取服务实例的. 分成三个部分来撸: 配置 获取服务 选择服务 配置 在上一篇<撸一撸Spring Cloud Ribbon的原理>的配置部分可以看到默认的负载均衡器是ZoneAwareLoadBalancer. 看一看配置类. 位置: spring-cloud-netflix-core-1.3.5.RELEASE.jar org.springframework.cloud.netflix.ribbon
-
Spring Cloud 专题之Sleuth 服务跟踪实现方法
目录 准备工作 实现跟踪 抽样收集 整合Zipkin 1.下载Zipkin 2.引入依赖配置 3.测试与分析 持久化到mysql 1.创建zipkin数据库 2.启动zipkin 3.测试与分析 在一个微服务架构中,系统的规模往往会比较大,各微服务之间的调用关系也错综复杂.通常一个有客户端发起的请求在后端系统中会经过多个不同的微服务调用阿里协同产生最后的请求结果.在复杂的微服务架构中,几乎每一个前端请求都会形成一条复杂的分布式的服务调用链路,在每条链路中任何一个依赖服务出现延迟过高或错误的时候都
-
Spring Cloud Ribbon实现客户端负载均衡的方法
简介 我们继续以之前博客的代码为基础,增加Ribbon组件来提供客户端负载均衡.负载均衡是实现高并发.高性能.可伸缩服务的重要组成部分,它可以把请求分散到一个集群中不同的服务器中,以减轻每个服务器的负担.客户端负载均衡是运行在客户端程序中的,如我们的web项目,然后通过获取集群的IP地址列表,随机选择一个server发送请求.相对于服务端负载均衡来说,它不需要消耗服务器的资源. 基础环境 JDK 1.8 Maven 3.3.9 IntelliJ 2018.1 Git:项目源码 更新配置 我们这次
-
详解spring cloud分布式日志链路跟踪
首先要明白一点,为什么要使用链路跟踪? 当我们微服务之间调用的时候可能会出错,但是我们不知道是哪个服务的问题,这时候就可以通过日志链路跟踪发现哪个服务出错. 它还有一个好处:当我们在企业中,可能每个人都负责一个服务,我们可以通过日志来检查自己所负责的服务不会出错,当调用其它服务时,这时候出现错误,那么就可以判定出不是自己的服务出错,从而也可以发现责任不是自己的. 基于微服务之间的调用开始,如果看不懂的小伙伴,请先参考我上篇博客:spring cloud中微服务之间的调用以及eureka的自我保护
-
浅谈Spring Cloud Ribbon的原理
Ribbon是Netflix发布的开源项目,主要功能是提供客户端的软件负载均衡算法,将Netflix的中间层服务连接在一起.Ribbon客户端组件提供一系列完善的配置项如连接超时,重试等.简单的说,就是在配置文件中列出Load Balancer(简称LB)后面所有的机器,Ribbon会自动的帮助你基于某种规则(如简单轮询,随即连接等)去连接这些机器.我们也很容易使用Ribbon实现自定义的负载均衡算法. 说起负载均衡一般都会想到服务端的负载均衡,常用产品包括LBS硬件或云服务.Nginx等,都是
-
Spring Cloud 负载均衡器 Ribbon原理及实现
Ribbon简介 分布式系统中,各个微服务会部署多个实例,如何将服务消费者均匀分摊到多个服务提供者实例上,就要使用到负载均衡器 Ribbon 是负载均衡器 ,它提供了很多负载均衡算法,例如轮询.随即等,在配置服务提供者地址后,可以将服务消费者请求均匀的分发 为服务消费者整合Ribbon 添加 Ribbon 依赖库 <dependency> <groupId>org.springframework.boot</groupId> <artifactId>spri
-
Spring Cloud Stream如何实现服务之间的通讯
Spring Cloud Stream Srping cloud Bus的底层实现就是Spring Cloud Stream,Spring Cloud Stream的目的是用于构建基于消息驱动(或事件驱动)的微服务架构.Spring Cloud Stream本身对Spring Messaging.Spring Integration.Spring Boot Actuator.Spring Boot Externalized Configuration等模块进行封装(整合)和扩展,下面我们实现两个
-
解决Spring Cloud中Feign/Ribbon第一次请求失败的方法
前言 在Spring Cloud中,Feign和Ribbon在整合了Hystrix后,可能会出现首次调用失败的问题,要如何解决该问题呢? 造成该问题的原因 Hystrix默认的超时时间是1秒,如果超过这个时间尚未响应,将会进入fallback代码.而首次请求往往会比较慢(因为Spring的懒加载机制,要实例化一些类),这个响应时间可能就大于1秒了.知道原因后,我们来总结一下解决放你. 解决方案有三种,以feign为例. 方法一 hystrix.command.default.execution.