用python生成与调用cntk模型代码演示方法
由于一些原因,视频录制要告一段落了。再写一篇关于cntk的文章分享出来吧。我也很想将这个事情进行下去。以后如果条件允许还会接着做。
cntk2.0框架生成的模型才可以支持python。1.0不支持。
python可以导入cntk.exe生成的框架,也可以导入python调用cntk生成的框架。举两个例子:
1 、导入cntk.exe生成的框架。
from cntk.ops.functions import load_model
from PIL import Image
import numpy as np
from sklearn.utils import shuffle

np.random.seed(0)

def generate(N, mean, cov, diff):
  #import ipdb;ipdb.set_trace()

  samples_per_class = int(N/2)

  X0 = np.random.multivariate_normal(mean, cov, samples_per_class)
  Y0 = np.zeros(samples_per_class)

  for ci, d in enumerate(diff):
    X1 = np.random.multivariate_normal(mean+d, cov, samples_per_class)
    Y1 = (ci+1)*np.ones(samples_per_class)

    X0 = np.concatenate((X0,X1))
    Y0 = np.concatenate((Y0,Y1))

  X, Y = shuffle(X0, Y0)

  return X,Y
mean = np.random.randn(2)
cov = np.eye(2)
features, labels = generate(6, mean, cov, [[3.0], [3.0, 0.0]])
features= features.astype(np.float32)
labels= labels.astype(np.int)
print(features)
print(labels)

z = load_model("MC.dnn")

print(z.parameters[0].value)
print(z.parameters[0])
print(z)
print(z.uid)
#print(z.signature)
#print(z.layers[0].E.shape)
#print(z.layers[2].b.value)
for index in range(len(z.inputs)):
   print("Index {} for input: {}.".format(index, z.inputs[index]))

for index in range(len(z.outputs)):
   print("Index {} for output: {}.".format(index, z.outputs[index].name))

import cntk as ct
z_out = ct.combine([z.outputs[2].owner])

predictions = np.squeeze(z_out.eval({z_out.arguments[0]:[features]}))

ret = list()
for t in predictions:
  ret.append(np.argmax(t))
top_class = np.argmax(predictions)
print(ret)
print("predictions{}.top_class{}".format(predictions,top_class))
上述的代码生成一个.py文件。放到3分类例子中,跟模型一个文件夹下(需要预先用cntk.exe生成模型)。CNTK-2.0.beta15.0\CNTK-2.0.beta15.0\Tutorials\HelloWorld-LogisticRegression\Models
2 、python生成模型和使用自己的模型:
代码如下:
# -*- coding: utf-8 -*-
"""
Created on Mon Apr 10 04:59:27 2017
@author: Administrator
"""
from __future__ import print_function
import matplotlib.pyplot as plt
import numpy as np
from matplotlib.colors import colorConverter, ListedColormap
from cntk.learners import sgd, learning_rate_schedule, UnitType #old in learner
from cntk.ops.functions import load_model
from cntk.ops import * #softmax
from cntk.io import CTFDeserializer, MinibatchSource, StreamDef, StreamDefs
from cntk import *
from cntk.layers import Dense, Sequential
from cntk.logging import ProgressPrinter
def generate_random_data(sample_size, feature_dim, num_classes):
# Create synthetic data using NumPy.
Y = np.random.randint(size=(sample_size, 1), low=0, high=num_classes)
# Make sure that the data is separable
X = (np.random.randn(sample_size, feature_dim) + 3) * (Y + 1)
X = X.astype(np.float32)
# converting class 0 into the vector "1 0 0",
# class 1 into vector "0 1 0", ...
class_ind = [Y == class_number for class_number in range(num_classes)]
Y = np.asarray(np.hstack(class_ind), dtype=np.float32)
return X, Y
# Read a CTF formatted text (as mentioned above) using the CTF deserializer from a file
def create_reader(path, is_training, input_dim, num_label_classes):
return MinibatchSource(CTFDeserializer(path, StreamDefs(
labels = StreamDef(field='labels', shape=num_label_classes, is_sparse=False),
features = StreamDef(field='features', shape=input_dim, is_sparse=False)
)), randomize = is_training, epoch_size = INFINITELY_REPEAT if is_training else FULL_DATA_SWEEP)
def ffnet():
inputs = 2
outputs = 2
layers = 2
hidden_dimension = 50
# input variables denoting the features and label data
features = input((inputs), np.float32)
label = input((outputs), np.float32)
# Instantiate the feedforward classification model
my_model = Sequential ([
Dense(hidden_dimension, activation=sigmoid,name='d1'),
Dense(outputs)])
z = my_model(features)
ce = cross_entropy_with_softmax(z, label)
pe = classification_error(z, label)
# Instantiate the trainer object to drive the model training
lr_per_minibatch = learning_rate_schedule(0.125, UnitType.minibatch)
# Initialize the parameters for the reader
input_dim=2
num_output_classes=2
num_samples_per_sweep = 6000
# Get minibatches of training data and perform model training
minibatch_size = 25
num_minibatches_to_train = 1024
num_sweeps_to_train_with = 2#10
num_minibatches_to_train = (num_samples_per_sweep * num_sweeps_to_train_with) / minibatch_size
# progress_printer = ProgressPrinter(0)
progress_printer = ProgressPrinter(tag='Training',num_epochs=num_sweeps_to_train_with)
trainer = Trainer(z, (ce, pe), [sgd(z.parameters, lr=lr_per_minibatch)], [progress_printer])
#trainer = Trainer(z, (ce, pe), [sgd(z.parameters, lr=lr_per_minibatch)])
train_file = "Train2-noLiner_cntk_text.txt"
# Create the reader to training data set
reader_train = create_reader(train_file, True, input_dim, num_output_classes)
# Map the data streams to the input and labels.
input_map = {
label : reader_train.streams.labels,
features : reader_train.streams.features
}
print(reader_train.streams.keys())
aggregate_loss = 0.0
#for i in range(num_minibatches_to_train):
for i in range(0, int(num_minibatches_to_train)):
#train_features, labels = generate_random_data(minibatch_size, inputs, outputs)
# Specify the mapping of input variables in the model to actual minibatch data to be trained with
#trainer.train_minibatch({features : train_features, label : labels})
# Read a mini batch from the training data file
data = reader_train.next_minibatch(minibatch_size, input_map = input_map)
trainer.train_minibatch(data)
sample_count = trainer.previous_minibatch_sample_count
aggregate_loss += trainer.previous_minibatch_loss_average * sample_count
#
last_avg_error = aggregate_loss / trainer.total_number_of_samples_seen
trainer.summarize_training_progress()
z.save_model("myfirstmod.dnn")
print(z)
print(z.parameters)
print(z.d1)
print(z.d1.signature)
print(z.d1.root_function)
print(z.d1.placeholders)
print(z.d1.parameters)
print(z.d1.op_name)
print(z.d1.type)
print(z.d1.output)
print(z.outputs)
test_features, test_labels = generate_random_data(minibatch_size, inputs, outputs)
avg_error = trainer.test_minibatch({features : test_features, label : test_labels})
print(' error rate on an unseen minibatch: {}'.format(avg_error))
return last_avg_error, avg_error
np.random.seed(98052)
ffnet()
print("-------------分割-----------------")
inputs = 2
outputs = 2
minibatch_size = 5
features = input((inputs), np.float32)
label = input((outputs), np.float32)
test_features, test_labels = generate_random_data(minibatch_size, inputs, outputs)
print('fea={}'.format(test_features))
z = load_model("myfirstmod.dnn")
ce = cross_entropy_with_softmax(z, label)
pe = classification_error(z, label)
lr_per_minibatch = learning_rate_schedule(0.125, UnitType.minibatch)
progress_printer = ProgressPrinter(0)
trainer = Trainer(z, (ce, pe), [sgd(z.parameters, lr=lr_per_minibatch)], [progress_printer])
avg_error = trainer.test_minibatch({z.arguments[0] : test_features, label : test_labels})
print(' error rate on an unseen minibatch: {}'.format(avg_error))
result1 = z.eval({z.arguments[0] : test_features})
#print("r={} ".format(result1))
out = softmax(z)
result = out.eval({z.arguments[0] : test_features})
print(result)
print("Label :", [np.argmax(label) for label in test_labels])
print("Predicted :", [np.argmax(label) for label in result])
#print("Predicted:", [np.argmax(result[i,:,:]) for i in range(result.shape[0])])
type1_x=[]
type1_y=[]
type2_x=[]
type2_y=[]
for i in range(len(test_labels)):
#for i in range(6):
if np.argmax(test_labels[i]) == 0:
type1_x.append( test_features[i][0] )
type1_y.append( test_features[i][1] )
if np.argmax(test_labels[i]) == 1:
type2_x.append( test_features[i][0] )
type2_y.append( test_features[i][1] )
type1 = plt.scatter(type1_x, type1_y,s=40, c='red',marker='+' )
type2 = plt.scatter(type2_x, type2_y, s=40, c='green',marker='+')
nb_of_xs = 100
xs1 = np.linspace(2, 8, num=nb_of_xs)
xs2 = np.linspace(2, 8, num=nb_of_xs)
xx, yy = np.meshgrid(xs1, xs2) # create the grid
featureLine = np.vstack((np.array(xx).reshape(1,nb_of_xs*nb_of_xs),np.array(yy).reshape(1,yy.size)))
print(featureLine.T)
r = out.eval({z.arguments[0] : featureLine.T})
print(r)
# Initialize and fill the classification plane
classification_plane = np.zeros((nb_of_xs, nb_of_xs))
for i in range(nb_of_xs):
for j in range(nb_of_xs):
#classification_plane[i,j] = nn_predict(xx[i,j], yy[i,j])
#r = out.eval({z.arguments[0] : [xx[i,j], yy[i,j]]})
classification_plane[i,j] = np.argmax(r[i*nb_of_xs+j] )
print(classification_plane)
# Create a color map to show the classification colors of each grid point
cmap = ListedColormap([
colorConverter.to_rgba('r', alpha=0.30),
colorConverter.to_rgba('b', alpha=0.30)])
# Plot the classification plane with decision boundary and input samples
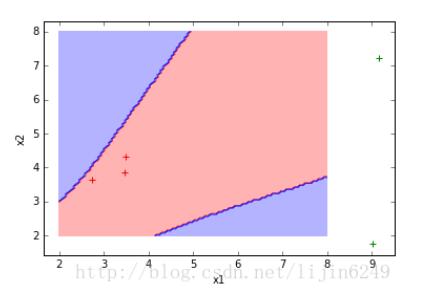
plt.contourf(xx, yy, classification_plane, cmap=cmap)
plt.xlabel('x1')
plt.ylabel('x2')
#axes.legend((type1, type2,type3), ('0', '1','2'),loc=1)
plt.show()
代码内容:
1先生成模型。并打印出模型里面的参数
2调用模型,测试下模型错误率
3调用模型,输出结果
4将数据可视化
输出:dict_keys([‘features', ‘labels'])
Finished Epoch[1 of 2]: [Training] loss = 0.485836 * 12000, metric = 20.36% * 12000 0.377s (31830.2 samples/s);
Composite(Dense): Input(‘Input456', [#], [2]) -> Output(‘Block577_Output_0', [#], [2])
(Parameter(‘W', [], [50 x 2]), Parameter(‘b', [], [2]), Parameter(‘W', [], [2 x 50]), Parameter(‘b', [], [50]))
Dense: Input(‘Input456', [#], [2]) -> Output(‘d1', [#], [50])
(Input(‘Input456', [#], [2]),)
Dense: Input(‘Input456', [#], [2]) -> Output(‘d1', [#], [50])
()
(Parameter(‘W', [], [2 x 50]), Parameter(‘b', [], [50]))
Dense
Tensor[50]
Output(‘d1', [#], [50])
(Output(‘Block577_Output_0', [#], [2]),)
error rate on an unseen minibatch: 0.6
————-分割—————–
fea=[[ 2.74521399 3.6318233 ]
[ 3.45750308 3.8683207 ]
[ 3.49858737 4.31363964]
[ 9.01324368 1.75216711]
[ 9.15447521 7.21175623]]
average since average since examples
loss last metric last
error rate on an unseen minibatch: 0.2
[[ 0.57505184 0.42494816]
[ 0.70583773 0.29416227]
[ 0.67773896 0.32226101]
[ 0.04568771 0.95431226]
[ 0.95059013 0.04940984]]
Label : [0, 0, 0, 1, 1]
Predicted : [0, 0, 0, 1, 0]
[[ 2. 2. ]
[ 2.06060606 2. ]
[ 2.12121212 2. ]
…,
[ 7.87878788 8. ]
[ 7.93939394 8. ]
[ 8. 8. ]]
Train2-noLiner_cntk_text 部分数据:
|features 1.480778 -1.265981 |labels 1 0
|features -0.592276 3.097171 |labels 0 1
|features 4.654565 1.054850 |labels 0 1
|features 6.124534 0.265861 |labels 0 1
|features 6.529863 1.347884 |labels 0 1
|features 2.330881 4.995633 |labels 0 1
|features 1.690045 0.171233 |labels 1 0
|features 2.101682 3.911253 |labels 0 1
|features 1.907487 0.201574 |labels 1 0
|features 5.141490 1.246433 |labels 0 1
|features 0.696826 0.481824 |labels 1 0
|features 3.305343 4.792150 |labels 1 0
|features 3.496849 -0.408635 |labels 1 0
|features 3.911750 0.205660 |labels 0 1
|features 5.154604 0.453434 |labels 0 1
|features 4.084166 2.718320 |labels 0 1
|features 5.544332 1.617196 |labels 0 1
|features -0.050979 0.466522 |labels 1 0
|features 5.168221 4.647089 |labels 1 0
|features 3.051973 0.864701 |labels 1 0
|features 5.989367 4.118536 |labels 1 0
|features 1.251041 -0.505563 |labels 1 0
|features 3.528092 0.319297 |labels 0 1
|features 6.907406 6.122889 |labels 1 0
|features 2.168320 0.546091 |labels 1 0
以上这篇用python生成与调用cntk模型代码演示方法就是小编分享给大家的全部内容了,希望能给大家一个参考,也希望大家多多支持我们。
相关推荐
-

python实现感知机线性分类模型示例代码
前言 感知器是分类的线性分类模型,其中输入为实例的特征向量,输出为实例的类别,取+1或-1的值作为正类或负类.感知器对应于输入空间中对输入特征进行分类的超平面,属于判别模型. 通过梯度下降使误分类的损失函数最小化,得到了感知器模型. 本节为大家介绍实现感知机实现的具体原理代码: 运 行结果如图所示: 总结 以上就是这篇文章的全部内容了,希望本文的内容对大家的学习或者工作具有一定的参考学习价值,谢谢大家对我们的支持.
-
python使用tensorflow保存、加载和使用模型的方法
使用Tensorflow进行深度学习训练的时候,需要对训练好的网络模型和各种参数进行保存,以便在此基础上继续训练或者使用.介绍这方面的博客有很多,我发现写的最好的是这一篇官方英文介绍: http://cv-tricks.com/tensorflow-tutorial/save-restore-tensorflow-models-quick-complete-tutorial/ 我对这篇文章进行了整理和汇总. 首先是模型的保存.直接上代码: #!/usr/bin/env python #-*- c
-
用tensorflow构建线性回归模型的示例代码
用tensorflow构建简单的线性回归模型是tensorflow的一个基础样例,但是原有的样例存在一些问题,我在实际调试的过程中做了一点自己的改进,并且有一些体会. 首先总结一下tf构建模型的总体套路 1.先定义模型的整体图结构,未知的部分,比如输入就用placeholder来代替. 2.再定义最后与目标的误差函数. 3.最后选择优化方法. 另外几个值得注意的地方是: 1.tensorflow构建模型第一步是先用代码搭建图模型,此时图模型是静止的,是不产生任何运算结果的,必须使用Session
-
python 用opencv调用训练好的模型进行识别的方法
此程序为先调用opencv自带的人脸检测模型,检测到人脸后,再调用我自己训练好的模型去识别人脸,使用时更改模型地址即可 #!usr/bin/env python import cv2 font=cv2.FONT_HERSHEY_SIMPLEX cascade1 = cv2.CascadeClassifier("D:\\opencv249\\opencv\\sources\\data\\haarcascades\\haarcascade_frontalface_alt_tree.xml"
-
用python生成与调用cntk模型代码演示方法
由于一些原因,视频录制要告一段落了.再写一篇关于cntk的文章分享出来吧.我也很想将这个事情进行下去.以后如果条件允许还会接着做. cntk2.0框架生成的模型才可以支持python.1.0不支持. python可以导入cntk.exe生成的框架,也可以导入python调用cntk生成的框架.举两个例子: 1 .导入cntk.exe生成的框架. from cntk.ops.functions import load_model from PIL import Image import numpy
-
python生成大写32位uuid代码
我就废话不多说了,还是直接看代码吧,希望对你有帮助! import uuid def getUUID(): return "".join(str(uuid.uuid4()).split("-")).upper() 补充拓展:随机产生32位随机数 1.通过uuid UUID.randomUUID().toString()这个方法可以得到32位数字和四个"-"穿插在其中 再调用 .replace("-","")
-
Python生成九宫格图片的示例代码
一.前言 大家在朋友圈应该看到过用一张图片以九宫格的方式显示,效果大致如下: 要实现上面的效果非常简单,我们只需要截取图片的九个区域即可.今天我们就要带大家使用Python来实现一下九宫格图片的生成.在开始之前,我们需要安装一下Pillow模块,语句如下: pip install pillow 下面我们先来看看一些简单的图片操作. 二.图片基本操作 今天我们会使用到三个操作,分别是读取图片.保存图片和截取图片.下面我们分别来看看. 2.1 读取图片 在Pillow中,我们最常用的就是Image子
-
用python生成一张壁纸实例代码
目录 前言 代码 效果 总结 前言 之前在csdn上看见用python写春联的,这次突发奇想用python制作一张壁纸,其元素包括背景.文字.图片. 知识点 用PIL创建一张纯色背景Image.new:图片上添加文字ImageDraw,cv2只能显示英文:转换图片的透明度:图片上叠加图片:jpg与png的区别. 代码 import os from PIL import ImageFont, ImageDraw, Image import cv2 import random def white2t
-
Python生成任意范围任意精度的随机数方法
实例如下所示: # -*- coding: utf-8 -*- import numpy as np random = np.random.RandomState(0)#RandomState生成随机数种子 for i in range(200):#随机数个数 a = random.uniform(-0.1, 0.1)#随机数范围 print round(a, 2)#随机数精度要求 以上这篇Python生成任意范围任意精度的随机数方法就是小编分享给大家的全部内容了,希望能给大家一个参考,也希望大
-
用python生成(动态彩色)二维码的方法(使用myqr库实现)
最近真的感觉到了python生态的强大(倒吸一口凉气) 现在介绍一个可以生成动态二维码的库(myqr) 效果如图: 第一步要安装myqr库 在cmd中直接用pip安装 pip install myqr 第二步 from MyQR import myqr import os version, level, qr_name = myqr.run( words="https://www.baidu.com", # 可以是字符串,也可以是网址(前面要加http(s)://) version=1
-
python 类对象的析构释放代码演示
目录 一.类的构造函数与析构函数 二.代码演示 1. 引用的更迭 2. 只在函数内部的类对象 三.函数内部返回的类对象 1. 使用全局变量 引用 函数内部的类对象 一.类的构造函数与析构函数 _init__ 函数是python 类的构造函数,在创建一个类对象的时候,就会自动调用该函数:可以用来在创建对象的时候,设置该对象的一些初始化信息和设置. __del__ 函数是python 类的析构函数,在一个类对象生命周期结束.被销毁的时候,就会自动调用该函数:主要用来释放对象占用的一些资源等. 二.代
-
Python 生成 -1~1 之间的随机数矩阵方法
1. 使用函数 np.random.random 由于 np.random.random() 默认生成 0~1 之间的小数,因此需要转换一下 如生成 3*3 的 -1~1 之间的随机数矩阵 -1 + 2*np.random.random((3,3)) # -*- coding:utf-8 -*- import matplotlib.pyplot as plt import pylab import cv2 import numpy as np img = plt.imread("1.png&qu
-
Python生成词云的实现代码
1 概述 利用Python生成简单的词云,需要的工具是cython,wordcloud与anaconda. 2 准备工作 包括安装cython,wordcloud与anaconda. 2.1 安装anaconda 下载官网 选择对应的版本下载即可. 2.2 安装cython cython是为了安装wordcloud准备的. pip -m pip install --upgrade cython 2.3 安装wordcloud 安装wordcloud前需要先安装Microsoft Visuall
-
使用Python生成200个激活码的实现方法
题目:使用 Python 生成 200 个不重复的激活码 编写思路 # 激活码一般是由26个大写字母和10个数字任意组合而成 # 长度为12位或者16位的居多激活码 # 一个激活码里的字符是可以重复的,而且必须要保证激活码是不能重复的 测试用例 # 1.随机生成字符:数字加字母 # 2.生成200个 # 3.去重 编码: 第一步:随机生成16位字母跟数字的字符串 1.调用ramdom模块,使用了import random 2.choice() 方法返回一个列表,元组或字符串的随机项 使用了ran