Vue实现仿iPhone悬浮球的示例代码

悬浮球插件简单的效果图:

很遗憾,没找到太好的视频转gif的软件,压缩出来的大小超过了限制,就不放图了

可以参考其他人的图,效果一致:
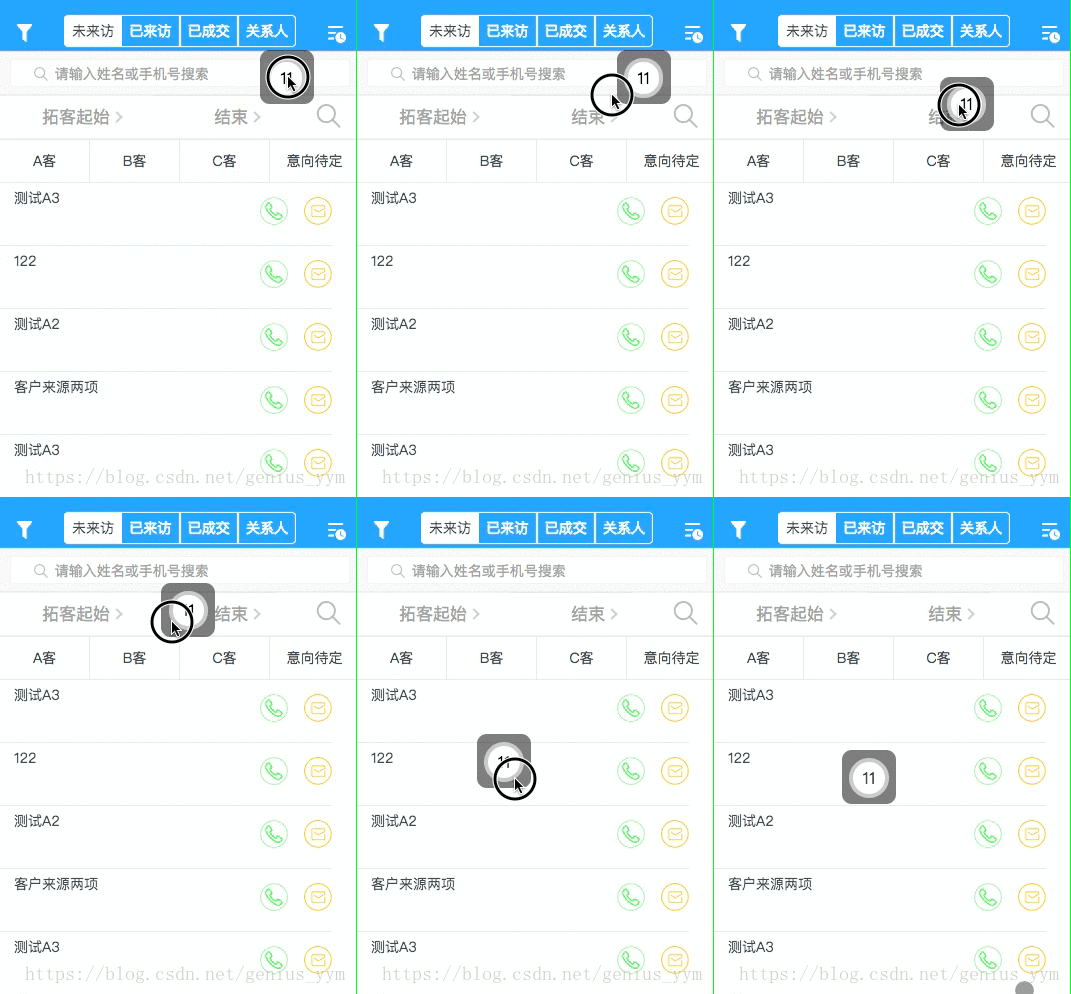
简单实用案例:

<!-- 给定一个初始位置position,插槽中填写想滑动的部分 -->
<xuanfuqiu :position="position">
	<d-add-button @click="addPigFarm" add-item="猪场"></d-add-button>
</xuanfuqiu>

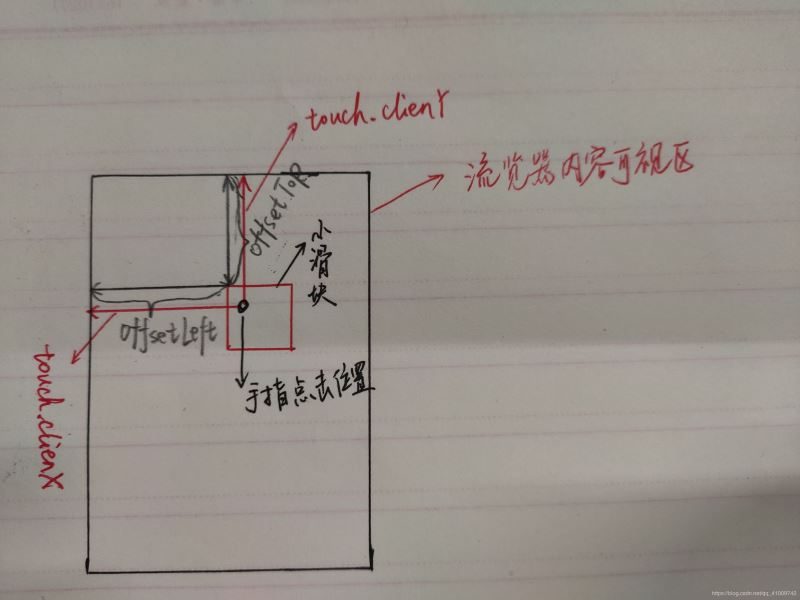
原理示意图

请结合代码注释来理解
悬浮球插件代码如下:

<template>
  <div>
    <div class="xuanfu" id="moveDiv" :style="position"
      @mousedown="down" @touchstart="down"
      @mousemove="move" @touchmove="move"
      @mouseup="end" @touchend="end">
      <slot></slot>
    </div>
  </div>
</template>

<script>
export default {
  name: "",
  components: {},
  props: {
    // 通过position来设置初始定位
    position: {
      type: Object,
      default: function() {
        return {
          top: "32.25rem",
          left: "18.34375rem"
        }
      }
    },
    // 通过fixed来禁用自由移动
    fixed: {
      type: Boolean,
      default: false
    }
  },
  data() {
    return {
      flags: false,
      positionTemp: { x: 0, y: 0 },  // 记录手指点击的位置
      nx: '', ny: '', dx: '', dy: '', xPum: '', yPum: '',
    }
  },
  watch: {},
  computed: {},
  methods: {
    // 实现移动端拖拽
    down(){
      if (this.fixed) {
        return
      }

      this.flags = true;
      var touch;
      // 该if判断是用touch还是mouse来移动
      if (event.touches) {
        touch = event.touches[0];
      } else {
        touch = event;
      }
      this.positionTemp.x = touch.clientX;  // 手指点击后的位置
      this.positionTemp.y = touch.clientY;

      this.dx = moveDiv.offsetLeft;  // 移动的div元素的位置
      this.dy = moveDiv.offsetTop;

      // console.log("moveDiv.offsetLeft", moveDiv.offsetLeft)
      // console.log("touch.clientX", touch.clientX)
    },
    move(){
      if(this.flags) {
        var touch ;
        if(event.touches){
          touch = event.touches[0];
        }else {
          touch = event;
        }
        this.nx = touch.clientX - this.positionTemp.x;  // 手指移动的变化量
        this.ny = touch.clientY - this.positionTemp.y;

        this.xPum = this.dx + this.nx;  // 移动后,div元素的位置
        this.yPum = this.dy + this.ny;

        let windowWidth = document.documentElement.clientWidth
        let windowHeight = document.documentElement.clientHeight
        // console.log("window.clientWidth", windowWidth)
        // console.log(this.xPum)
        // console.log(" moveDiv.clientWidth", moveDiv.clientWidth)

        if (this.xPum > 0 && (this.xPum + moveDiv.clientWidth < windowWidth)) {
        	// movediv的左右边,未出界
          moveDiv.style.left = this.xPum + "px";
        } else if (this.xPum <= 0) {
          // 左边出界,则左边缘贴边
          moveDiv.style.left = 0 + "px";
        } else if (this.xPum + moveDiv.clientWidth >= windowWidth) {
          // 右边缘出界
          moveDiv.style.left = (windowWidth - moveDiv.clientWidth) + "px";
          // console.log("dx", windowWidth - moveDiv.clientWidth)
        }
        // 上下未出界
        if (this.yPum > 0 && (this.yPum + moveDiv.clientHeight < windowHeight)) {
          moveDiv.style.top = this.yPum +"px";
        } else if (this.yPum <= 0) {
          // 上边缘出界
          moveDiv.style.top = 0 + "px"
        } else if (this.yPum + moveDiv.clientHeight >= windowHeight) {
          // 下边缘
          // console.log("windowHeight:", windowHeight)
          // console.log("moveDiv.clientHeight:", moveDiv.clientHeight)
          // console.log(this.yPum + moveDiv.clientHeight)
          moveDiv.style.top = windowHeight - moveDiv.clientHeight + "px"
        }

        // 阻止页面的滑动默认事件,为了只让悬浮球滑动,其他部分不滑动;如果碰到滑动问题,1.2 请注意是否获取到 touchmove, 系统默认passive: true,无法使用preventDefault
        // document.addEventListener("touchmove", function(){
        //  event.preventDefault();
        // }, { passive: false });
        // document.addEventListener("mousemove", function(){
        //   event.preventDefault();
        // }, { passive: false });
        document.addEventListener("touchmove", this.preventDefault, { passive: false })
        document.addEventListener("mousemove", this.preventDefault, { passive: false })
      }
    },
    //鼠标释放时候的函数,鼠标释放,移除之前添加的侦听事件,将passive设置为true,不然背景会滑动不了
    end(){
      this.flags = false
      // 注意事项,在添加和删除监听事件时,其function必须是同名的函数,不能为匿名函数。
      document.removeEventListener('touchmove',this.preventDefault, false)
      document.removeEventListener('mousemove',this.preventDefault, false)
      // 下面两句是保证在移除监听事件后,除了悬浮球的部分还能够滑动,如果不添加,则无法滑动
      document.addEventListener("touchmove", function(e) {
        window.event.returnValue = true
      })
      document.addEventListener("mousemove", function(e) {
        window.event.returnValue = true
      })
    },
    preventDefault(e) {
      e.preventDefault()
    }
  },
  created() {},
  mounted() {}
}
</script>

<style lang="scss" scoped>
.xuanfu {
  /* 如果碰到滑动问题,1.3 请检查 z-index。z-index需比web大一级*/
  z-index: 999;
  position: fixed; // 这里的定位方式有待考量,fixed的话存在未知设置不合理,跑出屏幕不显示的问题
}
</style>

到此这篇关于Vue实现仿iPhone悬浮球的示例代码的文章就介绍到这了,更多相关Vue 悬浮球内容请搜索我们以前的文章或继续浏览下面的相关文章希望大家以后多多支持我们!

(0)

相关推荐

  • vue实现element-ui对话框可拖拽功能

    element-ui对话框可拖拽及边界处理 应业务需求,需要实现对话框可拖拽问题,应element-ui没有提供官方支持,于是便参考大神的文章,得出了适合业务需要的解决方案.很多大神给出的代码是没有解决边界问题的,但是不解决边界问题存在一个bug,拖到不可视区域后边再也拖不回来了,不信你们可以试试. 在实现的功能的情况下,封装成了js文件,然后再main.js中引入后可全局使用. 还是上代码吧 功能实现代码directives.js代码如下: import Vue from 'vue'; //

  • vue draggable resizable 实现可拖拽缩放的组件功能

    虽然之前适配过旧版组件,但是因为2.0版本原作者对代码进行了重构,原来修改的代码照搬是不可能的了. 所以也就一直没有将 冲突检测 以及 吸附对齐 功能适配到2.0版本,最近正好有时间就适配一下. 新增特征 冲突检测 吸附对齐 默认样式优化 功能预览 项目地址 github.com/gorkys/vue-- 如果喜欢该项目,欢迎 Star 新增Props isConflictCheck Type: Boolean Required: false Default: false 定义组件是否开启冲突检

  • vue悬浮可拖拽悬浮按钮的实例代码

    前言 vue开发手机端悬浮按钮实现,可以拖拽,滚动的时候收到里边,不影响视线 github地址 使用,基于vue-cli3.0+webpack 4+vant ui + sass+ rem适配方案+axios封装,构建手机端模板脚手架 vue-h5-template 后续将发布各种商城组件组件,让商城简单高效开发 线上体验 使用 将 src/components文件夹下的s-icons组件放到你的组件目录下 使用组件 // template <template> <div> <

  • Vue实现仿iPhone悬浮球的示例代码

    悬浮球插件简单的效果图: 很遗憾,没找到太好的视频转gif的软件,压缩出来的大小超过了限制,就不放图了 可以参考其他人的图,效果一致: 简单实用案例: <!-- 给定一个初始位置position,插槽中填写想滑动的部分 --> <xuanfuqiu :position="position"> <d-add-button @click="addPigFarm" add-item="猪场"></d-add-b

  • Vue实现悬浮框自由移动+录音功能的示例代码

    目录 效果如下 主要功能 实现 1.封装第一个漂浮组件FloatBall.vue 2.封装第二个组件录音组件Audio.vue 3.recorder.js 效果如下 主要功能 1.一个漂浮的球,在全屏幕中自由移动遇到边边角角自动改变方向 ,自带动画效果 2.录音功能,可以录制用户的声音,可以下载为任意格式的音频文件到本地,也可以通过二进制流发给后端 由于后端要声音文件格式wav或者pcm,采样率16000,所以我改了配置文件,稍后我会介绍在哪里改,改什么什么样都是可以的. 注:代码我已经封装成组

  • 使用 Vue.js 仿百度搜索框的实例代码

    整理文档,搜刮出一个使用 Vue.js 仿百度搜索框的实例代码,稍微整理精简一下做下分享. <!DOCTYPE html> <html> <head> <meta charset="utf-8"> <title>Vue demo</title> <style type="text/css"> .bg { background: #ccc; } </style> <s

  • vue实现仿淘宝结账页面实例代码

    虽然Vue最强大的是组件化开发,但是其实多页面开发也蛮适合的.下面小编给大家分享vue实现仿淘宝结账页面实例代码,具体内容大家参考下本文. 这个demo,是小编基于之前的 vue2.0在table中实现全选和反选 文章进行更新后的demo,主要功能呢,是仿照淘宝页面的结算购物车商品时自动算出合计价格的页面,具体页面效果请看下面的动图:(如果大家发现有什么问题请及时提出帮小颖改正错误呦,谢谢啦嘻嘻) 效果图: 更新后的home.vue <template> <div class="

  • vue组件中使用iframe元素的示例代码

    本文介绍了vue组件中使用iframe元素的示例代码,分享给大家,具体如下: 需要在本页面中展示vue组件中的超链接,地址栏不改变的方法: <template> <div class="accept-container"> <div class="go-back" v-show="goBackState" @click="goBack">GoBack</div> <ul&g

  • 使用Vue调取接口,并渲染数据的示例代码

    刚接触vue.js框架的时候,很伤脑筋.今天整理一下post/get两种方式,简单的调取数据库数据,并进行渲染,希望帮助大家! 首先,在HTML页面引入: //引入vue.js文件 <script src="https://cdn.staticfile.org/vue/2.4.2/vue.min.js"></script> 引入vue-resource.min.js文件,就可以引入接口方法了 <script src="https://cdn.st

  • Vue+mui实现图片的本地缓存示例代码

    下面一段代码给大家分享基于Vue+mui实现图片的本地缓存,具体代码如下所示: const menu = { state: { products: {}, GLOBAL_CONFIG:GLOBAL_CONFIG['GLOBAL_CONFIG'] }, mutations: { get_product: function (state, products) { //商品列表 state.products = products; for(let i = 0; i < state.products.l

  • vue 2.0 购物车小球抛物线的示例代码

    本文介绍了vue 2.0 购物车小球抛物线的示例代码,分享给大家,具体如下: 备注:此项目模仿 饿了吗.我用的是最新的Vue, 视频上的一些写法已经被废弃了. 布局代码 <div class="ball-container"> <transition name="drop" v-for="ball in balls" @before-enter="beforeDrop" @enter="droppi

  • vue+element 实现商城主题开发的示例代码

    本文介绍了vue+element 实现商城主题开发的示例代码,分享给大家,具体如下: <template> <div> <div class="set-phone"> <el-form :model="theme" :rules="rules" ref="ruleForm" class="demo-ruleForm"> <el-form-item lab

  • Vue的props父传子的示例代码

    废话不多少,父传子做一个比喻 首页想加一个图片,但又不想每次都用img而且又让img做css和动画事件.此时最简单的方法做一个页面封装,然后起一个名字让首页自己获取,放一个地址就行!其他什么都不用管. 步骤如下: 第一步:创建一个组件,相当于创意文件夹,专门存小东西以后经常用 <template> <div> <img src="./xxx.xx" alt=""> </div> </template> &l

随机推荐