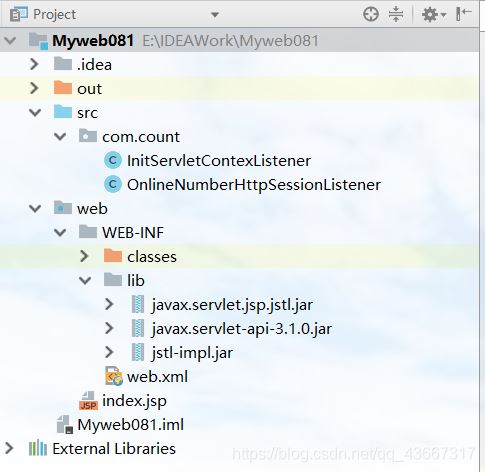
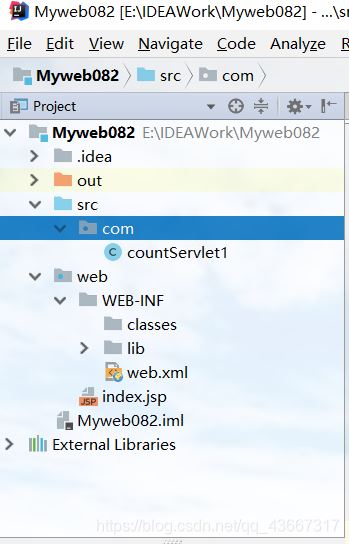
IDEA 当前在线人数和历史访问量的示例代码
当前在线人数

一共需要三处
创建监听器
package com.count;
import javax.servlet.ServletContext;
import javax.servlet.ServletContextEvent;
import javax.servlet.ServletContextListener;
import javax.servlet.annotation.WebListener;
/*
 初始化:
   只有服务器的启动,才会创建servletContext对象。
  用于监听servletContext创建,一旦创建servletContext创建,则设置servletContext中的count值为0;
*/
@WebListener
/*
 这个注解的作用是启动监听,相当于在web.xml配置(
 <listener>
  <listener-class>com.cyl.count.InitServletContexListener</listener-class>
 </listener>
*/
public class InitServletContexListener implements ServletContextListener {
 @Override
 public void contextInitialized(ServletContextEvent servletContextEvent) {
  //获取ServletContext域对象
  ServletContext servletContext = servletContextEvent.getServletContext();
  //给ServletContext域对象,设置count=0
  servletContext.setAttribute("count",0);
 }

 @Override
 public void contextDestroyed(ServletContextEvent servletContextEvent) {

 }
}
package com.count;

import javax.servlet.ServletContext;
import javax.servlet.annotation.WebListener;
import javax.servlet.http.HttpSession;
import javax.servlet.http.HttpSessionEvent;
import javax.servlet.http.HttpSessionListener;

/**
 * @监听在线人数,监听session的创建和销毁
 *  如果session创建 获取ServletContext中的count++,重新设置
 *  如果session销毁 获取ServletContext中的count--,重新设置
 */
@WebListener
public class OnlineNumberHttpSessionListener implements HttpSessionListener {
 @Override
 public void sessionCreated(HttpSessionEvent httpSessionEvent) {
  //1.获取session
  HttpSession session = httpSessionEvent.getSession();
  ServletContext servletContext = session.getServletContext();
  //2.获取counnt值,加1
  int count = (int) servletContext.getAttribute("count");
  count++;
  //3.把servlet存储到servletContext对象中
  servletContext.setAttribute("count",count);
 }

 @Override
 public void sessionDestroyed(HttpSessionEvent httpSessionEvent) {

  //1.获取session
  HttpSession session = httpSessionEvent.getSession();
  ServletContext servletContext = session.getServletContext();
  //2.获取counnt值,减1
  int count = (int) servletContext.getAttribute("count");
  count++;
  //3.把servlet存储到servletContext对象中
  servletContext.setAttribute("count",count);
 }
}
修改index.jsp
<%@ page contentType="text/html;charset=UTF-8" language="java" %>
<%@taglib prefix="c" uri="http://java.sun.com/jstl/core" %>
<html>
<head>
 <title>$Title$</title>
</head>
<body>
<h1>当前在线人数:${count}</h1>
</body>
</html>
历史访问量

import java.io.IOException;
import java.io.PrintWriter;

import javax.servlet.ServletContext;
import javax.servlet.ServletException;
import javax.servlet.annotation.WebServlet;
import javax.servlet.http.HttpServlet;
import javax.servlet.http.HttpServletRequest;
import javax.servlet.http.HttpServletResponse;

/**
 * Servlet implementation class countServlet1
 */
@WebServlet("/countServlet1")
public class countServlet1 extends HttpServlet {
 private static final long serialVersionUID = 1L;

 /**
  * @see HttpServlet#HttpServlet()
  */
 public countServlet1() {
  super();
  // TODO Auto-generated constructor stub
 }

 /**
  * @see HttpServlet#doGet(HttpServletRequest request, HttpServletResponse response)
  */
 protected void doGet(HttpServletRequest request, HttpServletResponse response) throws ServletException, IOException {
  //设置字符编码
  request.setCharacterEncoding("utf-8");
  response.setCharacterEncoding("utf-8");
  response.setContentType("text/html; charset=utf-8");

  //获取全局的共享数据
  ServletContext servletContext = this.getServletContext();

  //获取计数器count
  Integer count = (Integer) servletContext.getAttribute("count");

  //如果获取的计算器对象为空 ,说明是第一次访问,并将count,放入servletCount
  if( servletContext.getAttribute("count") == null) {
   count = 1;
   servletContext.setAttribute("count", count);
  }else {
   //否则就不是第一次访问,将登陆的计数器进行加1的数据更新
   servletContext.setAttribute("count", count+1);
  }

  //将登陆的次数显示在页面上
  PrintWriter out =response.getWriter();
  out.print("<!DOCTYPE html>\r\n" +
    "<html>\r\n" +
    "<head>\r\n" +
    "<meta charset=\"UTF-8\">\r\n" +
    "<title>登陆网页次数统计</title>\r\n" +
    "</head>\r\n" +
    "<body>");
  out.print("<h1>");
  out.print("您是第 "+ servletContext.getAttribute("count")+"位访客");
  out.print("<h1>");
  out.print("</body>\r\n" +
    "</html>");
 }

 /**
  * @see HttpServlet#doPost(HttpServletRequest request, HttpServletResponse response)
  */
 protected void doPost(HttpServletRequest request, HttpServletResponse response) throws ServletException, IOException {
  // TODO Auto-generated method stub
  doGet(request, response);
 }

}
<%@ page contentType="text/html;charset=UTF-8" language="java" %>
<html>
 <head>
 <title>$Title$</title>
 </head>
 <body>
 <%
 //统计网页访问量
 if (application.getAttribute("count") == null) {
  application.setAttribute("count", 0);//application.setAttribute("count", new Integer(0));
 }
 Integer count = (Integer) application.getAttribute("count");
 //使用application对象读取count参数的值,再在原值基础上累加1
 application.setAttribute("count", count + 1);//application.setAttribute("count", new Integer(count.intValue() + 1));
 %>
 <h2>
 <!-- 输出累加后的count参数对应的值 -->
 欢迎您访问,本页面已经被访问过 <font color="#ff0000"><%=application.getAttribute("count")%></font>次
 </h2>
 </body>
</html>
总结
到此这篇关于IDEA :当前在线人数和历史访问量的文章就介绍到这了,更多相关IDEA :当前在线人数和历史访问量内容请搜索我们以前的文章或继续浏览下面的相关文章希望大家以后多多支持我们!
赞 (0)

