关于vue中根据用户权限动态添加路由的问题
根据用户的权限,展示不同的菜单页。
知识点
路由守卫(使用了前置守卫):根据用户角色判断要添加的路由
vuex:保存动态添加的路由
难点
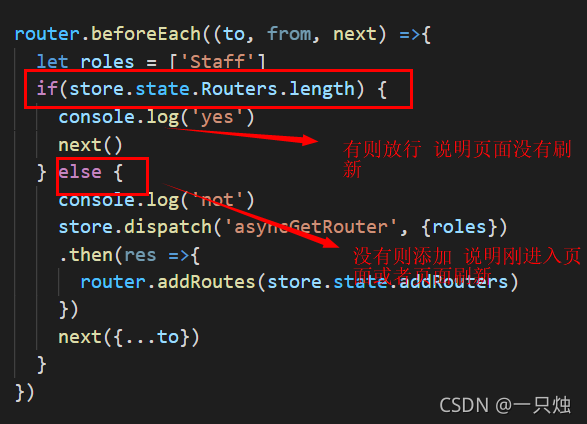
每次路由发生变化时都需要调用一次路由守卫,并且store中的数据会在每次刷新的时候清空,因此需要判断store中是否有添加的动态路由。
(若没有判断 则会一直添加 导致内存溢出)

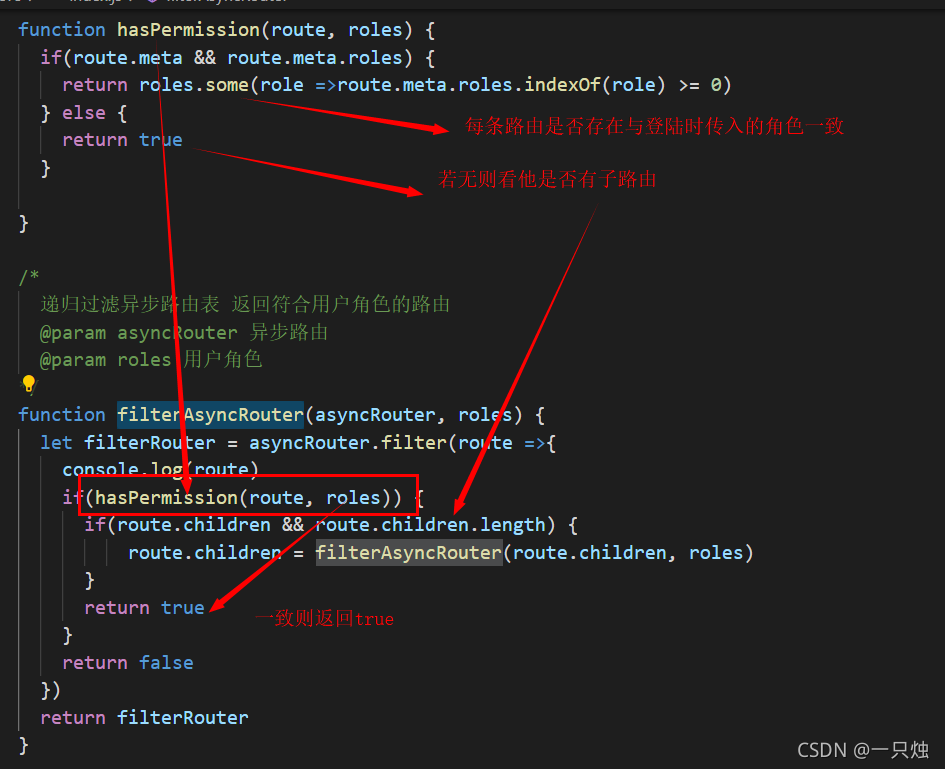
根据角色判断路由
过滤动态路由 判断每条路由角色是否与登录传入的角色一致

<template>
  <div>
    <el-menu
      :default-active="$route.path"
      class="el-menu-vertical-demo menu_wrap"
      background-color="#324057"
      text-color="white"
      active-text-color="#20a0ff"
      :collapse="isCollapse"
      unique-opened
      router
    >
      <el-submenu
        v-for="item in $store.state.Routers"
        :key="item.path"
        :index="item.path"
        v-if="!item.hidden"
      >
        <template slot="title" >
          <i class="el-icon-location"></i>
          <span>{{ item.meta.title }}</span>
        </template>
        <div v-for="chi in item.children" :key="chi.name">
          <el-menu-item v-if="!chi.hidden" :index="item.path + '/' + chi.path">
            <i class="el-icon-location"></i>{{ chi.meta.title }}
          </el-menu-item>
        </div>
      </el-submenu>
    </el-menu>
  </div>
</template>

<script>
export default {
  name: "MenuList",
  data() {
    return {
      isCollapse: false,
    };
  },
  created() {
    this.$bus.$on("getColl", (data) => {
      this.isCollapse = data;
    });
  },
  methods: {

  }
};
</script>

<style scoped>
.menu_wrap {
  height: 100vh;
}
.el-menu-vertical-demo:not(.el-menu--collapse) {
  width: 200px;
  height: 100vh;
}
</style>
import Vue from 'vue'
import VueRouter from 'vue-router'
import store from '../store/index'

Vue.use(VueRouter)

const originalPush = VueRouter.prototype.push
VueRouter.prototype.push = function push(location) {
  return originalPush.call(this, location).catch(err => err)
}

export const routes = [
  {
    path: '/home',
    name: 'First',
    component: () => import('../views/Index.vue'),
    meta: { title: 'Home'},
    children: [
      {
        path: 'index',
        name: 'Home',
        component: () => import('../views/Home'),
        meta: { title: 'Home', roles: ['Customer'] }
      }
    ]
  },
  {
    path: '/index',
    name: 'NavigationOne',
    component: () => import('../views/Index.vue'),
    meta: { title: '导航一'},
    children: [
      {
        path: 'personnel',
        name: 'Personnel ',
        component: () => import('../views/One/Personnel.vue'),
        meta: { title: 'Personnel', roles: ['Customer'] }
      },
      {
        path: 'account',
        name: 'Account',
        component: () => import('../views/One/Account.vue'),
        meta: { title: 'Account', roles: ['Customer'] }
      },
      {
        path: 'psw',
        name: 'psw',
        component: () => import('../views/One/Password.vue'),
        meta: { title: 'psw', roles: ['Customer'] }
      }
    ]
  },
  {
    path: '/card',
    name: 'NavigationTwo',
    component: () => import('../views/Index.vue'),
    meta: { title: '导航二'},
    children: [
      {
        path: 'activity',
        name: 'Activity ',
        component: () => import('../views/Three/Activity.vue'),
        meta: { title: 'Activity', roles: ['Customer'] }
      },
      {
        path: 'Social',
        name: 'Social',
        component: () => import('../views/Three/Social.vue'),
        meta: { title: 'Social', roles: ['Customer'] }
      },
      {
        path: 'content',
        name: 'Content',
        component: () => import('../views/Three/Content.vue'),
        meta: { title: 'Content', roles: ['Customer'] }
      }
    ]
  },
  {
    path: '/two',
    name: 'NavigationThree',
    component: () => import('../views/Index.vue'),
    meta: { title: '导航三'},
    children: [
      {
        path: 'index',
        name: 'Two ',
        component: () => import('../views/Two'),
        meta: { title: 'Two', roles: ['Customer'] }
      }]
  },
  {
    path: '/404',
    name: 'Error',
    hidden: true,
    meta: { title: 'error'},
    component: () => import('../views/Error')
  }
]

export const asyncRouter = [
  // Agent3 Staff2
  {
    path: '/agent',
    component: () => import('../views/Index.vue'),
    name: 'Agent',
    meta: { title: 'Agent', roles: ['Agent','Staff']},
    children: [
      {
        path: 'one',
        name: 'agentOne',
        component: () => import('@/views/agent/One'),
        meta: { title: 'agentOne', roles: ['Agent','Staff']  }
      },
      {
        path: 'two',
        name: 'agentTwo',
        component: () => import('@/views/agent/Two'),
        meta: { title: 'agentTwo', roles: ['Agent']  }
      },
      {
        path: 'three',
        name: 'agentThree',
        component: () => import('@/views/agent/Three'),
        meta: { title: 'agentThree', roles: ['Agent','Staff']  }
      }
    ]
  },
  // Staff3
  {
    path: '/staff',
    component: () => import('../views/Index.vue'),
    name: 'Staff',
    meta: { title: 'Staff', roles: ['Staff']},
    children: [
      {
        path: 'one',
        name: 'StaffOne',
        component: () => import('@/views/Staff/One'),
        meta: { title: 'StaffOne', roles: ['Staff']  }
      },
      {
        path: 'two',
        name: 'StaffTwo',
        component: () => import('@/views/Staff/Two'),
        meta: { title: 'StaffTwo', roles: ['Staff']  }
      },
      {
        path: 'three',
        name: 'StaffThree',
        component: () => import('@/views/Staff/Three'),
        meta: { title: 'StaffThree', roles: ['Staff']  }
      }
    ]
  },
  { path: '*', redirect: '/404', hidden: true }
]

const router = new VueRouter({
  routes
})

router.beforeEach((to, from, next) =>{
  let roles = ['Staff']
  if(store.state.Routers.length) {
    console.log('yes')
    next()
  } else {
    console.log('not')
    store.dispatch('asyncGetRouter', {roles})
    .then(res =>{
      router.addRoutes(store.state.addRouters)
    })
    next({...to})
    // next()与next({ ...to })的区别:next() 放行   next('/XXX') 无限拦截
  }
})

export default router
import Vue from 'vue'
import Vuex from 'vuex'
import modules from './module'

import router, {routes, asyncRouter} from '../router'

function hasPermission(route, roles) {
  if(route.meta && route.meta.roles) {
    return roles.some(role =>route.meta.roles.indexOf(role) >= 0)
  } else {
    return true
  }

}

/*
  递归过滤异步路由表 返回符合用户角色的路由
  @param asyncRouter 异步路由
  @param roles 用户角色
*/
function filterAsyncRouter(asyncRouter, roles) {
  let filterRouter = asyncRouter.filter(route =>{
    if(hasPermission(route, roles)) {
      if(route.children && route.children.length) {
          route.children = filterAsyncRouter(route.children, roles)
      }
      return true
    }
    return false
  })
  return filterRouter
}

Vue.use(Vuex)

export default new Vuex.Store({
  state: {
    addRouters:  [],
    Routers: []
  },
  mutations: {
    getRouter(state, paload) {
      // console.log(paload)
      state.Routers = routes.concat(paload)
      state.addRouters = paload
      // router.addRoutes(paload)
    }
  },
  actions: {
    asyncGetRouter({ commit }, data) {
      const { roles } = data
      return new Promise(resolve =>{
        let addAsyncRouters = filterAsyncRouter(asyncRouter, roles)
        commit('getRouter', addAsyncRouters)
        resolve()
      })
    }
  }
})
到此这篇关于vue中根据用户权限动态添加路由详解的文章就介绍到这了,更多相关vue动态添加路由内容请搜索我们以前的文章或继续浏览下面的相关文章希望大家以后多多支持我们!
赞 (0)

