Spring EnableAsync注解异步执行源码解析
目录
- 概述
- @EnableAsync 分析
- ProxyAsyncConfiguration 分析
- AsyncAnnotationBeanPostProcessor 分析
- AsyncAnnotationAdvisor 分析
- Advice 构建
- Pointcut 构建
- AnnotationAsyncExecutionInterceptor 分析
- AsyncTaskExecutor 查找
- Callable 任务封装
- doSubmit 异步执行方法
- 总结
概述
基于 Spring Framework v5.2.6.RELEASE
Spring 终有一种非常简便的方法使 Bean 中的一个方法变成异步执行的方法,那就是在方法上标记 @Async 注解,想要开启这一特性,需要在一个配置类上标记 @EnableAsync 注解。
本文将通过源码分析 @EnableAsync 注解是如何开启这一特性的。
@EnableAsync 分析
@EnableAsync 注解的源码如下。
@Target(ElementType.TYPE)
@Retention(RetentionPolicy.RUNTIME)
@Documented
@Import(AsyncConfigurationSelector.class)
public @interface EnableAsync {
Class<? extends Annotation> annotation() default Annotation.class;
boolean proxyTargetClass() default false;
AdviceMode mode() default AdviceMode.PROXY;
int order() default Ordered.LOWEST_PRECEDENCE;
}
注解的每一个属性都指定了默认值,后续的分析也会基于默认的属性值进行分析。除此之外,注解上的 @Import 元注解引入了 AsyncConfigurationSelector 类。

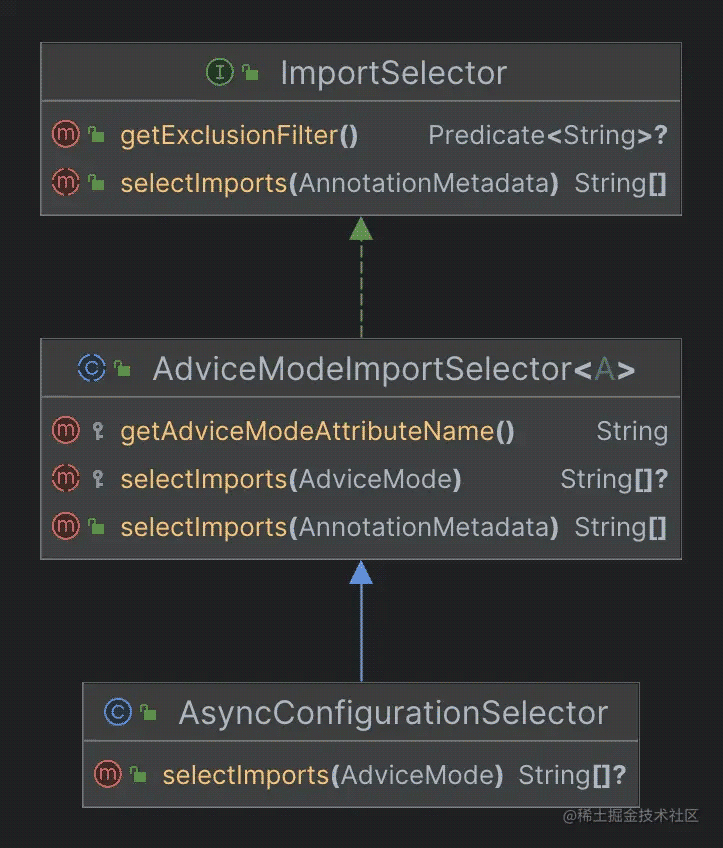
从它的类关系中可以看出,AsyncConfigurationSelector 实现了 ImportSelector 接口,因此,当 Spring 扫描到配置类后,会执行它的 selectImports 方法,获取一个包含配置类名称的数组,用于加载对应的配置。
AsyncConfigurationSelector 虽然也包含了selectImports方法,但是从参数类型中可以看出它不是接口中的selectImports方法的实现方法,要找到接口中的实现方法,我们需要去 AsyncConfigurationSelector 的父类 AdviceModeImportSelector 中。
@Override
public final String[] selectImports(AnnotationMetadata importingClassMetadata) {
   Class<?> annType = GenericTypeResolver.resolveTypeArgument(getClass(), AdviceModeImportSelector.class);
   Assert.state(annType != null, "Unresolvable type argument for AdviceModeImportSelector");
   AnnotationAttributes attributes = AnnotationConfigUtils.attributesFor(importingClassMetadata, annType);
   if (attributes == null) {
      throw new IllegalArgumentException(String.format(
            "@%s is not present on importing class '%s' as expected",
            annType.getSimpleName(), importingClassMetadata.getClassName()));
   }
   AdviceMode adviceMode = attributes.getEnum(getAdviceModeAttributeName());
   String[] imports = selectImports(adviceMode);
   if (imports == null) {
      throw new IllegalArgumentException("Unknown AdviceMode: " + adviceMode);
   }
   return imports;
}
这个方法中,主要是从 @EnableAsync 注解获取各项属性的值,然后使用adviceMode属性,调用另一个selectImports方法获取最终的结果。
此处被调用的selectImports方法,就是 AsyncConfigurationSelector 中的 selectImports 方法。
@Override
@Nullable
public String[] selectImports(AdviceMode adviceMode) {
   switch (adviceMode) {
      case PROXY:
         return new String[] {ProxyAsyncConfiguration.class.getName()};
      case ASPECTJ:
         return new String[] {ASYNC_EXECUTION_ASPECT_CONFIGURATION_CLASS_NAME};
      default:
         return null;
   }
}
在 @EnableAsync 注解中,mode的默认值是AdviceMode.PROXY,因此,这里引入的配置类是 ProxyAsyncConfiguration。
接下来分析 ProxyAsyncConfiguration 类。
ProxyAsyncConfiguration 分析
@Configuration
@Role(BeanDefinition.ROLE_INFRASTRUCTURE)
public class ProxyAsyncConfiguration extends AbstractAsyncConfiguration {
   @Bean(name = TaskManagementConfigUtils.ASYNC_ANNOTATION_PROCESSOR_BEAN_NAME)
   @Role(BeanDefinition.ROLE_INFRASTRUCTURE)
   public AsyncAnnotationBeanPostProcessor asyncAdvisor() {
      Assert.notNull(this.enableAsync, "@EnableAsync annotation metadata was not injected");
      AsyncAnnotationBeanPostProcessor bpp = new AsyncAnnotationBeanPostProcessor();
      bpp.configure(this.executor, this.exceptionHandler);
      Class<? extends Annotation> customAsyncAnnotation = this.enableAsync.getClass("annotation");
      if (customAsyncAnnotation != AnnotationUtils.getDefaultValue(EnableAsync.class, "annotation")) {
         bpp.setAsyncAnnotationType(customAsyncAnnotation);
      }
      bpp.setProxyTargetClass(this.enableAsync.getBoolean("proxyTargetClass"));
      bpp.setOrder(this.enableAsync.<Integer>getNumber("order"));
      return bpp;
   }
}
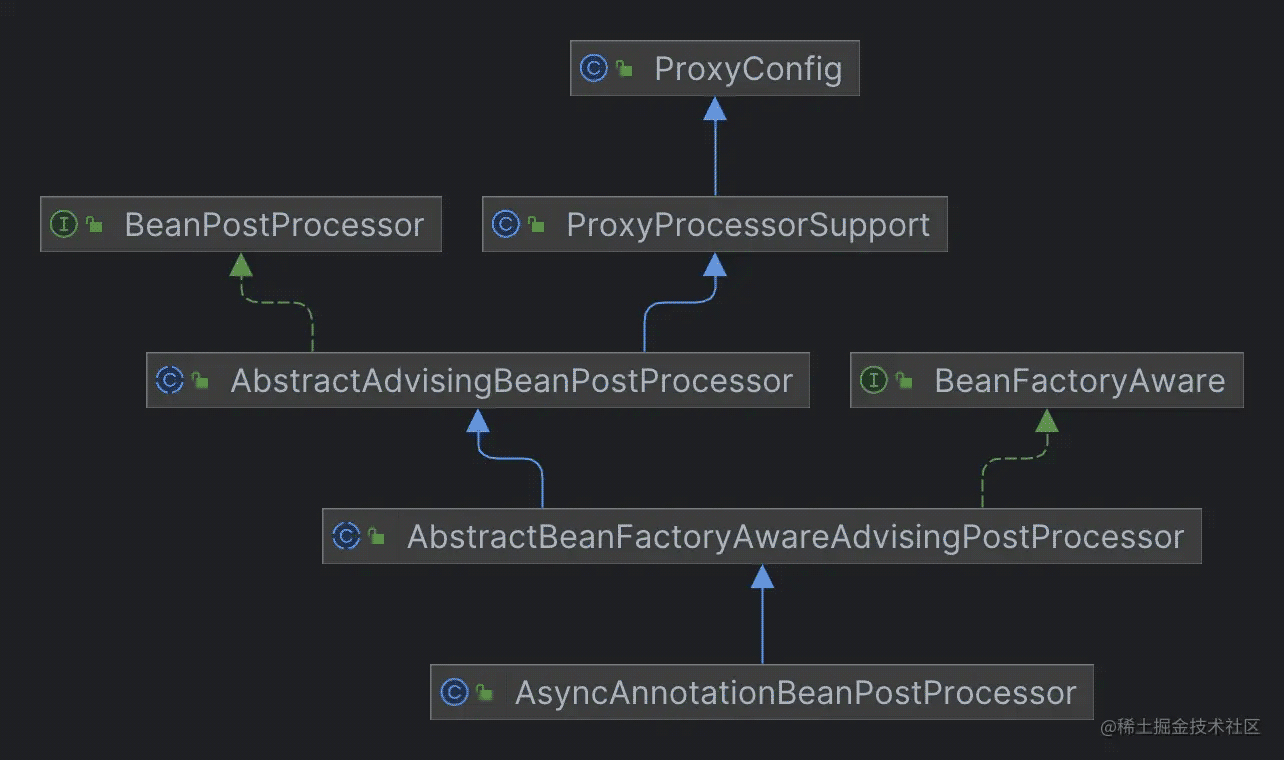
在 ProxyAsyncConfiguration 中,只有一个 Bean 配置,类型是 AsyncAnnotationBeanPostProcessor,由此可以知道,@EnableAsync 所开启的功能,是通过 Bean 的后处理器来实现的。
上述的方法体中,通过构造方法创建了 AsyncAnnotationBeanPostProcessor 对象。
public AsyncAnnotationBeanPostProcessor() {
   setBeforeExistingAdvisors(true);
}
构造方法中设置了一个属性值,这个属性是是beforeExistingAdvisors,定义在父类 AbstractAdvisingBeanPostProcessor 中,这个属性的默认值是false,当它的值为true时,会将新的增强逻辑添加到增强逻辑列表的开头而不是最后。
也就是说,@EnableAsync 提供的异步执行特性,是基于 AOP 特性来实现的。
接着往下看,在创建了 AsyncAnnotationBeanPostProcessor 对象之后,为其配置了一些属性,有一些属性的值是从 @EnableAsync 属性值获取的,还有两个属性值需要留意,就是this.executor和this.exceptionHandler,这两个成员变量的值是从哪儿来的呢?
我们可以找到 ProxyAsyncConfiguration 的父类 AbstractAsyncConfiguration,其中有一个标记了 @Autowired 注解的方法。
// org.springframework.scheduling.annotation.AbstractAsyncConfiguration#setConfigurers
@Autowired(required = false)
void setConfigurers(Collection<AsyncConfigurer> configurers) {
   if (CollectionUtils.isEmpty(configurers)) {
      return;
   }
   if (configurers.size() > 1) {
      throw new IllegalStateException("Only one AsyncConfigurer may exist");
   }
   AsyncConfigurer configurer = configurers.iterator().next();
   this.executor = configurer::getAsyncExecutor;
   this.exceptionHandler = configurer::getAsyncUncaughtExceptionHandler;
}
如果我们自己配置了线程池和异常处理器,则会在这里执行配置,这样,我们配置的线程池和异常处理器就会被添加到 AsyncAnnotationBeanPostProcessor 中。
接下来,我们再分析 AsyncAnnotationBeanPostProcessor 后处理器是如何工作的。
AsyncAnnotationBeanPostProcessor 分析

从它的类继承关系中可以看出,它是一个基于 AOP 特性来为 Bean 中的方法提供异步执行功能的 Bean 后处理器。
AsyncAnnotationBeanPostProcessor 同时实现了 BeanFactoryAware 接口,在它的setBeanFactory方法中,完成了 Advisor 的创建。
@Override
public void setBeanFactory(BeanFactory beanFactory) {
   super.setBeanFactory(beanFactory);
   AsyncAnnotationAdvisor advisor = new AsyncAnnotationAdvisor(this.executor, this.exceptionHandler);
   if (this.asyncAnnotationType != null) {
      advisor.setAsyncAnnotationType(this.asyncAnnotationType);
   }
   advisor.setBeanFactory(beanFactory);
   this.advisor = advisor;
}
这里创建的 Advisor 类型是 AsyncAnnotationAdvisor,创建完之后,它被复制给了advisor成员变量,这个成员变量定义在 AsyncAnnotationBeanPostProcessor 的父类 AbstractBeanFactoryAwareAdvisingPostProcessor 中。
这个advisor成员变量就是处理增强逻辑的对象。
AsyncAnnotationAdvisor 分析
关于 Spring 是如何在后处理器中为 Bean 创建代理对象以及如何向代理对象中加入增强逻辑的,我之前的文章有很详细的分析,可以阅读之前关于 AOP 原理的分析文章来了解。下面我们直接分析 AsyncAnnotationAdvisor,它是完成方法异步执行的核心。
一个 Advisor 通常有两个非常重要的部分,一个是 Pointcut,用于匹配需要增强的方法,另一个是 Advice 也就是具体的增强逻辑。对于 AsyncAnnotationAdvisor 来说,这两个部分都是在它的构造方法中构建的。
public AsyncAnnotationAdvisor(
      @Nullable Supplier<Executor> executor, @Nullable Supplier<AsyncUncaughtExceptionHandler> exceptionHandler) {
   Set<Class<? extends Annotation>> asyncAnnotationTypes = new LinkedHashSet<>(2);
   asyncAnnotationTypes.add(Async.class);
   try {
      asyncAnnotationTypes.add((Class<? extends Annotation>)
            ClassUtils.forName("javax.ejb.Asynchronous", AsyncAnnotationAdvisor.class.getClassLoader()));
   }
   catch (ClassNotFoundException ex) {
      // If EJB 3.1 API not present, simply ignore.
   }
   this.advice = buildAdvice(executor, exceptionHandler);
   this.pointcut = buildPointcut(asyncAnnotationTypes);
}
其中可以看到两行关键的代码,他们分别完成了advice和pointcut成员变量的构建。
this.advice = buildAdvice(executor, exceptionHandler);
this.pointcut = buildPointcut(asyncAnnotationTypes);
下面分别来看这两部分。
Advice 构建
先看buildAdvice方法。
// org.springframework.scheduling.annotation.AsyncAnnotationAdvisor#buildAdvice
protected Advice buildAdvice(
      @Nullable Supplier<Executor> executor, @Nullable Supplier<AsyncUncaughtExceptionHandler> exceptionHandler) {
   AnnotationAsyncExecutionInterceptor interceptor = new AnnotationAsyncExecutionInterceptor(null);
   interceptor.configure(executor, exceptionHandler);
   return interceptor;
}
Advice 的构建比较简单,这里可以看到,最终构建的 Advice 是一个 AnnotationAsyncExecutionInterceptor 类型的拦截器,除了调用构造方法创建之外,还配置了executor和exceptionHandler,这个拦截器应该就是完成 AOP 增强逻辑的拦截器,我们放到后文中分析。
Pointcut 构建
下面再看buildPointcut方法。
// org.springframework.scheduling.annotation.AsyncAnnotationAdvisor#buildPointcut
protected Pointcut buildPointcut(Set<Class<? extends Annotation>> asyncAnnotationTypes) {
   ComposablePointcut result = null;
   for (Class<? extends Annotation> asyncAnnotationType : asyncAnnotationTypes) {
      Pointcut cpc = new AnnotationMatchingPointcut(asyncAnnotationType, true);
      Pointcut mpc = new AnnotationMatchingPointcut(null, asyncAnnotationType, true);
      if (result == null) {
         result = new ComposablePointcut(cpc);
      }
      else {
         result.union(cpc);
      }
      result = result.union(mpc);
   }
   return (result != null ? result : Pointcut.TRUE);
}
这个方法的逻辑比较简单,首先创建了两个 Pointcut 对象,cpc用于匹配类型,mpc用于匹配方法,他们的逻辑都很简单,就是看类或者方法的定义是否包含 @Async 注解。
最后再将两者合并为一个 ComposablePointcut 对象返回,ComposablePointcut 的作用就是将多个 Pointcut 对象合并成一个。
AnnotationAsyncExecutionInterceptor 分析
了解完上面的内容,接下来就开始分析 AnnotationAsyncExecutionInterceptor 拦截器。它是一个包含 AOP 增强逻辑的拦截器,也是完成方法异步调用的核心逻辑。
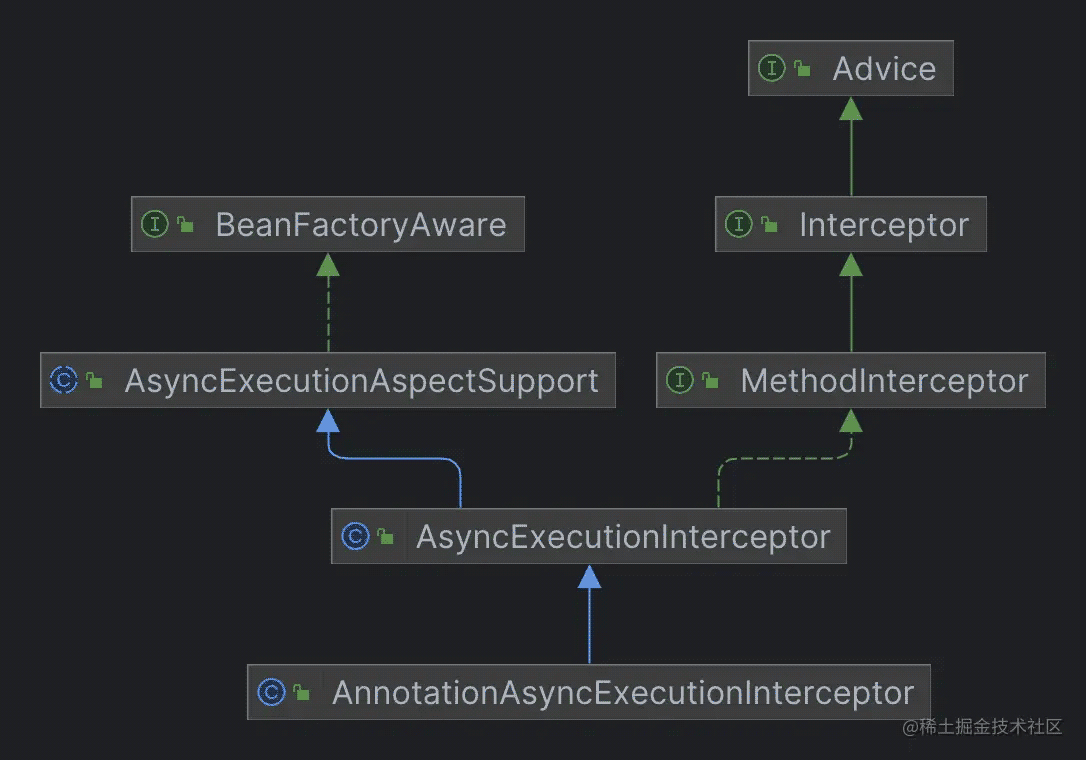
AnnotationAsyncExecutionInterceptor 要完成它的任务,有两个比较核心的功能,一个是目标方法的匹配,另一个就是拦截器的逻辑。目标方法的匹配逻辑,我们在上文中已经介绍过了,以下主要分析其拦截器逻辑,也就是它的invoke方法。

以上是 AnnotationAsyncExecutionInterceptor 的类关系图,它实现了 MethodInterceptor 接口,invoke方法的实现在父类 AsyncExecutionInterceptor 中。
// org.springframework.aop.interceptor.AsyncExecutionInterceptor#invoke
@Override
@Nullable
public Object invoke(final MethodInvocation invocation) throws Throwable {
   Class<?> targetClass = (invocation.getThis() != null ? AopUtils.getTargetClass(invocation.getThis()) : null);
   Method specificMethod = ClassUtils.getMostSpecificMethod(invocation.getMethod(), targetClass);
   final Method userDeclaredMethod = BridgeMethodResolver.findBridgedMethod(specificMethod);
   AsyncTaskExecutor executor = determineAsyncExecutor(userDeclaredMethod);
   if (executor == null) {
      throw new IllegalStateException(
            "No executor specified and no default executor set on AsyncExecutionInterceptor either");
   }
   Callable<Object> task = () -> {
      try {
         Object result = invocation.proceed();
         if (result instanceof Future) {
            return ((Future<?>) result).get();
         }
      }
      catch (ExecutionException ex) {
         handleError(ex.getCause(), userDeclaredMethod, invocation.getArguments());
      }
      catch (Throwable ex) {
         handleError(ex, userDeclaredMethod, invocation.getArguments());
      }
      return null;
   };
   return doSubmit(task, executor, invocation.getMethod().getReturnType());
}
从上面的源码中可以看到三个关键的步骤:
- 找到目标方法,并根据目标方法获取到执行它的 AsyncTaskExecutor。
- 将目标方法的调用,封装到一个 Callable 异步任务
task当中。 - 通过doSubmit方法来异步调用上一步封装的
task。
下面我们详细分析这三个步骤。
AsyncTaskExecutor 查找
AsyncTaskExecutor 在determineAsyncExecutor方法中完成。
@Nullable
protected AsyncTaskExecutor determineAsyncExecutor(Method method) {
   AsyncTaskExecutor executor = this.executors.get(method);
   if (executor == null) {
      Executor targetExecutor;
      String qualifier = getExecutorQualifier(method);
      if (StringUtils.hasLength(qualifier)) {
         targetExecutor = findQualifiedExecutor(this.beanFactory, qualifier);
      }
      else {
         targetExecutor = this.defaultExecutor.get();
      }
      if (targetExecutor == null) {
         return null;
      }
      executor = (targetExecutor instanceof AsyncListenableTaskExecutor ?
            (AsyncListenableTaskExecutor) targetExecutor : new TaskExecutorAdapter(targetExecutor));
      this.executors.put(method, executor);
   }
   return executor;
}
首先会从executors中根据方法获取对应的 AsyncTaskExecutor,executors是一个用来缓存 Executor 的成员变量。
private final Map<Method, AsyncTaskExecutor> executors = new ConcurrentHashMap<>(16);
当第一次进入这个方法的时候,executors肯定是空的,因此会进入if语句的逻辑获取 Executor 然后再将其添加到executors中。在if语句中,首先会通过getExecutorQualifier方法获取一个qualifier,我们进入方法查看获取的过程。
// org.springframework.scheduling.annotation.AnnotationAsyncExecutionInterceptor#getExecutorQualifier
@Override
@Nullable
protected String getExecutorQualifier(Method method) {
   // Maintainer's note: changes made here should also be made in
   // AnnotationAsyncExecutionAspect#getExecutorQualifier
   Async async = AnnotatedElementUtils.findMergedAnnotation(method, Async.class);
   if (async == null) {
      async = AnnotatedElementUtils.findMergedAnnotation(method.getDeclaringClass(), Async.class);
   }
   return (async != null ? async.value() : null);
}
这个方法会从目标方法或者其所在的类型上的 @Async 注解的value属性,作为方法的返回值复制给qualifier。这个qualifier的值是一个 Executor 的 Bean 名称,也就是说,我们可以通过 @Async 的value属性指定执行异步任务的 Executor 的 Bean 名称。
如果qualifier不是空的,那么,就会通过findQualifiedExecutor方法从 Spring 容器中获取对应的 Executor 实例。
// org.springframework.aop.interceptor.AsyncExecutionAspectSupport#findQualifiedExecutor
@Nullable
protected Executor findQualifiedExecutor(@Nullable BeanFactory beanFactory, String qualifier) {
   if (beanFactory == null) {
      throw new IllegalStateException("BeanFactory must be set on " + getClass().getSimpleName() +
            " to access qualified executor '" + qualifier + "'");
   }
   return BeanFactoryAnnotationUtils.qualifiedBeanOfType(beanFactory, Executor.class, qualifier);
}
如果qualifier是空的,那么就会通过this.defaultExecutor.get()获取默认的 Executor,那么,默认的 Executor 是什么呢?我们需要在去 AsyncAnnotationAdvisor 的buildAdvice方法中,回顾一下 AnnotationAsyncExecutionInterceptor 创建的过程。
AnnotationAsyncExecutionInterceptor interceptor = new AnnotationAsyncExecutionInterceptor(null);
以上是 AnnotationAsyncExecutionInterceptor 创建的语句,从这里找到对应的构造方法。
public AnnotationAsyncExecutionInterceptor(@Nullable Executor defaultExecutor) {
   super(defaultExecutor);
}
构造方法需要提供一个默认的 Executor,也就是defaultExecutor参数,这里提供了null,不过我们可以继续查看父类的构造方法。
public AsyncExecutionAspectSupport(@Nullable Executor defaultExecutor) {
   this.defaultExecutor = new SingletonSupplier<>(defaultExecutor, () -> getDefaultExecutor(this.beanFactory));
   this.exceptionHandler = SingletonSupplier.of(SimpleAsyncUncaughtExceptionHandler::new);
}
在被调用的 AsyncExecutionAspectSupport 的构造方法中,通过getDefaultExecutor方法,提供了默认的 Executor。
// org.springframework.aop.interceptor.AsyncExecutionInterceptor#getDefaultExecutor
@Override
@Nullable
protected Executor getDefaultExecutor(@Nullable BeanFactory beanFactory) {
   Executor defaultExecutor = super.getDefaultExecutor(beanFactory);
   return (defaultExecutor != null ? defaultExecutor : new SimpleAsyncTaskExecutor());
}
这里看到,默认的 Executor 是一个 SimpleAsyncTaskExecutor,也就是说,如果我们没有在项目中配置线程池,则默认使用 SimpleAsyncTaskExecutor 来执行异步任务。
Callable 任务封装
得到 Executor 之后,就是任务的封装,这一步很简单,就是将目标方法的调用放到一个 Callable 类型的任务的call方法中。
doSubmit 异步执行方法
最后一步就是任务的提交,通过doSubmit方法完成。
// org.springframework.aop.interceptor.AsyncExecutionAspectSupport#doSubmit
@Nullable
protected Object doSubmit(Callable<Object> task, AsyncTaskExecutor executor, Class<?> returnType) {
   if (CompletableFuture.class.isAssignableFrom(returnType)) {
      return CompletableFuture.supplyAsync(() -> {
         try {
            return task.call();
         }
         catch (Throwable ex) {
            throw new CompletionException(ex);
         }
      }, executor);
   }
   else if (ListenableFuture.class.isAssignableFrom(returnType)) {
      return ((AsyncListenableTaskExecutor) executor).submitListenable(task);
   }
   else if (Future.class.isAssignableFrom(returnType)) {
      return executor.submit(task);
   }
   else {
      executor.submit(task);
      return null;
   }
}
其实就是调用了 Executor 的submit异步执行了任务。
不过这里有一点要说明,虽然在我们没有配置 Excutor 的情况下 ,Spring 会使用默认的 SimpleAsyncTaskExecutor 来执行异步任务,但是 SimpleAsyncTaskExecutor 会为每一个任务创建一个新的线程,而不是使用线程池来完成,很容易导致内存溢出,因此,在实践中最好为异步任务配置合适的线程池。
总结
本文以 @EnableAsync 作为切入点,分析了 Spring 开启基于注解的异步任务特性的原理,更多关于Spring EnableAsync注解的资料请关注我们其它相关文章!

