SpringBoot定时任务设计之时间轮案例原理详解
目录
- 知识准备
- 什么是时间轮(Timing Wheel)
- Netty的HashedWheelTimer要解决什么问题
- HashedWheelTimer的使用方式
- 实现案例
- Pom依赖
- 2个简单例子
- HashedWheelTimer是如何实现的?
- 什么是多级Timing Wheel?
知识准备
Timer和ScheduledExecutorService是JDK内置的定时任务方案,而业内还有一个经典的定时任务的设计叫时间轮(Timing Wheel), Netty内部基于时间轮实现了一个HashedWheelTimer来优化百万量级I/O超时的检测,它是一个高性能,低消耗的数据结构,它适合用非准实时,延迟的短平快任务,例如心跳检测。本文主要介绍时间轮(Timing Wheel)及其使用。@pdai
需要对时间轮(Timing Wheel),以及Netty的HashedWheelTimer要解决什么问题有初步的认识。
什么是时间轮(Timing Wheel)
时间轮(Timing Wheel)是George Varghese和Tony Lauck在1996年的论文' Hashed and Hierarchical Timing Wheels: data structures to efficiently implement a timer facility '实现的,它在Linux内核中使用广泛,是Linux内核定时器的实现方法和基础之一。
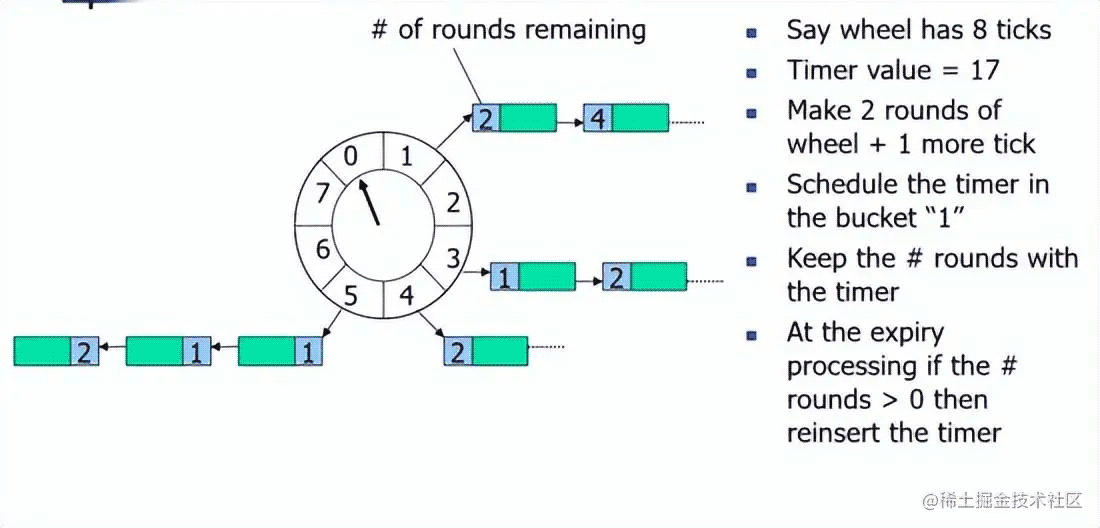
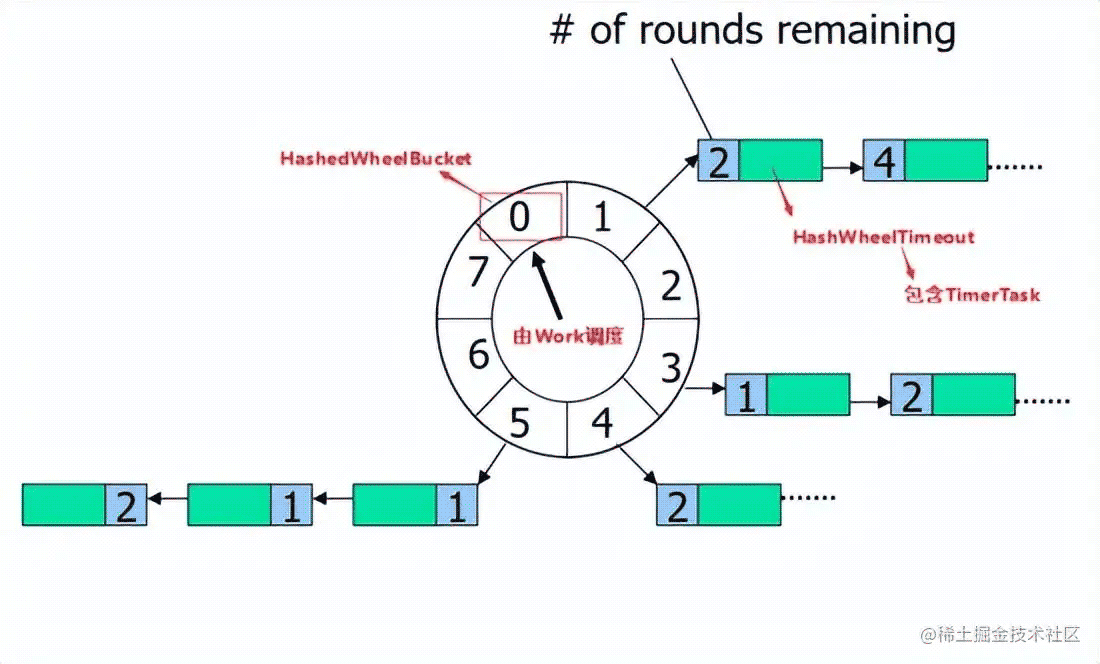
时间轮(Timing Wheel)是一种环形的数据结构,就像一个时钟可以分成很多格子(Tick),每个格子代表时间的间隔,它指向存储的具体任务(timerTask)的一个链表。

以上述在论文中的图片例子,这里一个轮子包含8个格子(Tick), 每个tick是一秒钟;
任务的添加:如果一个任务要在17秒后执行,那么它需要转2轮,最终加到Tick=1位置的链表中。
任务的执行:在时钟转2Round到Tick=1的位置,开始执行这个位置指向的链表中的这个任务。(# 这里表示剩余需要转几轮再执行这个任务)
Netty的HashedWheelTimer要解决什么问题
HashedWheelTimer是Netty根据时间轮(Timing Wheel)开发的工具类,它要解决什么问题呢?这里面有两个要点: 延迟任务 + 低时效性 。@pdai
在Netty中的一个典型应用场景是判断某个连接是否idle,如果idle(如客户端由于网络原因导致到服务器的心跳无法送达),则服务器会主动断开连接,释放资源。判断连接是否idle是通过定时任务完成的,但是Netty可能维持数百万级别的长连接,对每个连接去定义一个定时任务是不可行的,所以如何提升I/O超时调度的效率呢?
Netty根据时间轮(Timing Wheel)开发了HashedWheelTimer工具类,用来优化I/O超时调度(本质上是延迟任务);之所以采用时间轮(Timing Wheel)的结构还有一个很重要的原因是I/O超时这种类型的任务对时效性不需要非常精准。
HashedWheelTimer的使用方式
在了解时间轮(Timing Wheel)和Netty的HashedWheelTimer要解决的问题后,我们看下HashedWheelTimer的使用方式
通过构造函数看主要参数
public HashedWheelTimer(
        ThreadFactory threadFactory,
        long tickDuration, TimeUnit unit, int ticksPerWheel, boolean leakDetection,
        long maxPendingTimeouts, Executor taskExecutor) {
}
具体参数说明如下:
threadFactory
tickDuration
unit
ticksPerWheel
leakDetection
maxPendingTimeouts
实现案例
这里展示下HashedWheelTimer的基本使用案例。@pdai
Pom依赖
引入pom的依赖
<dependency>
    <groupId>io.netty</groupId>
    <artifactId>netty-all</artifactId>
    <version>4.1.77.Final</version>
</dependency>
2个简单例子
例子1:5秒后执行TimerTask
@SneakyThrows
public static void simpleHashedWheelTimer() {
    log.info("init task 1...");
    HashedWheelTimer timer = new HashedWheelTimer(1, TimeUnit.SECONDS, 8);
    // add a new timeout
    timer.newTimeout(timeout -> {
        log.info("running task 1...");
    }, 5, TimeUnit.SECONDS);
}
执行结果如下:
23:32:21.364 [main] INFO tech.pdai.springboot.schedule.timer.netty.HashedWheelTimerTester - init task 1...
...
23:32:27.454 [pool-1-thread-1] INFO tech.pdai.springboot.schedule.timer.netty.HashedWheelTimerTester - running task 1...
例子2:任务失效后cancel并让它重新在3秒后执行。
@SneakyThrows
public static void reScheduleHashedWheelTimer() {
    log.info("init task 2...");
    HashedWheelTimer timer = new HashedWheelTimer(1, TimeUnit.SECONDS, 8);
    Thread.sleep(5000);
    // add a new timeout
    Timeout tm = timer.newTimeout(timeout -> {
        log.info("running task 2...");
    }, 5, TimeUnit.SECONDS);
    // cancel
    if (!tm.isExpired()) {
        log.info("cancel task 2...");
        tm.cancel();
    }
    // reschedule
    timer.newTimeout(tm.task(), 3, TimeUnit.SECONDS);
}
23:28:36.408 [main] INFO tech.pdai.springboot.schedule.timer.netty.HashedWheelTimerTester - init task 2...
23:28:41.412 [main] INFO tech.pdai.springboot.schedule.timer.netty.HashedWheelTimerTester - cancel task 2...
23:28:45.414 [pool-2-thread-1] INFO tech.pdai.springboot.schedule.timer.netty.HashedWheelTimerTester - running task 2...
我们通过如下问题进一步理解HashedWheelTimer。@pdai
HashedWheelTimer是如何实现的?
简单看下HashedWheelTimer是如何实现的

Worker
HashedWheelBucket
HashedWheelTimeout
构造函数
public HashedWheelTimer(
        ThreadFactory threadFactory,
        long tickDuration, TimeUnit unit, int ticksPerWheel, boolean leakDetection,
        long maxPendingTimeouts, Executor taskExecutor) {
    checkNotNull(threadFactory, "threadFactory");
    checkNotNull(unit, "unit");
    checkPositive(tickDuration, "tickDuration");
    checkPositive(ticksPerWheel, "ticksPerWheel");
    this.taskExecutor = checkNotNull(taskExecutor, "taskExecutor");
    // Normalize ticksPerWheel to power of two and initialize the wheel.
    wheel = createWheel(ticksPerWheel);
    mask = wheel.length - 1;
    // Convert tickDuration to nanos.
    long duration = unit.toNanos(tickDuration);
    // Prevent overflow.
    if (duration >= Long.MAX_VALUE / wheel.length) {
        throw new IllegalArgumentException(String.format(
                "tickDuration: %d (expected: 0 < tickDuration in nanos < %d",
                tickDuration, Long.MAX_VALUE / wheel.length));
    }
    if (duration < MILLISECOND_NANOS) {
        logger.warn("Configured tickDuration {} smaller than {}, using 1ms.",
                    tickDuration, MILLISECOND_NANOS);
        this.tickDuration = MILLISECOND_NANOS;
    } else {
        this.tickDuration = duration;
    }
    workerThread = threadFactory.newThread(worker);
    leak = leakDetection || !workerThread.isDaemon() ? leakDetector.track(this) : null;
    this.maxPendingTimeouts = maxPendingTimeouts;
    if (INSTANCE_COUNTER.incrementAndGet() > INSTANCE_COUNT_LIMIT &&
        WARNED_TOO_MANY_INSTANCES.compareAndSet(false, true)) {
        reportTooManyInstances();
    }
}
创建wheel
private static HashedWheelBucket[] createWheel(int ticksPerWheel) {
    //ticksPerWheel may not be greater than 2^30
    checkInRange(ticksPerWheel, 1, 1073741824, "ticksPerWheel");
    ticksPerWheel = normalizeTicksPerWheel(ticksPerWheel);
    HashedWheelBucket[] wheel = new HashedWheelBucket[ticksPerWheel];
    for (int i = 0; i < wheel.length; i ++) {
        wheel[i] = new HashedWheelBucket();
    }
    return wheel;
}
private static int normalizeTicksPerWheel(int ticksPerWheel) {
    int normalizedTicksPerWheel = 1;
    while (normalizedTicksPerWheel < ticksPerWheel) {
        normalizedTicksPerWheel <<= 1;
    }
    return normalizedTicksPerWheel;
}
任务的添加
@Override
public Timeout newTimeout(TimerTask task, long delay, TimeUnit unit) {
    checkNotNull(task, "task");
    checkNotNull(unit, "unit");
    long pendingTimeoutsCount = pendingTimeouts.incrementAndGet();
    if (maxPendingTimeouts > 0 && pendingTimeoutsCount > maxPendingTimeouts) {
        pendingTimeouts.decrementAndGet();
        throw new RejectedExecutionException("Number of pending timeouts ("
            + pendingTimeoutsCount + ") is greater than or equal to maximum allowed pending "
            + "timeouts (" + maxPendingTimeouts + ")");
    }
    start();
    // Add the timeout to the timeout queue which will be processed on the next tick.
    // During processing all the queued HashedWheelTimeouts will be added to the correct HashedWheelBucket.
    long deadline = System.nanoTime() + unit.toNanos(delay) - startTime;
    // Guard against overflow.
    if (delay > 0 && deadline < 0) {
        deadline = Long.MAX_VALUE;
    }
    HashedWheelTimeout timeout = new HashedWheelTimeout(this, task, deadline);
    timeouts.add(timeout);
    return timeout;
}
执行方法
/**
    * Starts the background thread explicitly.  The background thread will
    * start automatically on demand even if you did not call this method.
    *
    * @throws IllegalStateException if this timer has been
    *                               {@linkplain #stop() stopped} already
    */
public void start() {
    switch (WORKER_STATE_UPDATER.get(this)) {
        case WORKER_STATE_INIT:
            if (WORKER_STATE_UPDATER.compareAndSet(this, WORKER_STATE_INIT, WORKER_STATE_STARTED)) {
                workerThread.start();
            }
            break;
        case WORKER_STATE_STARTED:
            break;
        case WORKER_STATE_SHUTDOWN:
            throw new IllegalStateException("cannot be started once stopped");
        default:
            throw new Error("Invalid WorkerState");
    }
    // Wait until the startTime is initialized by the worker.
    while (startTime == 0) {
        try {
            startTimeInitialized.await();
        } catch (InterruptedException ignore) {
            // Ignore - it will be ready very soon.
        }
    }
}
停止方法
@Override
public Set<Timeout> stop() {
    if (Thread.currentThread() == workerThread) {
        throw new IllegalStateException(
                HashedWheelTimer.class.getSimpleName() +
                        ".stop() cannot be called from " +
                        TimerTask.class.getSimpleName());
    }
    if (!WORKER_STATE_UPDATER.compareAndSet(this, WORKER_STATE_STARTED, WORKER_STATE_SHUTDOWN)) {
        // workerState can be 0 or 2 at this moment - let it always be 2.
        if (WORKER_STATE_UPDATER.getAndSet(this, WORKER_STATE_SHUTDOWN) != WORKER_STATE_SHUTDOWN) {
            INSTANCE_COUNTER.decrementAndGet();
            if (leak != null) {
                boolean closed = leak.close(this);
                assert closed;
            }
        }
        return Collections.emptySet();
    }
    try {
        boolean interrupted = false;
        while (workerThread.isAlive()) {
            workerThread.interrupt();
            try {
                workerThread.join(100);
            } catch (InterruptedException ignored) {
                interrupted = true;
            }
        }
        if (interrupted) {
            Thread.currentThread().interrupt();
        }
    } finally {
        INSTANCE_COUNTER.decrementAndGet();
        if (leak != null) {
            boolean closed = leak.close(this);
            assert closed;
        }
    }
    return worker.unprocessedTimeouts();
}
什么是多级Timing Wheel?
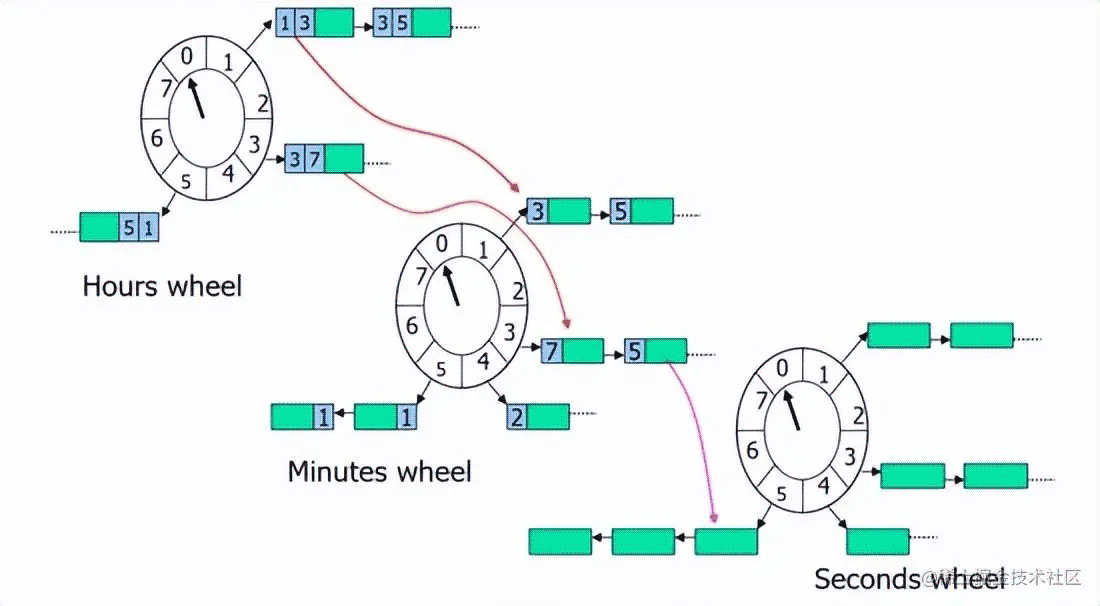
多级的时间轮是比较好理解的,时钟是有小时,分钟,秒的,秒转一圈(Round)分钟就转一个格(Tick), 分钟转一圈(Round)小时就转一格(Tick)。

PS:显然HashedWheelTimer是一层时间轮。
以上就是SpringBoot定时任务设计之时间轮案例原理详解的详细内容,更多关于SpringBoot定时任务时间轮的资料请关注我们其它相关文章!

