freebsd安装图解
本文将对FreeBSD安装过程提供详细的图解,在安装之前,先提出几点建议供大家参考:
1、采用最小化安装。
2、安装时启用inetd,并在编辑inetd.conf文件时,把带有“ftp”的行前面的“#”号去掉。这样作是为了以后安装软件时可以用ftp上传文件。
3、添加一个wheel组的用户,这样在系统工作正常后可以在windows系统上通过终端登录软件(如SecureCRT)进行所有操作。
FreeBSD4.7在最小安装时支持SSH终端登录,所以我们需要使用支持SSH协议的终端软件,如SecureCRT。
例如:我添加的用户名是ylf,隶属wheel系统组。
系统产生一个用户目录/home/ylf。
我可以通过SecureCRT以ylf身份登录到系统,然后通过su命令切换到root用户。
同时我也可以在IE浏览器内键入ftp://192.168.0.1,并输入ylf用户名和密码登录ftp将需要的文件上传到自己的用户目录里。/
(注:192.168.0.1是我的服务器连接内网的网卡IP地址)。
以下除系统安装部分,我都是采用终端方式操作。
4、分区时将/home、/usr和/var划的大一些,因为/usr为程序目录,/var要存放日志,/home是用户主目录,我的用户文件如网页、 ftp上传文件等都放在这里。还有最好保留一部分空间留作以后需要的时候用。我的机器上有2块硬盘,一快18.2G SCSI硬盘,一块40G IDE硬盘。我是这样划分的。
128M /
20G /home
2G /ftp
256M /tmp
6 G /usr
5G /var
其中/ftp是为匿名ftp用户访问专用。剩余空间留作备用。当然如果硬盘空间少的话,做我们的试验也是够用的。
关于安装方面的文章,大家也可以参考delphij写的《FreeBSD服务器的安装与优化》一文。
本系统安装过程图解是专为初学者提供的。整个系统的定制过程都是针对连载文章的系统要求作的。
我们采用光盘启动安装FreeBSD的方式,并且硬盘上只有FreeBSD一个系统。
首先修改CMOS使系统能够通过光盘引导。
插入FreeBSD的第一张盘。正常引导后进入定制内核界面,如图一: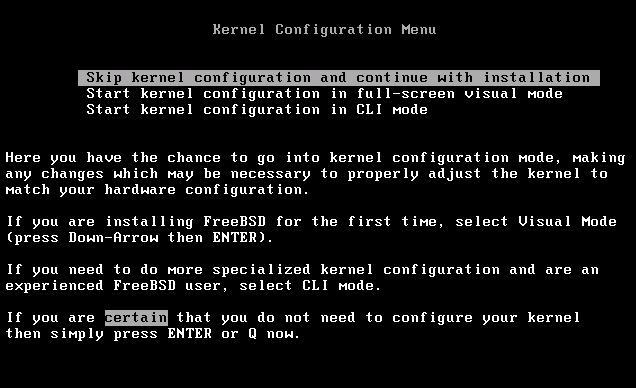 screen.width*0.7) {this.resized=true; this.width=screen.width*0.7; this.alt='Click here to open new windownCTRL+Mouse wheel to zoom in/out';}" border=0 twffan="done">
图一
选Skip kernel configuration and continue with installation跳过内核定制,我们在整个系统安装结束后会重新定制内核。
接着进入系统安装主界面,图二: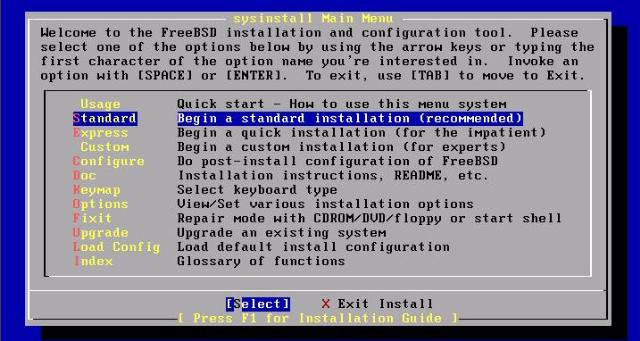 screen.width*0.7) {this.resized=true; this.width=screen.width*0.7; this.alt='Click here to open new windownCTRL+Mouse wheel to zoom in/out';}" border=0 twffan="done" resized="true" pop="Click here to open new window
CTRL+Mouse wheel to zoom in/out">
图二
选择Standard开始标准安装。
接着出现提示告诉你下一步将要进行Fdisk操作,按回车继续(图略)。
进入Fdisk Partition Editor界面,图三: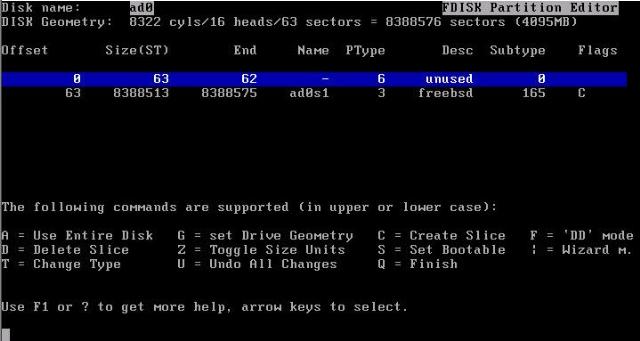 screen.width*0.7) {this.resized=true; this.width=screen.width*0.7; this.alt='Click here to open new windownCTRL+Mouse wheel to zoom in/out';}" border=0 twffan="done" resized="true" pop="Click here to open new window
CTRL+Mouse wheel to zoom in/out">
图三
为了保证与FreeBSD共存的系统能够启动,默认情况下FreeBSD会保留一部分磁盘空间(64 cyl)。我们装的是单系统,这部分空间没有用,按“Shift+F”将所有空间都给FreeBSD,图四: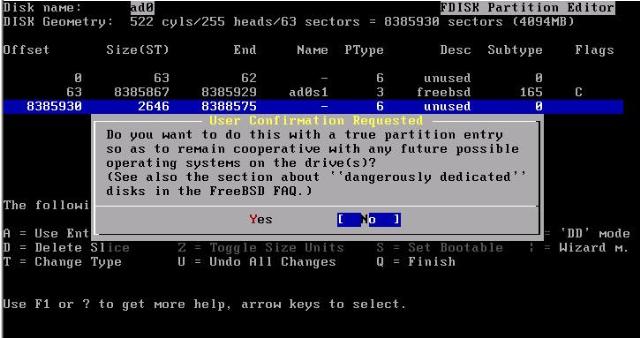 screen.width*0.7) {this.resized=true; this.width=screen.width*0.7; this.alt='Click here to open new windownCTRL+Mouse wheel to zoom in/out';}" border=0 twffan="done" resized="true" pop="Click here to open new window
CTRL+Mouse wheel to zoom in/out">
图四
这里选择No。
接着按“Q”完成。然后提示需要划分FreeBSD文件系统。回车继续。
进入Disklable Editor界面,按A先让系统自动划分,图五: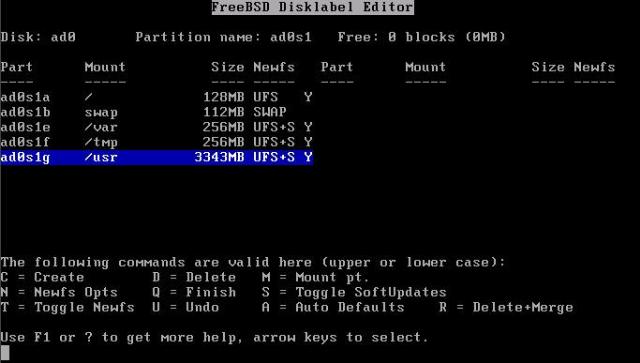 screen.width*0.7) {this.resized=true; this.width=screen.width*0.7; this.alt='Click here to open new windownCTRL+Mouse wheel to zoom in/out';}" border=0 twffan="done">
图五
然后移动光标到/var和/usr,按D将这两个分区先删除。把光标移到最上面,按C分别创建/var,/usr,/home,/ftp分区。如图六: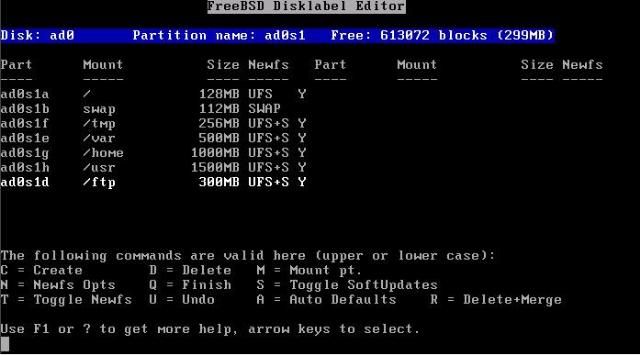 screen.width*0.7) {this.resized=true; this.width=screen.width*0.7; this.alt='Click here to open new windownCTRL+Mouse wheel to zoom in/out';}" border=0 twffan="done">
图六
其中/ftp分区专为匿名Ftp使用。/var用于存放日志,/usr存放程序,/home存放用户数据。
我这里是4G的硬盘,如果硬盘空间大,应该适当加大这4个分区的容量。
按“Q”继续。
出现Choose distributions(选择安装组件)界面,如图七: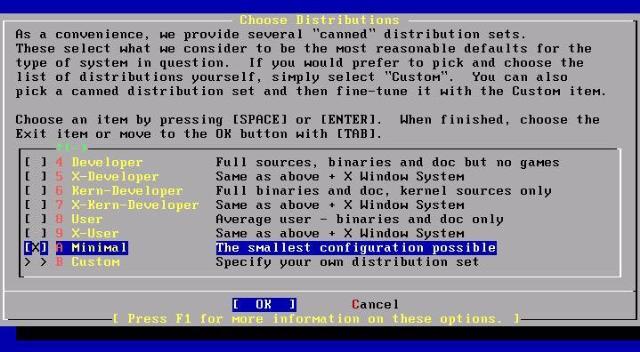 screen.width*0.7) {this.resized=true; this.width=screen.width*0.7; this.alt='Click here to open new windownCTRL+Mouse wheel to zoom in/out';}" border=0 twffan="done" resized="true">
图七
这里选Minimal最小化安装。选择OK继续。
出现Choose Installation Media选择安装媒体界面,图八: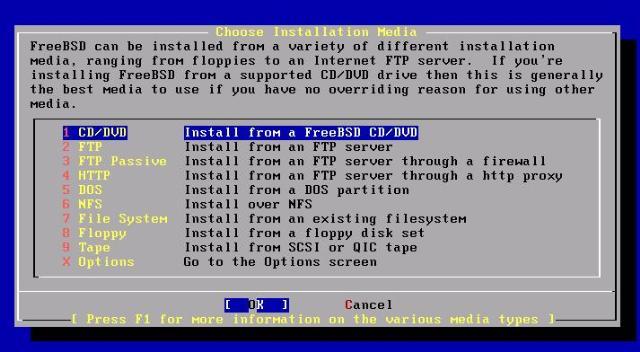 screen.width*0.7) {this.resized=true; this.width=screen.width*0.7; this.alt='Click here to open new windownCTRL+Mouse wheel to zoom in/out';}" border=0 twffan="done">
图八
这里选择 1 CD/DVD,通过光盘安装。OK继续。
出现确认界面,这是最后一次后悔的机会!选YES开始安装,图略。
经过一段时间后,出现安装成功提示。OK继续,图略。
出现是否配置网络设备提示。选YES,图九: screen.width*0.7) {this.resized=true; this.width=screen.width*0.7; this.alt='Click here to open new windownCTRL+Mouse wheel to zoom in/out';}" border=0 twffan="done">
图九
接下来会列出你的网络设备,选择第一块网卡,回车,会问你是否启用IPv6协议,选NO继续。问你是否使用DHCP,选NO继续。
出现网卡配置界面,图十: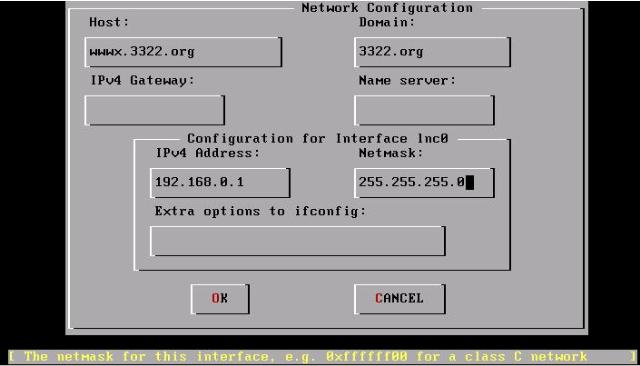 screen.width*0.7) {this.resized=true; this.width=screen.width*0.7; this.alt='Click here to open new windownCTRL+Mouse wheel to zoom in/out';}" border=0 twffan="done">
图十
这里只要添入主机名和IP地址就可以,其他的在后续安装中会配置。
接着问你是否现在启用这块网卡接口,选YES。然后问你是否使用本系统作为网关,选YES。
出现是否配制inetd(Internet超级服务器)界面。选YES,图十一: screen.width*0.7) {this.resized=true; this.width=screen.width*0.7; this.alt='Click here to open new windownCTRL+Mouse wheel to zoom in/out';}" border=0 twffan="done">
图十一
提示是否启用inetd,选YES。图略
提示是否编辑inetd的配置文件,inetd.conf,选YES。图略
接着出现文件编辑界面,图十二: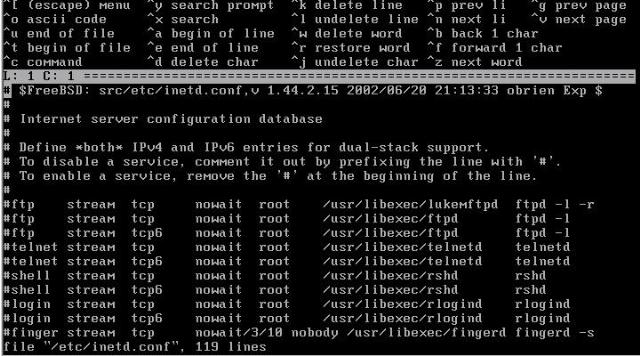 screen.width*0.7) {this.resized=true; this.width=screen.width*0.7; this.alt='Click here to open new windownCTRL+Mouse wheel to zoom in/out';}" border=0 twffan="done" resized="true">
图十二
移动光标到带有ftp的行,将前面的#删掉,只删除头两行的即可。按ESC退出并保存。
接着问你是否启用匿名ftp访问,选YES,后面的提示也选YES继续,图略。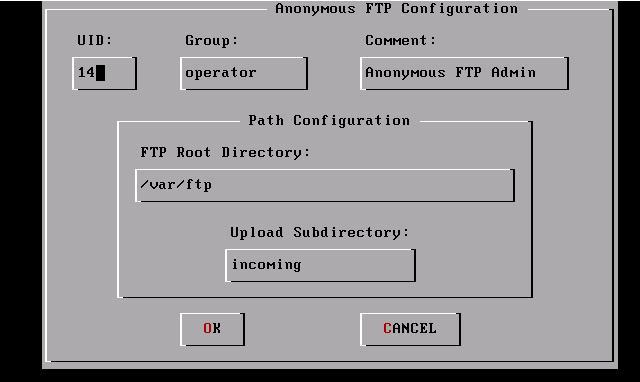 screen.width*0.7) {this.resized=true; this.width=screen.width*0.7; this.alt='Click here to open new windownCTRL+Mouse wheel to zoom in/out';}" border=0 twffan="done">
图十三
图十三对匿名用户的组和用户目录进行了设置,不用改动,直接选OK继续。
接着问你是否建立一个ftp登陆时的欢迎信息。选NO不建立继续。
接下来的几个提示:
是否使本机运行NFS服务器,选NO。图略
是否使本机运行NFS客户,选NO。图略
是否配制默认安全策略,选NO。图略
列出当前对inetd做过的设置,OK继续。图略
是否定制系统控制台,选NO。图略
设置系统时区,依次选NO——Asia——China——East China——YES screen.width*0.7) {this.resized=true; this.width=screen.width*0.7; this.alt='Click here to open new windownCTRL+Mouse wheel to zoom in/out';}" border=0 twffan="done">
图十四
图十四询问是否启用Linux二进制兼容支持,这将使FreeBSD可以运行所有Linux程序。选YES。
接着提示是否配制非USB鼠标,选NO继续。图略
接着问是否浏览Package collection,选NO继续,图略
问是否添加系统用户和组,选YES,图略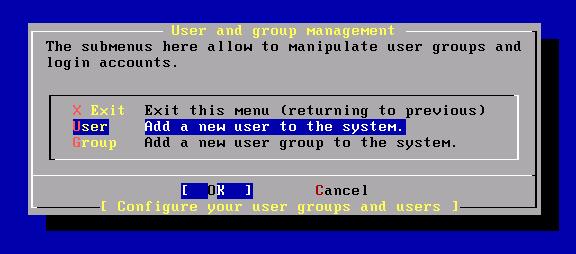 screen.width*0.7) {this.resized=true; this.width=screen.width*0.7; this.alt='Click here to open new windownCTRL+Mouse wheel to zoom in/out';}" border=0 twffan="done">
图十五
图十五选择USER Add a new user to the system,添加一个新用户。OK 继续。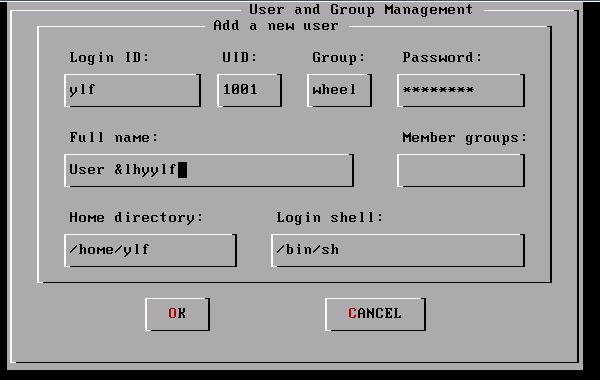 screen.width*0.7) {this.resized=true; this.width=screen.width*0.7; this.alt='Click here to open new windownCTRL+Mouse wheel to zoom in/out';}" border=0 twffan="done">
图十六
这里添加一个wheel组的用户ylf,用于终端登录时可以用这个用户切换到root。
OK后回到前一个界面,选EXIT退出。图略
这时提示要求输入root用户密码。需要输入2次。图略
然后问你是否想回到主界面对配置做改动,选NO——Exit Install退出安装,图略。
最后提示是否退出重新启动,选YES,记得要拿出光盘。图十七。 screen.width*0.7) {this.resized=true; this.width=screen.width*0.7; this.alt='Click here to open new windownCTRL+Mouse wheel to zoom in/out';}" border=0 twffan="done">
图十七
为了让系统可以重新编译内核和使用ports安装应用程序。我们重新运行系统配置程序安装内核编译支持和ports。
以root用户登录后,运行:
# /stand/sysinstall
出现系统配置主界面,图十八: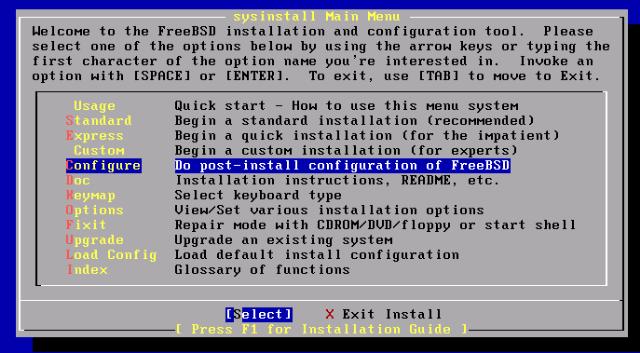 screen.width*0.7) {this.resized=true; this.width=screen.width*0.7; this.alt='Click here to open new windownCTRL+Mouse wheel to zoom in/out';}" border=0 twffan="done">
图十八
选择Configure后回车继续。出现FreeBSD Configuration菜单,图十九: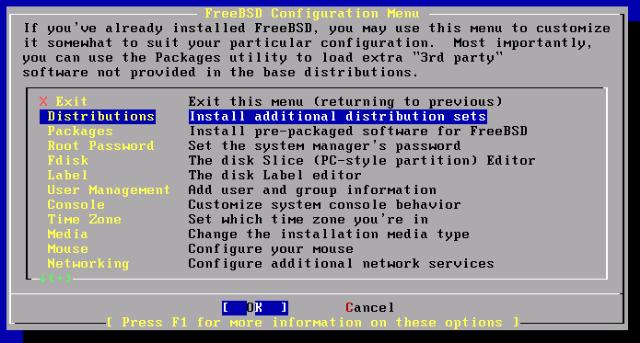 screen.width*0.7) {this.resized=true; this.width=screen.width*0.7; this.alt='Click here to open new windownCTRL+Mouse wheel to zoom in/out';}" border=0 twffan="done">
图十九
选择Distributions后 OK继续。出现组件安装选择界面,图二十: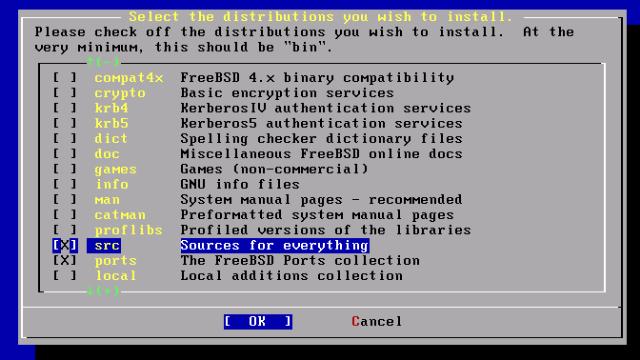 screen.width*0.7) {this.resized=true; this.width=screen.width*0.7; this.alt='Click here to open new windownCTRL+Mouse wheel to zoom in/out';}" border=0 twffan="done">
图二十
选择src——sys和ports,OK后出现选择安装媒体界面,选通过光盘安装,图略
这样就把内核编译支持和ports安装到系统。
安装完成后,选Exit——Exit Install退出。
安装完系统后,要重新编译内核。目的是要系统支持Firrwall和提高运行效率。
注意:这之后的过程在终端上操作要方便许多。SecureCRT支持在终端界面上直接拷贝和粘贴文本内容。
转到内核文件目录:
# cd /usr/src/sys/i386/conf

