vue 自定义组件实现通讯录功能
在线demo:http://tangyupeng.top/dist/index.html#/phone

<template>
<div>
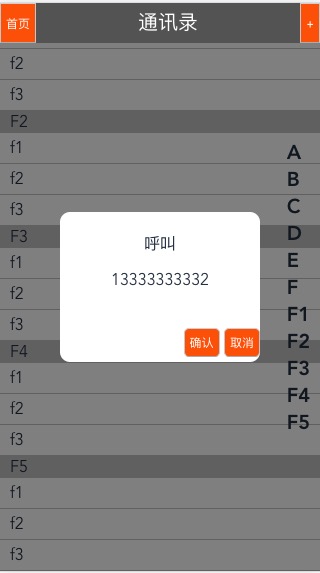
<my-header custom-title="通讯录" custom-fixed >
<button @touchstart="backBtn" slot="left">首页</button>
<button @touchstart="homeBtn" slot="right">+</button>
</my-header>
<my-list :user-data="userData"></my-list> <!-- 传递数据 -->
<my-alert custom-title="呼叫">
<div class="alert_btn">
<button class="aler_tbn" @touchstart="confirmBtn">确认</button>
<button class="aler_tbn" @touchstart="cancelBtn">取消</button>
</div>
</my-alert>
</div>
</template>
<script>
import Vue from 'vue';
import Vuex from 'vuex';
var userData=[
{"index":"A","users":[
{"name":"a1","tel":"13333333331"},
{"name":"a2","tel":"13333333332"},
{"name":"a3","tel":"13333333333"},
]},
{"index":"B","users":[
{"name":"b1","tel":"13333333331"},
{"name":"b2","tel":"13333333332"},
{"name":"b3","tel":"13333333333"},
]},
{"index":"C","users":[
{"name":"c1","tel":"13333333331"},
{"name":"c2","tel":"13333333332"},
{"name":"c3","tel":"13333333333"},
]},
{"index":"D","users":[
{"name":"d1","tel":"13333333331"},
{"name":"d2","tel":"13333333332"},
{"name":"d3","tel":"13333333333"},
]},
{"index":"E","users":[
{"name":"e1","tel":"13333333331"},
{"name":"e2","tel":"13333333332"},
{"name":"e3","tel":"13333333333"},
]},
{"index":"F","users":[
{"name":"f1","tel":"13333333331"},
{"name":"f2","tel":"13333333332"},
{"name":"f3","tel":"13333333333"},
]},
{"index":"F1","users":[
{"name":"f1","tel":"13333333331"},
{"name":"f2","tel":"13333333332"},
{"name":"f3","tel":"13333333333"},
]},
{"index":"F2","users":[
{"name":"f1","tel":"13333333331"},
{"name":"f2","tel":"13333333332"},
{"name":"f3","tel":"13333333333"},
]},
{"index":"F3","users":[
{"name":"f1","tel":"13333333331"},
{"name":"f2","tel":"13333333332"},
{"name":"f3","tel":"13333333333"},
]},
{"index":"F4","users":[
{"name":"f1","tel":"13333333331"},
{"name":"f2","tel":"13333333332"},
{"name":"f3","tel":"13333333333"},
]},
{"index":"F5","users":[
{"name":"f1","tel":"13333333331"},
{"name":"f2","tel":"13333333332"},
{"name":"f3","tel":"13333333333"},
]},
];
var busVm=new Vue(); //空实例 非父子传递值
Vue.component('my-header',{
template:`<div id="header" :style="{'position':customFixed ? 'fixed':'static'}">
<slot name="left"></slot>
{{customTitle}}
<slot name="right"></slot>
</div>`,
props:{
'customTitle':{
type:String,
default:"标题"
},
'customFixed':{
type:Boolean,
default:false
}
}
})
Vue.component('my-alert',{
template:`<div id="alert" ref="alert">
<div class="alert_content">
<div class="alert_title">
{{customTitle}}
</div>
<div class="alert_body">{{customBody}}</div>
<slot></slot>
</div>
</div>`,
props:{
'customTitle':{
type:String,
default:"弹窗"
},
},
data:function(){
return{
'customBody':''
}
},
mounted:function(){
busVm.$on('changeEvents',function(ev){
console.log(ev);
this.customBody=ev;
this.$refs.alert.style.display="flex"
}.bind(this));
}
})
Vue.component('my-list',{
template:`<div id="list">
<ul class="list_user" ref="listuser" @touchmove="bMove=true">
<li v-for="item in userData">
<p>{{item.index}}</p>
<ul>
<li @touchend="showtel(user.tel)" v-for="user in item.users">{{user.name}}</li>
</ul>
</li>
</ul>
<ul class="list_index" ref="listIndex">
<li @touchstart="setScroll" v-for="item in userIndex">{{item}}</li>
</ul>
</div>`,
props:{
'user-data':{
type:Array,
default:function(){
return [];
}
}
},
data:function(){
return {
bMove:false
}
},
computed:{
userIndex:function(){
console.log(this.userData)
console.log(this.filterIndex(this.userData))
return this.filterIndex(this.userData);
}
},
methods:{
filterIndex:function(data){
var result=[];
for(var i=0; i<data.length;i++){
if(data[i].index){
result.push(data[i].index);
}
}
return result;
},
setlistIndexPos:function(){
// 1、ref 加在普通的元素上,用this.ref.name 获取到的是dom元素
// 2、ref 加在子组件上,用this.ref.name 获取到的是组件实例,可以使用组件的所有方法。
// 3、如何利用 v-for 和 ref 获取一组数组或者dom 节点
var iH= this.$refs.listIndex.offsetHeight;
this.$refs.listIndex.style.marginTop=-iH/2 +'px';
},
showtel:function(ev){
if(!this.bMove){
busVm.$emit("changeEvents",ev)
}else{
this.bMove=false;
}
},
setScroll:function(ev){
console.log(ev.target.innerHTML);
var ap=this.$refs.listuser.getElementsByTagName('p');
for(var i=0;i<ap.length;i++){
if(ap[i].innerHTML==ev.target.innerHTML){
document.body.scrollTop=ap[i].offsetTop;
document.documentElement.scrollTop=ap[i].offsetTop;
window.scrollTop=ap[i].offsetTop;
console.log(ap[i].offsetTop);
}
}
}
},
mounted:function(){
this.setlistIndexPos();
}
})
export default {
name: "HelloWorld",
data() {
return {
userData:userData //挂载数据
}
},
methods:{
backBtn:function(){
alert("123")
},
homeBtn:function(){
alert("123")
},
confirmBtn:function(){
alert("a");
},
cancelBtn:function(){
console.log(this);
this.$children[2].$el.style.display="none"; //此处需要从外级找到
}
},
};
</script>
<!-- Add "scoped" attribute to limit CSS to this component only -->
<style>
.page-container {
position: absolute;
left: 0;
top: 0;
width: 100%;
height: 100%;
}
#alert{width: 100%; height: 100%; background: rgba(0,0,0,0.5); position: fixed; top: 0; top: 0; z-index: 20px; display: none;}
#alert .alert_content{width: 200px;position: relative; height: 150px; background: #fff;border-radius: 10px; margin: auto;}
.alert_body{height: 50px; line-height: 50px; text-align: center;}
.alert_btn{position: absolute;right: 0 ;bottom:0;}
.list_index{ position: fixed;list-style: none; padding-right: 10px; font-size: 20px; font-weight: 700;
top: 50%;
right: 0;}
.alert_title{padding-top: 20px;}
#list .list_user p{background: #ccc; padding-left: 10px}
#list .list_user ul li{ padding-left: 10px;border-bottom: 1px solid #ccc; line-height:30px;}
#list{
width: 100%;
text-align: left;
float: left;
position: relative; top: 40px; overflow: hidden;
}
.aler_tbn{padding: 5px; margin-bottom: 5px; border-radius: 5px;}
button{background: #f60; color: #fff;}
#header{width: 100%;height:40px; background: #666; z-index:9999;color: #fff;text-align: center;line-height: 40px;font-size: 20px;}
#header button{height: 100%;padding: 0 5px}
#header button:nth-of-type(1){float: left}
#header button:nth-of-type(2){float: right}
</style>
总结
以上所述是小编给大家介绍的vue 通讯录 自定义组件功能的实例代码,希望对大家有所帮助,如果大家有任何疑问请给我留言,小编会及时回复大家的。在此也非常感谢大家对我们网站的支持!
相关推荐
-
element-ui 的el-button组件中添加自定义颜色和图标的实现方法
我使用的element-ui的版本是V1.4.13. 如上图所示,如果使用el-button,加颜色是可以通过设置type属性的值,加图标就设置icon属性的值. 现在产品给了一个需求,就是自定义的很多种类别,不同的类别的按钮显示不同的颜色和图标.如下图所示: 为了方便开发,目前的解决方案是:添加一个自定义全局指令,同时在element-ui源码中,加入对应的组件.开发人员在开发时只要在type中添加不同的类的值,就能添加上颜色和图标. 1.在element-ui的button源码中加了自定义指
-
详解微信小程序自定义组件的实现及数据交互
简单的自定义组件 本文的使用场景是:多个页面都需要用到拨打电话功能,为减少代码量.便于维护,所以自定义了一个组件,每个页面直接调用即可.基本实现下图样式: 下面我们来一步步的实现它: step1:创建文件夹以及文件 首先创建一个components(名字可自取)文件夹,用于放置所有自定义的组件, 里面可以用右键自动创建的方式,新建一个Component组件,例如: 创建之后的目录结构为: 其中callphone是我们本次要实现的拨打电话组件. step2:组件的基本搭建 在callphone.w
-

微信小程序学习笔记之表单提交与PHP后台数据交互处理图文详解
本文实例讲述了微信小程序学习笔记之表单提交与PHP后台数据交互处理.分享给大家供大家参考,具体如下: 前面一篇结介绍了微信小程序函数定义.页面渲染.这里介绍form表单提交与后台php数据交互处理. [form表单提交] form.wxml: <form bindsubmit="formSubmit" bindreset="formReset"> <view> 昵称:<input type="text" name=&
-
微信小程序wx.request实现后台数据交互功能分析
本文实例讲述了微信小程序wx.request实现后台数据交互功能.分享给大家供大家参考,具体如下: 记录微信小程序wx.request这个api在跟后台交互时遇上的问题. 1.根据资料,完成第一步,请求发送,代码如下: wx.request({ url: 'https://localhost:8443/xiaochengxu/addBill.do', data: e.detail.value, method: 'POST', success:function(res) { console.log
-
微信小程序 数据交互与渲染实例详解
微信小程序 数据交互与渲染 实现效果图: 微信小程序的api中提供了网络交互的api,我们只要调用即可和后端进行数据交互,该api为wx.request.,具体代码如下. //list.js //获取应用实例 var app = getApp() Page({ data: { list:[], hiddenLoading: true, url: '' }, loadList: function () { var that = this; that.setData({ hiddenLoading:
-
vue-自定义组件传值的实例讲解
项目中,我们经常会遇到自定义组件传值的问题,方法很多种,但是原理很简单,下述文档总结实际项目中使用的传值方式. 父组件传递给子组件某一值,子组件内会修改该值,然后父组件需要获取新值 在 Vue 中,父子组件的关系可以总结为 prop 向下传递,事件向上传递.父组件通过 prop给子组件下发数据,子组件通过事件给父组件发送消息. 自定义组件传值 常规prop-event 父组件 <prop-event-value :address="address" @update="v
-
微信小程序自定义tabBar组件开发详解
本文实例为大家分享了微信小程序自定义tabBar组件的具体代码,供大家参考,具体内容如下 以下代码保存在github地址 先看一看目录 template文件夹里存放tabbar模板. template/template.wxml <template name="tabBar"> <view class="tabBar"> <block wx:for="{{tabBar}}" wx:for-item="ite
-
微信小程序自定义组件的实现方法及自定义组件与页面间的数据传递问题
首先我们在pages文件夹下创建components目录用于存放自定义组件.如图所示,以我创建的dialog组件为例,自定义组件的格式与页面一样,分为4个文件. 图1 图2 如上图2所示,假如index页面有一个按钮触发点击事件后弹出dialog,并且当点击某个部门时,将dialog关闭,并将部门名称与红色标题同步. 一.首先把dialog组件的样式写好,并在index页面相应的位置引用.以下就是代码啦(分别为:wxml.wxss.js.json) <view class='wx_dialog_
-
vue 自定义组件实现通讯录功能
在线demo:http://tangyupeng.top/dist/index.html#/phone <template> <div> <my-header custom-title="通讯录" custom-fixed > <button @touchstart="backBtn" slot="left">首页</button> <button @touchstart=&quo
-
vue 自定义组件实现通讯录功能
在线demo:http://tangyupeng.top/dist/index.html#/phone <template> <div> <my-header custom-title="通讯录" custom-fixed > <button @touchstart="backBtn" slot="left">首页</button> <button @touchstart=&quo
-
vue 自定义组件的写法与用法详解
三个技能,父组件 -> 子组件传值(props).子组件 -> 父组件传值(emit用来使这个独立的组件通过一些逻辑来融入其他组件中.举个具体点的例子,假如你要做一辆车,车轮是要封装的一个独立组件,props指的就是根据整个车的外形你可以给轮子设置一些你想要的且符合车风格的花纹,图案等:而$emit的作用则是让这些轮子能够和整辆车完美契合的运作起来. (1)使用props可以实现父子组件之间的传值 (2)使用this.$emit()可是实现子组件调用父组件的方法 一.在commponents文
-
Vue自定义复制指令 v-copy功能的实现
使用自定义指令创建一个点击复制文本功能 1. 创建v-copy.js文件 import Vue from "vue"; // 注册一个全局自定义复制指令 `v-copy` Vue.directive("copy", { bind(el, { value }) { el.$value = value; el.handler = () => { el.style.position = 'relative'; if (!el.$value) { // 值为空的时候,
-
Vue自定义指令拖拽功能示例
下面给大家分享vue自定义指令拖拽功能代码,具体代码如下所示: <!DOCTYPE html> <html lang="en"> <head> <meta charset="UTF-8"> <title>实例方法</title> <meta name="viewport" content="width=device-width, initial-scale=1
-
浅析Vue自定义组件的v-model
最近在学习vue,今天看到自定义事件的表单输入组件,纠结了一会会然后恍然大悟...官方教程写得不是很详细,所以我决定总结一下. v-model语法糖 v-model实现了表单输入的双向绑定,我们一般是这么写的: <div id="app"> <input v-model="price"> </div> new Vue({ el: '#app', data: { price: '' } }); 通过该语句实现price变量与输入值双
-
vue 自定义组件 v-model双向绑定、 父子组件同步通信的多种写法
上篇文章给大家介绍了浅析Vue自定义组件的v-model,大家可以参考下.接下来通过本文给大家介绍vue 自定义组件 v-model双向绑定. 父子组件同步通信的多种写法,具体详情如下所示: 父子组件通信,都是单项的,很多时候需要双向通信.方法如下: 1.父组件使用:msg.sync="aa" 子组件使用$emit('update:msg', 'msg改变后的值xxx') 2.父组件传值直接传对象,子组件收到对象后可随意改变对象的属性,但不能改变对象本身. 3.父组件使用: v-mo
-
vue实现组件之间传值功能示例
本文实例讲述了vue实现组件之间传值功能.分享给大家供大家参考,具体如下: slot标签: 想向封装好结构的组件中插入内容,需要借助<slot></slot> 在组件之中进行关联:如 模板中: <slot name='txt'></slot> 组件调用中: <p slot='txt'></p> 注:如果只有slot上面每一定义name属性,则只能有一个slot <div class='box'> <com> &
-
VUE 自定义组件模板的方法详解
本文实例讲述了VUE 自定义组件模板的方法.分享给大家供大家参考,具体如下: 先说下需求吧,因为客户的用户群比较大,如果需求变动,频繁更新版本就需要重新开发和重新发布,影响用户的体验,考虑到这一层就想到,页面展示效果做动态可配,需求更新时,重新配置一份模板录入到数据库,然后根据用户选择的模板进行展示. 关于页面展示做的动态可配,我是参考vue的Component组件方式,开始时可能会遇到组件定义后不能加载的情况,并在控制台如下错误:You are using the runtime-only b
-
使用form-create动态生成vue自定义组件和嵌套表单组件
使用form-create动态生成vue自定义组件和嵌套表单组件 [github]| [说明文档] maker.create 通过建立一个虚拟 DOM的方式生成自定义组件 生成 Maker let rule = [ formCreate.maker.create('i-button').props({ type:'primary', field:'btn' loading:true }) ] $f = formCreate.create(rule); 上面的代码是通过maker生成器动态生成一个