SpringBoot使用CXF集成WebService的方法
1、写在前面
WebService 对我来说既熟悉又陌生,已经将近六七年没有看到过他了, 具体的介绍我就不多少了, 想了解的百度百科下说的很详细。
之所以突然研究WebService是接到一个需求要去给 XX 项目做一个适配层,他们原有系统是使用webservice做的,所以……
那我们就来看看,这一个古老的技术如何和如今最流行的框架SpringBoot进行结合。
2、SpringBoot 集成WebService
2.1 导入依赖
compile('org.springframework.boot:spring-boot-starter-web-services',
      'org.apache.cxf:cxf-spring-boot-starter-jaxws:3.2.5',
      'org.apache.cxf:cxf-rt-frontend-jaxws:3.1.6',
      'org.apache.cxf:cxf-rt-transports-http:3.1.6')
我是用Gradle 来构建项目的,使用Maven一样,添加以上jar依赖就可以了。
2.2 开发Webservice接口
/**
 * serviceName 服务名称
 * targetNamesPace : 一般都是接口包倒序,也可以自定义
@javax.jws.WebService(serviceName = "gzcxfw_wx_webserviceService",
    targetNamespace = "http://36.101.208.59:8090/axis/services/bdcgzcxfw_wx")
public interface WebService {
  /**
   *
   * @param wxid   微信ID
   * @param xm    姓名
   * @param sfzh   身份证号
   * @param sjh   手机号
   * @param macId  预定用户
   * @param password 密码
   * @return 查询结果 Base64字符串
   */
  @WebMethod(operationName = "gzcxfw_hlw_wxrz_Info_cs")
  @WebResult(name = "gzcxfw_hlw_wxrz_Info_csReturn")
  String gzcxfwHlwWxrzInfoCs(@WebParam(name = "WXID", targetNamespace = "http://36.101.208.59:8090/axis/services/bdcgzcxfw_wx") String wxid, @WebParam(name = "XM") String xm,
                @WebParam(name = "SFZH", targetNamespace = "http://36.101.208.59:8090/axis/services/bdcgzcxfw_wx") String sfzh, @WebParam(name = "SJH") String sjh,
                @WebParam(name = "mac_id", targetNamespace = "http://36.101.208.59:8090/axis/services/bdcgzcxfw_wx") String macId, @WebParam(name = "password") String password
  );
2.3 实现类
/**
 * @author yueli
 * @date 2019-08-05 19:17
 */
@javax.jws.WebService(serviceName = "gzcxfw_wx_webserviceService",
    targetNamespace = "http://36.101.208.59:8090/axis/services/bdcgzcxfw_wx")
public class WebServiceImpl implements WebService {

  private static Logger logger = LoggerFactory.getLogger(CatalogInfoImpl.class);

  @Override
  public String gzcxfwHlwWxrzInfoCs(String wxid, String xm, String sfzh, String sjh, String macId, String password) {
    logger.info("gzcxfwHlwWxrzInfoCs: 入参- wxid:{}, xm:{}, sfzh:{}, sjh:{}, macId:{}, pawd:{}", wxid, xm, sfzh,
        macId, password);

    return wxid + “:” + sfzh;
  }
实现类就很简单了。和我们一般写的没啥区别,
2.4 发布
package com.tusdao.base.configuration;

import com.tusdao.TusdaoWebserviceApplication;
import com.tusdao.webservice.service.WebService;
import com.tusdao.webservice.service.impl.WebServiceImpl;
import org.apache.cxf.Bus;
import org.apache.cxf.bus.spring.SpringBus;
import org.apache.cxf.jaxws.EndpointImpl;
import org.apache.cxf.transport.servlet.CXFServlet;
import org.springframework.boot.web.servlet.ServletRegistrationBean;
import org.springframework.context.annotation.Bean;
import org.springframework.context.annotation.ComponentScan;
import org.springframework.context.annotation.Configuration;

import javax.xml.ws.Endpoint;

/**
 * @author yueli
 * @date 2019-08-05 19:24
 */
@Configuration
@ComponentScan(basePackageClasses = TusdaoWebserviceApplication.class)
public class CxfConfig {
  @SuppressWarnings("all")
  @Bean(name = "cxfServletRegistration")
  public ServletRegistrationBean dispatcherServlet() {
    //创建服务并指定服务名称
    return new ServletRegistrationBean(new CXFServlet(), "/axis/services/*");
  }

  @Bean(name = Bus.DEFAULT_BUS_ID)
  public SpringBus springBus() {
    return new SpringBus();
  }

  @Bean
  public WebService webService() {

    return new WebServiceImpl();
  }

  /**
   * 注册WebServiceDemoService接口到webservice服务
   *
   * @return
   */
  @Bean
  public Endpoint endpoint() {
    EndpointImpl endpoint = new EndpointImpl(springBus(), webService());
    endpoint.publish("/bdcgzcxfw_wx");
    endpoint.getInInterceptors().add(new ServerNameSpaceInterceptor());
    //endpoint.getInInterceptors().add(new InInterceptor());
    return endpoint;
  }

}
这个就简单了, 我们在使用时可以直接copy过去就行。
最后就是启动项目了。
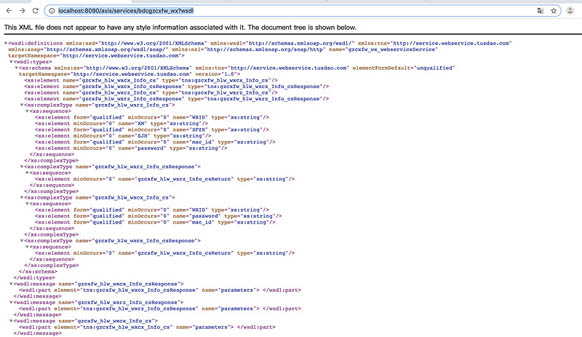
启动后我们直接输入项目地址:http://localhost:8090/指定的服务名

会看到生成的ssdl。到这基本搭建就结束了。测试在这就不写了, 大家可以使用wsdl生成客户端,或者直接使用http发送xml格式数据进行请求。
3、总结
springboot使用CXF集成Webservice 开发很简单,不用在单独的部署到外部tomcat上, 这为我们熟悉springboot开发的同学带了很好的体验。
有想要完整实例的请看着 >> https://github.com/yuelicn/springboot-webservice-cxf
或者直接clone >> https://github.com/yuelicn/springboot-webservice-cxf
以上就是本文的全部内容,希望对大家的学习有所帮助,也希望大家多多支持我们。
赞 (0)

