Spring Boot整合Thymeleaf详解
目录
- Thymeleaf
- 基本介绍
- 基本语法
- th:text文本替换
- th:if和th:unless文本替换
- th:each foreach循环
- th:id、th:value、th:checked等(和form表单相关)
- 整合Thymeleaf
- 基本配置
- 三层架构
- 删除操作
- 编辑操作
- 用户登录
- 用户注销
- 点击注销用户
Thymeleaf
基本介绍
Spring Boot 官方推荐使用 Thymeleaf 作为其模板引擎。SpringBoot 为 Thymeleaf 提供了一系列默认配置,并且为Thymeleaf提供了视图解析器。项目中一但导入了 Thymeleaf 的依赖,相对应的自动配置 (ThymeleafAutoConfiguration) 就会自动生效,因此 Thymeleaf 可以与 Spring Boot 完美整合 。Thymeleaf模板引擎可以和html标签完美结合,便于后端渲染数据。Thymeleaf支持静态效果和动态效果,在没有动态数据的时候,会展示静态效果模板引擎是为了使用户界面与业务数据(内容)分离而产生的,它可以生成特定格式的文档,用于网站的模板引擎就会生成一个标准的HTML文档就是将模板文件和数据通过模板引擎生成一个HTML代码**常见的模板引擎有:jsp、freemarker、velocity、thymeleafThymeleaf默认写的位置是在templates这个目录下面Thymeleaf官网:https://www.thymeleaf.org/
<dependency>
  <groupId>org.springframework.boot</groupId>
  <artifactId>spring-boot-starter-thymeleaf</artifactId>
</dependency>
Thymeleaf默认的视图路径是:/ resources/templates,在这个目录下面创建html并引入thymeleaf
<html lang="en" xmlns:th="http://www.thymleaf.org">
xmlns:th=“http://www.thymleaf.org”>
基本语法
${域属性名}:获得request域中的域属性值并显示
${session.域属性名}: 获得session域中的域属性值并显示
< p th:text="${name}">aaa</p>
如果取得到数据的话,就会渲染成动态画面,否则就渲染成静态画面(只显示学生管理系统只显示学生管理系统这几个字)
th:text文本替换
<span th:text="${user.name}">Tom</span>
th:if和th:unless文本替换
使用th:if和th:unless属性进行条件判断,th:unlessth:unless刚好相反,只有表达式条件不成立才会显示内容
<h2 th:if="${age>=18}">成年</h2>
<h2 th:unless="${age>=18}">未成年</h2>
th:each foreach循环
<!DOCTYPE html>
<html lang="en" xmlns:th="http://www.thymleaf.org">
<head>
    <meta charset="UTF-8">
    <title>Title</title>
    <style>
        .tb-stus{
            width: 900px;
            margin: 0 auto;
            border: black 1px solid;
            border-collapse: collapse;
        }
        .tb-stus th,td{
            padding: 10px;
            text-align: center;
            border:1px solid black;
        }
    </style>
</head>
<body>
    <h2 align="center">学生管理系统</h2>
    <table class="tb-stus">
        <thead>
            <tr>
                <th>序号</th>
                <th>姓名</th>
                <th>年龄</th>
                <th>性别</th>
                <th>班级</th>
                <th>生日</th>
                <th>操作</th>
            </tr>
        </thead>
        <tbody>
            <tr th:each="stu:${stuList}">
                <td>1</td>
                <td th:text="${stu.name}">aa</td>
                <td>22</td>
                <td>男</td>
                <td>计科1班</td>
                <td>2022-2-3</td>
                <td>
                    <a href="#" rel="external nofollow" >删除</a>
                </td>
            </tr>
        </tbody>
    </table>
</body>
</html>

th:href和@{}链接表达式
<!--http://localhost:8080/stu/10 -->
<a th:href="${'/stus/'+ stu.id}" rel="external nofollow" >编辑学生1</a>

<!--http://localhost:8080/stu?id=10 -->
<a th:href="@{/stus(id=${stu.id})}" rel="external nofollow" >编辑学生2</a>

<!--http://localhost:8080/stu?id=10&name=abc -->
<a th:href="@{/stus(id=${stu.id},name=${stu.name})}" rel="external nofollow" >编辑学生3</a>
th:switch和th:case
<div th:switch="${stu.role}">
  <h2 th:case="banzhang">班长</h2>
  <h2 th:case="tuanzhishu">团支书</h2>
  <h2 th:case="${data}">学委</h2>
  <h2 th:case="*">其他</h2>

</div>
thymeleaf默认给变量名+Stat的状态
如果没有显示设置状态变量,thymeleaf会默认给一个变量名+Stat的状态
<tr th:each="stu: ${stus}">
  <td th:text="${stuStat.index}"></td>
  <td th:text="${ stu.name}"></td>
  <td th:text="${ stu.age}"></td>
</tr>
th:id、th:value、th:checked等(和form表单相关)
th:object可以定义对象属性
*{}可以和th:object配合使用,可以取出对象中的属性#dates.format()可以用来格式化日期格式
 <form th:object="${stu}">
        编号:<input type="text" name="id" th:value="*{id}"><br>
        姓名:<input type="text" name="name" th:value="*{name}"><br>
        年龄:<input type="text" name="age" th:value="*{age}"><br>
        性别:<input type="radio" name="gender" value="true" th:checked="*{gender}">男<br>
        性别:<input type="radio" name="gender" value="true" th:checked="*{not gender}">女<br>
        生日:<input type="text" name="birth" th:value="*{#dates.format(birth,'yyyy-MM-dd')}"><br>
        <input type="submit" value="编辑">
    </form>
整合Thymeleaf
基本配置
创建项目的时候,记得在模板引擎中勾选Thymeleaf
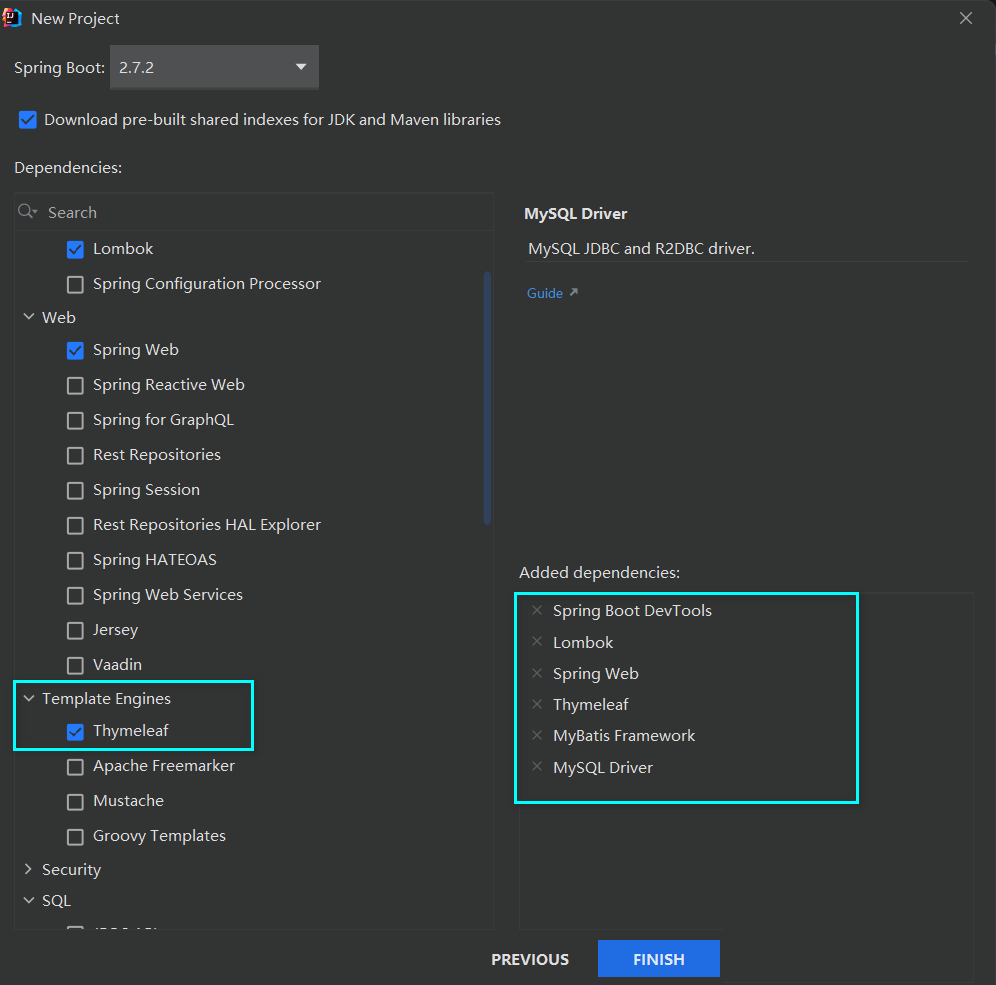
在pom.xml中把MySQL驱动的作用域删除
然后我们这里使用druid连接池,所以需要在pom文件导入相关依赖
 <dependency>
            <groupId>com.alibaba</groupId>
            <artifactId>druid-spring-boot-starter</artifactId>
            <version>1.2.11</version>
        </dependency>
然后我们需要在全局配置文件application.properties中进行相关配置
# 指定Mybatis的Mapper接口的xml映射文件的路径
mybatis.mapper-locations=classpath:mapper/*xml
# MySQL数据库驱动
#这个驱动也可以省略,可以根据使用的MySQL自动加载相应的驱动
spring.datasource.driver-class-name=com.mysql.cj.jdbc.Driver
# 数据源名称
spring.datasource.name=com.alibaba.druid.pool.DruidDataSource
# 数据库连接地址
spring.datasource.url=jdbc:mysql://localhost:3306/school?serverTimezone=UTC&zeroDateTimeBehavior=convertToNull
# 数据库用户名和密码
spring.datasource.username=root
spring.datasource.password=a87684009.
# 设置日志级别
logging.level.com.zyh.springboot=debug
# 开启mybatis驼峰命名规则自动转换功能
mybatis.configuration.map-underscore-to-camel-case=true
数据库准备 准备好数据库中表所对应的实体类,以及三层结构

@Data
public class Stu {
    private Integer id;
    private String name;
    private Integer age;
    private Boolean gender;
    private Integer cid;
    @DateTimeFormat(pattern = "yyyy-MM-dd")
    private Date birth;
}
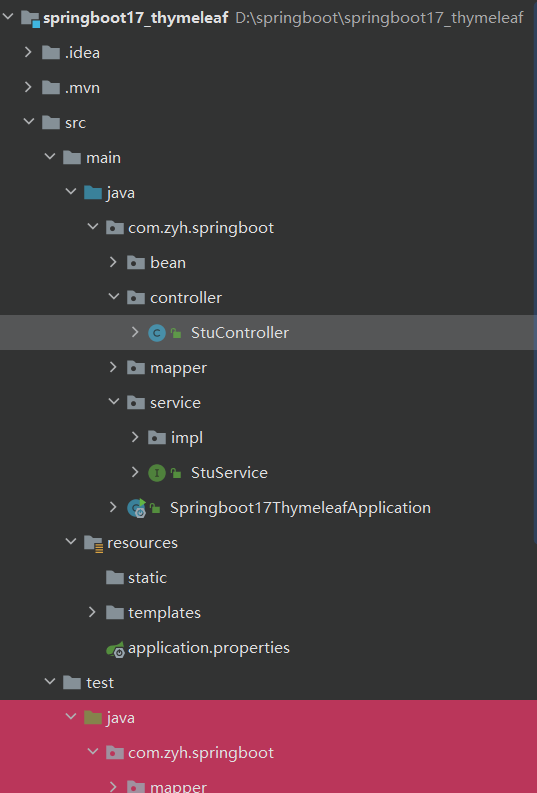
三层架构
Mapper
@Mapper
public interface StuMapper {
    /**
     * 查询所有学生信息
     * @return
     * @throws Exception
     */
    @Select("select * from stu")
     List<Stu> queryAllStu() throws Exception;
}
Service
public interface StuService  {
    /**
     * 查询所有学生信息
     * @return
     */
    List<Stu> queryAllStu() throws Exception;
}
Service的实现类
@Service
public class StuServiceImpl implements StuService {
    @Autowired
    private StuMapper stuMapper;
    @Override
    public List<Stu> queryAllStu() throws Exception {
         return stuMapper.queryAllStu();
    }
}
thymeleaf
<!DOCTYPE html>
<html lang="en" xmlns:th="http://www.thymleaf.org">
  <head>
    <meta charset="UTF-8">
    <title>Title</title>
  </head>
  <body>
    <h2>学生管理系统</h2>
    <h2 th:text="${name}">aaaa</h2>
  </body>
</html>
Controller
@Controller
@RequestMapping("/stu")
public class StuController {
    @Autowired
    private StuService stuService;
    /**
    * 显示学生管理系统的画面
    * @return
    */
    @RequestMapping("/stusUi")
    public String stusUi(){
        return "stus";
    }
}
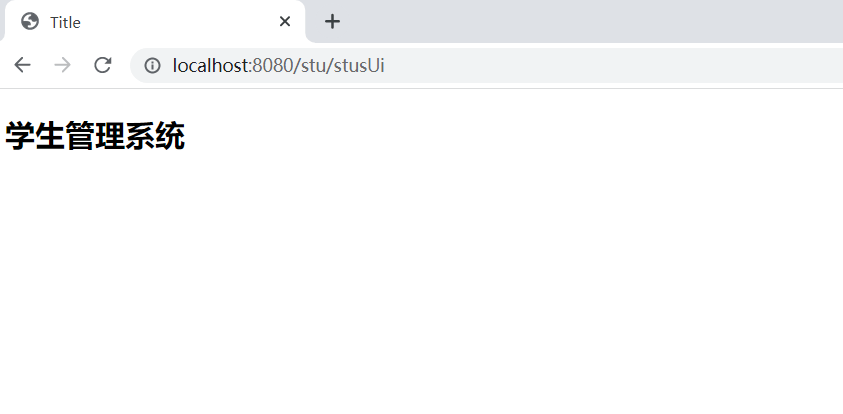


然后我们先准备好页面
<!DOCTYPE html>
<html lang="en" xmlns:th="http://www.thymeleaf.org">
<head>
<meta charset="UTF-8">
<title>Title</title>
<style>
.tb-stus{
width: 900px;
margin: 0 auto;
border: black 1px solid;
border-collapse: collapse;
}
.tb-stus th,td{
padding: 10px;
text-align: center;
border:1px solid black;
}
</style>
</head>
<body>
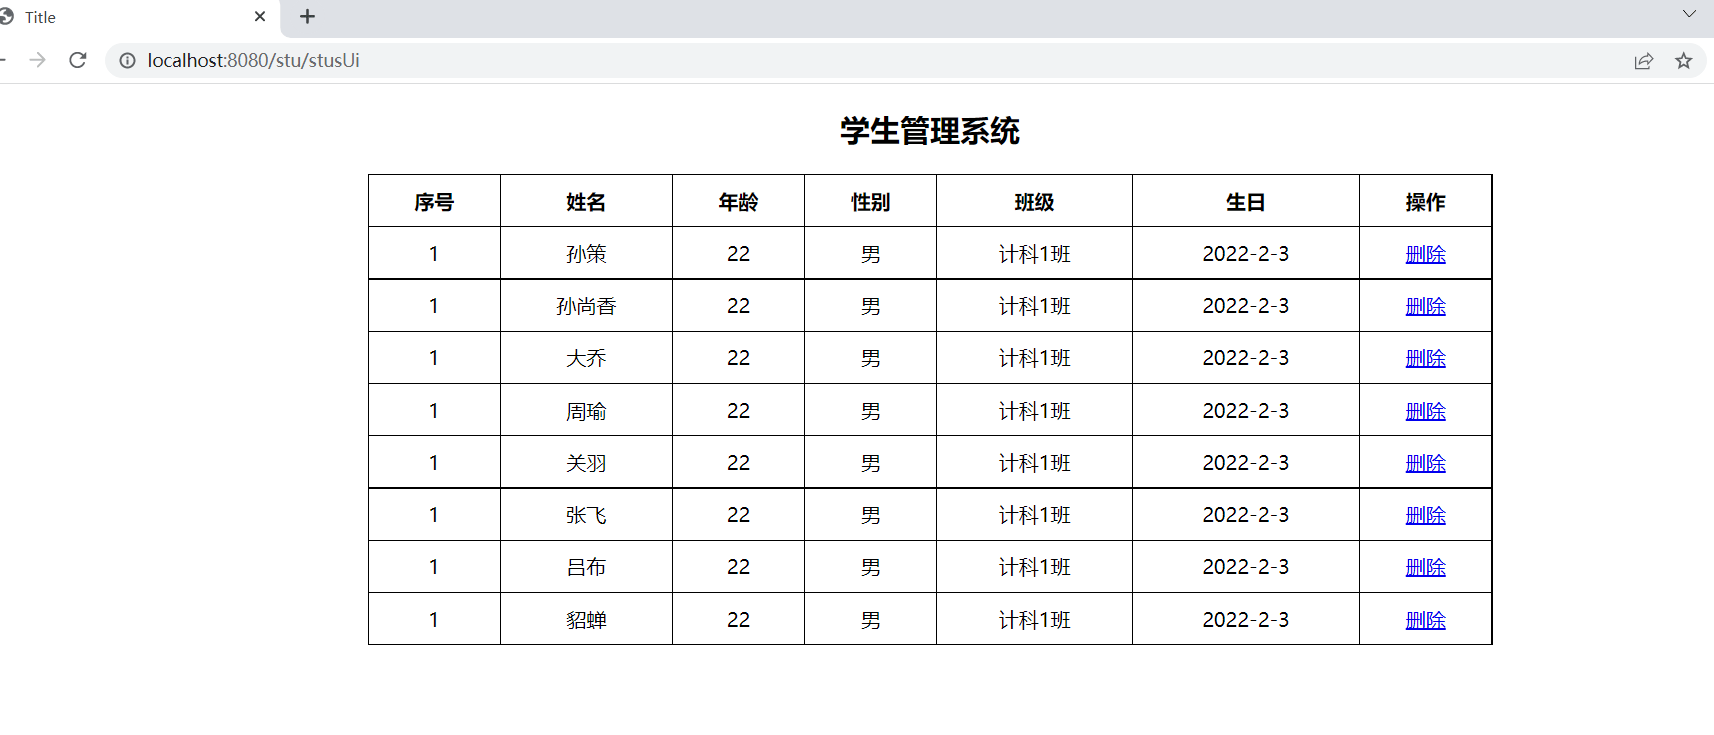
<h2 align="center">学生管理系统</h2>
<table class="tb-stus">
<thead>
<tr>
<th>序号</th>
<th>姓名</th>
<th>年龄</th>
<th>性别</th>
<th>班级</th>
<th>生日</th>
<th>操作</th>
</tr>
</thead>
<tbody>
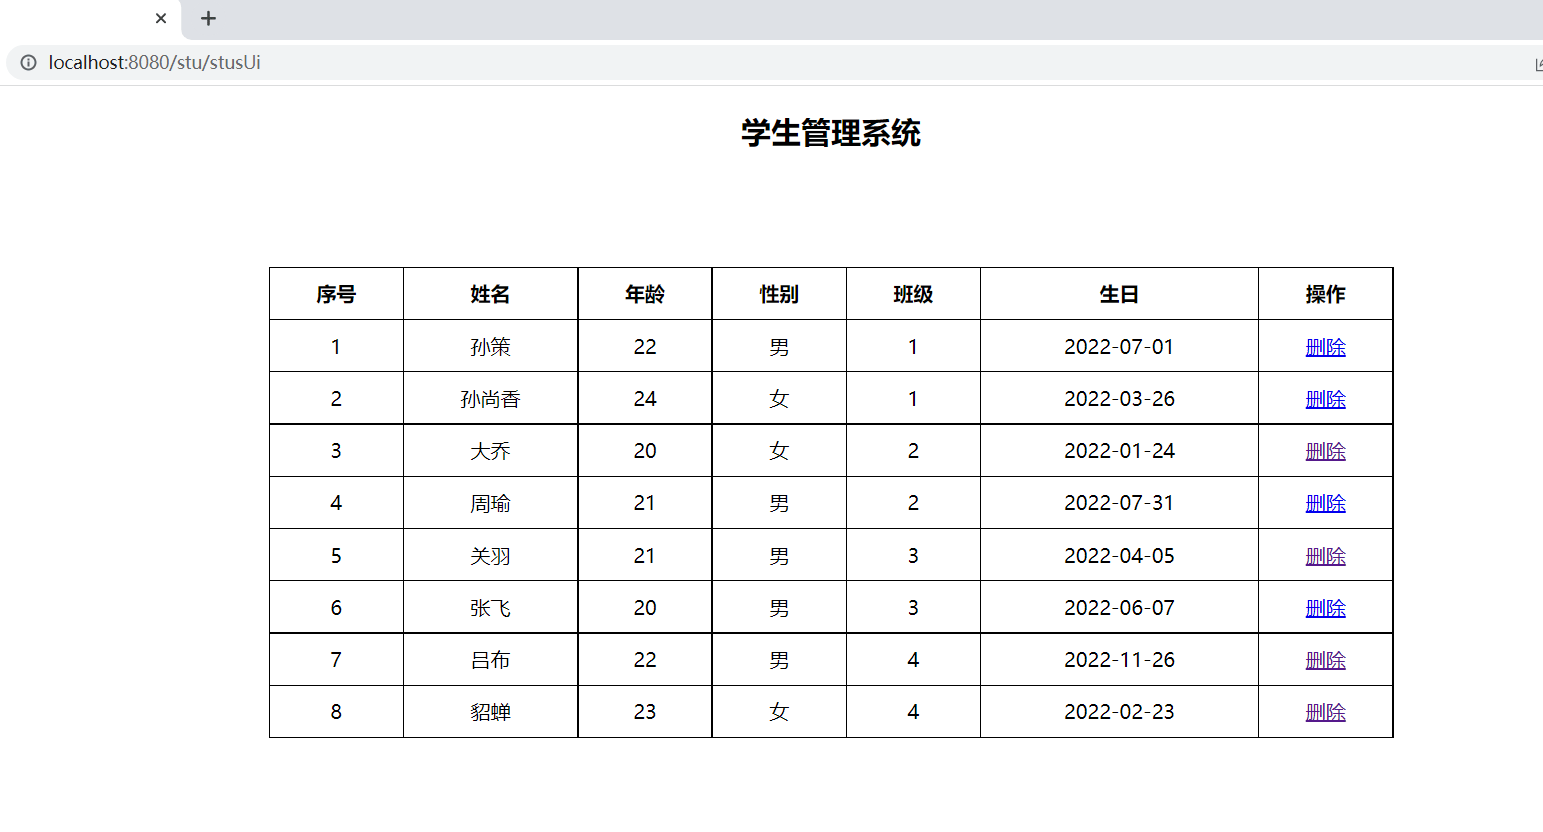
<tr th:each="stu,status: ${stuList}">
<td th:text="${status.index+1}">1</td>
<td th:text="${stu.name}">aa</td>
<td th:text="${stu.age}">22</td>
<!-- gender的属性值为1表示性别为男-->
<td th:if="${stu.gender}">男</td>
<td th:unless="${stu.gender}">女</td>
<td th:text="${stu.cid}">计科1班</td>
<td th:text="${#dates.format(stu.birth,'yyyy-MM-dd')}">2022-2-3</td>
<td>
<!--http://localhost:8080/stu/delete?id=10-->
<a th:href="@{/stu/delete(id=${stu.id})}" rel="external nofollow" rel="external nofollow" rel="external nofollow" >删除</a>
</td>
</tr>
</tbody>
</table>
</body>
</html>
当我们点击删除的时候,后端要根据前端传过来的id来从数据库中删除对应的数据。这里我们先按照我们之前学的时候,熟悉的方法来完成,到后面的时候,会详细讲前后端分离开发
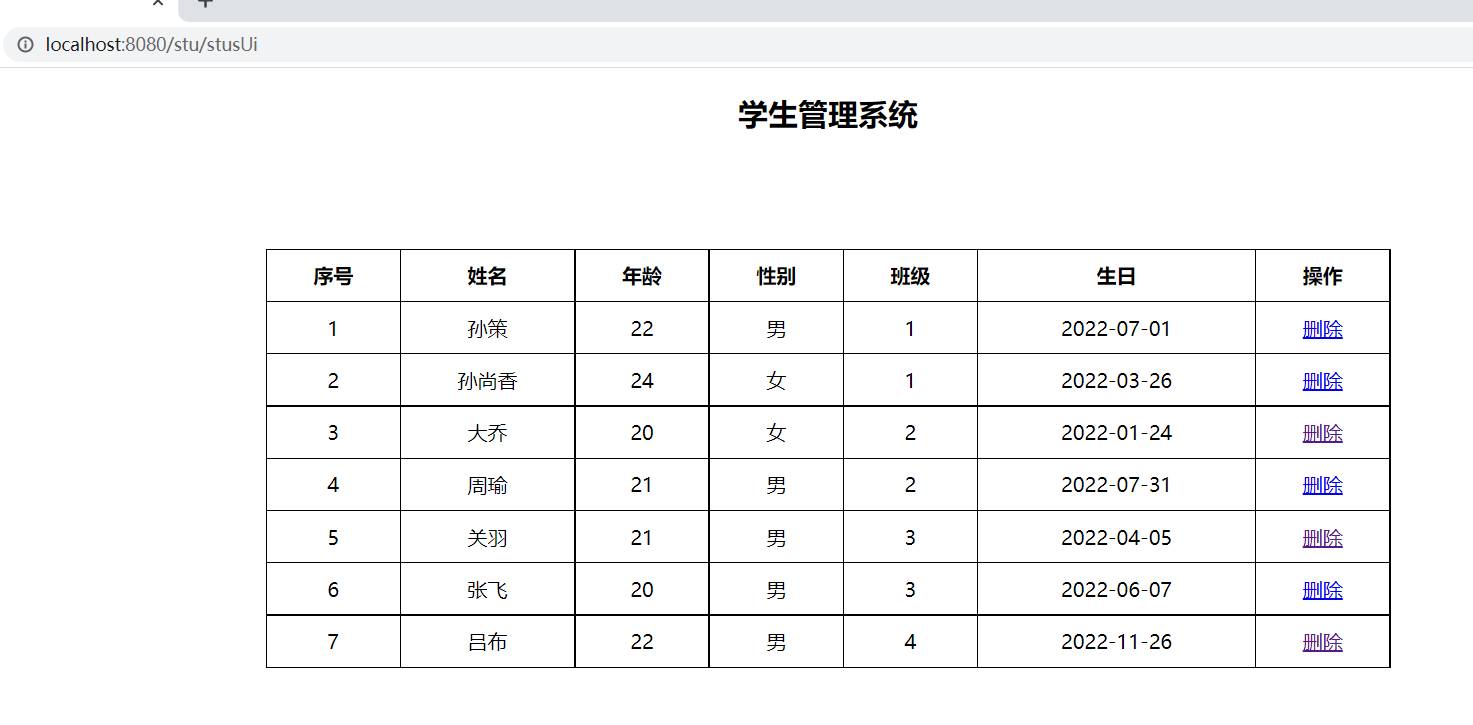
删除操作
Controller(之前的方法这里没有粘贴出来,不然代码太多了)
@Controller
@RequestMapping("/stu")
public class StuController {
    @Autowired
    private StuService stuService;

    /**根据id删除数据
     * http://localhost:8080/stu/delete?id=10
     * @return
     */
    @RequestMapping("/delete")
    public String deleteById(@RequestParam("id") Integer id){
        try {
            stuService.deleteByid(id);
        } catch (Exception e) {
            e.printStackTrace();
        }
        System.out.println(id);
        return "redirect:/stu/stusUi";
    }

  }
Service
public interface StuService  {
    /**
     * 查询所有学生信息
     * @return
     */
    List<Stu> queryAllStu() throws Exception;

    void deleteByid(Integer id);
}
Service实现类
@Service
public class StuServiceImpl implements StuService {
    @Autowired
    private StuMapper stuMapper;
    @Override
    public List<Stu> queryAllStu() throws Exception {
         return stuMapper.queryAllStu();
    }

    /**
     * 根据id删除数据
     * @param id
     */
    @Override
    public void deleteByid(Integer id) throws Exception {
        stuMapper.deleteById(id);
    }
}
Mapper
@Mapper
public interface StuMapper {
    /**
     * 查询所有学生信息
     * @return
     * @throws Exception
     */
    @Select("select * from stu")
     List<Stu> queryAllStu() throws Exception;
    @Delete("delete from stu where id=#{id}")
    void deleteById( Integer id);
}
把编号为8的数据删除
编辑操作
页面stus.html
<!DOCTYPE html>
<html lang="en"  xmlns:th="http://www.thymeleaf.org">
<head>
    <meta charset="UTF-8">
    <title>Title</title>
    <style>
        .tb-stus{
            width: 900px;
            margin: 0 auto;
            border: black 1px solid;
            border-collapse: collapse;
        }
        .tb-stus th,td{
            padding: 10px;
            text-align: center;
            border:1px solid black;
        }
    </style>
</head>
<body>
<h2 align="center">学生管理系统</h2>
<table class="tb-stus">
    <thead>
    <tr>
        <th>序号</th>
        <th>姓名</th>
        <th>年龄</th>
        <th>性别</th>
        <th>班级</th>
        <th>生日</th>
        <th>操作</th>
    </tr>
    </thead>
    <tbody>
    <tr th:each="stu,status: ${stuList}">
        <td th:text="${stu.id}">1</td>
        <td th:text="${stu.name}">aa</td>
        <td th:text="${stu.age}">22</td>
<!--        gender的属性值为1表示性别为男-->
        <td th:if="${stu.gender}">男</td>
        <td th:unless="${stu.gender}">女</td>
        <td th:text="${stu.cid}">计科1班</td>
         <td th:text="${#dates.format(stu.birth,'yyyy-MM-dd')}">2022-2-3</td>
        <td>
<!--            localhost:8080/stu/delete/8-->
<!--            <a th:href="${'/stu/delete/'+stu.id}" rel="external nofollow"  rel="external nofollow" >删除</a>-->
            <!--http://localhost:8080/stu/delete?id=10-->
            <a th:href="@{/stu/delete(id=${stu.id})}" rel="external nofollow"  rel="external nofollow"  rel="external nofollow" >删除</a>
            <a th:href="@{/stu/edit(id=${stu.id})}" rel="external nofollow"  rel="external nofollow" >编辑</a>
        </td>
    </tr>
    </tbody>
</table>

</body>
</html>
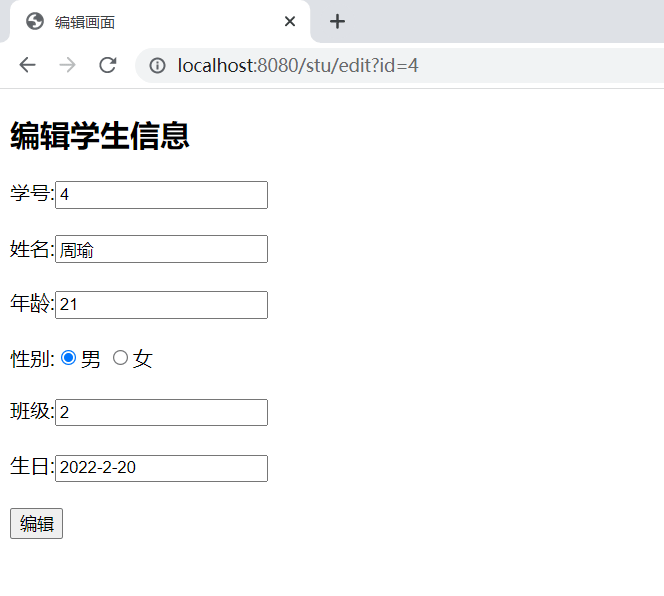
页面 stu-edit.html
<!DOCTYPE html>
<html lang="en" xmlns:th="http://www.thymeleaf.org">
  <head>
    <meta charset="UTF-8">
    <title>编辑画面</title>
  </head>
  <body>
    <h2 >编辑学生信息</h2>
    <form action="" method="post" th:object="${stu}">
      学号:<input type="text" name="id" th:value="*{id}"  ><br><br>
      姓名:<input type="text" name="name"  th:value="*{name}"><br><br>
      年龄:<input type="text" name="age"  th:value="*{age}"><br><br>
      性别:<input type="radio" name="gender"    th:checked="*{gender}"  >男
      <input type="radio" name="gender"   th:checked="*{!gender}" >女<br><br>
      班级:<input type="text" name="cid" th:value="*{cid}"><br><br>
      生日:<input type="text" name="birth" th:value="*{#dates.format(birth,'yyyy-MM-dd')}"><br><br>
      <input type="submit" value="编辑">
    </form>
  </body>
</html>
Controller
/**
     * 根据id来修改数据
     * 我们首先得先根据id把数据查询出来,然后把数据展示出来
     * 用户再进行编辑,用户编辑完并且提交以后,跳转到学生管理系统画面,展示所有数据
     * @return
     */
    @RequestMapping("/edit")
    public String edit(@RequestParam("id") Integer id,Model model){
        System.out.println("id"+id);
        try {
            Stu stu=stuService.queryById(id);
            model.addAttribute("stu",stu);
        } catch (Exception e) {
            e.printStackTrace();
        }

        return "stu-edit";
    }
Service
public interface StuService  {
    /**
     * 查询所有学生信息
     * @return
     */
    List<Stu> queryAllStu() throws Exception;

    /**
     * 根据id来删除学生信息
     * @param id
     * @throws Exception
     */
    void deleteByid(Integer id) throws Exception;

    /**
     * 根据id来查询对应学生信息
     * @param id
     * @return
     * @throws Exception
     */
    Stu queryById(Integer id) throws Exception;
}
Service实现类
@Service
public class StuServiceImpl implements StuService {
    @Autowired
    private StuMapper stuMapper;
    @Override
    public List<Stu> queryAllStu() throws Exception {
         return stuMapper.queryAllStu();
    }

    /**
     * 根据id删除数据
     * @param id
     */
    @Override
    public void deleteByid(Integer id) throws Exception {
        stuMapper.deleteById(id);
    }

    @Override
    public Stu queryById(Integer id) throws Exception {
        return stuMapper.queryById(id);
    }
}
Mapper
@Mapper
public interface StuMapper {
    /**
    * 查询所有学生信息
    * @return
    * @throws Exception
    */
    @Select("select * from stu")
    List<Stu> queryAllStu() throws Exception;
    @Delete("delete from stu where id=#{id}")
    void deleteById( Integer id);
    @Select("select * from stu where id=#{id}")
    Stu queryById(Integer id) throws Exception;
}
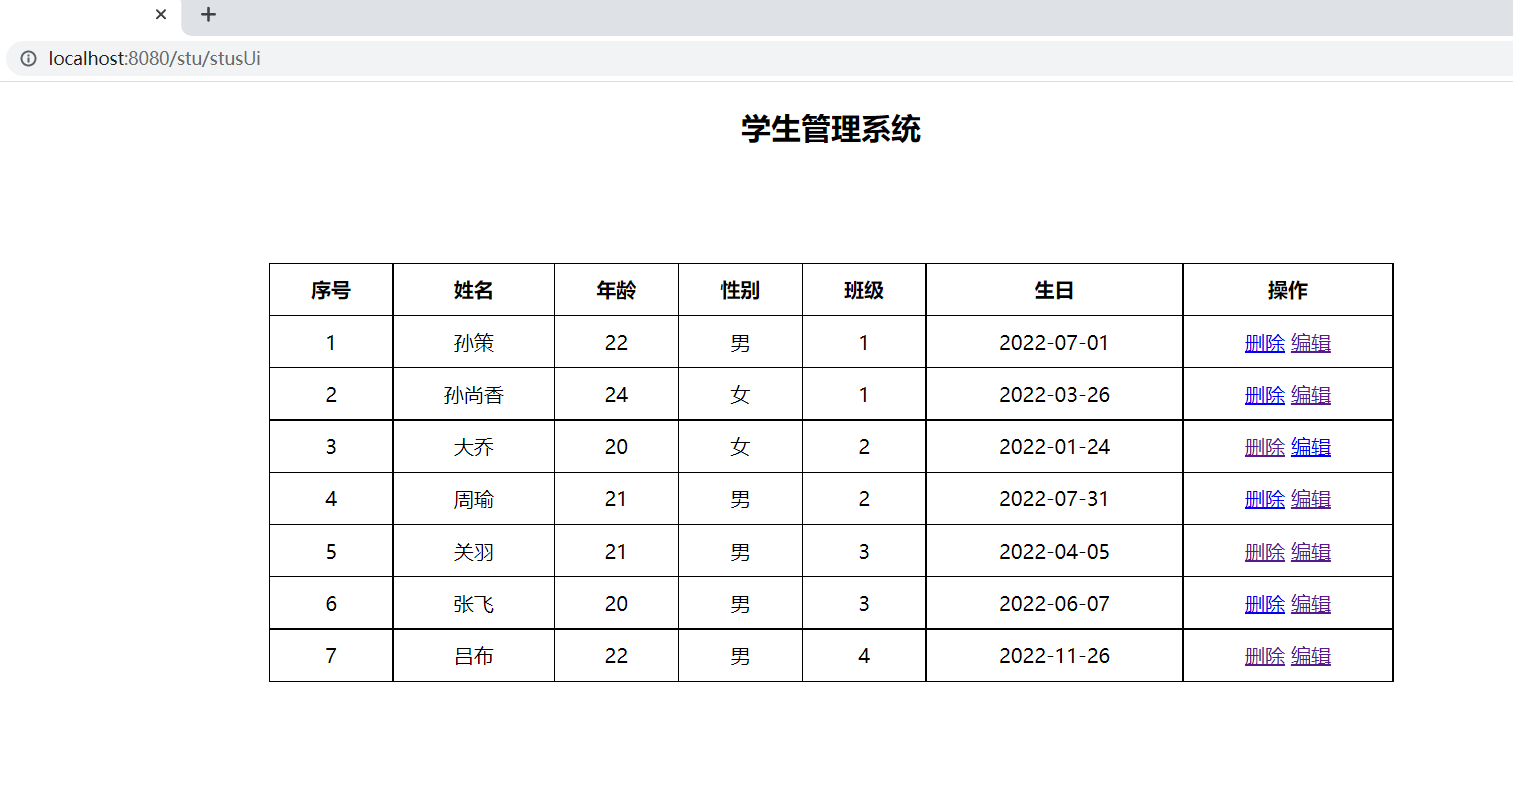
比如在序号为4中,点击编辑
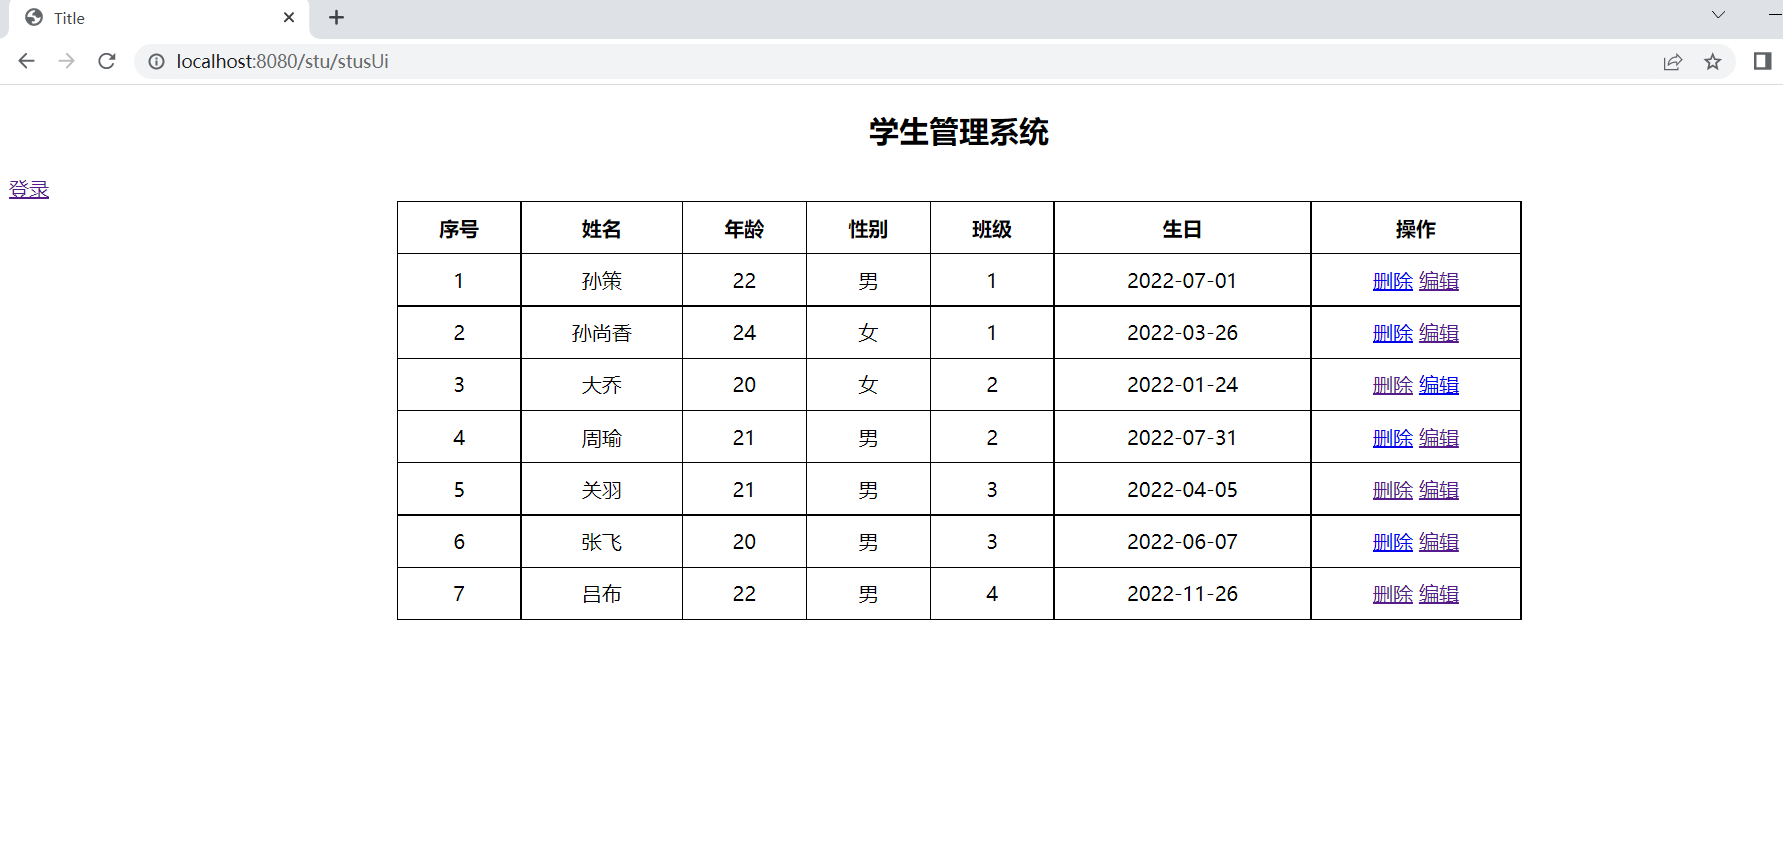
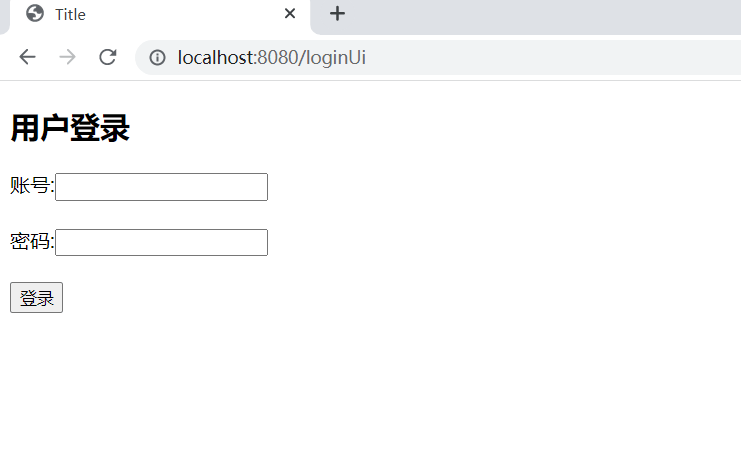
用户登录
登录页面:
<!DOCTYPE html>
<html lang="en">
<head>
    <meta charset="UTF-8">
    <title>Title</title>
</head>
<body>
    <h2>用户登录</h2>
    <form action="/login" method="post">
        账号:<input type="text" name="username"><br><br>
        密码:<input type="password" name="password"><br><br>
        <input type="submit" value="登录">
    </form>

</body>
</html>
因为需要判断用户是否存在,这是从数据库进行查询的,所以要准备对应的管理员表
# 创建管理员表
CREATE TABLE admin(
	id INT PRIMARY KEY AUTO_INCREMENT,
	username VARCHAR(20),
	`password` VARCHAR(20)
);

INSERT INTO admin VALUES
	(DEFAULT,'aaa',111),
	(DEFAULT,'bbb',222),
	(DEFAULT,'ccc',333);
# 查询测试
SELECT * FROM admin;
准备对应的实体类
@Data
public class Admin {
    private String username;
    private String password;
}
Controller
@Controller
@SessionAttributes(names = {"admin"})
public class AdminController {
    @Autowired
    private AdminService adminService;

    /**
     * 显示登录页面
     * @return
     */
    @RequestMapping(value = "/loginUi")
    public String loginUi(){
        return "login";
    }
    @RequestMapping(value = "/login",method = RequestMethod.POST)
    public String login(String username, String password, Model model){
        try {
            Admin admin = adminService.login(username, password);
            //用户名存在说明登录成功
            if (admin!=null){
                //存放到session域中
                model.addAttribute("admin",admin);
                return "redirect:/stu/stusUi";
            }
        } catch (Exception e) {
            e.printStackTrace();
        }
        return "redirect:/loginUi";
    }

}
Service
public interface AdminService {
    Admin login(String username,String password) throws Exception;
}
Service对应的实现类
@Service
public class AdminServiceImpl implements AdminService {
    @Autowired
    private AdminMapper adminMapper;
    @Override
    public Admin login(String username, String password) throws Exception {
        return adminMapper.queryByUsernameAndPassword(username,password);
    }
}
Mapper
@Mapper
public interface AdminMapper {
    @Select("select * from admin where username=#{username} and password=#{password}")
    Admin queryByUsernameAndPassword(@Param("username") String username, @Param("password") String password);
}


<!DOCTYPE html>
<html lang="en"  xmlns:th="http://www.thymeleaf.org">
<head>
    <meta charset="UTF-8">
    <title>Title</title>
    <style>
        .tb-stus{
            width: 900px;
            margin: 0 auto;
            border: black 1px solid;
            border-collapse: collapse;
        }
        .tb-stus th,td{
            padding: 10px;
            text-align: center;
            border:1px solid black;
        }
    </style>
</head>
<body>
    <h2 align="center">学生管理系统</h2>
    <h2 th:if="${session.admin!=null}" th:text="${session.admin.username}">用户名</h2>
    <a th:unless="${session.admin!=null}" href="/loginUi" rel="external nofollow" >登录</a>
    <a th:if="${session.admin!=null}" href="/logout" rel="external nofollow" >注销用户</a>
<table class="tb-stus">
    <thead>
    <tr>
        <th>序号</th>
        <th>姓名</th>
        <th>年龄</th>
        <th>性别</th>
        <th>班级</th>
        <th>生日</th>
        <th>操作</th>
    </tr>
    </thead>
    <tbody>
    <tr th:each="stu,status: ${stuList}">
        <td th:text="${stu.id}">1</td>
        <td th:text="${stu.name}">aa</td>
        <td th:text="${stu.age}">22</td>
<!--        gender的属性值为1表示性别为男-->
        <td th:if="${stu.gender}">男</td>
        <td th:unless="${stu.gender}">女</td>
        <td th:text="${stu.cid}">计科1班</td>
        <td th:text="${#dates.format(stu.birth,'yyyy-MM-dd')}">2022-2-3</td>
        <td>
<!--            localhost:8080/stu/delete/8-->
<!--            <a th:href="${'/stu/delete/'+stu.id}" rel="external nofollow"  rel="external nofollow" >删除</a>-->
            <!--http://localhost:8080/stu/delete?id=10-->
            <a th:href="@{/stu/delete(id=${stu.id})}" rel="external nofollow"  rel="external nofollow"  rel="external nofollow" >删除</a>
            <a th:href="@{/stu/edit(id=${stu.id})}" rel="external nofollow"  rel="external nofollow" >编辑</a>
        </td>
    </tr>
    </tbody>
</table>

</body>
</html>

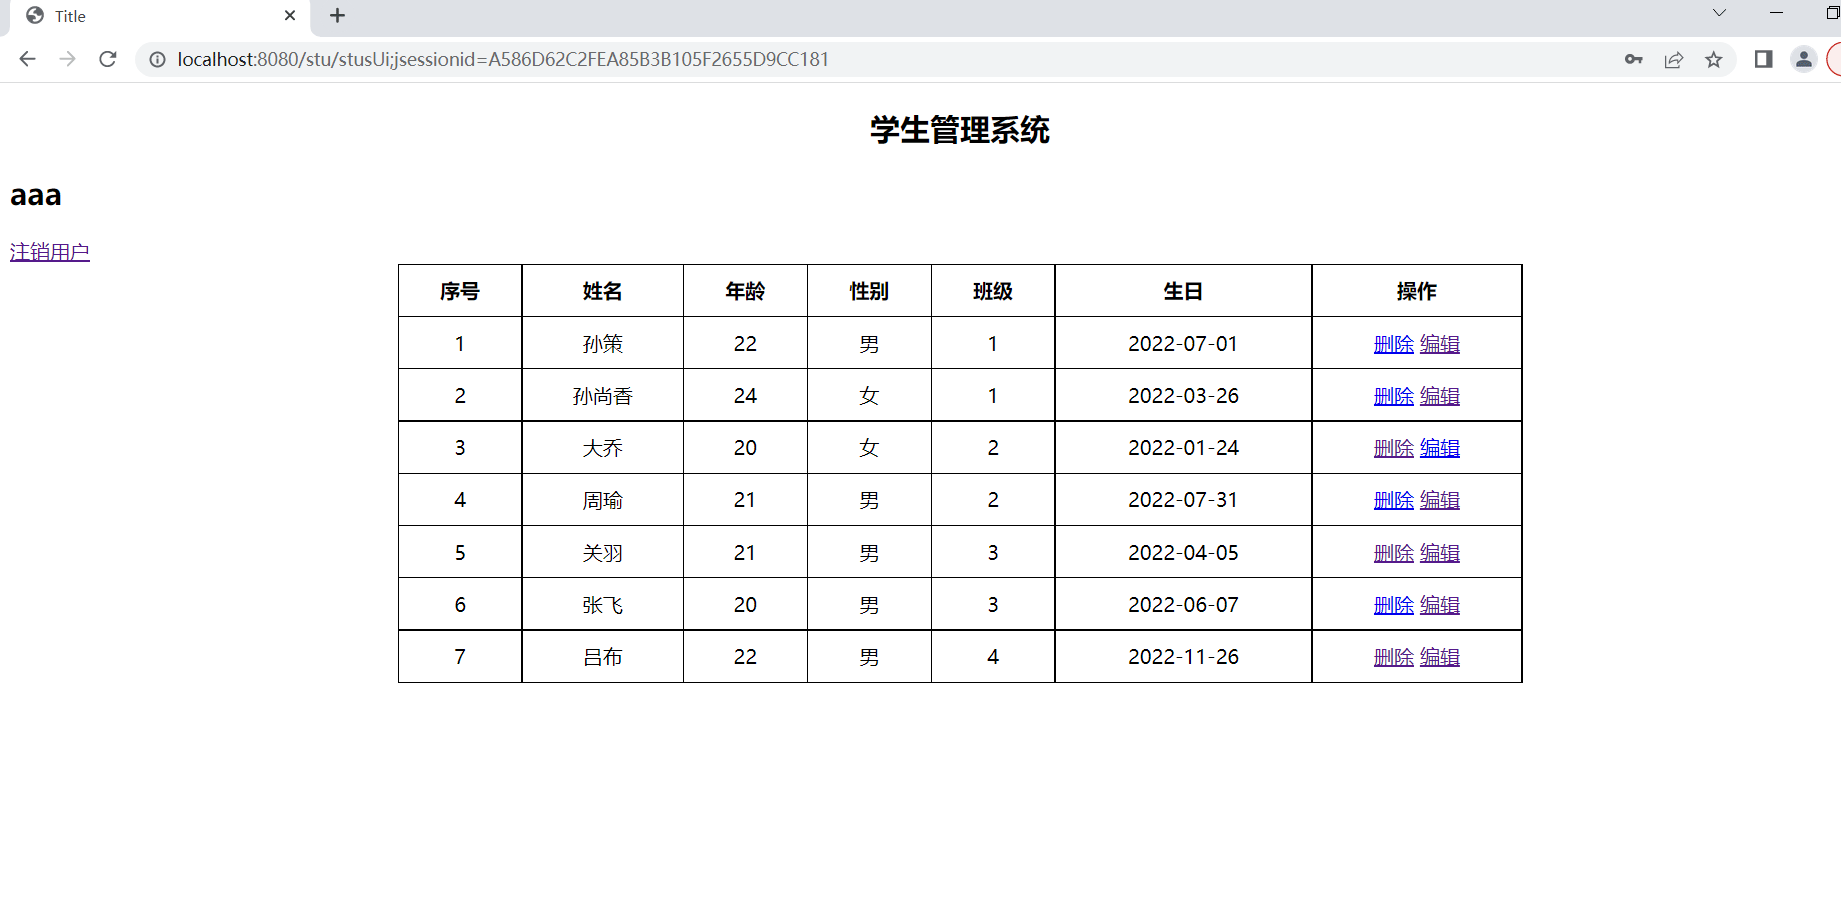
用户注销
注销的话,我们把session域中的用户对象取消,然后这个时候就得重新登录,应该要跳转到登录画面
@RequestMapping("/logout")
    public String logout(HttpSession session){
        session.removeAttribute("admin");
        return "redirect:/loginUi";
    }

点击注销用户
到此这篇关于Spring Boot整合Thymeleaf详解的文章就介绍到这了,更多相关Spring Boot整合Thymeleaf内容请搜索我们以前的文章或继续浏览下面的相关文章希望大家以后多多支持我们!
相关推荐
-
Spring Boot 整合 Shiro+Thymeleaf过程解析
这篇文章主要介绍了Spring Boot 整合 Shiro+Thymeleaf过程解析,文中通过示例代码介绍的非常详细,对大家的学习或者工作具有一定的参考学习价值,需要的朋友可以参考下 1.导包 <!-- springboot 与 shiro 的集成--> <dependency> <groupId>org.apache.shiro</groupId> <artifactId>shiro-spring</artifactId> <
-

SpringBoot详细讲解视图整合引擎thymeleaf
目录 1. 支持的视图技术 2. Thymeleaf 2.1 Thymeleaf语法 2.2 标准表达式 1. 变量表达式 ${…} 2. 选择变量表达式 *{…} 3. 消息表达式 #{…} 4. 链接表达式 @{…} 5. 片段表达式 ~{…} 3. 基本使用 3.1 Thymeleaf模板基本配置 3.2 静态资源的访问 3.3 完成数据的页面展示 1. 创建Spring Boot项目 2. 编写配置文件 3. 创建web控制类 4. 创建模板页面并引入静态资源文件 5.效果测试 1. 支
-
springboot整合shiro之thymeleaf使用shiro标签的方法
thymeleaf介绍 简单说, Thymeleaf 是一个跟 Velocity.FreeMarker 类似的模板引擎,它可以完全替代 JSP .相较与其他的模板引擎,它有如下三个极吸引人的特点: 1.Thymeleaf 在有网络和无网络的环境下皆可运行,即它可以让美工在浏览器查看页面的静态效果,也可以让程序员在服务器查看带数据的动态页面效果.这是由于它支持 html 原型,然后在 html 标签里增加额外的属性来达到模板+数据的展示方式.浏览器解释 html 时会忽略未定义的标签属性,所以 t
-
Springboot详解如何整合使用Thymeleaf
目录 引入Thymeleaf 取值 有无转义 循环 模板引擎的作用就是我们来写一个页面模板,比如有些值呢,是动态的,我们写一些表达式.而这些值,从哪来呢,就是我们在后台封装一些数据.然后把这个模板和这个数据交给我们模板引擎,模板引擎按照我们这个数据帮你把这表达式解析.填充到我们指定的位置,然后把这个数据最终生成一个我们想要的内容给我们写出去,这就是我们这个模板引擎 如果我们没有模板引擎的话,在页面中会提示500 引入Thymeleaf 在项目中加入依赖 <!--thymeleaf--> <
-
springboot2.1.7整合thymeleaf代码实例
这篇文章主要介绍了springboot2.1.7整合thymeleaf代码实例,文中通过示例代码介绍的非常详细,对大家的学习或者工作具有一定的参考学习价值,需要的朋友可以参考下 1.在pom里面添加thymeleaf依赖 <!--thymeleaf--> <dependency> <groupId>org.springframework.boot</groupId> <artifactId>spring-boot-starter-thymelea
-
SpringBoot整合thymeleaf 报错的解决方案
近日 在springboot项目中使用thymeleaf时,莫名报了以下错误: 在网上查找文章明白了报错的原因,这是由于如果使用thymeleaf 为模板,那么解析时就要求html必须为严格的html5格式,即必须有完整的结束标记, 不然就会报错. 在html页面中,诸如input,meta,link等标签 ,是可以不用闭合就可以被解析的(自闭合的),但是由于这里严格要求html5格式 于是解决办法如下: 1) 在报错的标签上加入 结束标签. 2) 修改为不严格的模式. 在配置文件中加入如下配置
-
springboot+thymeleaf整合阿里云OOS对象存储图片的实现
目录 1.先引入pom依赖 2.编写前端thymleeaf代码tetsfile.html 3.service层编写 4.controller层编写 今天再进行创建项目时想使用阿里云oos进行存储图片 下面进行实操 1.先引入pom依赖 <dependency> <groupId>com.aliyun.oss</groupId> <artifactId>aliyun-sdk-oss</artifactId> <version>3.9.1
-
Spring Boot整合Thymeleaf详解
目录 Thymeleaf 基本介绍 基本语法 th:text文本替换 th:if和th:unless文本替换 th:each foreach循环 th:id.th:value.th:checked等(和form表单相关) 整合Thymeleaf 基本配置 三层架构 删除操作 编辑操作 用户登录 用户注销 点击注销用户 Thymeleaf 基本介绍 Spring Boot 官方推荐使用 Thymeleaf 作为其模板引擎.SpringBoot 为 Thymeleaf 提供了一系列默认配置,并且为T
-
Spring boot整合security详解
目录 前言 配置依赖 用户配置 1.内存用户存储 2.数据库用户存储 3.LDAP用户存储 4.自定义用户存储 拦截配置 前言 在进行框架选型时最常用的选择就是在Spring security 和Shiro中进行抉择,Spring security 和 shiro 一样,都具有认证.授权.加密等用于权限管理的功能.但是对于Springboot而言,Spring Security比Shiro更合适一些,他们都是Spring生态里的内容,并且在使用上Spring boot只需要引入Security就
-
Spring Boot事务配置详解
1.在启动主类添加注解:@EnableTransactionManagement 来启用注解式事务管理,相当于之前在xml中配置的<tx:annotation-driven />注解驱动. 2.在需要事务的类或者方法上面添加@Transactional() 注解,里面可以配置需要的粒度: 这么多东西提供配置: Isolation :隔离级别 隔离级别是指若干个并发的事务之间的隔离程度,与我们开发时候主要相关的场景包括:脏读取.重复读.幻读. 我们可以看 org.springframework.
-
Spring Boot 整合 Thymeleaf 实例分享
目录 一.什么是 Thymeleaf 二.整合过程 准备过程 添加 Thymeleaf 依赖 编写实体类和 Controller 创建Thymeleaf 模板 三.测试 一.什么是 Thymeleaf Thymeleaf 是新一代的 Java 模板引擎,类似于 Velocity.FreeMarker 等传统引擎,其语言和 HTML 很接近,而且扩展性更高: Thymeleaf 的主要目的是将优雅的模板引入开发工作流程中,并将 HTML 在浏览器中正确显示.同时能够作为静态引擎,让开发成员之间更方
-
Spring Boot构建框架详解
什么Spring Boot? Spring Boot是由Pivotal团队提供的全新框架,其设计目的是用来简化新Spring应用的初始搭建以及开发过程.该框架使用了特定的方式来进行配置,从而使开发人员不再需要定义样板化的配置.用我的话来理解,就是spring boot其实不是什么新的框架,它默认配置了很多框架的使用方式. 环境准备 一个比较不错的文本编辑器(例如Vim.Emacs.Sublime Text)或者IDE(Eclipse.Idea Intellij) Java环境(JDK 1.8或以
-
Spring Boot统一异常处理详解
Spring Boot中默认带了error的映射,但是这个错误页面显示给用户并不是很友好. 统一异常处理 通过使用@ControllerAdvice定义统一异常处理的类,而不是在每个Controller中逐个定义. @ExceptionHandler用来定义函数针对的函数类型,最后将Exception对象和请求URL映射到URL中. @ControllerAdvice class ExceptionTranslator { public static final String DEFAULT_E
-
spring boot 日志配置详解
最近在学习spring boot框架的路上,今日看了一下spring boot日志配置,顺便留个笔记记录一下. 1.新建logback.xml文件 内容如下: <!-- Logback configuration. See http://logback.qos.ch/manual/index.html --> <configuration scan="true" scanPeriod="10 seconds"> <include res
-
Spring Boot日志控制详解
Spring Boot对日志的处理,和我们平时的日志处理完全一致,通过logback.xml进行日志管理功能.为了简便,这里采用"Spring Boot构建框架"一章节使用的工程,讲述如何在Spring Boot中处理日志. 第一步,虽然Spring Boot中application.properties配置文件提供了日志的配置,但是个人更倾向于旧的配置方式.在src/main/resources目录中增加logback.xml日志文件,文件内容如下(配置相对简单,个人请根据工程情况,
-
如何优雅的处理Spring Boot异常信息详解
Spring Boot 异常处理 异常处理是一种识别并响应错误的一致性机制,异常机制可以把程序中的异常处理代码和正常的业务逻辑代码分离,包装程序的可读性和健壮性.在Spring Boot应用程序中,能够捕获并及时的响应客户端的错误操作是一件非常重要的事情.在本章节中,我将展示如何处理Spring Boot中的异常. 1. 相关注解说明 在进行演示之前,我们先了解一下在Spring Boot应用程序中与异常处理相关的几个注解 注解名称 说明 @ControllerAdvice 该标签用于处理全局的
-
在Docker中部署Spring Boot项目过程详解
微服务现在在互联网公司可谓非常流行了,之前找工作的的时候很多HR电话约面试的时候都会问对微服务是否有过接触.而微服务和Docker可以非常完美的结合,更加方便的实现微服务架构的落地.作为微服务中的代表SpringBoot框架,今天我们就来了解一下如何在Docker容器中运行一个SpringBoot应用. 创建Spring Boot程序 在这篇文章中我们将在Docker容器中运行一个简单的SpringBoot的Web应用,下面是初始时刻的pom.xml中的内容. <?xml version="