jQuery 表单验证扩展代码(一)
再次申明,插件问题比较多,后期一个个来解决,请不要恶言相向。希望各位多多提好的建议善言。
一. 分析表单验证的基本情况
在我们做web开发的过程中,会遇到各种各样的验证。归纳一下基本可以分为一下几类:
(1). 是否必填项 [这个是非常基本的]
(2). 输入参数中的范围校验
(3). 输入参数与另外一个控件值的比较
(4). 输入的参数正则表达式验证
二. 是否必填项验证
有如下几种情况:
(1) 输入框获得焦点提示
(2)输入框失去焦点验证错误提示
(3)输入框失去焦点验证正确提示
首先确定输入框是否是必填项,然后就是提示消息的现实位置。
根据以上几种情况确定如下几个参数:
required : 是否为必填项,true 和 false ,true 表示为必填项 (*)
onFocus : 获得焦点的文字提示(如果指定样式则在样式名前加 @ ,因此文字提示首字母不能有@)
onBlur : 失去焦点的文字提示(如果指定样式则在样式名前加 @ ,因此文字提示首字母不能有@)(验证失败提示)
onSucces : 验证成功的文字提示(如果指定样式则在样式名前加 @ ,因此文字提示首字母不能有@)
tipId : 用于显示提示信息的控件id (*)
组合例子 : {required:true,onFocus:"Required",onBlur:"@error",onSucces:"Success",tipId:"tipid"}
注意: 上面定义的一些规则,有些可能没有实现,在后期过程中逐渐完善。
代码如下:
/**
* 检查输入框是否为必填项
* 输入参数:
* required : 是否为必填项,true 和 false ,true 表示为必填项 (*)
* onFocus : 获得焦点的文字提示(如果指定样式则在样式名前加 @ ,因此文字提示首字母不能有@)
* onBlur : 失去焦点的文字提示(如果指定样式则在样式名前加 @ ,因此文字提示首字母不能有@)(验证失败提示)
* onSucces : 验证成功的文字提示(如果指定样式则在样式名前加 @ ,因此文字提示首字母不能有@)
* tipId : 用于显示提示信息的控件id (*)
* 组合例子 : {required:true,onFocus:"Required",onBlur:"@error",onSucces:"Success",tipId:"tipid"}
*/
$.fn.extend({
checkRequired:function(inputArg){
if(inputArg.required){
if($(this).is("input") || $(this).is("textarea")){
//绑定获得焦点事件
$(this).bind("focus",function(){
if(inputArg.onFocus!=undefined){
$("#" + inputArg.tipId).html(inputArg.onFocus);
}
});
//绑定失去焦点事件
$(this).bind("blur",function(){
if($(this).val()!=undefined && $(this).val()!=""){
$("#" + inputArg.tipId).html(inputArg.onSucces);
}else{
$("#" + inputArg.tipId).html(inputArg.onBlur);
}
});
}
}
}
});
使用效果和测试代码:
 当获得焦点时候后面提示效果
 当失去焦点没有输入提示效果
 当输入文本信息之后提示成功效果
<script language="JavaScript" src="jquery-1.3.2.min.js" type="text/javascript"></script>
<script language="JavaScript" src="jquery-extend-1.0.0.js" type="text/javascript"></script>
<script language="JavaScript" type="text/javascript">
$(document).ready(function(){
$("#txtName").checkRequired({
required:true,
onFocus:"这个为必填项",
onBlur:"必须填写啊",
onSucces:"恭喜,你输入了",
tipId:"txtNameTip"
});
});
</script>
三. 输入参数中的范围校验
相比上面的验证来说,这个稍微复杂了一些,因为有输入值的范围。校验做了如下区分:输入的数据类型为 字符串, 数字 ,时间
如果是字符串则比较字符串的长短,数字和时间比较大小。(时间目前没有完善)
因为比较范围所以定义一个区间范围,所以这里再添加两个属性,下限值和上限值。
输入参数列表:
onFocus : 获得焦点的文字提示(如果指定样式则在样式名前加 @ ,因此文字提示首字母不能有@)
onEmpty : 输入项为空文字提示(如果指定样式则在样式名前加 @ ,因此文字提示首字母不能有@)
onSucces : 验证成功的文字提示(如果指定样式则在样式名前加 @ ,因此文字提示首字母不能有@)
onBlur : 失去焦点的文字提示(如果指定样式则在样式名前加 @ ,因此文字提示首字母不能有@)(验证失败提示)
dataType : 数据类型参数(text,number,date)
min : 输入的最小值
max : 输入的最大值
tipId : 用于显示提示信息的控件id (*)
代码如下:
/**
* 检查输入项的范围
* 输入参数:
* onFocus : 获得焦点的文字提示(如果指定样式则在样式名前加 @ ,因此文字提示首字母不能有@)
* onEmpty : 输入项为空文字提示(如果指定样式则在样式名前加 @ ,因此文字提示首字母不能有@)
* onSucces : 验证成功的文字提示(如果指定样式则在样式名前加 @ ,因此文字提示首字母不能有@)
* onBlur : 失去焦点的文字提示(如果指定样式则在样式名前加 @ ,因此文字提示首字母不能有@)(验证失败提示)
* dataType : 数据类型参数(text,number,date)
* min : 输入的最小值
* max : 输入的最大值
* tipId : 用于显示提示信息的控件id (*)
*
*/
$.fn.extend({
checkRange:function(inputArg){
if ($(this).is("input") || $(this).is("textarea")) {
//获得焦点绑定
$(this).bind("focus",function(){
if(inputArg.onFocus!=undefined){
$("#" + inputArg.tipId).html(inputArg.onFocus);
}
});
//失去焦点绑定
$(this).bind("blur",function(){
if($(this).val()==undefined || $(this).val()==""){
$("#" + inputArg.tipId).html(inputArg.onEmpty);
}else{
switch(inputArg.dataType){
case "text":
if($(this).val().length>= parseInt(inputArg.min) && $(this).val().length< parseInt(inputArg.max)){
$("#" + inputArg.tipId).html(inputArg.onSucces);
}else{
$("#" + inputArg.tipId).html(inputArg.onBlur);
}
break;
case "number":
if(!isNaN($(this).val())){
if(parseInt($(this).val())>parseInt(inputArg.min) && parseInt($(this).val())<parseInt(inputArg.max)){
$("#" + inputArg.tipId).html(inputArg.onSucces);
}else{
$("#" + inputArg.tipId).html(inputArg.onBlur);
}
}
break;
case "date":
break;
}
}
});
}
}
});
输入项范围效果和测试代码
 如果年龄约定为数字
 输入不在约定范围之内
$("#txtAge").checkRange({
onFocus:"年龄为数字",
onEmpty:"不能为空啊",
onSucces:"验证成功",
onBlur:"验证失败,请认真输入",
dataType:"number",
min:"10",
max:"100",
tipId:"txtAgeTip"
});
<p>
<label>年龄:</label><input type="text" id="txtAge" value=""/><span id="txtAgeTip"></span>
</p>
四. 输入参数与另外一个控件值的比较
和上面的验证比较,不同的地方在于要指定比较控件的id
下面是输入参数:
onFocus : 获得焦点的文字提示(如果指定样式则在样式名前加 @ ,因此文字提示首字母不能有@)
onEmpty : 输入项为空文字提示(如果指定样式则在样式名前加 @ ,因此文字提示首字母不能有@)
onSucces : 验证成功的文字提示(如果指定样式则在样式名前加 @ ,因此文字提示首字母不能有@)
onBlur : 失去焦点的文字提示(如果指定样式则在样式名前加 @ ,因此文字提示首字母不能有@)(验证失败提示)
dataType : 数据类型参数(text,number,date)
comType : 比较的类型(=,>,>=,<,<=,!=)
tipId : 用于显示提示信息的控件id (*)
targetId : 比较的目标控件Id
/**
* 控件值之间的比较
* 输入参数:
* onFocus : 获得焦点的文字提示(如果指定样式则在样式名前加 @ ,因此文字提示首字母不能有@)
* onEmpty : 输入项为空文字提示(如果指定样式则在样式名前加 @ ,因此文字提示首字母不能有@)
* onSucces : 验证成功的文字提示(如果指定样式则在样式名前加 @ ,因此文字提示首字母不能有@)
* onBlur : 失去焦点的文字提示(如果指定样式则在样式名前加 @ ,因此文字提示首字母不能有@)(验证失败提示)
* dataType : 数据类型参数(text,number,date)
* comType : 比较的类型(=,>,>=,<,<=,!=)
* tipId : 用于显示提示信息的控件id (*)
* targetId : 比较的目标控件Id
*/
$.fn.extend({
checkCompare:function(inputArg){
if($(this).is("input") || $(this).is("textarea")){
//获得焦点绑定
$(this).bind("focus",function(){
if(inputArg.onFocus!=undefined){
$("#" + inputArg.tipId).html(inputArg.onFocus);
}
});
//失去焦点绑定
$(this).bind("blur",function(){
var targetValue=$("#"+inputArg.targetId).val();
if(targetValue!=undefined && targetValue!=null){
if($(this).val()!=undefined && $(this).val()!=""){
if(inputArg.dataType=="text"){
switch(inputArg.comType){
case "=":
if(targetValue==$(this).val()){
$("#" + inputArg.tipId).html(inputArg.onSucces);
}else{
$("#" + inputArg.tipId).html(inputArg.onBlur);
}
break;
case "!=":
if(targetValue!=$(this).val()){
$("#" + inputArg.tipId).html(inputArg.onSucces);
}else{
$("#" + inputArg.tipId).html(inputArg.onBlur);
}
break;
}
}else if(inputArg.dataType=="number"){
if (isNaN(targetValue) == false && isNaN($(this).val()) == false) {
switch (inputArg.comType) {
case "=":
if (targetValue == $(this).val()) {
$("#" + inputArg.tipId).html(inputArg.onSucces);
}
else {
$("#" + inputArg.tipId).html(inputArg.onBlur);
}
break;
case "!=":
if (targetValue != $(this).val()) {
$("#" + inputArg.tipId).html(inputArg.onSucces);
}
else {
$("#" + inputArg.tipId).html(inputArg.onBlur);
}
break;
case ">":
if ($(this).val() > targetValue) {
$("#" + inputArg.tipId).html(inputArg.onSucces);
}
else {
$("#" + inputArg.tipId).html(inputArg.onBlur);
}
break;
case ">=":
if ($(this).val() >= targetValue) {
$("#" + inputArg.tipId).html(inputArg.onSucces);
}
else {
$("#" + inputArg.tipId).html(inputArg.onBlur);
}
break;
case "<":
if ($(this).val() < targetValue) {
$("#" + inputArg.tipId).html(inputArg.onSucces);
}
else {
$("#" + inputArg.tipId).html(inputArg.onBlur);
}
break;
case "<=":
if ($(this).val() <= targetValue) {
$("#" + inputArg.tipId).html(inputArg.onSucces);
}
else {
$("#" + inputArg.tipId).html(inputArg.onBlur);
}
break;
}
}else{
$("#" + inputArg.tipId).html(inputArg.onBlur);
}
}else if(inputArg.dataType=="date"){
}
}else{
$("#" + inputArg.tipId).html(inputArg.onEmpty);
}
}
});
}
}
});
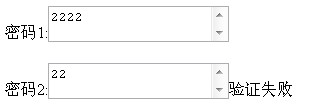
控件值之间的比较效果和测试代码

效果图1

效果图2
$("#txtPass2").checkCompare({
onFocus:"和前面的比较",
onEmpty:"输入的不能为空",
onSucces:"验证成功",
onBlur:"验证失败",
dataType:"number",
comType:">=",
tipId:"txtPass2Tip",
targetId:"txtPass1"
});
<p>
<label>密码1:</label><textarea id="txtPass1"></textarea><span id="txtPass1Tip"></span>
</p>
<p>
<label>密码2:</label><textarea id="txtPass2"></textarea><span id="txtPass2Tip"></span>
</p>
五. 输入的参数正则表达式验证
这个验证相对比较简单,因为使用正则表达式,无需自己去思考输入的情况。只需要引入一个正则表达式就可以了
下面是输入参数:
onFocus : 获得焦点的文字提示(如果指定样式则在样式名前加 @ ,因此文字提示首字母不能有@)
onEmpty : 输入项为空文字提示(如果指定样式则在样式名前加 @ ,因此文字提示首字母不能有@)
onSucces : 验证成功的文字提示(如果指定样式则在样式名前加 @ ,因此文字提示首字母不能有@)
onBlur : 失去焦点的文字提示(如果指定样式则在样式名前加 @ ,因此文字提示首字母不能有@)(验证失败提示)
regExp : 正则表达式
tipId : 用于显示提示信息的控件id (*)
/**
* 正则表达式的验证
* 输入参数:
* onFocus : 获得焦点的文字提示(如果指定样式则在样式名前加 @ ,因此文字提示首字母不能有@)
* onEmpty : 输入项为空文字提示(如果指定样式则在样式名前加 @ ,因此文字提示首字母不能有@)
* onSucces : 验证成功的文字提示(如果指定样式则在样式名前加 @ ,因此文字提示首字母不能有@)
* onBlur : 失去焦点的文字提示(如果指定样式则在样式名前加 @ ,因此文字提示首字母不能有@)(验证失败提示)
* regExp : 正则表达式
* tipId : 用于显示提示信息的控件id (*)
*/
$.fn.extend({
checkRegExp:function(inputArg){
if ($(this).is("input") || $(this).is("textarea")) {
//获得焦点绑定
$(this).bind("focus", function(){
if (inputArg.onFocus != undefined) {
$("#" + inputArg.tipId).html(inputArg.onFocus);
}
});
//获得失去焦点事件
$(this).bind("blur",function(){
if($(this).val()!=undefined && $(this).val()!=""){
if ($(this).val().match(inputArg.regExp) == null) {
$("#" + inputArg.tipId).html(inputArg.onSucces);
}else{
$("#" + inputArg.tipId).html(inputArg.onBlur);
}
}else{
$("#" + inputArg.tipId).html(inputArg.onEmpty);
}
});
}
}
});
正则表达式效果和测试代码

输入非数字
$("#txtAge").checkRegExp({
onFocus:"年龄必须为数字",
onEmpty:"输入的不能为空",
onSucces:"验证成功",
onBlur:"验证失败",
regExp:/\D/,
tipId:"txtAgeTip"
});
<label>年龄:</label><input type="text" id="txtAge" value=""/><span id="txtAgeTip"></span>
这是验证插件的一个基本雏形,后期不断跟新..........

 验证成功
验证成功 

