vue router权限管理实现不同角色显示不同路由
目录
- 思路:
- 主要逻辑代码
- 全部页面代码
思路:
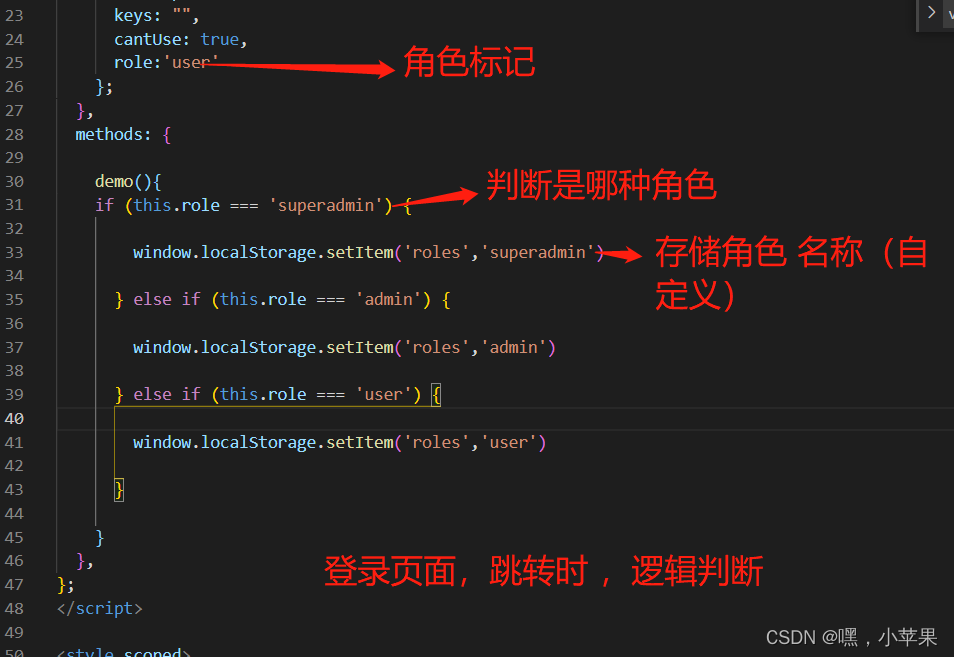
- login页面登录时 加上角色的标记,存储到本地缓存(localstorage)
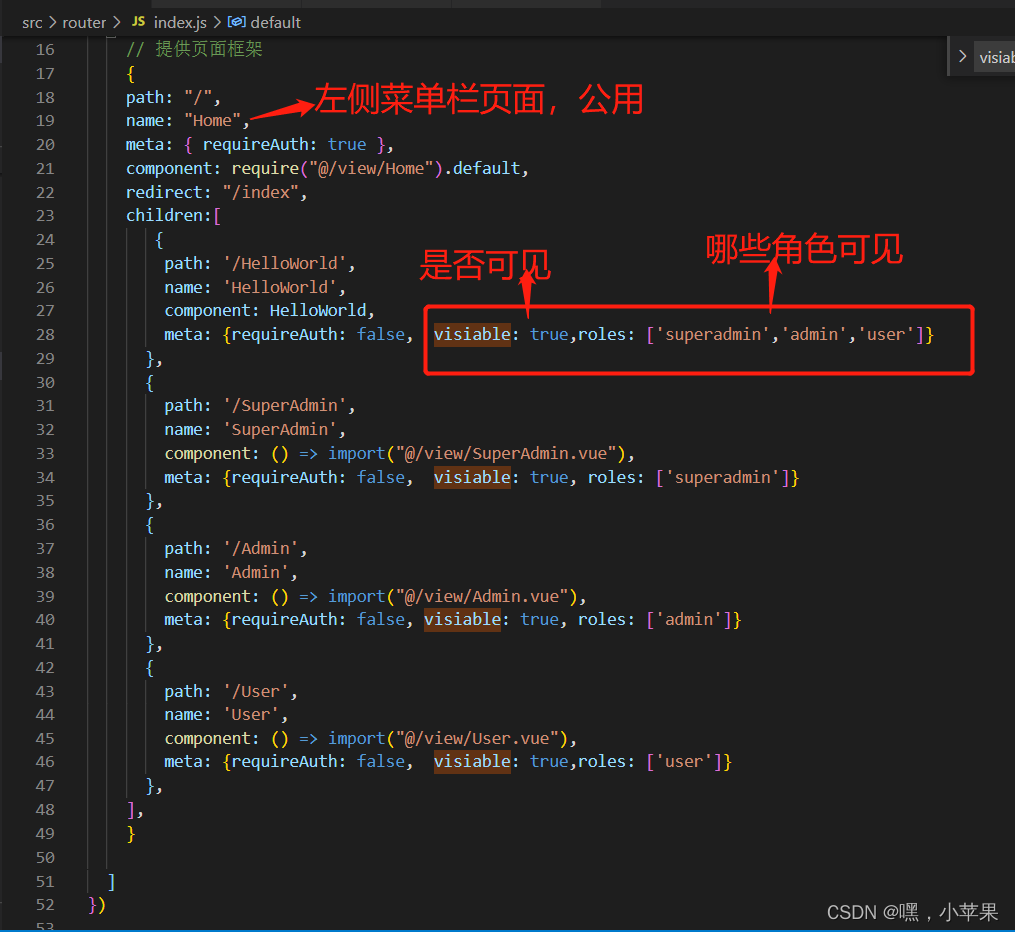
- 路由js文件,meta属性加个是否可见(visiable true或false)
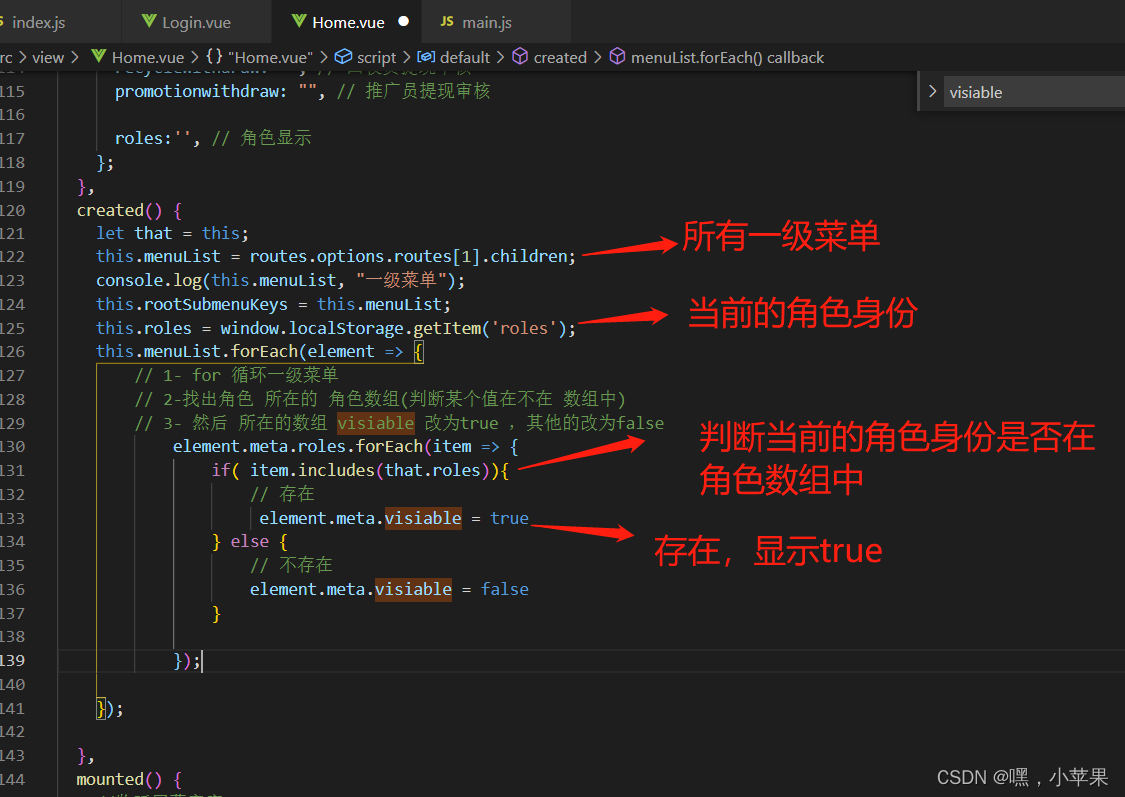
- home 基本导航栏页面逻辑,首先 可以获得到 所有一级菜单和角色标记
- for 循环一级菜单
- 找出角色 所在的 角色数组(判断某个值在不在 数组中)
- 然后 所在的数组 visiable 改为true ,其他的改为false
ui框架 是ant design of vue
主要逻辑代码
1-登录页面
2- 路由页面
3- home 菜单栏公用页面
全部页面代码
1. 登录页面
<template>
<div class='container'>
  <div class="bg-image">

        <p @click="demo">登录</p>

  </div>
  </div>
</template>

<script>
export default {
  name: "",
  data() {
    return {
      role:'user'
    };
  },
  methods: {

    demo(){
    if (this.role === 'superadmin') {

        window.localStorage.setItem('roles','superadmin')

      } else if (this.role === 'admin') {

        window.localStorage.setItem('roles','admin')

      } else if (this.role === 'user') {

        window.localStorage.setItem('roles','user')

      }

    }
  },
};
</script>

<style scoped>

</style>
2. 路由js文件
import Vue from 'vue'
import Router from 'vue-router'
import HelloWorld from '@/components/HelloWorld'

Vue.use(Router)

export default new Router({
  routes: [
      //一级路由
  {
    path: "/login",
    name: "Login",
    meta: { requireAuth: false },
    component: require("@/view/Login").default,
  },
    // 提供页面框架
    {
    path: "/",
    name: "Home",
    meta: { requireAuth: true },
    component: require("@/view/Home").default,
    redirect: "/index",
    children:[
       {
        path: '/HelloWorld',
        name: 'HelloWorld',
        component: HelloWorld,
        meta: {requireAuth: false,  visiable: true,roles: ['superadmin','admin','user']}
      },
      {
        path: '/SuperAdmin',
        name: 'SuperAdmin',
        component: () => import("@/view/SuperAdmin.vue"),
        meta: {requireAuth: false,  visiable: true, roles: ['superadmin']}
      },
      {
        path: '/Admin',
        name: 'Admin',
        component: () => import("@/view/Admin.vue"),
        meta: {requireAuth: false, visiable: true, roles: ['admin']}
      },
      {
        path: '/User',
        name: 'User',
        component: () => import("@/view/User.vue"),
        meta: {requireAuth: false,  visiable: true,roles: ['user']}
      },
    ],
    }

  ]
})
3. home公用菜单栏页面(ui框架 是ant design of vue)
<template>
<a-layout id="components-layout-demo-custom-trigger">
<a-layout-sider v-model="collapsed" :trigger="null" collapsible>
<div class="logo">
<span class="anticon">
<!-- <img src="../assets/image/logo.png" alt="" /> -->
</span>
<p v-if="!collapsed">项目名</p>
</div>
<a-menu
theme="dark"
mode="inline"
:defaultSelectedKeys="[current]"
:selectedKeys="[current]"
@click="handleClick"
@openChange="onOpenChange"
:open-keys="openKeys"
>
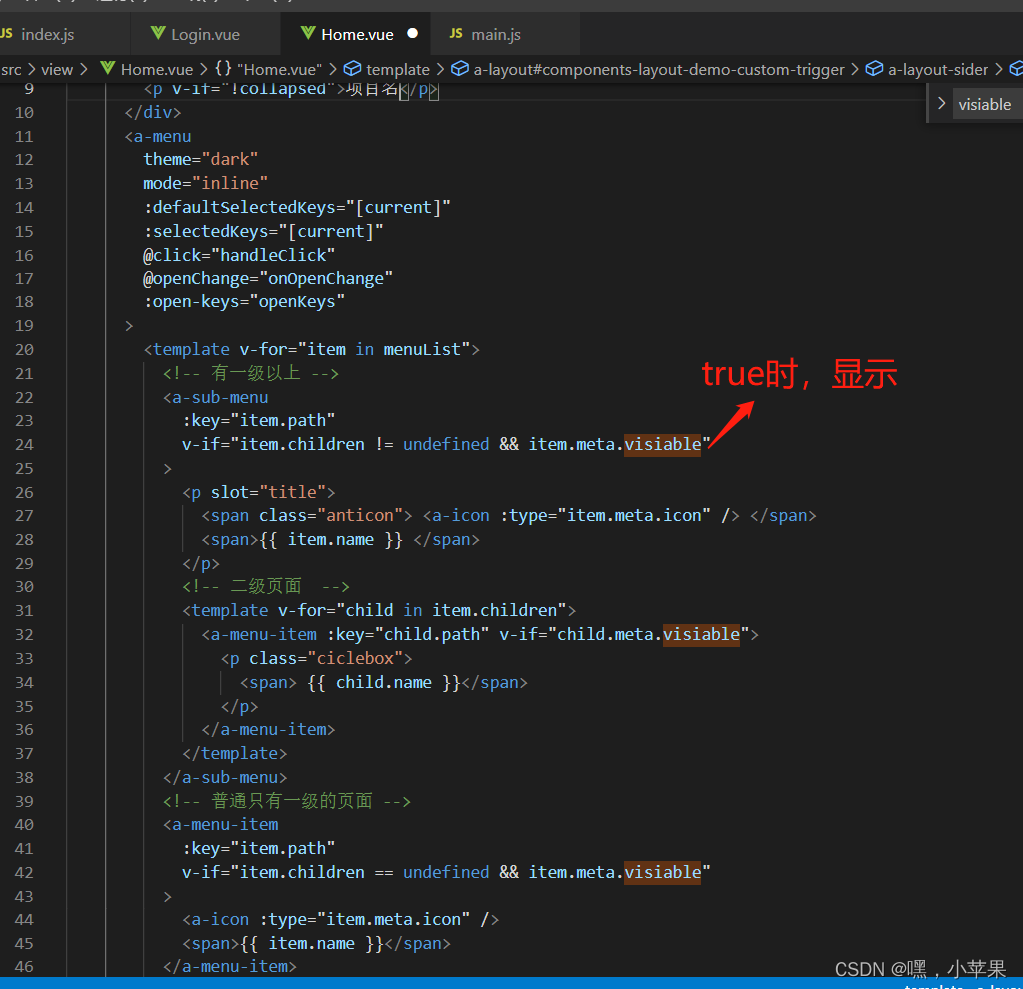
<template v-for="item in menuList">
<!-- 有一级以上 -->
<a-sub-menu
:key="item.path"
v-if="item.children != undefined && item.meta.visiable"
>
<p slot="title">
<span class="anticon"> <a-icon :type="item.meta.icon" /> </span>
<span>{{ item.name }} </span>
</p>
<!-- 二级页面 -->
<template v-for="child in item.children">
<a-menu-item :key="child.path" v-if="child.meta.visiable">
<p class="ciclebox">
<span> {{ child.name }}</span>
</p>
</a-menu-item>
</template>
</a-sub-menu>
<!-- 普通只有一级的页面 -->
<a-menu-item
:key="item.path"
v-if="item.children == undefined && item.meta.visiable"
>
<a-icon :type="item.meta.icon" />
<span>{{ item.name }}</span>
</a-menu-item>
</template>
</a-menu>
</a-layout-sider>
<a-layout :style="'width:' + (fullWidth - 200) + 'px'">
<a-layout-header style="background: #fff; padding: 0; height: 60px">
<div class="headerflex">
<a-icon
class="trigger"
:type="collapsed ? 'menu-unfold' : 'menu-fold'"
@click="() => (collapsed = !collapsed)"
/>
<div class="app-header-right">
<a-menu mode="horizontal" @click="handleClickLogin">
<a-sub-menu>
<span class="app-user-avatar" slot="title">
<a-avatar
size="small"
src="https://gw.alipayobjects.com/zos/antfincdn/XAosXuNZyF/BiazfanxmamNRoxxVxka.png"
/>
<!-- 用户名 -->
<!-- {{ User ? User.username : "" }} -->
<a-icon type="down" class="icon" />
</span>
<!-- <a-menu-item key="/setting/password"
><a-icon type="lock" key="password" />修改密码
</a-menu-item> -->
<a-menu-item key="/login"
><a-icon type="poweroff" />退出登录
</a-menu-item>
</a-sub-menu>
</a-menu>
</div>
</div>
</a-layout-header>
<a-layout-content style="padding-top: 4px">
<!-- 这里显示页面内容 -->
<router-view></router-view>
</a-layout-content>
</a-layout>
</a-layout>
</template>
<script>
import routes from "../router";
export default {
name: "Home",
components: {},
data() {
return {
collapsed: false,
menuList: [], //菜单循环列表
subList: [], // 二级子菜单
type: "", // 请求参数type类型
typeshow: false, // false 没提醒 true 有提醒
current: this.$route.path,
openKeys: [],
rootSubmenuKeys: [],
flag: false,
fullWidth: document.documentElement.clientWidth,
// 消息提醒
num: "", // 回收员审核
ordernum: "", // 订单列表
cycleordernum: "", // 周期回收列表
promoterverify: "", // 推广审核
userwithdraw: "", // 会员提现审核
recyclewithdraw: "", // 回收员提现审核
promotionwithdraw: "", // 推广员提现审核
roles:'', // 角色显示
};
},
created() {
let that = this;
this.menuList = routes.options.routes[1].children;
console.log(this.menuList, "一级菜单");
this.rootSubmenuKeys = this.menuList;
this.roles = window.localStorage.getItem('roles');
this.menuList.forEach(element => {
// 1- for 循环一级菜单
// 2-找出角色 所在的 角色数组(判断某个值在不在 数组中)
// 3- 然后 所在的数组 visiable 改为true ,其他的改为false
element.meta.roles.forEach(item => {
if( item.includes(that.roles)){
// 存在
element.meta.visiable = true
} else {
// 不存在
element.meta.visiable = false
}
});
});
},
mounted() {
//监听屏幕宽度
const that = this;
window.onresize = () => {
return (() => {
window.fullWidth = document.documentElement.clientWidth;
that.fullWidth = window.fullWidth;
})();
};
},
methods: {
onOpenChange(openKeys) {
// 最新的key值
const latestOpenKey = openKeys.find(
(key) => this.openKeys.indexOf(key) === -1
);
if (this.rootSubmenuKeys.indexOf(latestOpenKey) === -1) {
this.openKeys = openKeys;
} else {
this.openKeys = latestOpenKey ? [latestOpenKey] : [];
}
},
handleClick(e) {
//如果key为路由则跳转
this.current = e.key;
if (e.key.indexOf("/") > -1) {
this.$router.push(e.key).catch(() => {});
}
},
// 退出登录
handleClickLogin(e) {
this.current = e.key;
this.openCurrent = e.key;
if (e.key == "/login") {
localStorage.clear();
setTimeout(() => {
this.$router.replace({ path: "/logout", name: "Login" });
}, 300);
}
},
},
};
</script>
<style>
/* 退出登录 */
.headerflex {
display: flex;
align-items: center;
justify-content: space-between;
}
.rights {
padding: 0 24px;
}
#components-layout-demo-custom-trigger .trigger {
font-size: 18px;
height: 60px !important;
line-height: 60px !important;
padding: 0 24px;
cursor: pointer;
transition: color 0.3s;
}
#components-layout-demo-custom-trigger .trigger:hover {
color: #1890ff;
}
#components-layout-demo-custom-trigger .logo {
height: 52px;
margin: 16px 16px 10px;
display: flex;
align-items: center;
}
#components-layout-demo-custom-trigger .logo img {
width: 30px;
height: 30px;
margin-right: 10px;
}
#components-layout-demo-custom-trigger .logo p {
color: #fff;
margin-bottom: 0;
font-size: 16px;
font-weight: 700;
}
.ciclebox {
position: relative;
}
.ciclered {
position: absolute;
right: 0;
top: 50%;
transform: translateY(-50%);
display: inline-block;
width: 15px;
height: 15px;
border-radius: 50%;
text-align: center;
line-height: 15px;
background-color: #e72c0b;
color: #fff;
font-size: 12px;
}
.icon {
padding-left: 10px;
}
.app-header-right .ant-menu-horizontal {
line-height: 60px !important;
}
.app-user-avatar img{
width:20px;
height:20px;
}
* p {
margin-bottom: 0 !important;
}
* ul,
* li {
padding: 0;
margin: 0;
list-style: none;
}
.ant-card-body {
padding-top: 20px;
}
.change-inline {
display: inline-block;
}
.container .page-header {
height: 84px;
padding: 16px;
background-color: #fff;
}
.container .page-header h3 {
font-size: 20px;
padding-top: 8px;
font-weight: 600;
}
.container .claear-top-height {
height: auto !important;
}
.container .infomation-box-top {
margin-top: 10px;
}
.container .infomation-box-top h3 {
font-weight: 600;
margin-bottom: 14px;
}
.container .infomation-box-top p {
margin-bottom: 0;
line-height: 38px;
color: #4b4b4b;
}
.container .infomation-box-top .status-identity {
height: 108px;
display: flex;
align-items: flex-end;
justify-content: center;
}
.container .infomation-box-top .status-identity .type-title {
color: #666666;
font-weight: 600;
}
.container .infomation-box-top .status-identity p {
white-space: nowrap;
overflow: hidden;
text-overflow: ellipsis;
}
.container .infomation-box-top .status-identity .set-width {
width: 80%;
}
.container .infomation-box-top .status-identity .set-width .add-right-border {
height: 76px;
border-right: 2px solid #F4F4F4;
}
.container .infomation-box-top .status-identity .set-width .add-right-border span {
font-weight: 600;
}
.container .infomation-box-top .status-identity .set-width .add-right-border .money-edit {
display: flex;
align-items: center;
justify-content: space-between;
}
.container .infomation-box-top .status-identity .set-width .add-right-border .anticon {
margin-right: 10% !important;
}
.container .infomation-box-top .status-identity .set-width .add-right-border .edit-icon-color {
color: #2B85E4;
}
.container .set-flex-end {
display: flex;
justify-content: flex-end;
margin-bottom: 16px;
}
.container .set-flex-end .button-group {
display: flex;
align-items: center;
}
.container .set-flex-end .button-group .search {
margin-right: 16px;
}
.container .table-style .recommender {
text-decoration: underline;
color: #2B85E4;
}
.container .table-style .table-role {
margin-bottom: 0;
cursor: default;
}
.container .table-style .role-r {
color: #19BE6B;
}
.container .table-style .role-s {
color: #FF9900;
}
.container .table-style .role-t {
color: #2B85E4;
}
.container .table-style .role-w {
color: #F56C6C;
}
.container .table-style .role-c {
color: #8b8b8b;
}
.container .table-style .text-detail {
color: #409EFF;
padding: auto 10px !important;
}
.container .table-style .addleft-padding {
padding-left: 10px;
}
.container .table-style .order-to {
color: #409EFF;
padding-left: 10px !important;
}
.container .table-style .text-stop {
color: #F56C6C;
padding-left: 10px !important;
}
.container .table-style .text-stopis {
color: #2fc25b;
padding-left: 10px !important;
}
.container .pagination-margin {
margin-top: 25px;
display: flex;
justify-content: flex-end;
}
.container .ant-tabs-bar {
padding-left: 30px;
background: #fff;
font-weight: 600;
margin: 0 0 26px !important;
}
.container .ant-tabs-nav {
font-size: 15px !important;
}
.container .ant-tabs-nav .ant-tabs-tab {
margin-right: 0 !important;
padding-bottom: 20px;
}
.container .tab-pane-set {
padding: 0 2%;
}
.container .ant-card-head-title {
padding: 0px;
min-height: 44px !important;
line-height: 44px;
font-size: 15px;
font-weight: 600;
color: #6b6b6b;
}
.padbox {
margin-left: 10px;
}
.appoint {
background: #e72c0b;
color: #e72c0b !important;
}
.wait {
background: #ff9900;
color: #ff9900 !important;
}
.pass {
background: #2fc25b;
color: #2fc25b;
}
.success {
background: #409eff;
color: #409eff !important;
}
.cancel {
background: #8b8b8b;
color: #8b8b8b;
}
.red {
color: #e72c0b !important;
}
.appoint_cl {
color: #e72c0b !important;
}
.wait_cl {
color: #ff9900 !important;
}
.pass_cl {
color: #2fc25b !important;
}
.success_cl {
color: #409eff !important;
}
.cancel_cl {
color: #8b8b8b !important;
}
.clear-bg {
background: none !important;
}
</style>
项目目录

到此这篇关于vue router权限管理实现不同角色显示不同路由的文章就介绍到这了,更多相关vue router 不同角色显示不同路由内容请搜索我们以前的文章或继续浏览下面的相关文章希望大家以后多多支持我们!
相关推荐
-
使用vue-router beforEach实现判断用户登录跳转路由筛选功能
在开发webApp的时候,考虑到用户体验,经常会把不需要调用个人数据的页面设置成游客可以访问,而当用户进入到一些需要个人数据的,例如购物车,个人中心,我的钱包等等,在进行登录的验证判断,如果判断已经登录,则显示页面,如果判断未登录,则直接跳转到登录页面提示用户登录,今天就来分享下如何使用vue-router的beforEach方法来实现这个需求. 实现 本篇文章默认您已经会使用 webpack 或者 vue-cli 来进行环境的搭建,并且具有一定的vue基础,如果您目前是一个新手,那么网上搜索一
-
Vue-router路由判断页面未登录跳转到登录页面的实例
如下所示: router.beforeEach((to, from, next) => { if (to.matched.some(record => record.meta.requireAuth)){ // 判断该路由是否需要登录权限 if (token) { // 判断当前的token是否存在 next(); } else { next({ path: '/login', query: {redirect: to.fullPath} // 将跳转的路由path作为参数,登录成功后跳转到该
-
Vue Router 实现动态路由和常见问题及解决方法
个人理解:动态路由不同于常见的静态路由,可以根据不同的「因素」而改变站点路由列表.常见的动态路由大都是用来实现:多用户权限系统不同用户展示不同导航菜单. 如何利用Vue Router 实现动态路由 Vue项目实现动态路由的方式大体可分为两种: 前端将全部路由规定好,登录时根据用户角色权限来动态展示路由: 路由存储在数据库中,前端通过接口获取当前用户对应路由列表并进行渲染: 第一种方式在很多Vue UI Admin上都实现了,可以去读一下他们的源码理解具体的实现思路,这里就不过多展开.第二种方式现
-
vue-router之nuxt动态路由设置的两种方法小结
方法一:router-link <div class="slide-item" v-for="user in shareData.users"> <nuxt-link :to="'/community/member/'+ user.id"> <img src="../../static/head.png" alt=""> <p>{{user.nickname}
-
vue router路由参数刷新消失问题的解决方法
场景:vue-router实现的单页应用,登录页调用登录接口后,服务器返回用户信息,然后通过router.push({name: 'index', params: res.data})传给主页组件,并在主页显示数据.但是刷新页面后,数据就消失了. 解决方案: 1.session&服务器渲染 传统的方案是,登录页和主页是单独的两个页面,登录成功后服务器生成用户信息对应的session,然后渲染主页数据,并通过响应头将sessionid传给浏览器并生成相应的cookie文件.这样下次请求页面时,浏览
-

vue-router路由简单案例介绍
官方文档: 旧版:https://github.com/vuejs/vue-router/tree/1.0/docs/zh-cn 新版:http://router.vuejs.org/(2.0版本) 此文是旧版 文件结构图: 基本用法: <router-view>是一个顶级的路由外链,用于渲染匹配的组件. 例如:我的应用入口是app.vue 那么在app.vue中添加如下代码, 此处涉及ES6. app.vue <template> <div class='page inde
-
vue-router:嵌套路由的使用方法
模板抽离 我们已经学习过了Vue模板的另外定义形式,使用<template></template>. <!-- 模板抽离出来 --> <template id="home"> <div>首页</div> </template> <template id="news"> <div>新闻</div> </template> 然后js里定义路
-
Vue.js路由组件vue-router使用方法详解
使用Vue.js + vue-router 创建单页应用是非常简单的.只需要配置组件和路由映射,然后告诉 vue-router 在哪里渲染即可. 一.普通方式基本例子: <!DOCTYPE html> <html lang="en"> <head> <meta charset="UTF-8"> <title>vue-router使用方法</title> </head> <bod
-
解决vue+router路由跳转不起作用的一项原因
如下所示: Vue.use(Router) export default new Router({ mode:'history', routes: [ { path: '/', component: Login }, { path: '/login', component: Login }, { path: '/register',component: Register}, {path: '/*', component: NotFound}, ] }) 记得要写上 mode:'history',
-
vue router权限管理实现不同角色显示不同路由
目录 思路: 主要逻辑代码 全部页面代码 思路: login页面登录时 加上角色的标记,存储到本地缓存(localstorage) 路由js文件,meta属性加个是否可见(visiable true或false) home 基本导航栏页面逻辑,首先 可以获得到 所有一级菜单和角色标记 for 循环一级菜单 找出角色 所在的 角色数组(判断某个值在不在 数组中) 然后 所在的数组 visiable 改为true ,其他的改为false ui框架 是ant design of vue 主要逻辑代码
-
深入解析vue中的权限管理
目录 vue要做权限管理该怎么做? 一.是什么 二.如何做 接口权限 路由权限控制 菜单权限 方案一 方案二 按钮权限 方案一 方案二 小结 vue要做权限管理该怎么做? 一.是什么 权限是对特定资源的访问许可,所谓权限控制,也就是确保用户只能访问到被分配的资源 而前端权限归根结底是请求的发起权,请求的发起可能有下面两种形式触发 页面加载触发 页面上的按钮点击触发 总的来说,所有的请求发起都触发自前端路由或视图 所以我们可以从这两方面入手,对触发权限的源头进行控制,最终要实现的目标是: 路由方面
-
Vue element实现权限管理业务流程详解
目录 展开渲染标签编辑权限 对话框内树形组件编辑权限 展示所有权限 添加 编辑 删除 角色 都与上一篇 用户类似 只是接口不同 我们只关注其他不一样的: 展开渲染标签编辑权限 el-table-column type="expand"设置了expand则显示为一个可展开的按钮 显示图上的效果 使用了 三重for循环 按照 tree 数据结构 .children 取得下一级数据 <el-table-column type="expand"> <tem
-
vue实现权限控制路由(vue-router 动态添加路由)
用户登录后返回权限菜单,前端根据权限菜单动态添加路由,然后再动态生成菜单栏. 思路如下: 一.定义初始化默认路由. 二.动态配置路由,这里是把所有组件中相应的路由配置成一个个的对象,根据后台返回的菜单tree一个个去匹配. 三.通过匹配,把匹配好的路由数据addRoutes到路由中. 四.为了防止刷新页面后路由数据被清空,这里用判断是否登录的方式,再次加载动态路由. 具体代码如下: router.js import Vue from 'vue' import {router} from './i
-
Shiro:自定义Realm实现权限管理方式
目录 Shiro权限管理 1.基于JavaSe的Shiro的基本使用 1.导入shiro依赖 2.创建shiro配置文件:shiro.ini 3.shiro的基本使用 4.shiro认证授权流程 2.SpringBoot整合shiro 1. 导入依赖 2. 配置shiro过滤器 3. 进行认证测试 3.JdbcRealm实现权限管理 1. JdbcRealm表结构 2. 整合JdbcRealm 4.实现前端的权限菜单展示 1. 在Thymeleaf中使用标签 2. 常用标签 3. 认证流程回顾
-
详解利用 Vue.js 实现前后端分离的RBAC角色权限管理
项目背景:物业管理后台,不同角色拥有不同权限 采用技术:Vue.js + Vuex + Element UI 实现 RBAC 权限管理需要后端接口支持,这里仅提供前端解决方案. 因代码篇幅较大,对代码进行了删减,文中 "..." 即为省略的一部分代码. 大致思路: 首先登录成功后,从后台拉取用户当前可显示的菜单和可用权限列表,分别将其存入 store 的 nav(菜单导航) 和 auth(用户可用权限) 中,在用户切换路由时,判断是否存在 auth ,如果不存在,则重新获取,判断当前访
-
vue实现后台管理权限系统及顶栏三级菜单显示功能
•效果演示地址 项目demo展示 重要功能总结 权限功能的实现 权限路由思路: 根据用户登录的roles信息与路由中配置的roles信息进行比较过滤,生成可以访问的路由表,并通过router.addRoutes(store.getters.addRouters)动态添加可访问权限路由表,从而实现左侧和顶栏菜单的展示. 实现步骤: 1.在router/index.js中,给相应的菜单设置默认的roles信息: 如下:给"权限设置"菜单设置的权限为:meta:{roles: ['admin
-
基于vue实现网站前台的权限管理(前后端分离实践)
Javascript做为当下的热门语言,用途很广泛,从前端到后端处处可见其存在,该技术如今在我们项目内部也大量使用来开发诸如CMS系统以及其他其他一些数据分析系统的前端页面,为此个人非常感兴趣并将其作为帽子卡的扩展内容来进行课余学习. Javascript框架鳞次栉比,但基本原理大致相同,因此选用国内人开发的vue.js进行一个初步的尝试.学习vue.js也一周多的时间了,说起vue的主要用法,无外乎Declarative Rendering.Component System.Client-si
-
动态加载权限管理模块中的Vue组件
本文我们主要来聊聊登录以及组件的动态加载. 登录状态保存 当用户登录成功之后,需要将当前用户的登录信息保存在本地,方便后面使用.具体实现如下: 登录成功保存数据 在登录操作执行成功之后,通过commit操作将数据提交到store中,核心代码如下: this.postRequest('/login', { username: this.loginForm.username, password: this.loginForm.password }).then(resp=> { if (resp &
-
详解如何使用Vuex实现Vue后台管理中的角色鉴权
目录 前言 功能分析 实现思路 代码实现 vuex中定义user模块,存储用户信息以及用户侧边导航数据 router中路由meta中新增roles 定义当前路由可以访问的所有的角色 router新增路由前置首位 做权限拦截 侧边导航页面 使用 getters中的 authMenus 循环侧边导航 最后一步 登录页登录时调用 请求登录的action即可大功告成 总结 前言 一直以来,我们使用vue做后台管理时,不同角色的权限功能,都是我们老大难的问题,本篇文章我将手把你带你实现vue后台管理中的用