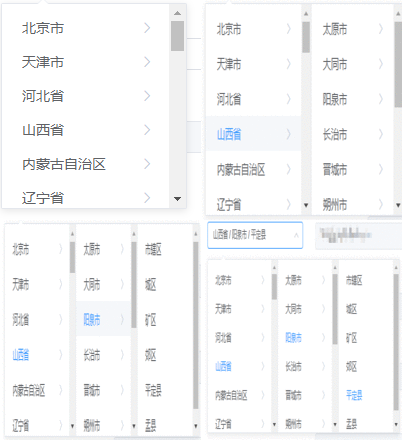
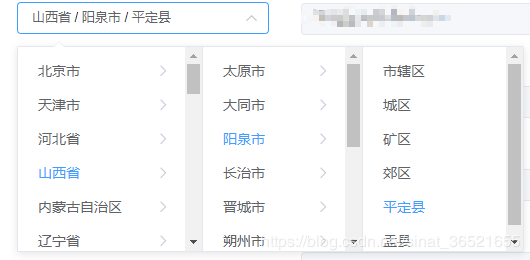
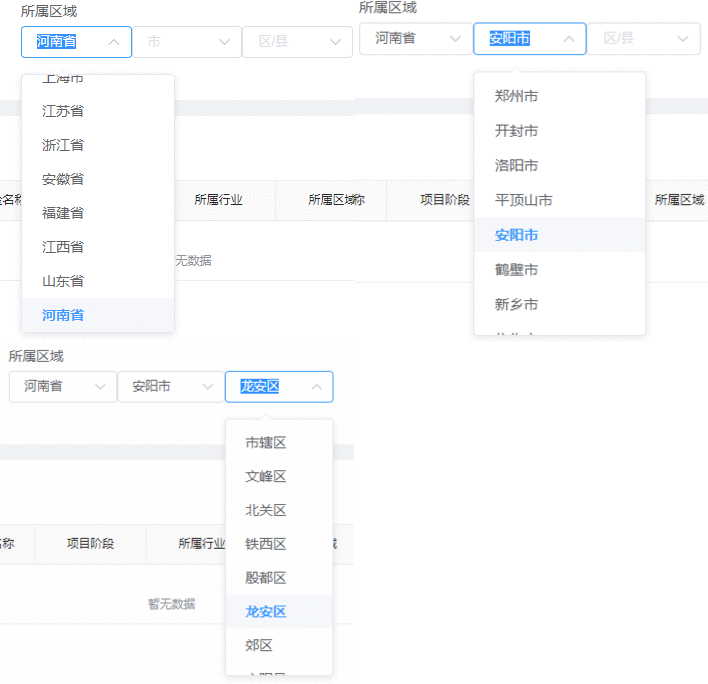
基于Vue+ElementUI的省市区地址选择通用组件
一、缘由
在项目开发过程中,有一个需求是省市区地址选择的功能,一开始想的是直接使用静态地址资源库本地打包,但这种方式不方便维护,于是放弃。后来又想直接让后台返回全部地址数据,然后使用级联选择器进行选择,但发现数据传输量有点大且处理过程耗时,于是又摒弃了这种方法。最后还是决定采用异步的方式进行省市区地址选择,即先查询省份列表,然后根据选择的省份code查询城市列表,最后根据选择的城市列表获取区/县列表,最终根据应用场景不同,给出了两种实现方案。
其中后台总共需要提供4个接口,一个查询所有省份的接口,一个根据省份code查询其下所有城市的接口,一个根据城市code查询其下所有区/县的接口,以及一个根据地址code转换成省市区三个code值的接口。
// 本人项目中使用的四个接口
`${this.API.province}/${countryCode}` // 根据国家code查询省份列表,中国固定为156,可以拓展
`${this.API.city }/${provinceCode}` // 根据省份code查询城市列表
`${this.API.area}/${cityCode}` // 根据城市code查询区/县列表
`${this.API.addressCode}/${addressCode}` // 地址code转换为省市区code
二、基于el-cascader 级联选择器的单选择框实现方案
<template>
 <el-row>
  <el-cascader
   size="small"
   :options="city.options"
   :props="props"
   v-model="cityValue"
   @active-item-change="handleItemChange"
   @change="cityChange">
  </el-cascader>
 </el-row>
</template>

<script>
export default {
 name: 'addressSelector',
 props: {
  areaCode: null
 },

 model: {
  prop: 'areaCode',
  event: 'cityChange'
 },

 data () {
  return {
   // 所在省市
   city: {
    obj: {},
    options: []
   },
   props: { // 级联选择器的属性配置
    value: 'value',
    children: 'cities',
    checkStrictly: true
   },
   cityValue: [], // 城市代码
  }
 },
 computed: {
 },
 created () {
  this._initData()
 },
 mounted () {
 },
 methods: {
  _initData () {
   this.$http({
    method: 'get',
    url: this.API.province + '/156' // 中国
   }).then(res => {
    this.city.options = res.data.body.map(item => { // 所在省市
     return {
      value: item.provinceCode,
      label: item.provinceName,
      cities: []
     }
    })
   })
  },
  getCodeByAreaCode (code) {
   if (code == undefined) return false
   this.$http({
    method: 'get',
    url: this.API.addressCode + '/' + code
   })
   .then(res => {
    if (res.data.code === this.API.SUCCESS) {
     let provinceCode = res.data.body.provinceCode
     let cityCode = res.data.body.cityCode
     let areaCode = res.data.body.areaCode
     this.cityValue = [provinceCode, cityCode, areaCode]
     this.handleItemChange([provinceCode, cityCode])
    }
   })
   .finally(res => {
   })
  },
  handleItemChange (value) {
   let a = (item) => {
    this.$http({
     method: 'get',
     url: this.API.city + '/' + value[0],
    }).then(res => {
     item.cities = res.data.body.map(ite => {
      return {
       value: ite.cityCode,
       label: ite.cityName,
       cities: []
      }
     })
     if(value.length === 2){ // 如果传入的value.length===2 && 先执行的a(),说明是传入了areaCode,需要初始化多选框
      b(item)
     }
    }).finally(_ => {
    })
   }
   let b = (item) => {
    if (value.length === 2) {
     item.cities.find(ite => {
      if (ite.value === value[1]) {
       if (!ite.cities.length) {
        this.$http({
         method: 'get',
         url: this.API.area + '/' + value[1]
        }).then(res => {
         ite.cities = res.data.body.map(ite => {
          return {
           value: ite.areaCode,
           label: ite.areaName,
          }
         })
        }).finally(_ => {
        })
       }
      }
     })
    }
   }
   this.city.options.find(item => {
    if (item.value === value[0]) {
     if (item.cities.length) {
      b(item)
     } else {
      a(item)
     }
     return true
    }
   })
  },
  getCityCode () {
   return this.cityValue[2]
  },
  reset () {
   this.cityValue = []
  },
  cityChange (value) {
   if (value.length === 3) {
    this.$emit('cityChange', value[2])
   } else {
    this.$emit('cityChange', null)
   }
  }
 },
 watch: {
  areaCode: {
   deep: true,
   immediate: true,
   handler (newVal) {
    if (newVal) {
     this.getCodeByAreaCode(newVal)
    } else {
     this.$nextTick(() => {
      this.reset()
     })
    }
   }
  }
 }
}
</script>

<style lang="less" scoped>
</style>
最终效果如下(动图):

截图:

三、基于el-select选择器的多选择框实现方案
lt;template>
 <div id="addressHorizontalSelect">
  <el-row>
   <el-col
    :span="span">
    <el-select
     size="small"
     v-model="provinceCode"
     @focus="getProvinces"
     @change="changeProvince"
     :placeholder="$t('省')"
     filterable>
     <el-option
      v-for="item in provinceList"
      :key="item.provinceCode"
      :label="item.provinceName"
      :value="item.provinceCode">
     </el-option>
    </el-select>
   </el-col>
   <el-col
    :span="span"
    v-if="!hideCity">
    <el-select
     size="small"
     v-model="cityCode"
     @focus="getCities"
     @change="changeCity"
     :placeholder="$t('市')"
     filterable>
     <el-option
      v-for="item in cityList"
      :key="item.cityCode"
      :label="item.cityName"
      :value="item.cityCode">
     </el-option>
    </el-select>
   </el-col>
   <el-col
    :span="span"
    v-if="!hideCity && !hideArea">
    <el-select
     size="small"
     v-model="areaCode"
     @focus="getAreas"
     @change="changeArea"
     :placeholder="$t('区/县')"
     filterable>
     <el-option
      v-for="item in areaList"
      :key="item.areaCode"
      :label="item.areaName"
      :value="item.areaCode">
     </el-option>
    </el-select>
   </el-col>
  </el-row>
 </div>
</template>

<script>
export default {
 name: 'addressHorizontalSelect',

 components: {},

 props: {
  hideCity: { // 隐藏市
   type: Boolean,
   default: false
  },
  hideArea: { // 隐藏区/县
   type: Boolean,
   default: false
  },
  addressCode: null // 地址编码
 },

 model: {
  prop: 'addressCode',
  event: 'addressSelect'
 },

 data() {
  return {
   provinceList: [], // 省份列表
   cityList: [], // 城市列表
   areaList: [], // 区/县列表
   provinceCode: '', // 省份编码
   cityCode: '', // 城市编码
   areaCode: '', // 区/县编码
   cityFlag: false, // 避免重复请求的标志
   provinceFlag: false,
   areaFlag: false
  }
 },

 computed: {
  span () {
   if (this.hideCity) {
    return 24
   }
   if (this.hideArea) {
    return 12
   }
   return 8
  }
 },

 watch: {
 },

 created () {
  this.getProvinces()
 },

 methods: {
  /**
   * 获取数据
   * @param {Array} array 列表
   * @param {String} url 请求url
   * @param {String} code 编码(上一级编码)
   */
  fetchData (array, url, code) {
   this.$http({
    method: 'get',
    url: url + '/' + code
   })
   .then(res => {
    if (res.data.code === this.API.SUCCESS) {
     let body = res.data.body || []
     array.splice(0, array.length, ...body)
    }
   })
   .catch(err => {
    console.log(err)
   })
   .finally(res => {
   })
  },
  // 根据国家编码获取省份列表
  getProvinces () {
   if (this.provinceFlag) {
    return
   }
   this.fetchData(this.provinceList, this.API.province, 156)
   this.provinceFlag = true
  },
  // 省份修改,拉取对应城市列表
  changeProvince (val) {
   this.fetchData(this.cityList, this.API.city, this.provinceCode)
   this.cityFlag = true
   this.cityCode = ''
   this.areaCode = ''
   this.$emit('addressSelect', val)
  },
  // 根据省份编码获取城市列表
  getCities () {
   if (this.cityFlag) {
    return
   }
   if (this.provinceCode) {
    this.fetchData(this.cityList, this.API.city, this.provinceCode)
    this.cityFlag = true
   }
  },
  // 城市修改,拉取对应区域列表
  changeCity (val) {
   this.fetchData(this.areaList, this.API.area, this.cityCode)
   this.areaFlag = true
   this.areaCode = ''
   this.$emit('addressSelect', val)
  },
  // 根据城市编码获取区域列表
  getAreas () {
   if (this.areaFlag) {
    return
   }
   if (this.cityCode) {
    this.fetchData(this.areaList, this.API.area, this.cityCode)
   }
  },
  // 区域修改
  changeArea (val) {
   this.$emit('addressSelect', val)
  },
  // 重置省市区/县编码
  reset () {
   this.provinceCode = '',
   this.cityCode = '',
   this.areaCode = ''
  },
  // 地址编码转换成省市区列表
  addressCodeToList (addressCode) {
   if (!addressCode) return false
   this.$http({
    method: 'get',
    url: this.API.addressCode + '/' + addressCode
   })
   .then(res => {
    let data = res.data.body
    if (!data) return
    if (data.provinceCode) {
     this.provinceCode = data.provinceCode
     this.fetchData(this.cityList, this.API.city, this.provinceCode)
    } else if (data.cityCode) {
     this.cityCode = data.cityCode
     this.fetchData(this.areaList, this.API.area, this.cityCode)
    } else if (data.areaCode) {
     this.areaCode = data.areaCode
    }
   })
   .finally(res => {
   })
  }
 },

 watch: {
  addressCode: {
   deep: true,
   immediate: true,
   handler (newVal) {
    if (newVal) {
     this.addressCodeToList(newVal)
    } else {
     this.$nextTick(() => {
      this.reset()
     })
    }
   }
  }
 }
}
</script>

<style lang="less" scoped>
</style>
实现效果如下(动图):

四、总结
两个组件都实现了双向绑定,根据场景不同可以使用不同的组件,如果读者有需求,根据自己的接口和场景进行修改即可。
当拓展至大洲-国家-省-市-区-街道等时,第一种级联选择器的方案就会暴露出拓展性较差的问题,随着层级加深,数据结构会变得复杂,而第二种方案明显可拓展性更强
赞 (0)

