Android自定义View实现箭头沿圆转动实例代码
具体代码如下所示:
//MyCircleView类
public class MyCircleView extends View{
 //当前画笔画圆的颜色
 private int CurrenCircleBoundColor;
 private Paint paint;
 ////从xml中获取的颜色
 private int circleBundColor;
 private float circleBoundWidth;
 private float pivotX;
 private float pivotY;
 private float radius=130;
 private float currentDegree=0;
 private int currentSpeed=1;
 private boolean isPause=false;
 public MyCircleView(Context context) {
  super(context);
  initView(context);
 }
 public MyCircleView(Context context, @Nullable AttributeSet attrs) {
  super(context, attrs);
  initView(context);
  TypedArray typedArray = context.obtainStyledAttributes(attrs, R.styleable.MyCircleView);
  for (int i = 0; i < typedArray.getIndexCount(); i++) {
   //就是我们自定义的属性的资源id
   int attr = typedArray.getIndex(i);
   switch (attr){
    case R.styleable.MyCircleView_circlr_bound_color:
     circleBundColor = typedArray.getColor(attr, Color.RED);
     CurrenCircleBoundColor=circleBundColor;
     break;
    case R.styleable.MyCircleView_circlr_bound_width:
     circleBoundWidth = typedArray.getDimension(attr, 3);
     break;
   }
  }
 }
 public MyCircleView(Context context, @Nullable AttributeSet attrs, int defStyleAttr) {
  super(context, attrs, defStyleAttr);
  initView(context);
 }
 private void initView(Context context){
  paint = new Paint();
 }
 public void setColor(int color){
  if (CurrenCircleBoundColor!=color){
   CurrenCircleBoundColor=color;
  }else {
   CurrenCircleBoundColor=circleBundColor;
  }
 }
 @Override
 protected void onDraw(Canvas canvas) {
  super.onDraw(canvas);
  paint.setAntiAlias(true);
  paint.setColor(CurrenCircleBoundColor);
  paint.setStrokeWidth(circleBoundWidth);
  paint.setStyle(Paint.Style.STROKE);
  pivotX = getWidth() / 2;
  pivotY = getHeight() / 2;
  canvas.drawCircle(pivotX,pivotY,radius,paint);
  canvas.save();
  //旋转画布 , 如果旋转的的度数大的话,视觉上看着是旋转快的
  canvas.rotate(currentDegree,pivotX,pivotY);
  //提供了一些api可以用来画线(画路径)
  Path path = new Path();
  //从哪开始画 从A开始画
  path.moveTo(pivotX+radius,pivotY);
  //从A点画一个直线到D点
  path.lineTo(pivotX+radius-20,pivotY-20);
  //从D点画一个直线到B点
  path.lineTo(pivotX+radius,pivotY+20);
  //从B点画一个直线到C点
  path.lineTo(pivotX+radius+20,pivotY-20);
  //闭合 -- 从C点画一个直线到A点
  path.close();
  paint.setStyle(Paint.Style.FILL);
  paint.setColor(Color.BLACK);
  canvas.drawPath(path,paint);
  canvas.restore();
  //旋转的度数一个一个度数增加, 如果乘以一个速度的话,按一个速度速度增加
  currentDegree+=1*currentSpeed;
  if (!isPause){
   invalidate();
  }
 }
 public void speed(){
  ++currentSpeed;
  if (currentSpeed>=10){
   currentSpeed=10;
   Toast.makeText(getContext(),"我比闪电还快",Toast.LENGTH_SHORT).show();
  }
 }
 public void slowDown(){
  --currentSpeed;
  if (currentSpeed<=1){
   currentSpeed=1;
  }
 }
 public void pauseOrStart(){
  //如果是开始状态的话去重新绘制
  if (isPause){
   isPause=!isPause;
   invalidate();
  }else {
   isPause=!isPause;
  }
 }
}
//主页面
public class MainActivity extends AppCompatActivity {
 //全局变量
 private MyCircleView my_view;
 @Override
 protected void onCreate(Bundle savedInstanceState) {
  super.onCreate(savedInstanceState);
  setContentView(R.layout.activity_main);
  //找控件
  my_view = (MyCircleView) findViewById(R.id.my_view);
 }
 public void onClick(View view){
  my_view.setColor(Color.BLUE);
 }
 public void add(View view){
  my_view.speed();
 }
 public void slow(View view){
  my_view.slowDown();
 }
 public void pauseOrStart(View view){
  my_view.pauseOrStart();
 }
}
主页面布局
<RelativeLayout
 xmlns:android="http://schemas.android.com/apk/res/android"
 xmlns:tools="http://schemas.android.com/tools"
 xmlns:app="http://schemas.android.com/apk/res-auto"
 android:layout_width="match_parent"
 android:layout_height="match_parent"
 tools:context="com.example.lx_20170928.MainActivity">
 <Button
  android:id="@+id/set_color_btn"
  android:layout_width="match_parent"
  android:layout_height="wrap_content"
  android:layout_centerHorizontal="true"
  android:onClick="onClick"
  android:text="设置颜色" />
 <Button
  android:id="@+id/add"
  android:layout_width="match_parent"
  android:layout_height="wrap_content"
  android:layout_below="@id/set_color_btn"
  android:layout_centerHorizontal="true"
  android:onClick="add"
  android:text="加速" />
 <Button
  android:id="@+id/slow"
  android:layout_width="match_parent"
  android:layout_height="wrap_content"
  android:layout_below="@+id/add"
  android:layout_centerHorizontal="true"
  android:onClick="slow"
  android:text="减速" />
 <Button
  android:id="@+id/pause_or_start"
  android:layout_width="match_parent"
  android:layout_height="wrap_content"
  android:layout_below="@+id/slow"
  android:layout_centerHorizontal="true"
  android:onClick="pauseOrStart"
  android:text="暂定/开始" />
  <com.example.lx_20170928.MyCircleView
   android:layout_width="wrap_content"
   android:layout_height="wrap_content"
   android:id="@+id/my_view"
   android:layout_centerInParent="true"
   app:circlr_bound_color="@color/colorAccent"
   app:circlr_bound_width="3dp"
   />
</RelativeLayout>
//在values建一个attrs.xml
<resources>
 <declare-styleable name="MyCustomCircleArrowView">
  <attr name="circlr_bound_width" format="dimension"></attr>
  <attr name="circlr_bound_color" format="color"></attr>
 </declare-styleable>
</resources>
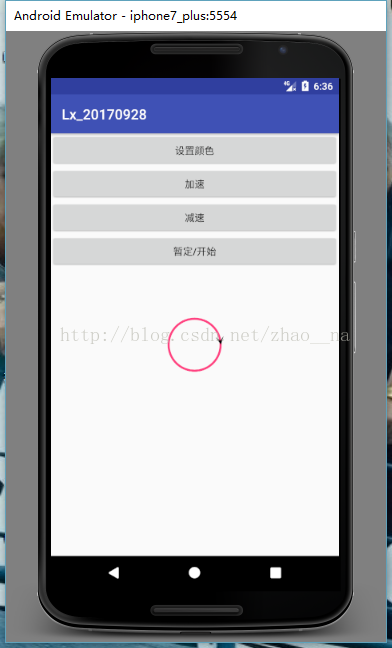
效果图如下所示:

总结
以上所述是小编给大家介绍的Android自定义View实现箭头沿圆转动实例代码,希望对大家有所帮助,如果大家有任何疑问请给我留言,小编会及时回复大家的。在此也非常感谢大家对我们网站的支持!
赞 (0)

