浮动AppBar中的textField焦点回滚问题解决
目录
- 完整问题描述
- 问题表现
- 初步探索
- 更好的解决办法
完整问题描述
SliverAppBar的floating=true,pinned=false模式中嵌套的TextField,会在获取焦点时触发CustomScrollView滚动到顶部。
问题表现
CustomScrollView和SliverAppBar的介绍和演示,参见官方文档。
在floating=true和pinned=false 这两个组合参数的模式下,SliverAppBar表现为:列表向上滑动时随列表向上滑动直至消失。
列表在任何位置向下滑动时,会立即从上方滑入直至全部展现。
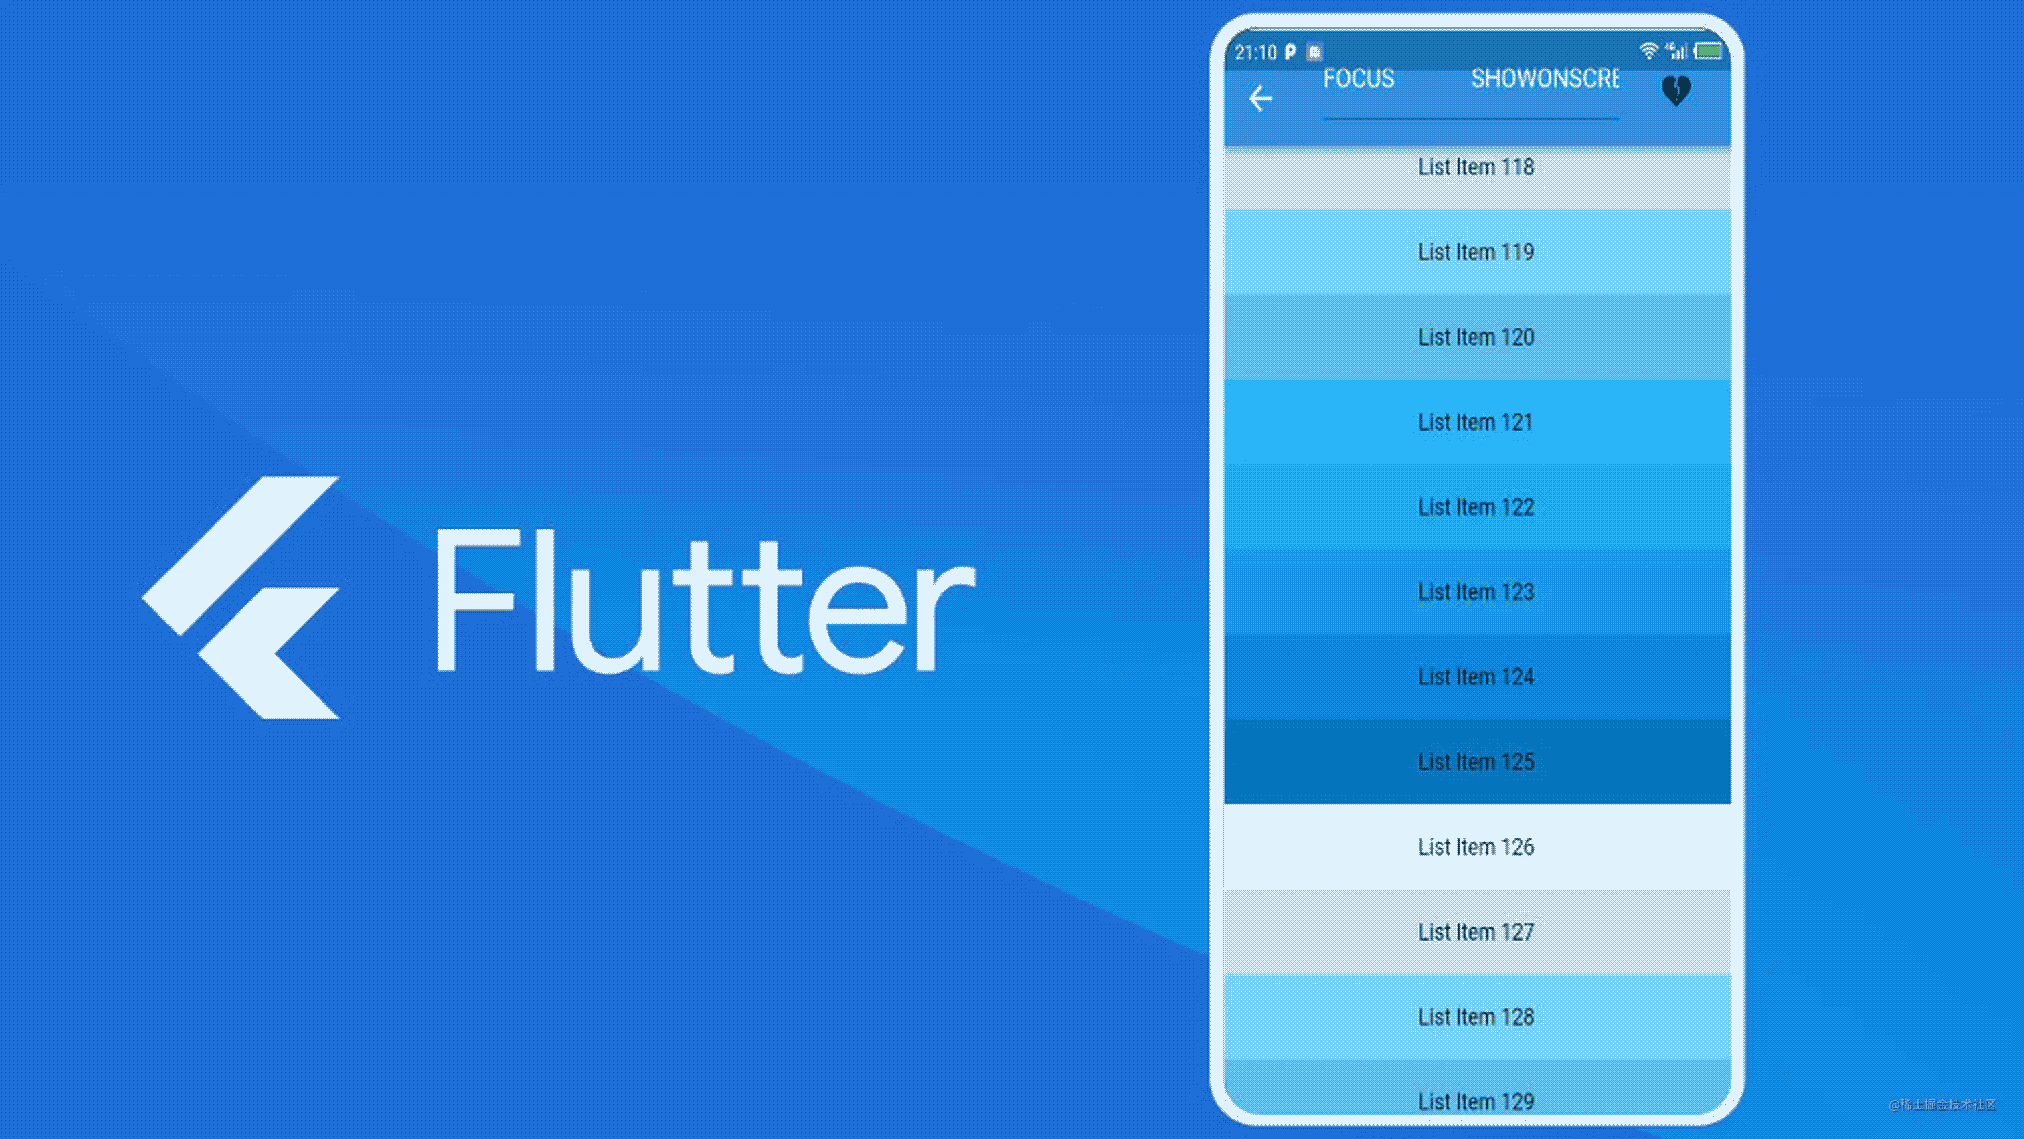
如果该组件内嵌套了TextField,在列表上滑一段距离,再下滑至SliverAppBar及其内嵌套的TextField出现时(此时列表尚未滑动到顶端),点击TextField使其获取焦点以输入文字,此时列表会立即滚动至顶。
如图:

初步探索
开始调试问题,尝试了各种参数组合,只要pinned为true就没有这个问题,因为SliverAppBar总会展现在最顶端。然后想到了在获取焦点的同时,将CustomScrollView的physics设置为 NeverScrollableScrollPhysics(意为禁止滚动),此时并不影响CustomScrollView的滚动位置,然后在输入完成或失去焦点时,再取消禁止滚动的状态,即可避免获取焦点时列表滚动至顶端的问题。解决代码如下:
class CustomScrollTextFieldPage extends StatefulWidget {
  const CustomScrollTextFieldPage({Key? key}) : super(key: key);
  @override
  State<CustomScrollTextFieldPage> createState() =>
      _CustomScrollTextFieldPageState();
}
class _CustomScrollTextFieldPageState extends State<CustomScrollTextFieldPage> {
  final textController = TextEditingController();
  final editableTextController = TextEditingController();
  bool focused = false;
  final focusNode = FocusNode();
  final buttonFocus = FocusNode();
  final textFocus = FocusNode();
  @override
  void initState() {
    super.initState();
    focusNode.addListener(_onFocus);
  }
  @override
  void dispose() {
    focusNode.removeListener(_onFocus);
    super.dispose();
  }
  _onFocus() {
    setState(() {
      focused = focusNode.hasFocus;
    });
  }
  @override
  Widget build(BuildContext context) {
    return Scaffold(
      body: GestureDetector(
        behavior: HitTestBehavior.translucent,
        onTapDown: () {
          FocusManager.instance.rootScope.requestFocus(FocusNode());
        },
        child: CustomScrollView(
          physics: focused ? const NeverScrollableScrollPhysics() : null,
          slivers: <Widget>[
            SliverAppBar(
              floating: true,
              pinned: false,
              expandedHeight: 250.0,
              flexibleSpace: FlexibleSpaceBar(
                expandedTitleScale: 1,
                title: Row(
                  crossAxisAlignment: CrossAxisAlignment.end,
                  children: [
                    Expanded(
                      child: TextField(
                        focusNode: focusNode,
                        controller: textController,
                        onEditingComplete: () {
                          FocusManager.instance.rootScope.requestFocus(FocusNode());
                        },
                        style: const TextStyle(color: Colors.white),
                        decoration: const InputDecoration(
                          border: UnderlineInputBorder(
                            borderSide: BorderSide(color: Colors.white),
                          ),
                          focusedBorder: UnderlineInputBorder(
                            borderSide: BorderSide(color: Colors.white),
                          ),
                        ),
                      ),
                    ),
                    Padding(
                      padding: EdgeInsets.symmetric(horizontal: 16),
                      child: IconButton(
                        visualDensity:
                            VisualDensity(horizontal: 0, vertical: -4),
                        padding: EdgeInsets.zero,
                        onPressed: () {
                          print('btn clicked');
                          buttonFocus.requestFocus();
                        },
                        focusNode: buttonFocus,
                        icon: Icon(Icons.heart_broken),
                      ),
                    )
                  ],
                ),
              ),
            ),
            SliverGrid(
              gridDelegate: const SliverGridDelegateWithMaxCrossAxisExtent(
                maxCrossAxisExtent: 200.0,
                mainAxisSpacing: 10.0,
                crossAxisSpacing: 10.0,
                childAspectRatio: 4.0,
              ),
              delegate: SliverChildBuilderDelegate(
                (BuildContext context, int index) {
                  return Container(
                    alignment: Alignment.center,
                    color: Colors.teal[100 * (index % 9)],
                    child: Text('Grid Item $index'),
                  );
                },
                childCount: 20,
              ),
            ),
            SliverFixedExtentList(
              itemExtent: 50.0,
              delegate: SliverChildBuilderDelegate(
                (BuildContext context, int index) {
                  return Container(
                    alignment: Alignment.center,
                    color: Colors.lightBlue[100 * (index % 9)],
                    child: Text('List Item $index'),
                  );
                },
              ),
            ),
          ],
        ),
      ),
    );
  }
}
这个解决方法有点不完美的表现,就是输入完成时不点击页面,而是直接点击收起键盘,这时不会触发onTapDown也不会触发 onEditingComplete ,就需要在屏幕再点击或者滑动时才能重置列表的可滚动状态。
更好的解决办法
经过进一步测试,发现在输入框内的EditableText中对focus进行了监听,在获取焦点时递归调用了RenderObject的showOnScreen方法,会一直向上追溯Render树,最终调用到RenderSliverList中,触发了滚动事件。
是不是可以在TextField外包裹一个自定义了RenderBox的组件,把这个showOnScreen调用给切断呢?于是翻了下官方的几个组件写法,照猫画虎写了个自定义的组件
class IgnoreShowOnScreenWidget extends SingleChildRenderObjectWidget {
  const IgnoreShowOnScreenWidget({
    Key? key,
    Widget? child,
    this.ignoreShowOnScreen = true,
  }) : super(key: key, child: child);
  final bool ignoreShowOnScreen;
  @override
  RenderObject createRenderObject(BuildContext context) {
    return IgnoreShowOnScreenRenderObject(
      ignoreShowOnScreen: ignoreShowOnScreen,
    );
  }
}
class IgnoreShowOnScreenRenderObject extends RenderProxyBox {
  IgnoreShowOnScreenRenderObject({
    RenderBox? child,
    this.ignoreShowOnScreen = true,
  });
  final bool ignoreShowOnScreen;
  @override
  void showOnScreen({
    RenderObject? descendant,
    Rect? rect,
    Duration duration = Duration.zero,
    Curve curve = Curves.ease,
  }) {
    if (!ignoreShowOnScreen) {
      return super.showOnScreen(
        descendant: descendant,
        rect: rect,
        duration: duration,
        curve: curve,
      );
    }
  }
}
使用方法
class CustomScrollTextFieldPage extends StatefulWidget {
  const CustomScrollTextFieldPage({Key? key}) : super(key: key);
  @override
  State<CustomScrollTextFieldPage> createState() =>
      _CustomScrollTextFieldPageState();
}
class _CustomScrollTextFieldPageState extends State<CustomScrollTextFieldPage> {
  final textController = TextEditingController();
  final focusNode = FocusNode();
  @override
  Widget build(BuildContext context) {
    return Scaffold(
      body: GestureDetector(
        behavior: HitTestBehavior.translucent,
        onTap: () {
          FocusManager.instance.rootScope.requestFocus(FocusNode());
        },
        child: CustomScrollView(
          slivers: <Widget>[
            SliverAppBar(
              floating: true,
              pinned: false,
              expandedHeight: 250.0,
              flexibleSpace: FlexibleSpaceBar(
                expandedTitleScale: 1,
                title: Row(
                  crossAxisAlignment: CrossAxisAlignment.end,
                  children: [
                    Expanded(
                      child: IgnoreShowOnScreenWidget(
                        child: TextField(
                          focusNode: focusNode ,
                          controller: textController ,
                          style: const TextStyle(color: Colors.white),
                          decoration: const InputDecoration(
                            border: UnderlineInputBorder(
                              borderSide: BorderSide(color: Colors.white),
                            ),
                            focusedBorder: UnderlineInputBorder(
                              borderSide: BorderSide(color: Colors.white),
                            ),
                          ),
                        ),
                      ),
                    ),
                    Padding(
                      padding: EdgeInsets.symmetric(horizontal: 16),
                      child: IconButton(
                        visualDensity:
                            VisualDensity(horizontal: 0, vertical: -4),
                        padding: EdgeInsets.zero,
                        onPressed: () {
                          print('btn clicked');
                        },
                        icon: Icon(Icons.heart_broken),
                      ),
                    )
                  ],
                ),
              ),
            ),
            SliverGrid(
              gridDelegate: const SliverGridDelegateWithMaxCrossAxisExtent(
                maxCrossAxisExtent: 200.0,
                mainAxisSpacing: 10.0,
                crossAxisSpacing: 10.0,
                childAspectRatio: 4.0,
              ),
              delegate: SliverChildBuilderDelegate(
                (BuildContext context, int index) {
                  return Container(
                    alignment: Alignment.center,
                    color: Colors.teal[100 * (index % 9)],
                    child: Text('Grid Item $index'),
                  );
                },
                childCount: 20,
              ),
            ),
            SliverFixedExtentList(
              itemExtent: 50.0,
              delegate: SliverChildBuilderDelegate(
                (BuildContext context, int index) {
                  return Container(
                    alignment: Alignment.center,
                    color: Colors.lightBlue[100 * (index % 9)],
                    child: Text('List Item $index'),
                  );
                },
              ),
            ),
          ],
        ),
      ),
    );
  }
}
初步尝试,确实可以更方便地解决问题。
效果如图:

目前还未发现有什么副作用,如果哪位大神有更好的解决办法,
以上就是浮动AppBar中的textField焦点回滚问题解决的详细内容,更多关于AppBar浮动textField焦点回滚的资料请关注我们其它相关文章!
相关推荐
-
flutter TextField换行自适应的实现
无论哪种界面框架输入文本框都是非常重要的控件, 但是发现flutter中的输入框TextField介绍的虽然多,但是各个属性怎么组合满足需要很多文章却说不清楚, 再加上控件版本变更频繁很多功能的介绍都是比较陈旧的属性.现在就需要一个类似微信的输入文本框, 这样一个非常实用的效果flutter要如何实现?前提是尽量用已有属性,少写或不写代码. 先明确这种输入文本框有哪些功能点? 能够自定义各种间距.主要是控件外边距(margin); 内间距(padding); 能够自定义样式. 输入框边框(圆角(
-

Flutter实现自定义搜索框AppBar的示例代码
目录 介绍 效果图 实现步骤 完整源码 总结 介绍 开发中,页面头部为搜索样式的设计非常常见,为了可以像系统AppBar那样使用,这篇文章记录下在Flutter中自定义一个通用的搜索框AppBar记录. 功能点: 搜索框.返回键.清除搜索内容功能.键盘处理. 效果图 实现步骤 首先我们先来看下AppBar的源码,实现了PreferredSizeWidget类,我们可以知道这个类主要是控制AppBar的高度的,Scaffold脚手架里的AppBar的参数类型就是PreferredSizeWidge
-
Flutter输入框TextField属性及监听事件介绍
textField用于文本输入,它提供了很多属性: const TextField({ ... TextEditingController controller, FocusNode focusNode, InputDecoration decoration = const InputDecoration(), TextInputType keyboardType, TextInputAction textInputAction, TextStyle style, TextAlign textA
-
flutter 输入框组件TextField的实现代码
TextField 顾名思义文本输入框,类似于iOS中的UITextField和Android中的EditText和Web中的TextInput.主要是为用户提供输入文本提供方便.相信大家在原生客户端上都用过这个功能,就不在做具体介绍了,接下来还是具体介绍下Flutter中TextField的用法. 以下内容已更新到 github TextField的构造方法: const TextField({ Key key, this.controller, //控制器,控制TextField文字 thi
-
flutter实现appbar下选项卡切换
本文实例为大家分享了flutter实现appbar下选项卡切换的具体代码,供大家参考,具体内容如下 TabBar .Tab.TabBarView 结合实现 这里实现的是appbar下的选项卡 import 'package:flutter/material.dart'; /** * 有状态StatefulWidget * 继承于 StatefulWidget,通过 State 的 build 方法去构建控件 */ class TabBarAndTopTab extends StatefulWid
-
Flutter自定义Appbar搜索框效果
本文实例为大家分享了Flutter自定义Appbar搜索框效果的具体代码,供大家参考,具体内容如下 首先看一下实现本次实现的效果. 本来想直接偷懒从flutter pub上找个能用的使用起来,但是看了下发现都与目前ui效果相差很大,于是乎决定自己实现一个.整体的话比较简单,本来也是为了练手而做的. 为了方便处理statusbar的高度适配,于是乎直接依托于Appbar进行了实现,这样就可以不用处理状态栏适配了. class _HotWidgetState extends State<HotWid
-
浮动AppBar中的textField焦点回滚问题解决
目录 完整问题描述 问题表现 初步探索 更好的解决办法 完整问题描述 SliverAppBar的floating=true,pinned=false模式中嵌套的TextField,会在获取焦点时触发CustomScrollView滚动到顶部. 问题表现 CustomScrollView和SliverAppBar的介绍和演示,参见官方文档. 在floating=true和pinned=false 这两个组合参数的模式下,SliverAppBar表现为:列表向上滑动时随列表向上滑动直至消失. 列表在
-
完美解决Spring声明式事务不回滚的问题
疑问,确实像往常一样在service上添加了注解 @Transactional,为什么查询数据库时还是发现有数据不一致的情况,想想肯定是事务没起作用,出现异常的时候数据没有回滚.于是就对相关代码进行了一番测试,结果发现一下踩进了两个坑,确实是事务未回滚导致的数据不一致. 下面总结一下经验教训: Spring事务的管理操作方法 编程式的事务管理 实际应用中很少使用 通过使用TransactionTemplate 手动管理事务 声明式的事务管理 开发中推荐使用(代码侵入最少) Spring的声明式事
-
在Java的JDBC使用中设置事务回滚的保存点的方法
新的JDBC3.0保存点的接口提供了额外的事务控制.他们的环境中,如Oracle的PL/ SQL中的大多数现代的DBMS支持保存点. 当设置一个保存点在事务中定义一个逻辑回滚点.如果发生错误,过去一个保存点,则可以使用rollback方法来撤消要么所有的改变或仅保存点之后所做的更改. Connection对象有两个新的方法,可帮助管理保存点: setSavepoint(String savepointName): 定义了一个新的保存点.它也返回一个Savepoint 对象. releaseSav
-
PyCharm代码回滚,恢复历史版本的解决方法
当我们修改一份代码的时候,也许会碰到修改后的代码还不如修改之前的代码能够满足自己的需求,那么这个时候我们就需要对代码进行回滚,下面我们来看一下在PyCharm里面如何操作. 首先在我们需要回滚的py文件的空白处右键点击,然后在弹出的选项卡中选择Local History>>Show History,如图所示: 然后弹出如下图所示的对话框,对话框中包含三栏,左侧是代码的各个历史版本,中间一栏是在左侧栏中被选中的某个历史版本,最右侧一栏是代码的当前版本. 代码的回滚只需在左侧栏中右键选中要回滚的版
-
SpringBoot事务使用及回滚实现代码详解
Springboot中事务的使用: 1.启动类加上@EnableTransactionManagement注解,开启事务支持(其实默认是开启的). 2.在使用事务的public(只有public支持事务)方法(或者类-相当于该类的所有public方法都使用)加上@Transactional注解. 在实际使用中一般是在service中使用@Transactional,那么对于controller->service流程中: 如果controller未开启事务,service中开始了事务,servic
-
详解Spring事务回滚和事务提交
事务回滚 回滚逻辑如下: 判断是否存在事务,只有存在事务才执行回滚 根据异常类型判断是否回滚.如果异常类型不符合,仍然会提交事务 回滚处理 详细解析 判断是否存在事务,只有存在事务才执行回滚,即是否有@Transactional事务注解或相关事务切面 根据异常类型判断是否回滚.如果异常类型不符合,仍然会提交事务 根据@Transactional注解中rollbackFor.rollbackForClassName.noRollbackForClassName配置的值,找到最符合ex的异常类型,如
-
一文搞懂MySQL持久化和回滚的原理
目录 redo log 为什么要先更新内存数据,不直接更新磁盘数据? 为什么需要redo log? redo log是如何实现的? 为什么一个block设计成512字节? 为什么要两段式提交? crash后是如何恢复的? undo log 什么情况下会生成undo log? undo log是如何回滚的? undo log存在什么地方? redo log 事务的支持是数据库区分文件系统的重要特征之一,事务的四大特性: 原子性:所有的操作要么都做,要么都不做,不可分割. 一致性:数据库从一种状态变
-
spring声明式事务 @Transactional 不回滚的多种情况以及解决方案
目录 一. spring 事务原理 问题一.@Transactional 应该加到什么地方,如果加到Controller会回滚吗? 问题二. @Transactional 注解中用不用加rollbackFor = Exception.class 这个属性值 问题三:事务调用嵌套问题具体结果如下代码: 四.总结 五. 参考链接 本文是基于springboot完成测试测试代码地址如下: https://github.com/Dr-Water/springboot-action/tree/master
-
使用IDEA回滚某次提交的代码步骤
直接看如下图解 1.右击项目,查看提交历史 2.选择要回滚的版本,点击回滚 3.push回滚的内容:双击该回滚记录,弹出后,检查一下回滚的内容,没问题就直接点击push按钮即可 Undo Commit 已经Commit但是还未push的代码,不回滚你所修改的代码,换言之,撤销你的Commit动作. Revert Commit 会新增一个 Revert “xxx Commit”的Commit记录,并将"xxx Commit"中的代码全部回滚. 如果是已经push到远端的Commit,Re
-
SQL Server中TRUNCATE事务回滚操作方法
我们一般都认为TRUNCATE是一种不可回滚的操作,它会删除表中的所有数据以及重置Identity列. 如果你在事务中进行TRUNCATE操作,就能回滚.反之,它就不会从日志文件文件恢复数据.它不会在日志文件中记录删除的那些数据,它只在日志中记录数据页的单元分配. 下面的例子就能解释上面的所说的. 复制代码 代码如下: USE temp_test_database GO --创建一个临时表 CREATE TABLE TruncateTabel(ID INT) INSERT INTO