Android实现MVVM架构数据刷新详解流程
目录
- 效果图
- 示例结构图
- 代码解析
- 导入dataBinding
- 实体类
- xml视图
- VM
- 绑定视图与数据层
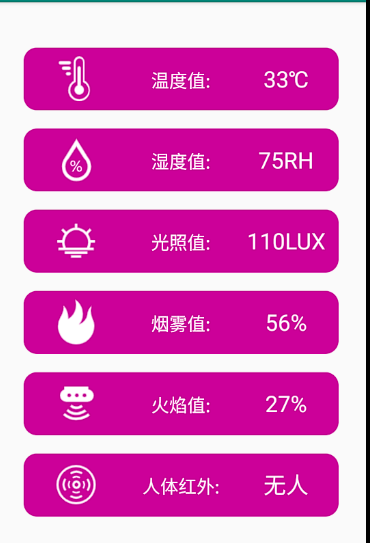
效果图
示例结构图

代码解析
导入dataBinding
 dataBinding{
            enabled = true
        }
实体类
继承BaseObservable
public class Sensor extends BaseObservable
为字段添加@Bindable
 @Bindable
    public String getTmpValue() {
        return tmpValue;
    }
显示图片
图片添加@BindingAdapter
@BindingAdapter( "tmpImage" )
示例采用本地图片,没有采用网络图片
@BindingAdapter( "tmpImage" )
    public static void setTmpImage(ImageView view, int tmpImage) {
        view.setImageDrawable( view.getContext().getResources().getDrawable( tmpImage ) );
    }
为图片路径绑定字段
@Bindable
    public int getTmpImage() {
        return tmpImage;
    }
绑定实体类
<layout
    xmlns:android="http://schemas.android.com/apk/res/android"
    xmlns:app="http://schemas.android.com/apk/res-auto"
    xmlns:tools="http://schemas.android.com/tools">

    <data>
        <variable
            name="viewmodel"
            type="com.franzliszt.refreshdata.viewmodel.ViewModel" />
    </data>
    <layout/>
根据设置@BindingAdapter( “tmpImage” )设置里的内容,设置属性
<ImageView
    android:layout_width="0dp"
    android:layout_weight="1"
    android:layout_height="50dp"
    tmpImage="@{viewmodel.sensor.tmpImage}"
    android:scaleType="fitCenter"/>
实体类全部代码
public class Sensor extends BaseObservable {
    private String tmpValue;
    private String humValue;
    private String lightValue;
    private String humanValue;
    private String smokeValue;
    private String fireValue;
    private int tmpImage;
    private int humImage;
    private int lightImage;
    private int humanImage;
    private int smokeImage;
    private int fireImage;
    public Sensor(){

    }
    public Sensor(int tmpImage,int humImage,int lightImage,int humanImage,int smokeImage,int fireImage){
        this.tmpImage = tmpImage;
        this.humImage = humImage;
        this.lightImage = lightImage;
        this.humanImage = humanImage;
        this.smokeImage = smokeImage;
        this.fireImage = fireImage;
    }
    @Bindable
    public String getTmpValue() {
        return tmpValue;
    }

    public void setTmpValue(String tmpValue) {
        this.tmpValue = tmpValue;
        notifyPropertyChanged( BR.tmpValue );
    }
    @Bindable
    public String getHumValue() {
        return humValue;
    }

    public void setHumValue(String humValue) {
        this.humValue = humValue;
        notifyPropertyChanged( BR.humValue );
    }
    @Bindable
    public String getLightValue() {
        return lightValue;
    }

    public void setLightValue(String lightValue) {
        this.lightValue = lightValue;
        notifyPropertyChanged( BR.lightValue );
    }
    @Bindable
    public String getHumanValue() {
        return humanValue;
    }

    public void setHumanValue(String humanValue) {
        this.humanValue = humanValue;
        notifyPropertyChanged( BR.humanValue );
    }
    @Bindable
    public String getSmokeValue() {
        return smokeValue;
    }

    public void setSmokeValue(String smokeValue) {
        this.smokeValue = smokeValue;
        notifyPropertyChanged( BR.smokeValue );
    }
    @Bindable
    public String getFireValue() {
        return fireValue;
    }

    public void setFireValue(String fireValue) {
        this.fireValue = fireValue;
        notifyPropertyChanged( BR.fireValue );
    }
    @Bindable
    public int getTmpImage() {
        return tmpImage;
    }
    @BindingAdapter( "tmpImage" )
    public static void setTmpImage(ImageView view, int tmpImage) {
        view.setImageDrawable( view.getContext().getResources().getDrawable( tmpImage ) );
    }
    @Bindable
    public int getLightImage() {
        return lightImage;
    }
    @BindingAdapter( "lightImage" )
    public static void setLightImage(ImageView view,int lightImage) {
        view.setImageDrawable( view.getContext().getResources().getDrawable( lightImage ) );
    }
    @Bindable
    public int getHumanImage() {
        return humanImage;
    }
    @BindingAdapter( "humanImage" )
    public static void setHumanImage(ImageView view,int humanImage) {
        view.setImageDrawable( view.getContext().getResources().getDrawable( humanImage ) );
    }
    @Bindable
    public int getSmokeImage() {
        return smokeImage;
    }
    @BindingAdapter( "smokeImage" )
    public static void setSmokeImage(ImageView view,int smokeImage) {
        view.setImageDrawable( view.getContext().getResources().getDrawable( smokeImage ) );
    }
    @Bindable
    public int getFireImage() {
        return fireImage;
    }
    @BindingAdapter( "fireImage" )
    public static void setFireImage(ImageView view,int fireImage) {
        view.setImageDrawable( view.getContext().getResources().getDrawable( fireImage ) );
    }
    @Bindable
    public int getHumImage() {
        return humImage;
    }
    @BindingAdapter( "humImage" )
    public static void setHumImage(ImageView view,int humImage) {
        view.setImageDrawable( view.getContext().getResources().getDrawable( humImage ) );
    }
}
xml视图
<?xml version="1.0" encoding="utf-8"?>
<layout
    xmlns:android="http://schemas.android.com/apk/res/android"
    xmlns:app="http://schemas.android.com/apk/res-auto"
    xmlns:tools="http://schemas.android.com/tools">

    <data>
        <variable
            name="viewmodel"
            type="com.franzliszt.refreshdata.viewmodel.ViewModel" />
    </data>
<LinearLayout
    android:layout_width="match_parent"
    android:layout_height="match_parent"
    android:orientation="vertical"
    tools:context=".view.MainActivity"
    android:layout_margin="30dp">

<LinearLayout
    android:layout_width="match_parent"
    android:layout_height="0dp"
    android:layout_weight="1"
    android:background="@drawable/item_bg_style"
    android:layout_marginTop="20dp"
    android:paddingTop="10dp">
<ImageView
    android:layout_width="0dp"
    android:layout_weight="1"
    android:layout_height="50dp"
    tmpImage="@{viewmodel.sensor.tmpImage}"
    android:scaleType="fitCenter"/>
   <TextView
       android:layout_width="0dp"
       android:layout_weight="1"
       android:layout_height="50dp"
       android:text="温度值:"
       android:textColor="#ffffff"
       android:textSize="20sp"
       android:gravity="center"/>
    <TextView
        android:layout_width="0dp"
        android:layout_weight="1"
        android:layout_height="50dp"
        android:text="@{viewmodel.sensor.tmpValue}"
        android:textColor="#ffffff"
        android:textSize="25sp"
        android:gravity="center"/>
</LinearLayout>
        <LinearLayout
            android:layout_width="match_parent"
            android:layout_height="0dp"
            android:layout_weight="1"
            android:background="@drawable/item_bg_style"
            android:layout_marginTop="20dp"
            android:paddingTop="10dp">
            <ImageView
                android:layout_width="0dp"
                android:layout_weight="1"
                android:layout_height="50dp"
                humImage="@{viewmodel.sensor.humImage}"
                android:scaleType="fitCenter"/>
            <TextView
                android:layout_width="0dp"
                android:layout_weight="1"
                android:layout_height="50dp"
                android:text="湿度值:"
                android:textColor="#ffffff"
                android:textSize="20sp"
                android:gravity="center"/>
            <TextView
                android:layout_width="0dp"
                android:layout_weight="1"
                android:layout_height="50dp"
                android:text="@{viewmodel.sensor.humValue}"
                android:textColor="#ffffff"
                android:textSize="25sp"
                android:gravity="center"/>
        </LinearLayout>
    <LinearLayout
        android:layout_width="match_parent"
        android:layout_height="0dp"
        android:layout_weight="1"
        android:background="@drawable/item_bg_style"
        android:layout_marginTop="20dp"
        android:paddingTop="10dp">
        <ImageView
            android:layout_width="0dp"
            android:layout_weight="1"
            android:layout_height="50dp"
            lightImage="@{viewmodel.sensor.lightImage}"
            android:scaleType="fitCenter"/>
        <TextView
            android:layout_width="0dp"
            android:layout_weight="1"
            android:layout_height="50dp"
            android:text="光照值:"
            android:textColor="#ffffff"
            android:textSize="20sp"
            android:gravity="center"/>
        <TextView
            android:layout_width="0dp"
            android:layout_weight="1"
            android:layout_height="50dp"
            android:text="@{viewmodel.sensor.lightValue}"
            android:textColor="#ffffff"
            android:textSize="25sp"
            android:gravity="center"/>
    </LinearLayout>
    <LinearLayout
        android:layout_width="match_parent"
        android:layout_height="0dp"
        android:layout_weight="1"
        android:background="@drawable/item_bg_style"
        android:layout_marginTop="20dp"
        android:paddingTop="10dp">
        <ImageView
            android:layout_width="0dp"
            android:layout_weight="1"
            android:layout_height="50dp"
            smokeImage="@{viewmodel.sensor.smokeImage}"
            android:scaleType="fitCenter"/>
        <TextView
            android:layout_width="0dp"
            android:layout_weight="1"
            android:layout_height="50dp"
            android:text="烟雾值:"
            android:textColor="#ffffff"
            android:textSize="20sp"
            android:gravity="center"/>
        <TextView
            android:layout_width="0dp"
            android:layout_weight="1"
            android:layout_height="50dp"
            android:text="@{viewmodel.sensor.smokeValue}"
            android:textColor="#ffffff"
            android:textSize="25sp"
            android:gravity="center"/>
    </LinearLayout>
    <LinearLayout
        android:layout_width="match_parent"
        android:layout_height="0dp"
        android:layout_weight="1"
        android:background="@drawable/item_bg_style"
        android:layout_marginTop="20dp"
        android:paddingTop="10dp">
        <ImageView
            android:layout_width="0dp"
            android:layout_weight="1"
            android:layout_height="50dp"
            fireImage="@{viewmodel.sensor.fireImage}"
            android:scaleType="fitCenter"/>
        <TextView
            android:layout_width="0dp"
            android:layout_weight="1"
            android:layout_height="50dp"
            android:text="火焰值:"
            android:textColor="#ffffff"
            android:textSize="20sp"
            android:gravity="center"/>
        <TextView
            android:layout_width="0dp"
            android:layout_weight="1"
            android:layout_height="50dp"
            android:text="@{viewmodel.sensor.fireValue}"
            android:textColor="#ffffff"
            android:textSize="25sp"
            android:gravity="center"/>
    </LinearLayout>
    <LinearLayout
        android:layout_width="match_parent"
        android:layout_height="0dp"
        android:layout_weight="1"
        android:background="@drawable/item_bg_style"
        android:layout_marginTop="20dp"
        android:paddingTop="10dp">
        <ImageView
            android:layout_width="0dp"
            android:layout_weight="1"
            android:layout_height="50dp"
            humanImage="@{viewmodel.sensor.humanImage}"
            android:scaleType="fitCenter"/>
        <TextView
            android:layout_width="0dp"
            android:layout_weight="1"
            android:layout_height="50dp"
            android:text="人体红外:"
            android:textColor="#ffffff"
            android:textSize="20sp"
            android:gravity="center"/>
        <TextView
            android:layout_width="0dp"
            android:layout_weight="1"
            android:layout_height="50dp"
            android:text="@{viewmodel.sensor.humanValue}"
            android:textColor="#ffffff"
            android:textSize="25sp"
            android:gravity="center"/>
    </LinearLayout>
    </LinearLayout>
</layout>
VM
接收数据
调用Handle类的接口,接收传感器数据(随机数据)
  private void InitData(){
       handle.setHandleDta( new Handle.HandleData() {
           @Override
           public void getSensorValue(int[] value) {
                 new Thread( ()->{
                  while (true){
                      try {
                          Thread.sleep( 5000 );
                      } catch (InterruptedException e) {
                          e.printStackTrace();
                      }
                      sensor.setTmpValue( value[0]+"℃");
                      sensor.setHumValue( value[1]+"RH" );
                      sensor.setLightValue( value[2]+"LUX" );
                      sensor.setSmokeValue( value[3]+"%" );
                      sensor.setFireValue( value[4]+"%" );
                      sensor.setHumanValue( value[5] == 1 ? "有人" : "无人" );
                  }
              } ).start();
          }
      });
  }
发送数据
建立接口,回调数据
  public interface HandleData{
        void getSensorValue(int[] value);
    }
    public void setHandleDta(HandleData handleDta){
        int[] value = ReturnData();
        handleDta.getSensorValue(value);
    }
制造数据
private void RefreshSensorValue(){
          thread = new Thread( ()->{
            while (true){
                try {
                    Thread.sleep( 2000 );
                } catch (InterruptedException e) {
                    e.printStackTrace();
                }
                /*温度*/
                value[0] = RandomRange(35,30);
                /*湿度*/
                value[1] = RandomRange(80,75);
                /*光照值*/
                value[2] = RandomRange(120,100);
                /*烟雾*/
                value[3] = RandomRange(60,50);
                /*火焰*/
                value[4] = RandomRange(30,25);
                /*红外*/
                value[5] = RandomRange(2,0);
                Log.d( "TAG",value[5]+"" );
            }
        } );
        thread.start();
    }
绑定视图与数据层
public class MainActivity extends AppCompatActivity {
    private ActivityMainBinding binding;

    @Override
    protected void onCreate(Bundle savedInstanceState) {
        super.onCreate( savedInstanceState );
        binding = DataBindingUtil.setContentView( this,R.layout.activity_main );
        binding.setViewmodel( new ViewModel() );
    }
}
到此这篇关于Android实现MVVM架构数据刷新详解流程的文章就介绍到这了,更多相关Android 数据刷新内容请搜索我们以前的文章或继续浏览下面的相关文章希望大家以后多多支持我们!
相关推荐
-

Android mvvm之LiveData原理案例详解
1. 生命周期感知 1.1 生命周期感知组件 我们知道,Controller(Activity or Fragment) 都是有生命周期的,但是传统的 Controller 实现方式只负责 Controller 本身的生命周期管理,而与业务层的数据之间并没有实现良好解耦的生命周期事件交换.所以业务层都需要自己主动去感知 Controller 生命周期的变化,并在 Controller 的生存期处理数据的保活,而在消亡时刻解除与 Controller 之间的关系,这种处理方式随着业务规模的扩大往往
-
详解Android框架MVVM分析以及使用
Android MVVM 分析以及使用 首先我们需要知道什么是MVVM,他的功能和优点,以及他的缺点. MVVM是Model-View-ViewModel的简写.它本质上就是MVC 的改进版.MVVM 就是将其中的View 的状态和行为抽象化,让我们将视图 UI 和业务逻辑分开.当然这些事 ViewModel 已经帮我们做了,它可以取出 Model 的数据同时帮忙处理 View 中由于需要展示内容而涉及的业务逻辑.微软的WPF带来了新的技术体验,如Silverlight.音频.视频.3D.动画-
-
详解Android的MVVM框架 - 数据绑定
本教程是跟着 Data Binding Guide学习过程中得出的一些实践经验,同时修改了官方教程的一些错误,每一个知识点都有对应的源码,争取做到实践与理论相结合. Data Binding 解决了 Android UI 编程中的一个痛点,官方原生支持 MVVM 模型可以让我们在不改变既有代码框架的前提下,非常容易地使用这些新特性.其实在此之前,已经有些第三方的框架可以支持 MVVM 模型,无耐由于框架的侵入性太强,导致一直没有流行起来. 准备 Android Studio 更新到 1.3 版
-
Android单项绑定MVVM项目模板的方法
0.前言 事情还要从上周和同事的小聚说起,同事说他们公司现在app的架构模式用的是MVP模式,但是并没有通过泛型和继承等一些列手段强制使用,全靠开发者在Activity或者Fragment里new一个presenter来做处理,说白了,全靠开发者自觉.这引发了我的一个思考,程序的架构或者设计模式的作用,除了传统的做到低耦合高内聚,业务分离,我觉得还有一个更重要的一点就是用来约束开发者,虽然使用某种模式或者架构可能并不会节省代码量,有的甚至会增加编码工作,但是让开发者在一定规则内进行开发,保证一个
-
Android实现MVVM架构数据刷新详解流程
目录 效果图 示例结构图 代码解析 导入dataBinding 实体类 xml视图 VM 绑定视图与数据层 效果图 示例结构图 代码解析 导入dataBinding dataBinding{ enabled = true } 实体类 继承BaseObservable public class Sensor extends BaseObservable 为字段添加@Bindable @Bindable public String getTmpValue() { return tmpValue; }
-
Android自定义View实现体重表盘详解流程
目录 效果视频 分析 起始角度 圆弧 指针 代码 初始化属性 画布 绘制内圆弧 绘制外圆弧 绘制中间指针 绘制中间文字 绘制左右两边文字 动画 全部代码 下载链接 效果视频 分析 起始角度 如下图所示,起点角度为150,终点角度为240 圆弧 白色圆弧为整个圆弧范围,蓝色圆弧为根据数据变动而覆盖白色圆弧,蓝色圆弧比白色圆弧大一点,突出显示 InnerArcPaint.setStrokeWidth( Width * (float)0.1 ); OuterArcPaint.setStrokeWidt
-
Android Canvas和Bitmap结合绘图详解流程
目录 Rect/RectF Matrix Canvas Bitmap Rect/RectF 存储四个值的矩形类:左侧.顶部.右侧和底部.可用于直接在画布上绘制或仅用于存储要绘制的对象的大小.Rect和RectF类之间的区别在于 RectF 存储浮点值,而Rect类存储整数. private static Bitmap createDrawableBitmap(Drawable drawable) { int width = drawable.getIntrinsicWidth(); int he
-
Android MVVM架构实现RecyclerView列表详解流程
目录 效果图 导入引用 导入Recyclerview依赖 导入dataBinding引用 代码解析 建立实体类 建立RecyclerView子项 适配器 建立适配器 设置子项点击事件 adapter全部代码 建立VM层 子项点击事件的使用 VM层代码 数据与视图交互 效果图 导入引用 导入Recyclerview依赖 implementation 'androidx.recyclerview:recyclerview:1.1.0' 导入dataBinding引用 dataBinding { en
-
Android架构发展进化详解
目录 一.MVC架构 1.概述 2.例子 二.MVP架构 1.概述 2.例子 三.MVVM架构 1.概述 2.例子 四.Clean架构 1.概述 2.例子 五.MVI架构 1.概述 2.例子 六.总结 1.从MVC架构到MVI架构 2.从clean code到clean coder 3.MVI架构之后 一.MVC架构 1.概述 MVC架构是第一个应用于Android开发的成熟架构,由Model.View.Controller三部分组成: Model:负责数据的存储及相关逻辑. View:负责界面
-
Android Jetpack架构组件 ViewModel详解
前言 前面两篇文章我们已经学习了Lifecycle和DataBind,本篇文章我们来学习Jetpack系列中比较重要的ViewModel,Jetpack的很多很多组件都是搭配使用的,所以单独的知识点可能会有些"无意义"但却是我们项目实战的基础! ViewModel的使用 ViewModel类旨在以注重生命周期的方式存储和管理界面相关的数据.ViewModel类让数据可在发生屏幕旋转等配置更改后继续存在.这句话很好理解,还记得我们在讲解Lifecycle的时候 举的例子吗,我们还是使用那
-
Android实现动态添加数据与堆叠折线图详解流程
目录 效果视频 引用 描述 导包 代码分析 初始化 动态添加数据 温度数据 湿度数据 光照数据 动态添加X轴时间值 初始化 自动刷新时间实现 尾言 效果视频 引用 描述 本示例采用的是非常.非常.非常好用的一款第三方SDK--helloCharts 传送门 导包 第一步 :导入maven maven { url 'https://jitpack.io' } 第二步:导入依赖 implementation 'com.github.lecho:hellocharts-library:1.5.8@aa
-
Android json数据解析详解及实例代码
Android json数据解析详解 移动开发经常要与服务器数据交互,也常使用json数据格式,那就说说Android json解析. 1.最简单json格式解析如下: //解析json ry { JSONTokener jsonParser = new JSONTokener(strResult); JSONObject jsonObj = (JSONObject) jsonParser.nextValue(); String strsportsTitle = jsonObj.getStri
-
Android Jetpack架构组件Lifecycle详解
前言 Lifecycle是Jetpack架构组件中用来感知生命周期的组件,使用Lifecycles可以帮助我们写出和生命周期相关更简洁更易维护的代码. 生命周期 生命周期这个简单而又重要的知识相信大家早已耳熟能详.假设我们现在有这样一个简单需求: 这个需求只是一个实例,在真实的开发中当然不可能有这样的需要: 在Activity 可见的时候,我们去做一个计数功能,每隔一秒 将计数加1 ,当Activity不可见的时候停止计数,当Activity被销毁的时候 将计数置为0 OK,So easy~ ,
-
InnoDb 体系架构和特性详解 (Innodb存储引擎读书笔记总结)
后台线程 •Master Thread 核心后台线程,主要负责将缓冲池的数据异步刷新到磁盘.例如脏页的刷新,插入缓冲的合并,undo 页的回收等. 每秒一次的操作: 1.日志缓冲刷新到磁盘,即使该事务还没有提交.该操作总是会发生,这个就是为了再大的事务,提交时间都很短. 2.当IO压力很小时(1s内发生的IO次数小于5% innodb_io_capacity)合并5% innodb_io_capacity 的插入缓冲. 3.当脏页比例大于 innodb_max_dirty_pages_cnt,