基于BCEWithLogitsLoss样本不均衡的处理方案
最近在做deepfake检测任务(可以将其视为二分类问题,label为1和0),遇到了正负样本不均衡的问题,正样本数目是负样本的5倍,这样会导致FP率较高。
尝试将正样本的loss权重增高,看BCEWithLogitsLoss的源码
Examples::

    >>> target = torch.ones([10, 64], dtype=torch.float32)  # 64 classes, batch size = 10
    >>> output = torch.full([10, 64], 0.999)  # A prediction (logit)
    >>> pos_weight = torch.ones([64])  # All weights are equal to 1
    >>> criterion = torch.nn.BCEWithLogitsLoss(pos_weight=pos_weight)
    >>> criterion(output, target)  # -log(sigmoid(0.999))
    tensor(0.3135)

Args:
    weight (Tensor, optional): a manual rescaling weight given to the loss
        of each batch element. If given, has to be a Tensor of size `nbatch`.
    size_average (bool, optional): Deprecated (see :attr:`reduction`). By default,
        the losses are averaged over each loss element in the batch. Note that for
        some losses, there are multiple elements per sample. If the field :attr:`size_average`
        is set to ``False``, the losses are instead summed for each minibatch. Ignored
        when reduce is ``False``. Default: ``True``
    reduce (bool, optional): Deprecated (see :attr:`reduction`). By default, the
        losses are averaged or summed over observations for each minibatch depending
        on :attr:`size_average`. When :attr:`reduce` is ``False``, returns a loss per
        batch element instead and ignores :attr:`size_average`. Default: ``True``
    reduction (string, optional): Specifies the reduction to apply to the output:
        ``'none'`` | ``'mean'`` | ``'sum'``. ``'none'``: no reduction will be applied,
        ``'mean'``: the sum of the output will be divided by the number of
        elements in the output, ``'sum'``: the output will be summed. Note: :attr:`size_average`
        and :attr:`reduce` are in the process of being deprecated, and in the meantime,
        specifying either of those two args will override :attr:`reduction`. Default: ``'mean'``
    pos_weight (Tensor, optional): a weight of positive examples.
            Must be a vector with length equal to the number of classes.
对其中的参数pos_weight的使用存在疑惑,BCEloss里的例子pos_weight = torch.ones([64]) # All weights are equal to 1,不懂为什么会有64个class,因为BCEloss是针对二分类问题的loss,后经过检索,得知还有多标签分类,
多标签分类就是多个标签,每个标签有两个label(0和1),这类任务同样可以使用BCEloss。

现在讲一下BCEWithLogitsLoss里的pos_weight使用方法
比如我们有正负两类样本,正样本数量为100个,负样本为400个,我们想要对正负样本的loss进行加权处理,将正样本的loss权重放大4倍,通过这样的方式缓解样本不均衡问题。
criterion = nn.BCEWithLogitsLoss(pos_weight=torch.tensor([4]))

# pos_weight (Tensor, optional): a weight of positive examples.
#            Must be a vector with length equal to the number of classes.
pos_weight里是一个tensor列表,需要和标签个数相同,比如我们现在是二分类,只需要将正样本loss的权重写上即可。
如果是多标签分类,有64个标签,则
Examples::

    >>> target = torch.ones([10, 64], dtype=torch.float32)  # 64 classes, batch size = 10
    >>> output = torch.full([10, 64], 0.999)  # A prediction (logit)
    >>> pos_weight = torch.ones([64])  # All weights are equal to 1
    >>> criterion = torch.nn.BCEWithLogitsLoss(pos_weight=pos_weight)
    >>> criterion(output, target)  # -log(sigmoid(0.999))
    tensor(0.3135)
补充:Pytorch —— BCEWithLogitsLoss()的一些问题
一、等价表达
1、pytorch:
torch.sigmoid() + torch.nn.BCELoss()
2、自己编写
def ce_loss(y_pred, y_train, alpha=1):

    p = torch.sigmoid(y_pred)
    # p = torch.clamp(p, min=1e-9, max=0.99)
    loss = torch.sum(- alpha * torch.log(p) * y_train \
           - torch.log(1 - p) * (1 - y_train))/len(y_train)
    return loss~
3、验证
import torch
import torch.nn as nn
torch.cuda.manual_seed(300)       # 为当前GPU设置随机种子
torch.manual_seed(300)            # 为CPU设置随机种子
def ce_loss(y_pred, y_train, alpha=1):
   # 计算loss
   p = torch.sigmoid(y_pred)
   # p = torch.clamp(p, min=1e-9, max=0.99)
   loss = torch.sum(- alpha * torch.log(p) * y_train \
          - torch.log(1 - p) * (1 - y_train))/len(y_train)
   return loss
py_lossFun = nn.BCEWithLogitsLoss()
input = torch.randn((10000,1), requires_grad=True)
target = torch.ones((10000,1))
target.requires_grad_(True)
py_loss = py_lossFun(input, target)
py_loss.backward()
print("*********BCEWithLogitsLoss***********")
print("loss: ")
print(py_loss.item())
print("梯度: ")
print(input.grad)
input = input.detach()
input.requires_grad_(True)
self_loss = ce_loss(input, target)
self_loss.backward()
print("*********SelfCELoss***********")
print("loss: ")
print(self_loss.item())
print("梯度: ")
print(input.grad)
测试结果:

– 由上结果可知,我编写的loss和pytorch中提供的j基本一致。
– 但是仅仅这样就可以了吗?NO! 下面介绍BCEWithLogitsLoss()的强大之处:
– BCEWithLogitsLoss()具有很好的对nan的处理能力,对于我写的代码(四层神经网络,层之间的激活函数采用的是ReLU,输出层激活函数采用sigmoid(),由于数据处理的问题,所以会导致我们编写的CE的loss出现nan:原因如下:
–首先神经网络输出的pre_target较大,就会导致sigmoid之后的p为1,则torch.log(1 - p)为nan;
– 使用clamp(函数虽然会解除这个nan,但是由于在迭代过程中,网络输出可能越来越大(层之间使用的是ReLU),则导致我们写的loss陷入到某一个数值而无法进行优化。但是BCEWithLogitsLoss()对这种情况下出现的nan有很好的处理,从而得到更好的结果。
– 我此实验的目的是为了比较CE和FL的区别,自己编写FL,则必须也要自己编写CE,不能使用BCEWithLogitsLoss()。
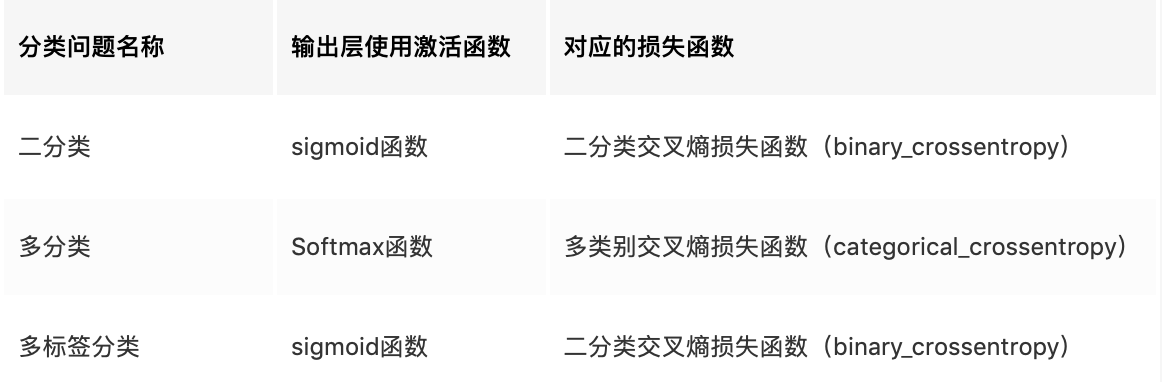
二、使用场景
二分类 + sigmoid()
使用sigmoid作为输出层非线性表达的分类问题(虽然可以处理多分类问题,但是一般用于二分类,并且最后一层只放一个节点)
三、注意事项
输入格式
要求输入的input和target均为float类型
以上为个人经验,希望能给大家一个参考,也希望大家多多支持我们。
相关推荐
-

pytorch loss反向传播出错的解决方案
今天在使用pytorch进行训练,在运行 loss.backward() 误差反向传播时出错 : RuntimeError: grad can be implicitly created only for scalar outputs File "train.py", line 143, in train loss.backward() File "/usr/local/lib/python3.6/dist-packages/torch/tensor.py", li
-
pytorch MSELoss计算平均的实现方法
给定损失函数的输入y,pred,shape均为bxc. 若设定loss_fn = torch.nn.MSELoss(reduction='mean'),最终的输出值其实是(y - pred)每个元素数字的平方之和除以(bxc),也就是在batch和特征维度上都取了平均. 如果只想在batch上做平均,可以这样写: loss_fn = torch.nn.MSELoss(reduction='sum') loss = loss_fn(pred, y) / pred.size(0) 补充:PyTorc
-
Pytorch BCELoss和BCEWithLogitsLoss的使用
BCELoss 在图片多标签分类时,如果3张图片分3类,会输出一个3*3的矩阵. 先用Sigmoid给这些值都搞到0~1之间: 假设Target是: 下面我们用BCELoss来验证一下Loss是不是0.7194! emmm应该是我上面每次都保留4位小数,算到最后误差越来越大差了0.0001.不过也很厉害啦哈哈哈哈哈! BCEWithLogitsLoss BCEWithLogitsLoss就是把Sigmoid-BCELoss合成一步.我们直接用刚刚的input验证一下是不是0.7193: 嘻嘻,我
-
Pytorch训练网络过程中loss突然变为0的解决方案
问题 // loss 突然变成0 python train.py -b=8 INFO: Using device cpu INFO: Network: 1 input channels 7 output channels (classes) Bilinear upscaling INFO: Creating dataset with 868 examples INFO: Starting training: Epochs: 5 Batch size: 8 Learning rate: 0.001
-
Pytorch 的损失函数Loss function使用详解
1.损失函数 损失函数,又叫目标函数,是编译一个神经网络模型必须的两个要素之一.另一个必不可少的要素是优化器. 损失函数是指用于计算标签值和预测值之间差异的函数,在机器学习过程中,有多种损失函数可供选择,典型的有距离向量,绝对值向量等. 损失Loss必须是标量,因为向量无法比较大小(向量本身需要通过范数等标量来比较). 损失函数一般分为4种,平方损失函数,对数损失函数,HingeLoss 0-1 损失函数,绝对值损失函数. 我们先定义两个二维数组,然后用不同的损失函数计算其损失值. import
-
基于BCEWithLogitsLoss样本不均衡的处理方案
最近在做deepfake检测任务(可以将其视为二分类问题,label为1和0),遇到了正负样本不均衡的问题,正样本数目是负样本的5倍,这样会导致FP率较高. 尝试将正样本的loss权重增高,看BCEWithLogitsLoss的源码 Examples:: >>> target = torch.ones([10, 64], dtype=torch.float32) # 64 classes, batch size = 10 >>> output = torch.full(
-
基于Redis实现延时队列的优化方案小结
目录 一.延时队列的应用 二.延时队列的实现 三.总结 一.延时队列的应用 近期在开发部门的新项目,其中有个关键功能就是智能推送,即根据用户行为在特定的时间点向用户推送相应的提醒消息,比如以下业务场景: 在用户点击充值项后,半小时内未充值,向用户推送充值未完成提醒. 在用户最近一次阅读行为2小时后,向用户推送继续阅读提醒. 在用户新注册或退出应用N分钟后,向用户推送合适的推荐消息. … 上述场景的共同特征就是在某事件触发后延迟一定时间后再执行特定任务,若事件触发时间点可知,则上述逻辑也可等价于在
-
Nginx+Tomcat+Https 服务器负载均衡配置实践方案详解
由于需要,得搭建个nginx+tomcat+https的服务器,搜了搜网上的发现总是有错,现在整理了些有用的,备忘. 环境:Centos6.5.JDK1.8.Tomcat8.Nginx1.10.1 准备材料: 1.JDK1.8安装包jdk-8u102-linux-x64.tar.gz 2.Tomcat8安装包apache-tomcat-8.0.37.tar.gz 3.Nginx1.10安装包nginx-1.10.1.tar.gz 1.JDK安装配置 解压并安装到/usr/local/jdk [r
-
基于Vue CSR的微前端实现方案实践
在这里就不讲微前端的各种优缺点,直接假设你在负责一个中后台管理系统的开发,所有的业务模块全部都在一个项目中打包,随着业务量的不断增长,编译越来越慢,你期望可以从老的项目中将新的业务进行独立开发.独立部署,以微应用的形式嵌入到老项目中. 本篇文章的受众是那些希望在新老的项目中,在不需要你对老项目进行改动老项目的前提下,嵌入微应用,如果本篇文章对你有帮助,请点个:+1:! 核心要素 构建生产环境代码,输出远程组件所需的 JSON 通过 ajax 请求,拿到这个 JSON 的数据,传给 远程组件 新项
-
详解基于MybatisPlus两步实现多租户方案
1.定义一个TenantLineHandler的实现类: import com.baomidou.mybatisplus.extension.plugins.handler.TenantLineHandler; import com.google.common.collect.Lists; import net.sf.jsqlparser.expression.Expression; import net.sf.jsqlparser.expression.LongValue; import ja
-
基于Vue的商品主图放大镜方案详解
前言 在做电商类应用时,难免会遇到商品主图实现放大镜效果的场景,现有的基于 Vue 的第三方包不多并且无法直接复用,今天,我来分享一种高稳定性的基于 Vue 的图片放大镜方法. 实现原理 放大镜的原理用一句话概括,就是根据小图上的鼠标位置去定位大图. 图1 原理图(以2倍放大为例) 相信原理图已经画的很明白了, 图中,左侧框是小图框,其蓝色区域为图片遮罩层(需放大区域),右侧框是整个大图目前所在区域,其蓝色区域是放大区域,设置超出隐藏,就实现了放大遮罩区域的效果. 显然,两块蓝色区域存在着某种对
-
详解基于vue-router的动态权限控制实现方案
使用vue开发带权限管理系统,尤其是采用了vue-router做路由,很多人都遇到的一个问题就是如何动态加载路由path对应的component. 典型的应用场景就是:前端菜单不静态的写在vue程序里,而是要从后台程序和数据库返回的菜单来动态加载到vue应用中. 网上很多问权限的问题,但几乎找不到很好的解决答案,在很长一段时间里,非常打击使用vue技术栈开发的信心.最有质量的一篇文章是:http://www.jb51.net/article/124801.htm 但作者并没有完全解决这个问题,还
-
基于R语言for循环的替换方案
R语言中,for循环运行比较慢 for(i in 1:1000){ print(i^2) } 补充:R语言:for循环使用小结 基本结构展示: vals =c(5,6,7) for(v in vals){ print(v) } #即把大括号里的内容对vals里的每一个值都循环run一遍 实例展示: 1. paste() 命令是把几个字符连接起来 如paste("A","B","C",sep=" ")得到的就是"A B
-
nginx基于tcp做负载均衡的方法
配置多台服务器时,经常需要让各个服务器之间的时间保持同步,如果服务器有外网环境,可以直接同外部的时间服务器更新时间,可以采用rdate命令更新时间: rdate -s tick.greyware.com 可以写个脚本放在/etc/cron.hourly中每小时校正一下时间. 如果是内网环境下,可以自己配置一个时间服务器,以CentOS为例,配置时间服务器的方法如下: 1.先安装xinetd : sudo yum install -y xinetd 2.修改/etc/xinetd.d/time-
-
详解基于webpack&gettext的前端多语言方案
gettext 是GNU 提供的一套 国际化与本地化 处理的相关函数库.大多数语言都有对应的gettext实现.本文主要使用jed来实现gettext 一系列方法对应的功能. pot/po文件 pot文件 是po文件的模板文件,一般是通过 xgettext 程序生成出来的. po文件 是根据pot文件通过msginit程序,设置对应的国家语言生成用于填写实际翻译内容的文件. xgettext/msginit/msgmerge xgettext 程序可以扫描指定的代码文件,取出其中gettext部