jcrop 网页截图工具(插件)开发
今天给大家介绍一下一个web 中经常会用到的截图(如:头像等)工具:
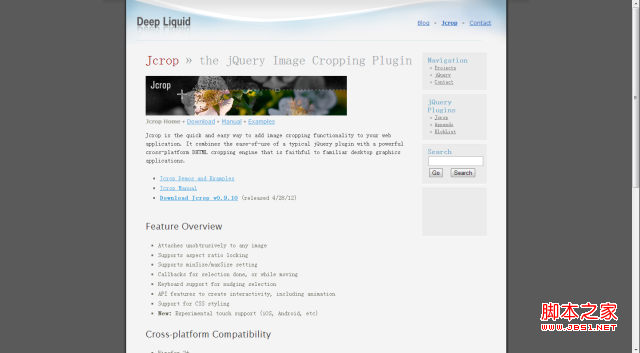
Jcrop演示
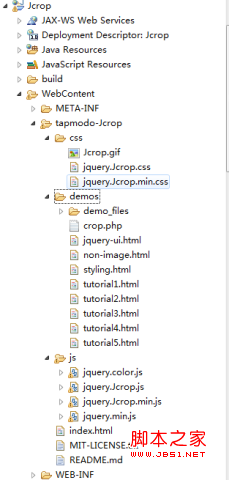
项目结构:
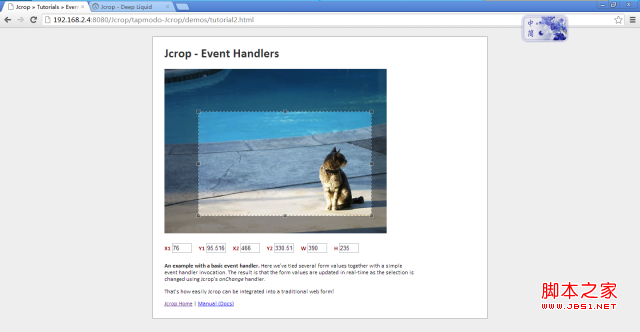
效果图:


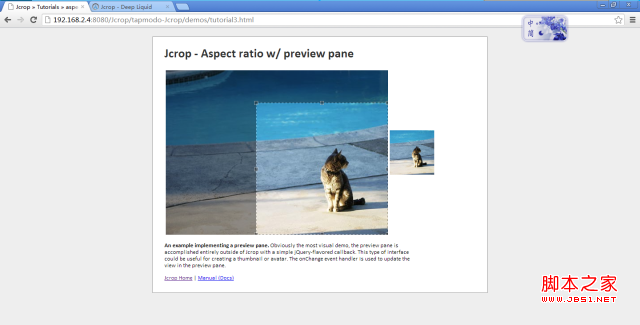
这个很有用:

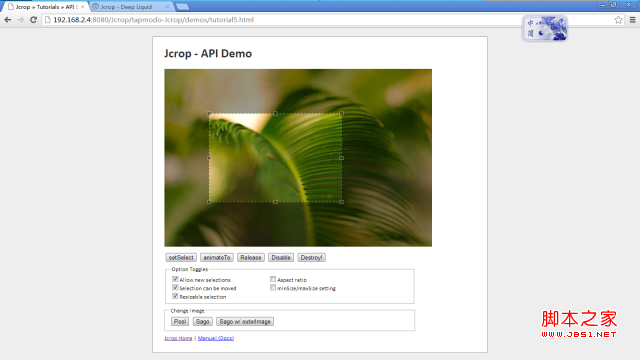
看到这些,大家也想自己试试吧
===========================================
代码部分:
===========================================
准备工作:
下载:Jcrop-0.9.10 (zip format)
解压后放入到你的项目里面,就如上面的项目结构一样...
/Jcrop/WebContent/tapmodo-Jcrop/demos/tutorial1.html
<!DOCTYPE html PUBLIC "-//W3C//DTD XHTML 1.0 Strict//EN"
"http://www.w3.org/TR/xhtml1/DTD/xhtml1-strict.dtd">
<html xmlns="http://www.w3.org/1999/xhtml">
<head>
<meta http-equiv="Content-type" content="text/html;charset=UTF-8" />
<title>Jcrop » Tutorials » Hello World</title>
<script src="../js/jquery.min.js" type="text/javascript"></script>
<script src="../js/jquery.Jcrop.js" type="text/javascript"></script>
<link rel="stylesheet" href="../css/jquery.Jcrop.css" type="text/css" />
<link rel="stylesheet" href="demo_files/demos.css" type="text/css" />
<script type="text/javascript">
jQuery(function($){
// How easy is this??
$('#target').Jcrop();
});
</script>
</head>
<body>
<div id="outer">
<div class="jcExample">
<div class="article">
<h1>Jcrop - Hello World</h1>
<img src="demo_files/pool.jpg" id="target" alt="Flowers" />
<p>
<b>This example demonstrates the default behavior of Jcrop.</b>
Since no event handlers have been attached it only performs
the cropping behavior.
</p>
<div id="dl_links">
<a href="http://deepliquid.com/content/Jcrop.html">Jcrop Home</a> |
<a href="http://deepliquid.com/content/Jcrop_Manual.html">Manual (Docs)</a>
</div>
</div>
</div>
</div>
</body>
</html>
/Jcrop/WebContent/tapmodo-Jcrop/demos/tutorial2.html
<!DOCTYPE html PUBLIC "-//W3C//DTD XHTML 1.0 Strict//EN"
"http://www.w3.org/TR/xhtml1/DTD/xhtml1-strict.dtd">
<html xmlns="http://www.w3.org/1999/xhtml">
<head>
<meta http-equiv="Content-type" content="text/html;charset=UTF-8" />
<title>Jcrop » Tutorials » Event Handler</title>
<script src="../js/jquery.min.js" type="text/javascript"></script>
<script src="../js/jquery.Jcrop.js" type="text/javascript"></script>
<link rel="stylesheet" href="../css/jquery.Jcrop.css" type="text/css" />
<link rel="stylesheet" href="demo_files/demos.css" type="text/css" />
<script type="text/javascript">
jQuery(function($){
$('#target').Jcrop({
onChange: showCoords,
onSelect: showCoords,
onRelease: clearCoords
});
});
// Simple event handler, called from onChange and onSelect
// event handlers, as per the Jcrop invocation above
function showCoords(c)
{
$('#x1').val(c.x);
$('#y1').val(c.y);
$('#x2').val(c.x2);
$('#y2').val(c.y2);
$('#w').val(c.w);
$('#h').val(c.h);
};
function clearCoords()
{
$('#coords input').val('');
};
</script>
</head>
<body>
<div id="outer">
<div class="jcExample">
<div class="article">
<h1>Jcrop - Event Handlers</h1>
<!-- This is the image we're attaching Jcrop to -->
<img src="demo_files/pool.jpg" id="target" alt="Flowers" />
<!-- This is the form that our event handler fills -->
<form id="coords"
class="coords"
onsubmit="return false;"
action="http://example.com/post.php">
<div>
<label>X1 <input type="text" size="4" id="x1" name="x1" /></label>
<label>Y1 <input type="text" size="4" id="y1" name="y1" /></label>
<label>X2 <input type="text" size="4" id="x2" name="x2" /></label>
<label>Y2 <input type="text" size="4" id="y2" name="y2" /></label>
<label>W <input type="text" size="4" id="w" name="w" /></label>
<label>H <input type="text" size="4" id="h" name="h" /></label>
</div>
</form>
<p>
<b>An example with a basic event handler.</b> Here we've tied
several form values together with a simple event handler invocation.
The result is that the form values are updated in real-time as
the selection is changed using Jcrop's <em>onChange</em> handler.
</p>
<p>
That's how easily Jcrop can be integrated into a traditional web form!
</p>
<div id="dl_links">
<a href="http://deepliquid.com/content/Jcrop.html">Jcrop Home</a> |
<a href="http://deepliquid.com/content/Jcrop_Manual.html">Manual (Docs)</a>
</div>
</div>
</div>
</div>
</body>
</html>
/Jcrop/WebContent/tapmodo-Jcrop/demos/tutorial3.html
代码如下:<!DOCTYPE html PUBLIC "-//W3C//DTD XHTML 1.0 Strict//EN"
"http://www.w3.org/TR/xhtml1/DTD/xhtml1-strict.dtd">
<html xmlns="http://www.w3.org/1999/xhtml">
<head>
<meta http-equiv="Content-type" content="text/html;charset=UTF-8" />
<title>Jcrop » Tutorials » aspectRatio w/ Preview</title>
<script src="../js/jquery.min.js" type="text/javascript"></script>
<script src="../js/jquery.Jcrop.js" type="text/javascript"></script>
<link rel="stylesheet" href="../css/jquery.Jcrop.css" type="text/css" />
<link rel="stylesheet" href="demo_files/demos.css" type="text/css" />
<script type="text/javascript">
jQuery(function($) {
// Create variables (in this scope) to hold the API and image size
var jcrop_api, boundx, boundy;
$('#target').Jcrop({
onChange : updatePreview,
onSelect : updatePreview,
aspectRatio : 1
}, function() {
// Use the API to get the real image size
var bounds = this.getBounds();
boundx = bounds[0];
boundy = bounds[1];
// Store the API in the jcrop_api variable
jcrop_api = this;
});
function updatePreview(c) {
if (parseInt(c.w) > 0) {
var rx = 100 / c.w;
var ry = 100 / c.h;
$('#preview').css({
width : Math.round(rx * boundx) + 'px',
height : Math.round(ry * boundy) + 'px',
marginLeft : '-' + Math.round(rx * c.x) + 'px',
marginTop : '-' + Math.round(ry * c.y) + 'px'
});
}
}});
</script>
</head>
<body>
<div id="outer">
<div class="jcExample">
<div class="article">
<h1>Jcrop - Aspect ratio w/ preview pane</h1>
<table>
<tr>
<td>
<div style="width: 500px; height: 370px; overflow: hidden;">
<img src="demo_files/pool.jpg" id="target" alt="Flowers" style="width: 500px; height: 370px;"/>
</div>
</td>
<td>
<div style="width: 100px; height: 100px; overflow: hidden;">
<img src="demo_files/pool.jpg" id="preview" alt="Preview" class="jcrop-preview" />
</div>
</td>
</tr>
</table>
<p>
<b>An example implementing a preview pane.</b> Obviously the most visual demo, the preview pane is accomplished entirely outside of Jcrop with a simple jQuery-flavored callback. This type of interface could be useful for creating a thumbnail or avatar. The onChange event handler is used to update the view in the preview pane.
</p>
<div id="dl_links">
<a href="http://deepliquid.com/content/Jcrop.html">Jcrop Home</a> | <a href="http://deepliquid.com/content/Jcrop_Manual.html">Manual (Docs)</a>
</div>
</div>
</div>
</div>
</body>
</html>/Jcrop/WebContent/tapmodo-Jcrop/demos/tutorial4.html
<!DOCTYPE html PUBLIC "-//W3C//DTD XHTML 1.0 Strict//EN"
"http://www.w3.org/TR/xhtml1/DTD/xhtml1-strict.dtd">
<html xmlns="http://www.w3.org/1999/xhtml">
<head>
<meta http-equiv="Content-type" content="text/html;charset=UTF-8" />
<title>Jcrop » Tutorials » Animations / Transitions</title>
<script src="../js/jquery.min.js" type="text/javascript"></script>
<script src="../js/jquery.Jcrop.js" type="text/javascript"></script>
<script src="../js/jquery.color.js" type="text/javascript"></script>
<link rel="stylesheet" href="../css/jquery.Jcrop.css" type="text/css" />
<link rel="stylesheet" href="../css/jquery.Jcrop.extras.css" type="text/css" />
<link rel="stylesheet" href="demo_files/demos.css" type="text/css" />
<script type="text/javascript">
jQuery(function($){
var jcrop_api;
$('#target').Jcrop({
bgFade: true,
bgOpacity: .3,
setSelect: [ 60, 70, 540, 330 ]
},function(){
jcrop_api = this;
});
$('#fadetog').change(function(){
jcrop_api.setOptions({
bgFade: this.checked
});
}).attr('checked','checked');
$('#shadetog').change(function(){
if (this.checked) $('#shadetxt').slideDown();
else $('#shadetxt').slideUp();
jcrop_api.setOptions({
shade: this.checked
});
}).attr('checked',false);
// Define page sections
var sections = {
anim_buttons: 'Animate Selection',
bgo_buttons: 'Change bgOpacity',
bgc_buttons: 'Change bgColor'
};
// Define animation buttons
var ac = {
anim1: [217,122,382,284],
anim2: [20,20,580,380],
anim3: [24,24,176,376],
anim4: [347,165,550,355],
anim5: [136,55,472,183]
};
// Define bgOpacity buttons
var bgo = {
Low: .2,
Mid: .5,
High: .8,
Full: 1
};
// Define bgColor buttons
var bgc = {
Red: '#900',
Blue: '#4BB6F0',
Yellow: '#F0B207',
Green: '#46B81C',
White: 'white',
Black: 'black'
};
// Create fieldset targets for buttons
for(i in sections)
insertSection(i,sections[i]);
// Create animation buttons
for(i in ac) {
$('#anim_buttons').append(
$('<button />').append(i).click(animHandler(ac[i])), ' '
);
}
// Create bgOpacity buttons
for(i in bgo) {
$('#bgo_buttons').append(
$('<button />').append(i).click(setoptHandler('bgOpacity',bgo[i])), ' '
);
}
// Create bgColor buttons
for(i in bgc) {
$('#bgc_buttons').append(
$('<button />').append(i).css({
backgroundColor: bgc[i],
color: ((i == 'Black') || (i == 'Red'))?'white':'black'
}).click(setoptHandler('bgColor',bgc[i])), ' '
);
}
// Function to insert named sections into interface
function insertSection(k,v) {
$('#interface').append(
$('<fieldset></fieldset>').attr('id',k).append(
$('<legend></legend>').append(v)
)
);
};
// Handler for option-setting buttons
function setoptHandler(k,v) {
return function() {
var opt = { };
opt[k] = v;
jcrop_api.setOptions(opt);
return false;
};
};
// Handler for animation buttons
function animHandler(v) {
return function() {
jcrop_api.animateTo(v);
return false;
};
};
$('#anim_buttons').append(
$('<button></button>').append('Bye!').click(function(){
jcrop_api.animateTo(
[300,200,300,200],
function(){ this.release(); }
);
return false;
})
);
$('#interface').show();
});
</script>
</head>
<body>
<div id="outer">
<div class="jcExample">
<div class="article">
<h1>Jcrop - Animations/Transitions</h1>
<img src="demo_files/sago.jpg" id="target" alt="Flowers" />
<div id="interface" style="margin: 1em 0;"></div>
<div><label><input type="checkbox" id="fadetog" /> Enable fading (bgFade: true)</label></div>
<div><label><input type="checkbox" id="shadetog" /> Use experimental shader (shade: true)</label></div>
<p id="shadetxt" style="display:none; color:#900;">
<b>Experimental shader active.</b>
Jcrop now includes a shading mode that facilitates building
better transparent Jcrop instances. The experimental shader is less
robust than Jcrop's default shading method and should only be
used if you require this functionality.
</p>
<p>
<b>Animation/Transitions.</b>
Demonstration of animateTo API method and transitions for bgColor
and bgOpacity options. Color fading requires inclusion of John Resig's
jQuery <a href="http://plugins.jquery.com/project/color">Color
Animations</a> plugin. If it is not included, colors will not fade.
</p>
<div id="dl_links">
<a href="http://deepliquid.com/content/Jcrop.html">Jcrop Home</a> |
<a href="http://deepliquid.com/content/Jcrop_Manual.html">Manual (Docs)</a>
</div>
</div>
</div>
</div>
</body>
</html>
/Jcrop/WebContent/tapmodo-Jcrop/demos/tutorial5.html
<!DOCTYPE html PUBLIC "-//W3C//DTD XHTML 1.0 Strict//EN"
"http://www.w3.org/TR/xhtml1/DTD/xhtml1-strict.dtd">
<html xmlns="http://www.w3.org/1999/xhtml">
<head>
<meta http-equiv="Content-type" content="text/html;charset=UTF-8" />
<title>Jcrop » Tutorials » API Demo</title>
<script src="../js/jquery.min.js" type="text/javascript"></script>
<script src="../js/jquery.Jcrop.js" type="text/javascript"></script>
<link rel="stylesheet" href="../css/jquery.Jcrop.css" type="text/css" />
<link rel="stylesheet" href="demo_files/demos.css" type="text/css" />
<style type="text/css">
.optdual { position: relative; }
.optdual .offset { position: absolute; left: 18em; }
.optlist label { width: 16em; display: block; }
#dl_links { margin-top: .5em; }
</style>
<script type="text/javascript">
jQuery(function($){
// The variable jcrop_api will hold a reference to the
// Jcrop API once Jcrop is instantiated.
var jcrop_api;
// In this example, since Jcrop may be attached or detached
// at the whim of the user, I've wrapped the call into a function
initJcrop();
// The function is pretty simple
function initJcrop()//{{{
{
// Hide any interface elements that require Jcrop
// (This is for the local user interface portion.)
$('.requiresjcrop').hide();
// Invoke Jcrop in typical fashion
$('#target').Jcrop({
onRelease: releaseCheck
},function(){
jcrop_api = this;
jcrop_api.animateTo([100,100,400,300]);
// Setup and dipslay the interface for "enabled"
$('#can_click,#can_move,#can_size').attr('checked','checked');
$('#ar_lock,#size_lock,#bg_swap').attr('checked',false);
$('.requiresjcrop').show();
});
};
//}}}
// Use the API to find cropping dimensions
// Then generate a random selection
// This function is used by setSelect and animateTo buttons
// Mainly for demonstration purposes
function getRandom() {
var dim = jcrop_api.getBounds();
return [
Math.round(Math.random() * dim[0]),
Math.round(Math.random() * dim[1]),
Math.round(Math.random() * dim[0]),
Math.round(Math.random() * dim[1])
];
};
// This function is bound to the onRelease handler...
// In certain circumstances (such as if you set minSize
// and aspectRatio together), you can inadvertently lose
// the selection. This callback re-enables creating selections
// in such a case. Although the need to do this is based on a
// buggy behavior, it's recommended that you in some way trap
// the onRelease callback if you use allowSelect: false
function releaseCheck()
{
jcrop_api.setOptions({ allowSelect: true });
$('#can_click').attr('checked',false);
};
// Attach interface buttons
// This may appear to be a lot of code but it's simple stuff
$('#setSelect').click(function(e) {
// Sets a random selection
jcrop_api.setSelect(getRandom());
});
$('#animateTo').click(function(e) {
// Animates to a random selection
jcrop_api.animateTo(getRandom());
});
$('#release').click(function(e) {
// Release method clears the selection
jcrop_api.release();
});
$('#disable').click(function(e) {
// Disable Jcrop instance
jcrop_api.disable();
// Update the interface to reflect disabled state
$('#enable').show();
$('.requiresjcrop').hide();
});
$('#enable').click(function(e) {
// Re-enable Jcrop instance
jcrop_api.enable();
// Update the interface to reflect enabled state
$('#enable').hide();
$('.requiresjcrop').show();
});
$('#rehook').click(function(e) {
// This button is visible when Jcrop has been destroyed
// It performs the re-attachment and updates the UI
$('#rehook,#enable').hide();
initJcrop();
$('#unhook,.requiresjcrop').show();
return false;
});
$('#unhook').click(function(e) {
// Destroy Jcrop widget, restore original state
jcrop_api.destroy();
// Update the interface to reflect un-attached state
$('#unhook,#enable,.requiresjcrop').hide();
$('#rehook').show();
return false;
});
// Hook up the three image-swapping buttons
$('#img1').click(function(e) {
jcrop_api.setImage('demo_files/sago.jpg');
jcrop_api.setOptions({ bgOpacity: .6 });
return false;
});
$('#img2').click(function(e) {
jcrop_api.setImage('demo_files/pool.jpg');
jcrop_api.setOptions({ bgOpacity: .6 });
return false;
});
$('#img3').click(function(e) {
jcrop_api.setImage('demo_files/sago.jpg',function(){
this.setOptions({
bgOpacity: 1,
outerImage: 'demo_files/sagomod.jpg'
});
this.animateTo(getRandom());
});
return false;
});
// The checkboxes simply set options based on it's checked value
// Options are changed by passing a new options object
// Also, to prevent strange behavior, they are initially checked
// This matches the default initial state of Jcrop
$('#can_click').change(function(e) {
jcrop_api.setOptions({ allowSelect: !!this.checked });
jcrop_api.focus();
});
$('#can_move').change(function(e) {
jcrop_api.setOptions({ allowMove: !!this.checked });
jcrop_api.focus();
});
$('#can_size').change(function(e) {
jcrop_api.setOptions({ allowResize: !!this.checked });
jcrop_api.focus();
});
$('#ar_lock').change(function(e) {
jcrop_api.setOptions(this.checked?
{ aspectRatio: 4/3 }: { aspectRatio: 0 });
jcrop_api.focus();
});
$('#size_lock').change(function(e) {
jcrop_api.setOptions(this.checked? {
minSize: [ 80, 80 ],
maxSize: [ 350, 350 ]
}: {
minSize: [ 0, 0 ],
maxSize: [ 0, 0 ]
});
jcrop_api.focus();
});
});
</script>
</head>
<body>
<div id="outer">
<div class="jcExample">
<div class="article">
<h1>Jcrop - API Demo</h1>
<img src="demo_files/sago.jpg" id="target" alt="Jcrop Image" />
<div style="margin: .8em 0 .5em;">
<span class="requiresjcrop">
<button id="setSelect">setSelect</button>
<button id="animateTo">animateTo</button>
<button id="release">Release</button>
<button id="disable">Disable</button>
</span>
<button id="enable" style="display:none;">Re-Enable</button>
<button id="unhook">Destroy!</button>
<button id="rehook" style="display:none;">Attach Jcrop</button>
</div>
<fieldset class="optdual requiresjcrop">
<legend>Option Toggles</legend>
<div class="optlist offset">
<label><input type="checkbox" id="ar_lock" />Aspect ratio</label>
<label><input type="checkbox" id="size_lock" />minSize/maxSize setting</label>
</div>
<div class="optlist">
<label><input type="checkbox" id="can_click" />Allow new selections</label>
<label><input type="checkbox" id="can_move" />Selection can be moved</label>
<label><input type="checkbox" id="can_size" />Resizable selection</label>
</div>
</fieldset>
<fieldset class="requiresjcrop" style="margin: .5em 0;">
<legend>Change Image</legend>
<span>
<button id="img2">Pool</button>
<button id="img1">Sago</button>
<button id="img3">Sago w/ outerImage</button>
</span>
</fieldset>
<div id="dl_links">
<a href="http://deepliquid.com/content/Jcrop.html">Jcrop Home</a> |
<a href="http://deepliquid.com/content/Jcrop_Manual.html">Manual (Docs)</a>
</div>
</div>
</div>
</div>
</body>
</html>

