超详细的vue组件间通信总结
目录
- 前言
- 一、props、$emit单向数据流
- 二、$parent、$children
- 三、$attrs、$listeners
- 四、provide、inject
- 五、eventBus(事件总线)
- 六、vuex
- 七、localstorage
- 总结
前言
组件通信在我们平时开发过程中,特别是在vue和在react中,有着举足轻重的地位。本篇将总结在vue中,组件之间通信的几种方式:
- props、$emit
- $parent、$children
- $attrs、$listeners
- provide、inject
- eventBus
- vuex
- 本地存储
一、props、$emit单向数据流

father.vue:
<template>
  <div>
    <div>我是父亲:<input type="button" value="父亲" /> 数字为: {{num}}</div>
    <son :num="num" @change="change"></son>
  </div>
</template>

<script>
import son from "./son.vue";
export default {
  name: "Father",
  components: {
    son,
  },
  data() {
    return {
      num: 1,
    };
  },
  methods:{
    change(val){
      this.num = val
    }
  }
};
</script>
son.vue:
<template>
  <div>我是儿子:<input type="button" value="儿子" @click="change"/>数字为:{{num}}</div>
</template>

<script>
export default {
  name: "App",
  components: {},
  props: {
    num: {
      default: 0,
    },
  },
  created() {},
  methods: {
    change(){
      // this.num = 2  props通信是单向数据流,在这直接修改父组件传过来的num将会报错    // 可以用$emit触发change事件,father组件绑定change事件    this.$emit('change', 2)
    }
  },
};
</script>

对于上面的场景:子组件的change事件只是为了修改父组件中某一个值,还可以有以下几种写法:
1.父组件绑定给子组件的事件使用箭头函数
father:
<son :num="num" @change="val => num = val"></son>

son:
this.$emit('change', 2)
2.update:num和.sync
father:

<son :num.sync="num"></son>

son:

this.$emit('update:num', 2)//update是规定的写法,不可更换
3.v-model
先修改props和绑定的事件:
father:<son :value="num" @input="val => num = val"></son>son:this.$emit('input', 2)
可用v-model简写:<son v-model="num"></son>
二、$parent、$children
$parent、$children可直接在父子组件中调用各自的方法以及修改数据
子组件中直接:this.$parent.num = 2
父组件中$children是个数组,因此具体是哪个子组件不太直观,可以用$refs来操作子组件
vue官方并不推荐使用这种通信方式:节制地使用$parent和$children- 它们的主要目的是作为访问组件的应急方法,更推荐用 props 和 events 实现父子组件通信。
三、$attrs、$listeners
$attrs可以拿到父组件传过来的属性:
<div>我是儿子:<input type="button" value="儿子" @click="change"/>数字为:{{$attrs}}</div>

dom节点:

$attrs会直接将传过来的属性放到对应的标签上,反观props就不会。如果想去掉标签中的这些属性,可以用inheritAttrs:

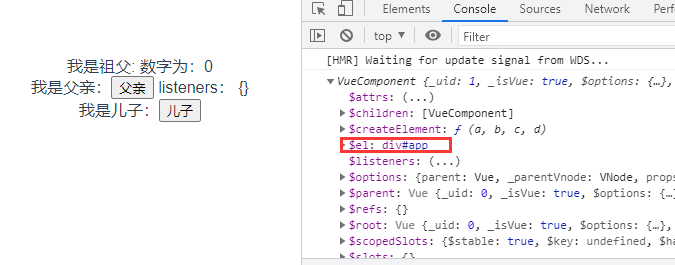
值得注意的是:props的优先级大于$attrs,即当props存在的时候,$attrs为空对象:

$attrs常用于跨多级组件传递属性,比如祖孙组件,用父组件做中转:
father:
<son v-bind="$attrs"></son>
$attrs用于属性跨级传递,方法跨级传递则用$listeners。
grandFather.vue:
<template>
  <div>
    <div>我是祖父: 数字为:{{nums}}</div>
    <father :nums="nums" @up="up" @down="down"></father>
  </div>
</template>

<script>
import father from "./father.vue";
export default {
  name: "App",
  components: {
    father,
  },
  data(){
    return {
      nums:0
    }
  },
  methods: {
    up() {
      alert('up')
    },  down() {   alert('down')  },
  },
};
</script>
father.vue:
<son v-bind="$attrs" v-on="$listeners"></son>
son.vue:
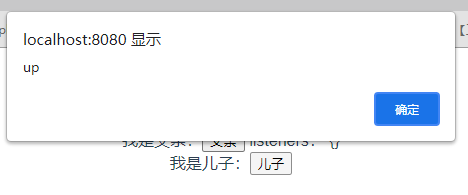
<div>我是儿子:<input type="button" value="儿子" @click="$listeners.up"/></div>

四、provide、inject
这对选项需要一起使用,以允许一个祖先组件向其所有子孙后代注入一个依赖,不论组件层次有多深,并在其上下游关系成立的时间里始终生效
provide选项应该是一个对象或返回一个对象的函数。
inject选项应该是一个字符串数组或一个对象。
App:
...

export default {
  provide(){
    return {vm: this}
  },

...
son:
...

export default {
  inject: ['vm'], data(){}, mounted(){  console.log(this.vm) }

...

注意:provide 和 inject 绑定并不是可响应的。这是刻意为之的。然而,如果你传入了一个可监听的对象,那么其对象的 property 还是可响应的。
inject注入中的值会沿着组件向上查找,遵从"就近原则"。
provide 和 inject中的数据流是双向的。
五、eventBus(事件总线)
eventBus通过发布订阅全局事件,供其他组件使用。
在main.js中:
Vue.prototype.$bus = new Vue();
parent.vue:
<template>
  <div>
    <son1></son1>
    <son2></son2>
  </div>
</template>

<script>
import son1 from './son1.vue'
import son2 from './son2.vue'
export default {
  name: 'parent',
  components: {
    son1,
    son2
  },
  created(){
     this.$bus.$on('busEvent',(v)=>{
      console.log(v);
    })
  },
  beforeDestroy(){
    this.$bus.off('busEvent')
  }
}
</script>
son1和son2中的mounted:
son1:mounted(){
  this.$bus.$emit('busEvent','son1哈哈')
}son2:mounted(){  this.$bus.$emit('busEvent', 'son2嘻嘻')}
打印结果:

使用eventBus有三点需要注意,1.$bus.on应该在created钩子内使用,如果在mounted使用,它可能接收不到其他组件来自created钩子内发出的事件;
2.$bus.emit应该在mounted中使用,等待created中的$bus.on事件绑定完成;
3.发布订阅的事件在beforeDestory钩子里需要使用$bus.off解除,组件销毁后没必要一直监听。
六、vuex
借助vuex的状态管理来实现组件通信,vuex适用于较为复杂的项目,频繁的数据共享且数据量比较大。
store/index.js:
import Vue from 'vue'
import Vuex from 'vuex'

Vue.use(Vuex)

const store = new Vuex.Store({
  state: {
    isLogin: false
  },
  mutations: {
    loginState (state, isLogin) {
      state.isLogin = isLogin
    }
  }
})

export default store
App.vue:
created(){
  this.$store.commit('loginState',true)// 设置登录状态为true
},
son.vue:
<template>
  <div>我是儿子:<input type="button" value="儿子" />登录状态:{{isLogin}}</div>
</template>

<script>
import {mapState} from 'vuex';
export default {
  name: "son",
  computed:{
    ...mapState(['isLogin'])
  }
};
</script>

七、localstorage
localstorage是浏览器的本地存储,将会长期存储在浏览器中,非常庞大的数据不建议用此方式。
App.vue
created(){
  localStorage.setItem('isLogin', true)
},
son.vue:
computed:{
  isLogin(){
    return localStorage.getItem('isLogin')
  }
}
常见的组件通信方式基本就是这些啦,有什么遗漏或不足的,欢迎评论区留言!
总结
到此这篇关于vue组件间通信的文章就介绍到这了,更多相关vue组件间通信内容请搜索我们以前的文章或继续浏览下面的相关文章希望大家以后多多支持我们!

