Android基础知识及线性布局介绍
目录
- 1.常见控件的基本属性
- 1.1控件的可见性
- 1.2控件的外边距
- 1.3控件的内边距
- 2.线性布局(Linear Layout)
- 2.1示例:
- 2.2微信界面实战
- 3.总结
1.常见控件的基本属性
android:id="@+id/button1":【设置控件id】
android:layout_width【设置控件宽度】/android:layout_height【设置控件高度】
wrap_content【控件的大小由内部决定】
match_parent【控件的大小与父控件保持一致】
android:text=" ":【设置组件文本】
android:textColor=" ":【设置字体颜色】
android:layout_marginLeft:【当前布局与父布局左边缘的距离】
android:layout_marginRight:【当前布局与父布局右边缘的距离】
android:layout_marginTop:【当前布局与父布局顶部边缘的距离】
android:layout_marginBottom:【当前布局与父布局底部边缘的距离】
android:gravity :【view里面的内容在这个view中的位置】
android:layout_gravity :【这个view相对于它父view的位置】
1、gravity在线性布局中不起任何作用,layout_gravity在线性布局中起作用;
2、 当我们使用 android:orientation=“vertical” 时, android:layout_gravity只有水平方向的设置才起作用,
垂直方向的设置不起作用。即:left,right,center_horizontal 是生效的;
3、当 我们使用android:orientation=“horizontal” 时, android:layout_gravity只有垂直方向的设置才起作用,
水平方向的设置不起作用。即:top,bottom,center_vertical 是生效的。
1.1控件的可见性
该属性有三种状态值:gone、visible、invisible。
gone 与invisible的区别是:
gone 表示控件不可见,也不会占任何的位置,也不会有任何响应。
而invisible表示控件虽然不可见,但是会占据它的宽高位置。
例子:
<LinearLayout
      android:id="@+id/linearLayout"
      android:layout_width="match_parent"
      android:layout_height="wrap_content"
      android:orientation="horizontal"
      app:layout_constraintEnd_toEndOf="parent"
      app:layout_constraintStart_toStartOf="parent"
      app:layout_constraintTop_toTopOf="parent">

      <Button
          android:id="@+id/button1"
          android:layout_width="wrap_content"
          android:layout_height="wrap_content"
          android:layout_weight="1"
          android:text="button1">

      </Button>

      <Button
          android:id="@+id/button2"
          android:layout_width="wrap_content"
          android:layout_height="wrap_content"
          android:layout_weight="1"
          android:visibility="invisible"      //invisible表示控件虽然不可见,但是会占据它的宽高位置。
          android:text="button2">
      </Button>

      <Button
          android:id="@+id/button3"
          android:layout_width="wrap_content"
          android:layout_height="wrap_content"
          android:layout_weight="1"

          android:text="button3"></Button>

  </LinearLayout>
效果如图:
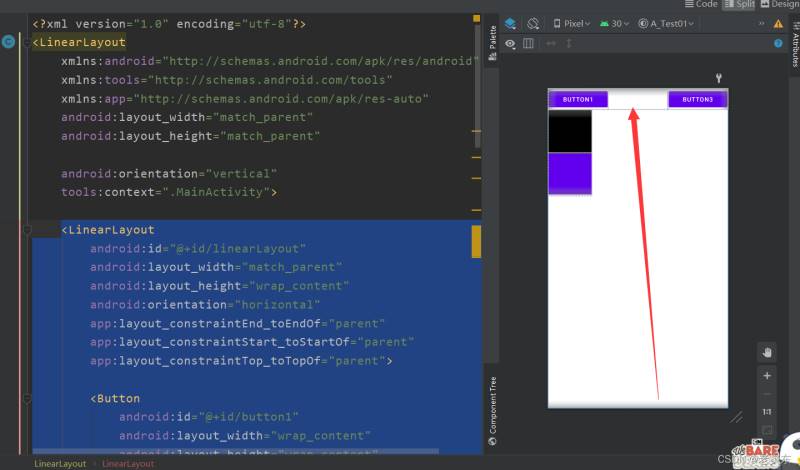
例子:
<LinearLayout
      android:id="@+id/linearLayout"
      android:layout_width="match_parent"
      android:layout_height="wrap_content"
      android:orientation="horizontal"
      app:layout_constraintEnd_toEndOf="parent"
      app:layout_constraintStart_toStartOf="parent"
      app:layout_constraintTop_toTopOf="parent">

      <Button
          android:id="@+id/button1"
          android:layout_width="wrap_content"
          android:layout_height="wrap_content"
          android:layout_weight="1"
          android:text="button1">

      </Button>

      <Button
          android:id="@+id/button2"
          android:layout_width="wrap_content"
          android:layout_height="wrap_content"
          android:layout_weight="1"
          android:visibility="gone"     //gone 表示控件不可见,也不会占任何的位置,也不会有任何响应。
          android:text="button2">
      </Button>

      <Button
          android:id="@+id/button3"
          android:layout_width="wrap_content"
          android:layout_height="wrap_content"
          android:layout_weight="1"
          android:text="button3">

      </Button>

  </LinearLayout>
效果如图:

1.2控件的外边距
学习过HTML的都会知道CSS里的盒模式有个外边距和内边距。
外边距可以设置视图距离父视图上下左右的距离。
内边距可以设置视图内部内容距离自己边框上下左右的距离。
Android 的控件布局其实也用的是这个盒模式。
如果距离父视图上下左右的外边距相同,可以这么设置:
android:layout_margin="10dp"
我们也可以单独的设置某个外边距:
android:layout_marginTop="10dp"
android:layout_marginBottom="10dp"
android:layout_marginLeft="10dp"
android:layout_marginRight="10dp"
1.3控件的内边距
统一设置上下左右内边距:
android:padding="5dp"
各自设置内边距:
android:paddingTop="5dp"
android:paddingBottom="5dp"
android:paddingLeft="5dp"
android:paddingRight="5dp"
2.线性布局(Linear Layout)
LinearLayout 核心属性:
(1) android:orientation:两个属性值:“vertical” 垂直 “horizontal”水平
(2) android:layout_weight 将父控件的剩余空间按照设置的权重比例再分配
2.1示例:

<LinearLayout
        android:id="@+id/linearLayout"
        android:layout_width="match_parent"
        android:layout_height="wrap_content"
        android:orientation="horizontal"
        app:layout_constraintEnd_toEndOf="parent"
        app:layout_constraintStart_toStartOf="parent"
        app:layout_constraintTop_toTopOf="parent">

        <Button
            android:id="@+id/button1"
            android:layout_width="wrap_content"
            android:layout_height="wrap_content"

            android:text="button1">

        </Button>

        <Button
            android:id="@+id/button2"
            android:layout_width="wrap_content"
            android:layout_height="wrap_content"

            android:text="button2">
        </Button>

        <Button
            android:id="@+id/button3"
            android:layout_width="wrap_content"
            android:layout_height="wrap_content"

            android:text="button3">

        </Button>

    </LinearLayout>
2.2微信界面实战

<?xml version="1.0" encoding="utf-8"?>
<LinearLayout xmlns:android="http://schemas.android.com/apk/res/android"
    xmlns:app="http://schemas.android.com/apk/res-auto"
    xmlns:tools="http://schemas.android.com/tools"
    android:layout_width="match_parent"
    android:orientation="vertical"
    android:layout_height="match_parent"
    tools:context=".MainActivity">

    <TextView
        android:layout_width="wrap_content"
        android:layout_height="wrap_content"
        android:text="×"
        android:textSize="50dp"
        android:layout_marginLeft="5dp"/>

    <TextView
        android:layout_width="wrap_content"
        android:layout_height="wrap_content"
        android:layout_marginLeft="20dp"
        android:layout_marginTop="5dp"
        android:text="微信号/QQ/邮箱登录"
        android:textColor="@color/black"
        android:textSize="30dp"/>

<!--第一个框架-->

    <LinearLayout
        android:layout_width="match_parent"
        android:layout_height="wrap_content"
        android:layout_marginTop="30dp">

        <LinearLayout
            android:layout_width="wrap_content"
            android:layout_height="wrap_content"
            android:layout_weight="1"
            android:layout_marginTop="6dp"
            android:orientation="horizontal">

            <TextView
                android:layout_width="wrap_content"
                android:layout_height="wrap_content"
                android:layout_marginLeft="25dp"
                android:text="账号"
                android:textColor="@color/black"
                android:textSize="25dp" />
        </LinearLayout>

        <LinearLayout
            android:layout_width="wrap_content"
            android:layout_height="wrap_content"
            android:layout_weight="0">
            <EditText
                android:layout_width="wrap_content"
                android:layout_height="match_parent"
                android:text="请填写微信号/QQ号/邮箱                  "/>
        </LinearLayout>

    </LinearLayout>

<!--第二个框架-->
    <LinearLayout
        android:layout_width="match_parent"
        android:layout_height="45dp"
        android:layout_marginTop="10dp"
        android:orientation="horizontal">
        <LinearLayout
            android:layout_width="wrap_content"
            android:layout_height="wrap_content"
            android:layout_weight="1">

            <TextView
                android:layout_width="wrap_content"
                android:layout_height="wrap_content"
                android:layout_marginLeft="25dp"
                android:text="密码"
                android:textColor="@color/black"
                android:textSize="25dp" />
        </LinearLayout>

        <LinearLayout
            android:layout_width="wrap_content"
            android:layout_height="wrap_content"
            android:layout_weight="0">
        <EditText
            android:layout_width="wrap_content"
            android:layout_height="wrap_content"
            android:text="请填写密码                                          "/>

        </LinearLayout>

    </LinearLayout>
        <TextView
            android:layout_width="wrap_content"
            android:layout_height="wrap_content"
            android:text="用手机号登录"
            android:layout_marginTop="20dp"
            android:layout_marginLeft="25dp"
            android:textSize="20dp"
            android:textColor="@color/purple_500"/>

    <Button
        android:layout_width="match_parent"
        android:layout_height="wrap_content"
        android:text="登录"
        android:textSize="30dp"
        android:layout_marginTop="30dp"
        />
<!--    第三个框架-->
    <LinearLayout
        android:layout_width="match_parent"
        android:layout_height="wrap_content"
        android:layout_marginTop="150dp"
        android:orientation="horizontal">

        <LinearLayout
            android:layout_width="wrap_content"
            android:layout_height="wrap_content"
            android:layout_weight="2">

            <TextView
                android:layout_width="wrap_content"
                android:layout_height="wrap_content"
                android:text="找回密码"
                android:layout_marginLeft="80dp"
                android:textColor="@color/purple_500"
                android:textSize="15dp" />
        </LinearLayout>

        <LinearLayout
            android:layout_width="122dp"
            android:layout_height="wrap_content"
            android:layout_weight="7">

            <TextView
                android:layout_width="wrap_content"
                android:layout_height="wrap_content"
                android:text="紧急冻结"
                android:layout_marginLeft="40dp"
                android:textColor="@color/purple_500"
                android:textSize="15dp" />
        </LinearLayout>
        <LinearLayout
            android:layout_width="wrap_content"
            android:layout_height="wrap_content"
            android:layout_weight="70">
            <TextView
                android:layout_width="wrap_content"
                android:layout_height="wrap_content"
                android:text="微信安全中心"
                android:textColor="@color/purple_500"/>
        </LinearLayout>

    </LinearLayout>

</LinearLayout>
3.总结
到此这篇关于Android基础知识及线性布局介绍的文章就介绍到这了,更多相关Android线性布局内容请搜索我们以前的文章或继续浏览下面的相关文章希望大家以后多多支持我们!
相关推荐
-

Android布局之LinearLayout线性布局
LinearLayout是线性布局控件:要么横向排布,要么竖向排布 常用属性: android:gravity------------设置的是控件自身上面的内容位置 android:layout_gravity-----设置控件本身相对于父控件的显示位置 android:layout_weight----- 给控件分配剩余空间 先给大家展示一下导图: 知识点详解(演示效果方便组件没有设置id) (1)gravity和Layout_gravity android:gravity 属性是对该view
-
Android RecyclerView线性布局详解(1)
RecyclerView是Android 5.0新增的控件,在android-support-v7下面.官方文档对RecycleView介绍很简洁到位,如下: A flexible view for providing a limited window into a large data set. 大概意思就是说:在有限大小的窗口里显示大量数据的一个灵活的view. 下面是ReccleView继承图: 看到这里我们自然想到了与之类似的控件ListView,RecyclerView和ListVie
-
Android UI组件LinearLayout线性布局详解
LinearLayout 线性布局,该布局的继承关系: 1. 什么是线性布局 通俗的说感觉起来和线有关,参照线的特点,有么是横向的,要么是竖向的. LinearLayout是线性布局控件,它包含的子控件将以横向或竖向的方式排列(通过android:orientation属性来控制),按照相对位置来排列所有的widgets或者其他的containers,超过边界时,某些控件将缺失或消失 2. 线性布局常用基本属性 - android:id - android:orientation - andro
-
Android基础知识及线性布局介绍
目录 1.常见控件的基本属性 1.1控件的可见性 1.2控件的外边距 1.3控件的内边距 2.线性布局(Linear Layout) 2.1示例: 2.2微信界面实战 3.总结 1.常见控件的基本属性 android:id="@+id/button1":[设置控件id] android:layout_width[设置控件宽度]/android:layout_height[设置控件高度] wrap_content[控件的大小由内部决定] match_parent[控件的大小与父控件保持一
-
Android基础知识之单点触摸
相对于多点触摸,单点触摸还是很简单的. 新建一个工程,先看看布局文件: <RelativeLayout xmlns:android="http://schemas.android.com/apk/res/android" xmlns:tools="http://schemas.android.com/tools" android:layout_width="match_parent" android:layout_height="
-
Android基础知识之tween动画效果
Android中一共提供了两种动画,其一便是tween动画,tween动画通过对view的内容进行一系列的图像变换(包括平移,缩放,旋转,改变透明度)来实现动画效果,动画效果的定义可以使用xml,也可以使用编码来实现. 下面我们逐一查看tween能够实现的动画效果. 先看看工程的整体结构吧: 我们要实现的效果图如图 点击按钮则执行相应的动画操作. 布局文件activity_main.xml <LinearLayout xmlns:android="http://schemas.androi
-
Android手机开发 使用线性布局和相对布局实现Button垂直水平居中
居中呢,这里分两种不同布局方式的居中!分别是 LinearLayout 和RelativeLayout. 一.首先说的是LinearLayout布局下的居中: 注意:android:layout_width="fill_parent" android:layout_height="fill_parent" 属性中,若水平居中,至少在宽度上占全屏:若垂直居中,则在高度上占全屏 <LinearLayout android:layout_width="fi
-
Android基础知识之broadcast广播详解
Android中的广播用的太多了,今天稍微总结一下. 按注册方式分为两种: 1.静态注册广播: 静态注册广播就是在androidManifest.xml文件中注册广播,假设我们要实现这样一个效果,在一个activity上点击按钮,发送一条广播,这条广播弹出一个toast,显示"静态"二字. 先看看广播接受者: public class MyBroadcast extends BroadcastReceiver { @Override public void onReceive(Cont
-
Android基础知识之frame动画效果
上一篇我们说了Android中的tween动画,这一篇我们说说frame动画,frame动画主要是实现了一种类似于gif动画的效果,就是多张图按预先设定好的时间依次连续显示. 新建一个android项目,名字叫做frameTest,在res文件夹下新建一个文件夹叫做anim,我们的frame动画的xml文件就放在这里. 在anim中新建一个frame.xml文件,内容如下: <?xml version="1.0" encoding="utf-8"?> &
-
C#基础知识之this关键字介绍
一.this可以代表引用类的当前实例,包括继承而来的方法,通常可以省略. 复制代码 代码如下: public class Person { public string Name { get; set; } public int Age { get; set; } public Person(string Name, int Age) { this.Age = Age; this.Name = Name; } } 这个不用多说
-
C#基础知识之base关键字介绍
一.调用基类已被派生类重写的方法 复制代码 代码如下: public class Father { public virtual void Say() { Console.WriteLine("Father Say"); } } public class Son : Father { public override void Say() { base.Say(); Console.WriteLi
-
C#基础知识之new关键字介绍
一.运算符 用于创建对象和调用构造函数.这种大家都比较熟悉,没什么好说的了. 二.修饰符 在用作修饰符时,new 关键字可以显式隐藏从基类继承的成员. 无new关键字代码: 有new关键字代码: 结果: 注意: 在子类中用 new 关键字修饰定义的与父类中同名的方法,叫覆盖.覆盖不会改变父类方法的功能. 当子类创建父类时,代码中A c = new B(),覆盖不会改变父类的功能.依然还是调用父类的功能. 三.new 约束 用于在泛型声明中约束可能用作类型参数的参数的类型. public clas