SpringBoot使用Redis缓存MySql的方法步骤

目录
  • 1项目组成
  • 2运行springboot
    • 2.1官网download最基本的restful应用
    • 2.2运行应用
  • 3访问mysql
  • 4设置redis缓存

1 项目组成

  • 应用:springboot rest api
  • 数据库:mysql
  • jdbc框架:jpa
  • 缓存中间件:redis

2 运行springboot

2.1 官网download最基本的restful应用

教程地址:https://spring.io/guides/gs/rest-service/

直接download成品,找到git命令 :git clone https://github.com/spring-guides/gs-rest-service.git

创建一个文件夹,打开git bash here(安装git)

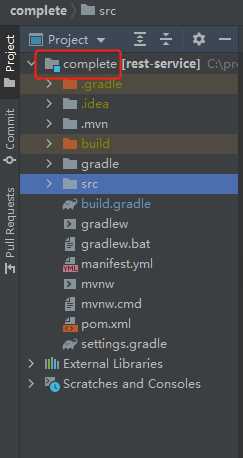
Idea打开成品 (complete文件夹)
2.2 运行应用

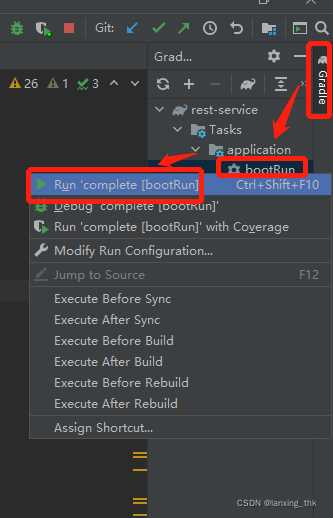
gradle -> bootRun右键 -> Run/Deubg
通过http://localhost:8080/greeting?name=lanxingisthebest访问

3 访问mysql

增加gradle依赖 (通过jpa)

implementation(‘mysql:mysql-connector-java')
implementation(‘org.springframework.boot:spring-boot-starter-data-jpa')

增加配置文件及数据库配置

创建文件application.yml

spring:
 datasource:
   url: jdbc:mysql://localhost:3306/user_info
   username: root
   password: root
 jpa:
   show-sql: true

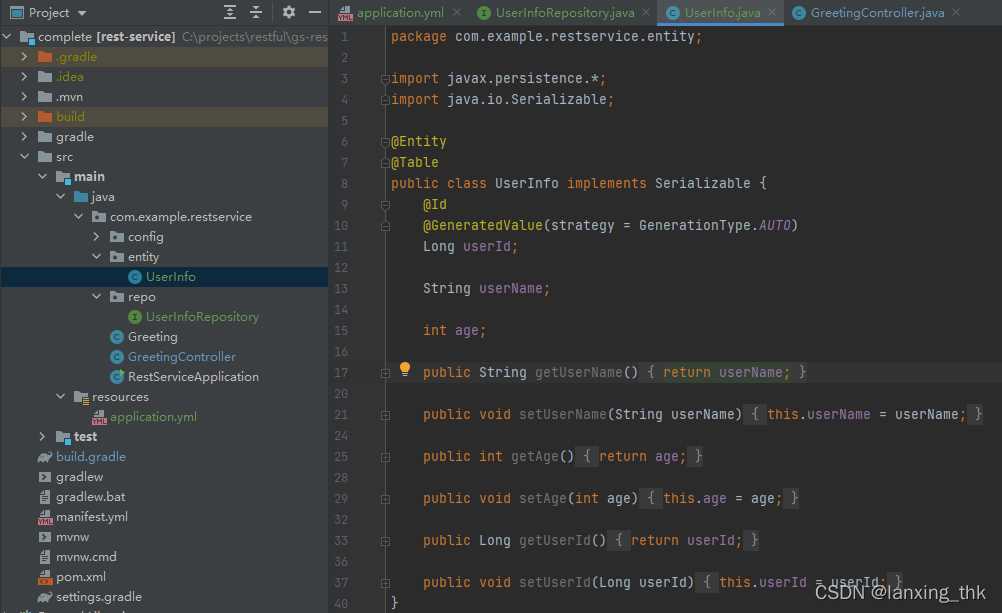
类调整

mysql insert一条数据,然后通过 http://localhost:8080/listAllUser 查询数据库

4 设置redis缓存

增加gradle依赖

implementation(‘org.springframework.boot:spring-boot-starter-data-redis')
implementation(‘org.springframework.boot:spring-boot-starter-cache')

配置文件配置redis参数

spring:
  datasource:
    url: jdbc:mysql://localhost:3306/user_info
    username: root
    password: root
  jpa:
    show-sql: true
  ## Redis 配置
  redis:
    ## Redis数据库索引(默认为0)
    database: 0
    ## Redis服务器地址
    host: localhost
    ## Redis服务器连接端口
    port: 6379
    ## Redis服务器连接密码(默认为空)
    password:
    jedis:
      pool:
        ## 连接池最大连接数(使用负值表示没有限制)
        #spring.redis.pool.max-active=8
        max-active: 8
        ## 连接池最大阻塞等待时间(使用负值表示没有限制)
        #spring.redis.pool.max-wait=-1
        max-wait: -1
        ## 连接池中的最大空闲连接
        #spring.redis.pool.max-idle=8
        max-idle: 8
        ## 连接池中的最小空闲连接
        #spring.redis.pool.min-idle=0
        min-idle: 0
    ## 连接超时时间(毫秒)
    timeout: 1200

Redis配置类

RedisConfig代码

package com.example.restservice.config;

import com.fasterxml.jackson.annotation.JsonAutoDetect;
import com.fasterxml.jackson.annotation.PropertyAccessor;
import com.fasterxml.jackson.databind.ObjectMapper;
import org.springframework.cache.CacheManager;
import org.springframework.cache.annotation.CachingConfigurerSupport;
import org.springframework.cache.annotation.EnableCaching;
import org.springframework.context.annotation.Bean;
import org.springframework.context.annotation.Configuration;
import org.springframework.data.redis.cache.RedisCacheConfiguration;
import org.springframework.data.redis.cache.RedisCacheManager;
import org.springframework.data.redis.cache.RedisCacheWriter;
import org.springframework.data.redis.connection.RedisConnectionFactory;
import org.springframework.data.redis.core.*;
import org.springframework.data.redis.serializer.Jackson2JsonRedisSerializer;
import org.springframework.data.redis.serializer.StringRedisSerializer;

import java.time.Duration;

/**
 * @author lzh
 * create 2019-09-24-15:07
 */
@Configuration
@EnableCaching
public class RedisConfig extends CachingConfigurerSupport {

    /**
     * 选择redis作为默认缓存工具
     * @param redisConnectionFactory
     * @return
     */
    /*@Bean
    //springboot 1.xx
    public CacheManager cacheManager(RedisTemplate redisTemplate) {
        RedisCacheManager rcm = new RedisCacheManager(redisTemplate);
        return rcm;
    }*/
    @Bean
    public CacheManager cacheManager(RedisConnectionFactory redisConnectionFactory) {
        RedisCacheConfiguration redisCacheConfiguration = RedisCacheConfiguration.defaultCacheConfig()
                .entryTtl(Duration.ofHours(1)); // 设置缓存有效期一小时
        return RedisCacheManager
                .builder(RedisCacheWriter.nonLockingRedisCacheWriter(redisConnectionFactory))
                .cacheDefaults(redisCacheConfiguration).build();
    }

    /**
     * retemplate相关配置
     * @param factory
     * @return
     */
    @Bean
    public RedisTemplate<String, Object> redisTemplate(RedisConnectionFactory factory) {

        RedisTemplate<String, Object> template = new RedisTemplate<>();
        // 配置连接工厂
        template.setConnectionFactory(factory);

        //使用Jackson2JsonRedisSerializer来序列化和反序列化redis的value值(默认使用JDK的序列化方式)
        Jackson2JsonRedisSerializer jacksonSeial = new Jackson2JsonRedisSerializer(Object.class);

        ObjectMapper om = new ObjectMapper();
        // 指定要序列化的域,field,get和set,以及修饰符范围,ANY是都有包括private和public
        om.setVisibility(PropertyAccessor.ALL, JsonAutoDetect.Visibility.ANY);
        // 指定序列化输入的类型,类必须是非final修饰的,final修饰的类,比如String,Integer等会跑出异常
        om.enableDefaultTyping(ObjectMapper.DefaultTyping.NON_FINAL);
        jacksonSeial.setObjectMapper(om);

        // 值采用json序列化
        template.setValueSerializer(jacksonSeial);
        //使用StringRedisSerializer来序列化和反序列化redis的key值
        template.setKeySerializer(new StringRedisSerializer());

        // 设置hash key 和value序列化模式
        template.setHashKeySerializer(new StringRedisSerializer());
        template.setHashValueSerializer(jacksonSeial);
        template.afterPropertiesSet();

        return template;
    }

    /**
     * 对hash类型的数据操作
     *
     * @param redisTemplate
     * @return
     */
    @Bean
    public HashOperations<String, String, Object> hashOperations(RedisTemplate<String, Object> redisTemplate) {
        return redisTemplate.opsForHash();
    }

    /**
     * 对redis字符串类型数据操作
     *
     * @param redisTemplate
     * @return
     */
    @Bean
    public ValueOperations<String, Object> valueOperations(RedisTemplate<String, Object> redisTemplate) {
        return redisTemplate.opsForValue();
    }

    /**
     * 对链表类型的数据操作
     *
     * @param redisTemplate
     * @return
     */
    @Bean
    public ListOperations<String, Object> listOperations(RedisTemplate<String, Object> redisTemplate) {
        return redisTemplate.opsForList();
    }

    /**
     * 对无序集合类型的数据操作
     *
     * @param redisTemplate
     * @return
     */
    @Bean
    public SetOperations<String, Object> setOperations(RedisTemplate<String, Object> redisTemplate) {
        return redisTemplate.opsForSet();
    }

    /**
     * 对有序集合类型的数据操作
     *
     * @param redisTemplate
     * @return
     */
    @Bean
    public ZSetOperations<String, Object> zSetOperations(RedisTemplate<String, Object> redisTemplate) {
        return redisTemplate.opsForZSet();
    }
}

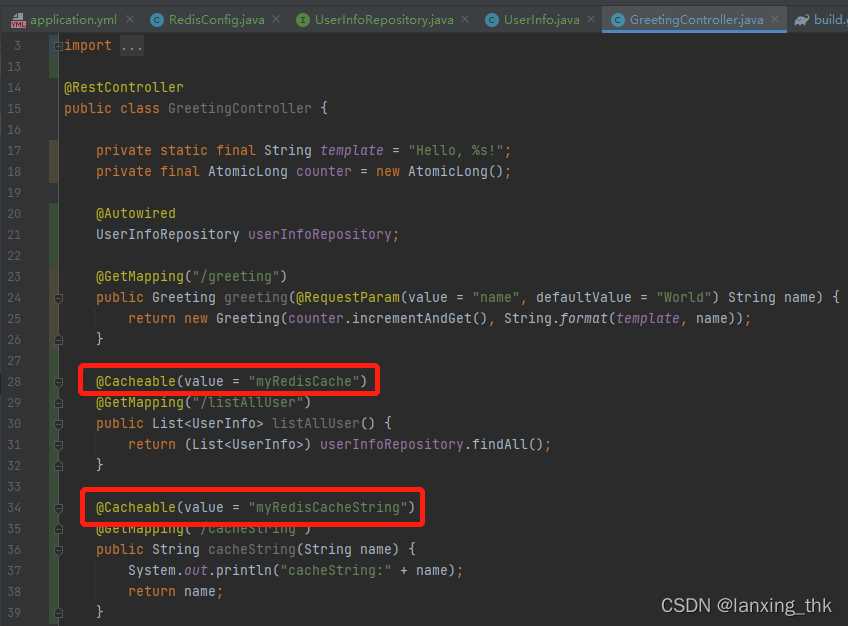
代码通过@Cacheable使用 redis缓存
访问接口后,通过redis工具查询数据

点击 redis-lic.exe
命令 keys *

到此这篇关于SpringBoot使用Redis缓存MySql的方法步骤的文章就介绍到这了,更多相关SpringBoot Redis缓存MySql内容请搜索我们以前的文章或继续浏览下面的相关文章希望大家以后多多支持我们!

(0)

相关推荐

  • SpringBoot redis分布式缓存实现过程解析

    前言 应用系统需要通过Cache来缓存不经常改变得数据来提高系统性能和增加系统吞吐量,避免直接访问数据库等低速存储系统.缓存的数据通常存放在访问速度更快的内存里或者是低延迟存取的存储器,服务器上.应用系统缓存,通常有如下作用:缓存web系统的输出,如伪静态页面.缓存系统的不经常改变的业务数据,如用户权限,字典数据.配置信息等 大家都知道springBoot项目都是微服务部署,A服务和B服务分开部署,那么它们如何更新或者获取共有模块的缓存数据,或者给A服务做分布式集群负载,如何确保A服务的所有集群

  • SpringBoot整合RedisTemplate实现缓存信息监控的步骤

    SpringBoot 整合 Redis 数据库实现数据缓存的本质是整合 Redis 数据库,通过对需要“缓存”的数据存入 Redis 数据库中,下次使用时先从 Redis 中获取,Redis 中没有再从数据库中获取,这样就实现了 Redis 做数据缓存.    按照惯例,下面一步一步的实现 Springboot 整合 Redis 来存储数据,读取数据. 1.项目添加依赖首页第一步还是在项目添加 Redis 的环境, Jedis. <dependency> <groupId>org.

  • springboot中redis的缓存穿透问题实现

    什么是缓存穿透问题?? 我们使用redis是为了减少数据库的压力,让尽量多的请求去承压能力比较大的redis,而不是数据库.但是高并发条件下,可能会在redis还没有缓存的时候,大量的请求同时进入,导致一大批的请求直奔数据库,而不会经过redis.使用代码模拟缓存穿透问题如下: 首先是service里面的代码: @Service public class NewsService { @Autowired private NewsDAO newsDAO; //springboot自动初始化,不需要

  • SpringBoot2整合Redis缓存三步骤代码详解

    遵循SpringBoot三板斧 第一步加依赖 <!-- Redis --> <dependency> <groupId>org.springframework.boot</groupId> <artifactId>spring-boot-starter-data-redis</artifactId> </dependency> <!-- redis依赖commons-pool 这个依赖一定要添加 --> <

  • SpringBoot 开启Redis缓存及使用方法

    目录 Redis缓存 主要步骤 具体实践 整体目录结构 yml文件里配置Redis集群 设置序列化的Bean 编写业务Controller 关于缓存的其他注解 检验结果 之前不是说过Redis可以当作缓存用嘛 现在我们就配置一下SpringBoot使用Redis的缓存 Redis缓存 为什么用Redis作缓存 用redis做缓存,是因为redis有着很优秀的读写能力,在集群下可以保证数据的高可用 主要步骤 1.pom.xml文件添加依赖 2.yml文件配置redis集群 3.编写RedisCon

  • SpringBoot实现redis缓存菜单列表

    因为系统的菜单列表是不轻易改变的,所以不需要在每次请求的时候都去查询数据库,所以,在第一次根据用户id请求到菜单列表的时候,可以把菜单列表的数据缓存在redis里,在第二次请求菜单列表的时候,可以直接在redis缓存里面获取数据,从而减少对数据库的操作,提升性能!首先,我们要下载redis到本地,然后在cmd终端打开redis的src目录,然后运行redis-server即可开启redis本地服务(mac),开启了redis服务后,就要在项目中配置相关的redis的代码了,首先在pom.xml中

  • SpringBoot+SpringCache实现两级缓存(Redis+Caffeine)

    1. 缓存.两级缓存 1.1 内容说明 Spring cache:主要包含spring cache定义的接口方法说明和注解中的属性说明 springboot+spring cache:rediscache实现中的缺陷 caffeine简介 spring boot+spring cache实现两级缓存 使用缓存时的流程图 1.2 Sping Cache spring cache是spring-context包中提供的基于注解方式使用的缓存组件,定义了一些标准接口,通过实现这些接口,就可以通过在方法

  • springboot使用shiro-整合redis作为缓存的操作

    说在前面 本来的整合过程是顺着博客的顺序来的,越往下,集成的越多,由于之前是使用ehcache缓存,现在改为redis,限制登录人数 以及 限制登录次数等 都需要改动,本篇为了简单,目前先将这两个功能下线,配置暂时是注销的,原类保存,在下篇博客中改. 还有之前是使用SessionListener监听session创建来统计在线人数,在本篇中也将改为统计redis中的key数目. 如果是单机,使用ehcache是最快的,项目一般都不是单节点,为了方便之后使用sso单点登录,以及多节点部署,所以使用

  • SpringBoot2.3整合redis缓存自定义序列化的实现

    1.引言 我们使用redis作为缓存中间件时,当我们第一次查询数据的时候,是去数据库查询,然后查到的数据封装到实体类中,实体类会被序列化存入缓存中,当第二次查数据时,会直接去缓存中查找被序列化的数据,然后反序列化被我们获取.我们在缓存中看到的序列化数据不直观,如果想看到类似json的数据格式,就需要自定义序列化规则. 2.整合redis pom.xml: <!--引入redis--> <dependency> <groupId>org.springframework.d

  • SpringBoot使用Redis缓存MySql的方法步骤

    目录 1项目组成 2运行springboot 2.1官网download最基本的restful应用 2.2运行应用 3访问mysql 4设置redis缓存 1 项目组成 应用:springboot rest api 数据库:mysql jdbc框架:jpa 缓存中间件:redis 2 运行springboot 2.1 官网download最基本的restful应用 教程地址:https://spring.io/guides/gs/rest-service/ 直接download成品,找到git命

  • SpringBoot使用Redis缓存的实现方法

    (1)pom.xml引入jar包,如下: <dependency> <groupId>org.springframework.boot</groupId> <artifactId>spring-boot-starter-data-redis</artifactId> </dependency> (2)修改项目启动类,增加注解@EnableCaching,开启缓存功能,如下: package springboot; import org

  • SpringBoot快速迁移至Quarkus的方法步骤

    Quarkus 是一个目前非常火的 Java 应用开发框架,定位是轻量级的微服务框架.,Quarkus 提供了优秀的容器化整合能力,相较于传统开发框架(Spring Boot)有着更快的启动速度.更小的内存消耗.更短的服务响应. 本文将演示将 SpringBoot 迁移至 Quarkus Spring Boot 示例程序 使用 JPA 完成 数据库的增删改查操作,基础代码如下 maven 依赖 <dependency> <groupId>org.springframework.bo

  • 在K8s上部署Redis集群的方法步骤

    一.前言 架构原理:每个Master都可以拥有多个Slave.当Master下线后,Redis集群会从多个Slave中选举出一个新的Master作为替代,而旧Master重新上线后变成新Master的Slave. 二.准备操作 本次部署主要基于该项目:https://github.com/zuxqoj/kubernetes-redis-cluster 其包含了两种部署Redis集群的方式: StatefulSet Service&Deployment 两种方式各有优劣,对于像Redis.Mong

  • Spring Boot实战解决高并发数据入库之 Redis 缓存+MySQL 批量入库问题

    目录 前言 架构设计 代码实现 测试 总结 前言 最近在做阅读类的业务,需要记录用户的PV,UV: 项目状况:前期尝试业务阶段: 特点: 快速实现(不需要做太重,满足初期推广运营即可)快速投入市场去运营 收集用户的原始数据,三要素: 谁在什么时间阅读哪篇文章 提到PV,UV脑海中首先浮现特点: 需要考虑性能(每个客户每打开一篇文章进行记录)允许数据有较小误差(少部分数据丢失) 架构设计 架构图: 时序图 记录基础数据MySQL表结构 CREATE TABLE `zh_article_count`

  • SpringBoot结合Redis实现序列化的方法详解

    目录 前言 配置类 配置 Jackson2JsonRedisSerializer 序列化策略 配置  RedisTemplate 配置缓存策略 测试代码 完整代码 前言 最近在学习Spring Boot结合Redis时看了一些网上的教程,发现这些教程要么比较老,要么不知道从哪抄得,运行起来有问题.这里分享一下我最新学到的写法 默认情况下,Spring 为我们提供了一个 RedisTemplate 来进行对 Redis 的操作,但是 RedisTemplate 默认配置的是使用Java本机序列化.

  • 使用Docker配置redis sentinel哨兵的方法步骤

    目录 1.配置主从 2. 配置哨兵 3.SpringBoot连接 本文演示一主二从. 先说一下遇到的问题.我看网上说想配置哨兵,必须让启动redis的docker网络模式为host,否则无法访问到从还是什么的.我指定--network host后无法外网访问,redis desktop manager连不上redis了,后来发现我这个新克隆的机器没关防火墙,关上就好了. 1.配置主从 docker pull一下redis master mkdir -p /mydata/redis/6379/co

  • Django安装配置mysql的方法步骤

    近期做那个python的开发,今天就来简单的写一下Django安装配置mysql的方法步骤 安装mysql 首先安装pymysql pip install pymysql 然后安装mysqlclient pip install mysqlclient 在安装过程中可能会报类似以下错误(因为我的已经安装成功了,找了类似的图): 在window下安装python的包会出现各种问题,https://www.lfd.uci.edu/~gohlke/pythonlibs/这个网站就是专门用于解决windo

  • 详解在Java程序中运用Redis缓存对象的方法

    这段时间一直有人问如何在Redis中缓存Java中的List 集合数据,其实很简单,常用的方式有两种: 1. 利用序列化,把对象序列化成二进制格式,Redis 提供了 相关API方法存储二进制,取数据时再反序列化回来,转换成对象. 2. 利用 Json与java对象之间可以相互转换的方式进行存值和取值. 正面针对这两种方法,特意写了一个工具类,来实现数据的存取功能. 1. 首页在Spring框架中配置 JedisPool 连接池对象,此对象可以创建 Redis的连接 Jedis对象.当然,必须导

随机推荐