远程debug调试入门
目录
- 1.远程DEBUG的必要性
- 2,IDEA构建SpringBoot测试Demo
- 3,测试Demo项目配置支持远程调试
- 4,IDEA打包jar
- 5,启动jar并且带启动参数支持远程调试
- 6,IDEA远程DEBUG配置
- 1,启动项下拉,选择
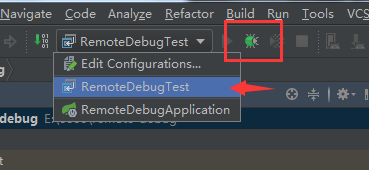
Edit Configurations...编辑配置 - 2,点击
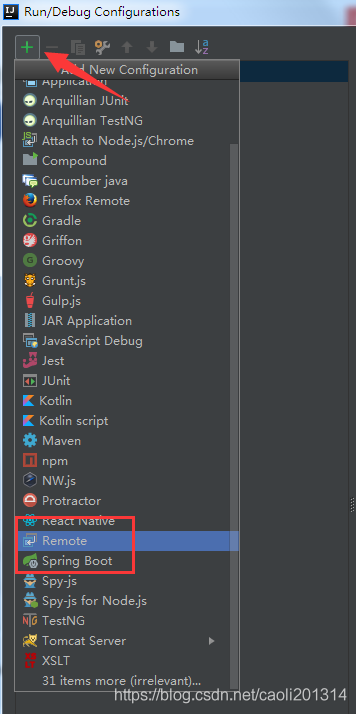
+,选择Remote,添加远程DEBUG配置 - 3,添加远程DEBUG配置项,Host和Port,配置后,点击
Apply和OK按钮 - 7,IDEA远程DEBUG测试
- 1,打测试断点
- 2,选择远程debug启动项,然后点击测试调试按钮启动;
- 3,postman测试
- 4,成功进入断点
- 5,启动的jar包打印信息,测试OK
- 8,eclipse远程DEBUG实现
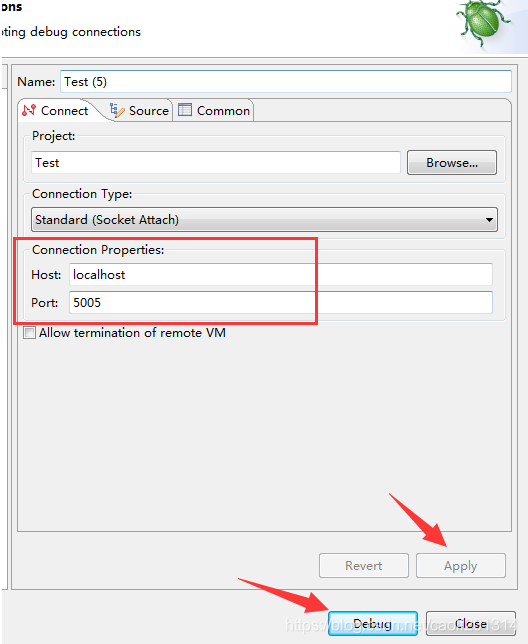
- 1,右击项目 -> Debug As -> Debug Configurations…
- 2,找到
Remote Java Application然后右击New - 3,配置
Host和Port,点击Debug按钮,即可实现远程DEBUG - 9,打war包方式配置远程DEBUG
- 总结
1.远程DEBUG的必要性
由于部署环境的差异性,相信很多朋友都碰到过开发环境正常测试过的功能在测试环境甚至生产环境下出现bug的情况。一般情况下,生产环境可以采取的手段比较单一,即通过日志的方式获取运行中的环境上下文,分析日志文件并尝试重现bug。这会带来的问题还是不少的,首先,日志的分析是一项比较耗时的工作;其次,现有的日志记录不一定能反映出问题,你可能需要多次重复这个过程(分析日志->猜测问题->加日志->部署->获取日志)来慢慢逼近问题。倘若是测试环境,我们还多了一项可供选择的手段——远程调试——将程序在测试环境中以debug模式启动,在本机使用IDEA在工程中设置断点进行调试。
2,IDEA构建SpringBoot测试Demo
新建SpringBoot测试项目remote-debug,只需要web依赖支持即可;版本选用2.2.6.RELEASE(注意,别用2.5.1版本,有坑,亲测)
pom.xml:
<?xml version="1.0" encoding="UTF-8"?>
<project xmlns="http://maven.apache.org/POM/4.0.0" xmlns:xsi="http://www.w3.org/2001/XMLSchema-instance"
	xsi:schemaLocation="http://maven.apache.org/POM/4.0.0 https://maven.apache.org/xsd/maven-4.0.0.xsd">
	<modelVersion>4.0.0</modelVersion>
	<parent>
		<groupId>org.springframework.boot</groupId>
		<artifactId>spring-boot-starter-parent</artifactId>
		<version>2.2.6.RELEASE</version>
		<relativePath/> <!-- lookup parent from repository -->
	</parent>
	<groupId>com.java1234</groupId>
	<artifactId>remote-debug</artifactId>
	<version>v1.0</version>
	<name>remote-debug</name>
	<description>Demo project for Spring Boot</description>
	<properties>
		<java.version>1.8</java.version>
	</properties>
	<dependencies>
		<dependency>
			<groupId>org.springframework.boot</groupId>
			<artifactId>spring-boot-starter-web</artifactId>
		</dependency>
		<dependency>
			<groupId>org.springframework.boot</groupId>
			<artifactId>spring-boot-starter-test</artifactId>
			<scope>test</scope>
		</dependency>
	</dependencies>
	<build>
		<plugins>
			<plugin>
				<groupId>org.springframework.boot</groupId>
				<artifactId>spring-boot-maven-plugin</artifactId>
			</plugin>
		</plugins>
	</build>
</project>
application.yml:
server:
  port: 80
  servlet:
    context-path: /
  tomcat:
    uri-encoding: utf-8
简单搞个TestController,提供一个Rest接口
package com.java1234.controller;

import org.springframework.web.bind.annotation.PostMapping;
import org.springframework.web.bind.annotation.RestController;

/**
 * @author java1234_小锋
 * @site www.java1234.com
 * @company Java知识分享网
 * @create 2021-06-12 15:37
 */
@RestController
public class TestController {

    @PostMapping("/test")
    public String test(Integer id,String name){
        System.out.println("id="+id);
        System.out.println("name="+name);
        if(id>0){
            return "success "+name;
        }else{
            return "fail";
        }
    }

}
我们启动项目,用postman测试下:
测试接口:http://localhost/test 加入Body form-data 参数 id=1,name=marry,Send 测试,返回 success marry,测试OK;

3,测试Demo项目配置支持远程调试
pom.xml里配置jvmArguments参数 -Xdebug -Xrunjdwp:transport=dt_socket,address=5005,server=y,suspend=n:
<build>
	<plugins>
		<plugin>
			<groupId>org.springframework.boot</groupId>
			<artifactId>spring-boot-maven-plugin</artifactId>
			<configuration>
				<jvmArguments>-Xdebug -Xrunjdwp:transport=dt_socket,address=5005,server=y,suspend=n</jvmArguments>
			</configuration>
		</plugin>
	</plugins>
</build>
加了此配置后,打包后的项目发布服务器,可支持远程DEBUG;
具体参数详解:
-Xdebug 通知JVM工作在DEBUG模式下;
-Xrunjdwp 通知JVM使用(Java debug wire protocol)运行调试环境。该参数同时包含了一系列的调试选项;
**transport **指定了调试数据的传送方式,dt_socket是指用SOCKET模式,另有dt_shmem指用共享内存方式,其中,dt_shmem只适用于Windows平台;
address 调试服务器的端口号,客户端用来连接服务器的端口号;
server=y/n VM 是否需要作为调试服务器执行;
suspend=y/n 是否在调试客户端建立连接之后启动 VM;
4,IDEA打包jar
我们打包jar包;
右侧Maven工具,双击 package打包工具;

一般打包跳过test,可以点击箭头所指闪电图标,这样打包速度会快很多;

打包后,在target目录下,会生成一个jar包;我们把它复制出来即可;

5,启动jar并且带启动参数支持远程调试
我们把remote-debug-v1.0.jar放D盘根目录;
我们启动jar,并且支持远程DEBUG;
java -agentlib:jdwp=transport=dt_socket,server=y,suspend=n,address=5005 -jar remote-debug-v1.0.jar

启动OK,监听socket 5005端口
6,IDEA远程DEBUG配置
IDEA要进行远程DEBUG,需要进行配置;
1,启动项下拉,选择 Edit Configurations...编辑配置

2,点击+,选择Remote,添加远程DEBUG配置

3,添加远程DEBUG配置项,Host和Port,配置后,点击Apply和OK按钮

7,IDEA远程DEBUG测试
1,打测试断点
我们直接在TestController类里的test方法上打点断;

2,选择远程debug启动项,然后点击测试调试按钮启动;

3,postman测试

4,成功进入断点

我们走完断点;
5,启动的jar包打印信息,测试OK

8,eclipse远程DEBUG实现
1,右击项目 -> Debug As -> Debug Configurations…

2,找到 Remote Java Application 然后右击 New

3,配置Host和Port,点击Debug按钮,即可实现远程DEBUG

9,打war包方式配置远程DEBUG
如果打的是war包,需要两个步骤:
1.将 web 应用部署到 Tomcat 的 webapp 目录下
2.修改 Tomcat/bin/startup.bat 文件,在最前面加上如下代码:
SET CATALINA_OPTS=-server -Xdebug -Xnoagent -Djava.compiler=NONE -Xrunjdwp:transport=dt_socket,server=y,suspend=n,address=5005
总结
本篇文章就到这里了,希望能给你带来帮助,也希望您能够多多关注我们的更多内容!

