python爬虫实例详解

本篇博文主要讲解Python爬虫实例,重点包括爬虫技术架构,组成爬虫的关键模块:URL管理器、HTML下载器和HTML解析器。

爬虫简单架构
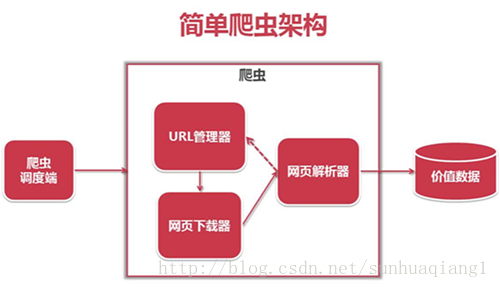
程序入口函数(爬虫调度段)

#coding:utf8
import time, datetime

from maya_Spider import url_manager, html_downloader, html_parser, html_outputer

class Spider_Main(object):
 #初始化操作
 def __init__(self):
  #设置url管理器
  self.urls = url_manager.UrlManager()
  #设置HTML下载器
  self.downloader = html_downloader.HtmlDownloader()
  #设置HTML解析器
  self.parser = html_parser.HtmlParser()
  #设置HTML输出器
  self.outputer = html_outputer.HtmlOutputer()

 #爬虫调度程序
 def craw(self, root_url):
  count = 1
  self.urls.add_new_url(root_url)
  while self.urls.has_new_url():
   try:
    new_url = self.urls.get_new_url()
    print('craw %d : %s' % (count, new_url))
    html_content = self.downloader.download(new_url)
    new_urls, new_data = self.parser.parse(new_url, html_content)
    self.urls.add_new_urls(new_urls)
    self.outputer.collect_data(new_data)

    if count == 10:
     break

    count = count + 1
   except:
    print('craw failed')

  self.outputer.output_html()

if __name__ == '__main__':
 #设置爬虫入口
 root_url = 'http://baike.baidu.com/view/21087.htm'
 #开始时间
 print('开始计时..............')
 start_time = datetime.datetime.now()
 obj_spider = Spider_Main()
 obj_spider.craw(root_url)
 #结束时间
 end_time = datetime.datetime.now()
 print('总用时:%ds'% (end_time - start_time).seconds)

URL管理器

class UrlManager(object):
 def __init__(self):
  self.new_urls = set()
  self.old_urls = set()

 def add_new_url(self, url):
  if url is None:
   return
  if url not in self.new_urls and url not in self.old_urls:
   self.new_urls.add(url)

 def add_new_urls(self, urls):
  if urls is None or len(urls) == 0:
   return
  for url in urls:
   self.add_new_url(url)

 def has_new_url(self):
  return len(self.new_urls) != 0

 def get_new_url(self):
  new_url = self.new_urls.pop()
  self.old_urls.add(new_url)
  return new_url

网页下载器

import urllib
import urllib.request

class HtmlDownloader(object):

 def download(self, url):
  if url is None:
   return None

  #伪装成浏览器访问,直接访问的话csdn会拒绝
  user_agent = 'Mozilla/4.0 (compatible; MSIE 5.5; Windows NT)'
  headers = {'User-Agent':user_agent}
  #构造请求
  req = urllib.request.Request(url,headers=headers)
  #访问页面
  response = urllib.request.urlopen(req)
  #python3中urllib.read返回的是bytes对象,不是string,得把它转换成string对象,用bytes.decode方法
  return response.read().decode()

网页解析器

import re
import urllib
from urllib.parse import urlparse

from bs4 import BeautifulSoup

class HtmlParser(object):

 def _get_new_urls(self, page_url, soup):
  new_urls = set()
  #/view/123.htm
  links = soup.find_all('a', href=re.compile(r'/item/.*?'))
  for link in links:
   new_url = link['href']
   new_full_url = urllib.parse.urljoin(page_url, new_url)
   new_urls.add(new_full_url)
  return new_urls

 #获取标题、摘要
 def _get_new_data(self, page_url, soup):
  #新建字典
  res_data = {}
  #url
  res_data['url'] = page_url
  #<dd class="lemmaWgt-lemmaTitle-title"><h1>Python</h1>获得标题标签
  title_node = soup.find('dd', class_="lemmaWgt-lemmaTitle-title").find('h1')
  print(str(title_node.get_text()))
  res_data['title'] = str(title_node.get_text())
  #<div class="lemma-summary" label-module="lemmaSummary">
  summary_node = soup.find('div', class_="lemma-summary")
  res_data['summary'] = summary_node.get_text()

  return res_data

 def parse(self, page_url, html_content):
  if page_url is None or html_content is None:
   return None

  soup = BeautifulSoup(html_content, 'html.parser', from_encoding='utf-8')
  new_urls = self._get_new_urls(page_url, soup)
  new_data = self._get_new_data(page_url, soup)
  return new_urls, new_data

网页输出器

class HtmlOutputer(object):

 def __init__(self):
  self.datas = []

 def collect_data(self, data):
  if data is None:
   return
  self.datas.append(data )

 def output_html(self):
  fout = open('maya.html', 'w', encoding='utf-8')
  fout.write("<head><meta http-equiv='content-type' content='text/html;charset=utf-8'></head>")
  fout.write('<html>')
  fout.write('<body>')
  fout.write('<table border="1">')
  # <th width="5%">Url</th>
  fout.write('''<tr style="color:red" width="90%">
     <th>Theme</th>
     <th width="80%">Content</th>
     </tr>''')
  for data in self.datas:
   fout.write('<tr>\n')
   # fout.write('\t<td>%s</td>' % data['url'])
   fout.write('\t<td align="center"><a href=\'%s\'>%s</td>' % (data['url'], data['title']))
   fout.write('\t<td>%s</td>\n' % data['summary'])
   fout.write('</tr>\n')
  fout.write('</table>')
  fout.write('</body>')
  fout.write('</html>')
  fout.close()

运行结果

附:完整代码

以上就是本文的全部内容,希望对大家的学习有所帮助,也希望大家多多支持我们。

(0)

相关推荐

  • Python 通过requests实现腾讯新闻抓取爬虫的方法

    最近也是学习了一些爬虫方面的知识.以我自己的理解,通常我们用浏览器查看网页时,是通过浏览器向服务器发送请求,然后服务器响应以后返回一些代码数据,再经过浏览器解析后呈现出来.而爬虫则是通过程序向服务器发送请求,并且将服务器返回的信息,通过一些处理后,就能得到我们想要的数据了. 以下是前段时间我用python写的一个爬取TX新闻标题及其网址的一个简单爬虫: 首先需要用到python中requests(方便全面的http请求库)和 BeautifulSoup(html解析库). 通过pip来安装这两个

  • python爬虫入门教程--利用requests构建知乎API(三)

    前言 在爬虫系列文章 优雅的HTTP库requests中介绍了 requests 的使用方式,这一次我们用 requests 构建一个知乎 API,功能包括:私信发送.文章点赞.用户关注等,因为任何涉及用户操作的功能都需要登录后才操作,所以在阅读这篇文章前建议先了解Python模拟知乎登录 .现在假设你已经知道如何用 requests 模拟知乎登录了. 思路分析 发送私信的过程就是浏览器向服务器发送一个 HTTP 请求,请求报文包括请求 URL.请求头 Header.还有请求体 Body,只要把

  • 使用requests库制作Python爬虫

    使用python爬虫其实就是方便,它会有各种工具类供你来使用,很方便.Java不可以吗?也可以,使用httpclient工具.还有一个大神写的webmagic框架,这些都可以实现爬虫,只不过python集成工具库,使用几行爬取,而Java需要写更多的行来实现,但目的都是一样. 下面介绍requests库简单使用: #!/usr/local/env python # coding:utf-8 import requests #下面开始介绍requests的使用,环境语言是python3,使用下面的

  • python爬虫基础教程:requests库(二)代码实例

    get请求 简单使用 import requests ''' 想要学习Python?Python学习交流群:973783996满足你的需求,资料都已经上传群文件,可以自行下载! ''' response = requests.get("https://www.baidu.com/") #text返回的是unicode的字符串,可能会出现乱码情况 # print(response.text) #content返回的是字节,需要解码 print(response.content.decod

  • Python使用requests及BeautifulSoup构建爬虫实例代码

    本文研究的主要是Python使用requests及BeautifulSoup构建一个网络爬虫,具体步骤如下. 功能说明 在Python下面可使用requests模块请求某个url获取响应的html文件,接着使用BeautifulSoup解析某个html. 案例 假设我要http://maoyan.com/board/4猫眼电影的top100电影的相关信息,如下截图: 获取电影的标题及url. 安装requests和BeautifulSoup 使用pip工具安装这两个工具. pip install

  • Python3多线程爬虫实例讲解代码

    多线程概述 多线程使得程序内部可以分出多个线程来做多件事情,充分利用CPU空闲时间,提升处理效率.python提供了两个模块来实现多线程thread 和threading ,thread 有一些缺点,在threading 得到了弥补.并且在Python3中废弃了thread模块,保留了更强大的threading模块. 使用场景 在python的原始解释器CPython中存在着GIL(Global Interpreter Lock,全局解释器锁),因此在解释执行python代码时,会产生互斥锁来限

  • python中数据爬虫requests库使用方法详解

    一.什么是Requests Requests 是Python语编写,基于urllib,采Apache2 Licensed开源协议的 HTTP 库.它urllib 更加方便,可以节约我们大量的工作,完全满足HTTP测试需求. 一句话--requests是python实现的简单易用的HTTP库 二.安装Requests库 进入命令行win+R执行 命令:pip install requests 项目导入:import requests 三.各种请求方式 直接上代码,不明白可以查看我的urllib的基

  • python爬虫入门教程--优雅的HTTP库requests(二)

    前言 urllib.urllib2.urllib3.httplib.httplib2 都是和 HTTP 相关的 Python 模块,看名字就觉得很反人类,更糟糕的是这些模块在 Python2 与 Python3 中有很大的差异,如果业务代码要同时兼容 2 和 3,写起来会让人崩溃. 好在,还有一个非常惊艳的 HTTP 库叫 requests,它是 GitHUb 关注数最多的 Python 项目之一,requests 的作者是 Kenneth Reitz 大神. requests 实现了 HTTP

  • python爬虫实例详解

    本篇博文主要讲解Python爬虫实例,重点包括爬虫技术架构,组成爬虫的关键模块:URL管理器.HTML下载器和HTML解析器. 爬虫简单架构 程序入口函数(爬虫调度段) #coding:utf8 import time, datetime from maya_Spider import url_manager, html_downloader, html_parser, html_outputer class Spider_Main(object): #初始化操作 def __init__(se

  • python 中xpath爬虫实例详解

    案例一: 某套图网站,套图以封面形式展现在页面,需要依次点击套图,点击广告盘链接,最后到达百度网盘展示页面. 这一过程通过爬虫来实现,收集百度网盘地址和提取码,采用xpath爬虫技术 1.首先分析图片列表页,该页按照更新先后顺序暂时套图封面,查看HTML结构.每一组"li"对应一组套图.属性href后面即为套图的内页地址(即广告盘链接页).所以,我们先得获取列表页内所有的内页地址(即广告盘链接页) 代码如下: import requests 倒入requests库 from lxml

  • JAVA 多线程爬虫实例详解

    JAVA 多线程爬虫实例详解 前言 以前喜欢Python的爬虫是出于他的简洁,但到了后期需要更快,更大规模的爬虫的时候,我才渐渐意识到Java的强大.Java有一个很好的机制,就是多线程.而且Java的代码效率执行起来要比python快很多.这份博客主要用于记录我对多线程爬虫的实践理解. 线程 线程是指一个任务从头至尾的执行流.线程提供了运行一个任务的机制.对于Java而言,可以在一个程序中并发地启动多个线程.这些线程可以在多处理器系统上同时运行. runnable接口 任务类必须实现runna

  • python3.7简单的爬虫实例详解

    python3.7简单的爬虫,具体代码如下所示: #https://www.runoob.com/w3cnote/python-spider-intro.html #Python 爬虫介绍 import urllib.parse import urllib.request from http import cookiejar url = "http://www.baidu.com" response1 = urllib.request.urlopen(url) print("

  • Python 多线程实例详解

    Python 多线程实例详解 多线程通常是新开一个后台线程去处理比较耗时的操作,Python做后台线程处理也是很简单的,今天从官方文档中找到了一个Demo. 实例代码: import threading, zipfile class AsyncZip(threading.Thread): def __init__(self, infile, outfile): threading.Thread.__init__(self) self.infile = infile self.outfile =

  • 基于python爬虫数据处理(详解)

    一.首先理解下面几个函数 设置变量 length()函数 char_length() replace() 函数 max() 函数 1.1.设置变量 set @变量名=值 set @address='中国-山东省-聊城市-莘县'; select @address 1.2 .length()函数 char_length()函数区别 select length('a') ,char_length('a') ,length('中') ,char_length('中') 1.3. replace() 函数

  • python自定义异常实例详解

    python自定义异常实例详解 本文通过两种方法对Python 自定义异常进行讲解,第一种:创建一个新的exception类来拥有自己的异常,第二种:raise 唯一的一个参数指定了要被抛出的异常 1.可以通过创建一个新的exception类来拥有自己的异常.异常应该继承自 Exception 类,或者直接继承,或者间接继承. >>>raiseNameError('HiThere') Traceback(most recent call last): File"<pysh

  • zookeeper python接口实例详解

    本文主要讲python支持zookeeper的接口库安装和使用.zk的python接口库有zkpython,还有kazoo,下面是zkpython,是基于zk的C库的python接口. zkpython安装 前提是zookeeper安装包已经在/usr/local/zookeeper下 cd /usr/local/zookeeper/src/c ./configure make make install wget --no-check-certificate http://pypi.python

  • scrapy处理python爬虫调度详解

    学习了简单的知识点,就会想要向有难度的问题挑战,这里必须要夸一夸小伙伴们.不过我们今天不需要做什么程序的测试,只用简单的两个代码对比,小伙伴们就能在其中体会两者的不同和难易程度.scrapy能否适合处理python爬虫调度的问题,小编直接说出答案小伙伴们也不能马上信服,下面就让我们在示例中找寻答案吧. 总的来说,需要使用代码来爬一些数据的大概分为两类人: 非程序员,需要爬一些数据来做毕业设计.市场调研等等,他们可能连 Python 都不是很熟: 程序员,需要设计大规模.分布式.高稳定性的爬虫系统

  • 一个入门级python爬虫教程详解

    前言 本文目的:根据本人的习惯与理解,用最简洁的表述,介绍爬虫的定义.组成部分.爬取流程,并讲解示例代码. 基础 爬虫的定义:定向抓取互联网内容(大部分为网页).并进行自动化数据处理的程序.主要用于对松散的海量信息进行收集和结构化处理,为数据分析和挖掘提供原材料. 今日t条就是一只巨大的"爬虫". 爬虫由URL库.采集器.解析器组成. 流程 如果待爬取的url库不为空,采集器会自动爬取相关内容,并将结果给到解析器,解析器提取目标内容后进行写入文件或入库等操作. 代码 第一步:写一个采集

随机推荐