Android实现注册登录界面的实例代码
本文讲述了在linux命令下导出导入.sql文件的方法。分享给大家供大家参考,具体如下:
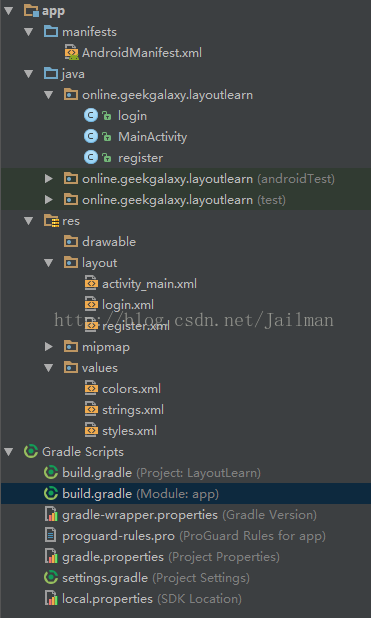
AndroidManifest.xml
<?xml version="1.0" encoding="utf-8"?>
<manifest xmlns:android="http://schemas.android.com/apk/res/android"
 package="online.geekgalaxy.layoutlearn">
 <application
 android:allowBackup="true"
 android:icon="@mipmap/ic_launcher"
 android:label="@string/app_name"
 android:roundIcon="@mipmap/ic_launcher_round"
 android:supportsRtl="true"
 android:theme="@style/AppTheme">
 <activity android:name=".MainActivity">
  <intent-filter>
  <action android:name="android.intent.action.MAIN" />
  <category android:name="android.intent.category.LAUNCHER" />
  </intent-filter>
 </activity>
 <activity android:name=".login">
  <intent-filter>
  <action android:name="android.intent.action.MAIN" />
  </intent-filter>
 </activity>
 <activity android:name=".register">
  <intent-filter>
  <action android:name="android.intent.action.MAIN" />
  </intent-filter>
 </activity>
 </application>
</manifest>
MainActivity.java
package online.geekgalaxy.layoutlearn;
import android.content.DialogInterface;
import android.content.Intent;
import android.support.v7.app.AlertDialog;
import android.support.v7.app.AppCompatActivity;
import android.os.Bundle;
import android.view.View;
import android.widget.Button;
import android.widget.EditText;
public class MainActivity extends AppCompatActivity {
 @Override
 protected void onCreate(Bundle savedInstanceState) {
 super.onCreate(savedInstanceState);
 setContentView(R.layout.activity_main);
 //login button
 final Button login = (Button) findViewById(R.id.button);
 final String user = "admin";
 final String pass = "hello";

 login.setOnClickListener(new View.OnClickListener() {
  public void onClick(View view) {
  String username = "";
  EditText editText1 = (EditText)findViewById(R.id.editText);
  username = editText1.getText().toString();
  String password = "";
  EditText editText2 = (EditText)findViewById(R.id.editText2);
  password = editText2.getText().toString();
  if (username.equals(user) & password.equals(pass)) {
   Intent intent = new Intent(MainActivity.this, login.class);
   startActivity(intent);
  }
  else {
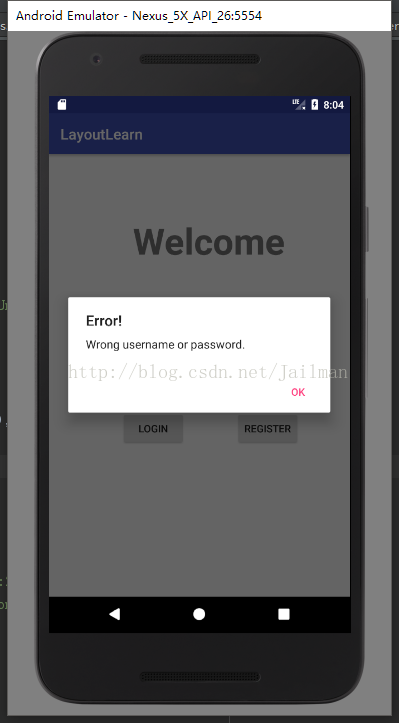
   new AlertDialog.Builder(MainActivity.this).setTitle("Error!").setMessage("Wrong username or password.")
    .setNegativeButton("OK",null)
    .show();
  }
  }
 });
 //register button
 final Button register = (Button) findViewById(R.id.button2);
 register.setOnClickListener(new View.OnClickListener() {
  public void onClick(View view) {
  //提示框确定是否跳转
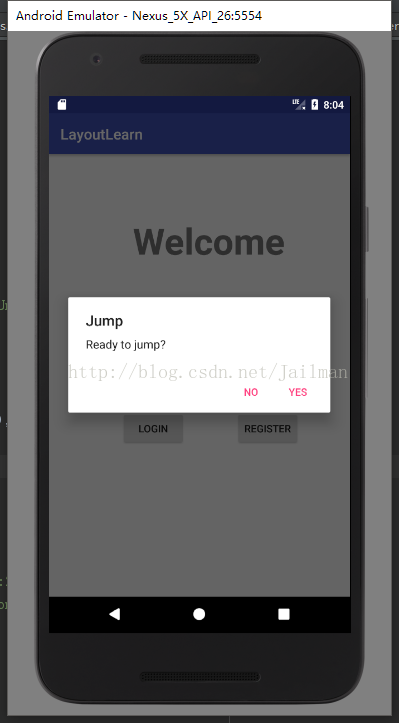
  new AlertDialog.Builder(MainActivity.this).setTitle("Jump").setMessage("Ready to jump?")
   .setPositiveButton("Yes", new DialogInterface.OnClickListener() {
    public void onClick(DialogInterface dialog, int which) {
    Intent intent = new Intent(MainActivity.this, register.class);
    startActivity(intent);
    }})
   .setNegativeButton("No",null)
   .show();
  }
 });
 }
}
login.java
package online.geekgalaxy.layoutlearn;
import android.app.Activity;
import android.os.Bundle;
/**
 * Created by jailman on 2017/9/18.
 */
public class login extends Activity {
 @Override
 protected void onCreate(Bundle savedInstanceState) {
 super.onCreate(savedInstanceState);
 setContentView(R.layout.login);
 }
}
register.java
package online.geekgalaxy.layoutlearn;
import android.app.Activity;
import android.os.Bundle;
/**
 * Created by jailman on 2017/9/18.
 */
public class register extends Activity{
 @Override
 protected void onCreate(Bundle savedInstanceState) {
 super.onCreate(savedInstanceState);
 setContentView(R.layout.register);
 }
}
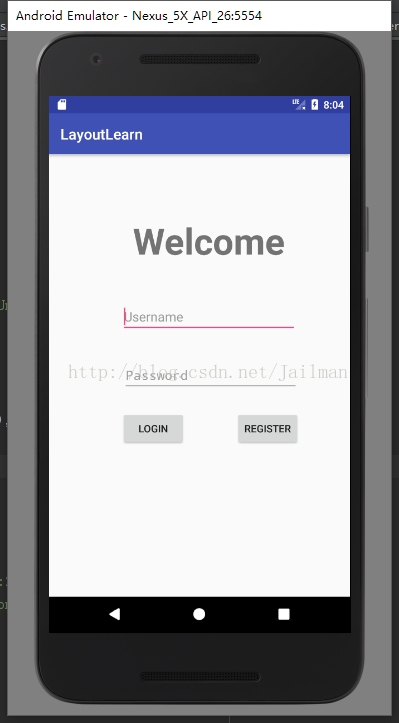
activity_main.xml
<?xml version="1.0" encoding="utf-8"?>
<android.support.constraint.ConstraintLayout xmlns:android="http://schemas.android.com/apk/res/android"
 xmlns:app="http://schemas.android.com/apk/res-auto"
 xmlns:tools="http://schemas.android.com/tools"
 android:layout_width="match_parent"
 android:layout_height="match_parent"
 android:layout_centerVertical="true"
 tools:context="online.geekgalaxy.layoutlearn.MainActivity">
 <Button
 android:id="@+id/button"
 android:layout_width="wrap_content"
 android:layout_height="wrap_content"
 android:layout_marginRight="68dp"
 android:text="@string/login"
 app:layout_constraintRight_toLeftOf="@+id/button2"
 tools:layout_constraintTop_creator="1"
 android:layout_marginEnd="68dp"
 android:layout_marginTop="26dp"
 app:layout_constraintTop_toBottomOf="@+id/editText2" />
 <Button
 android:id="@+id/button2"
 android:layout_width="wrap_content"
 android:layout_height="wrap_content"
 android:text="@string/register"
 tools:layout_constraintTop_creator="1"
 tools:layout_constraintRight_creator="1"
 android:layout_marginEnd="68dp"
 app:layout_constraintRight_toRightOf="parent"
 android:layout_marginTop="26dp"
 app:layout_constraintTop_toBottomOf="@+id/editText2" />
 <EditText
 android:id="@+id/editText"
 android:layout_width="240dp"
 android:layout_height="45dp"
 android:layout_marginBottom="35dp"
 android:layout_marginEnd="68dp"
 android:layout_marginLeft="8dp"
 android:layout_marginRight="8dp"
 android:layout_marginStart="68dp"
 android:ems="10"
 android:hint="@string/username"
 android:inputType="textPersonName"
 app:layout_constraintBottom_toTopOf="@+id/editText2"
 app:layout_constraintHorizontal_bias="0.516"
 app:layout_constraintLeft_toLeftOf="@+id/editText2"
 app:layout_constraintRight_toRightOf="@+id/editText2"
 tools:layout_constraintLeft_creator="1"
 tools:layout_constraintRight_creator="1"
 tools:layout_editor_absoluteX="-15dp"
 tools:layout_editor_absoluteY="152dp" />
 <EditText
 android:id="@+id/editText2"
 android:layout_width="240dp"
 android:layout_height="45dp"
 android:layout_marginEnd="69dp"
 android:layout_marginLeft="0dp"
 android:layout_marginRight="0dp"
 android:layout_marginStart="69dp"
 android:ems="10"
 android:hint="@string/password"
 android:inputType="textPassword"
 app:layout_constraintBottom_toBottomOf="parent"
 app:layout_constraintLeft_toLeftOf="@+id/button"
 app:layout_constraintRight_toRightOf="@+id/button2"
 app:layout_constraintTop_toTopOf="parent"
 tools:layout_constraintBottom_creator="1"
 tools:layout_constraintLeft_creator="1"
 tools:layout_constraintRight_creator="1"
 tools:layout_constraintTop_creator="1" />
 <TextView
 android:id="@+id/textView2"
 android:layout_width="250dp"
 android:layout_height="65dp"
 android:layout_marginBottom="50dp"
 android:layout_marginLeft="8dp"
 android:layout_marginRight="8dp"
 android:autoText="false"
 android:text="Welcome"
 android:textAlignment="center"
 android:textSize="50sp"
 android:textStyle="bold"
 app:layout_constraintBottom_toTopOf="@+id/editText"
 app:layout_constraintHorizontal_bias="0.509"
 app:layout_constraintLeft_toLeftOf="@+id/editText"
 app:layout_constraintRight_toRightOf="@+id/editText" />
</android.support.constraint.ConstraintLayout>
login.xml
<?xml version="1.0" encoding="utf-8"?>
<LinearLayout xmlns:android="http://schemas.android.com/apk/res/android"
 android:layout_width="match_parent"
 android:layout_height="match_parent"
 android:weightSum="1">
 <TextView
 android:id="@+id/textView3"
 android:layout_width="0dp"
 android:layout_height="118dp"
 android:layout_marginTop="200dp"
 android:layout_weight="1"
 android:text="@string/great_you_ve_login"
 android:textAlignment="center"
 android:textSize="24sp"
 android:textStyle="bold" />
</LinearLayout>
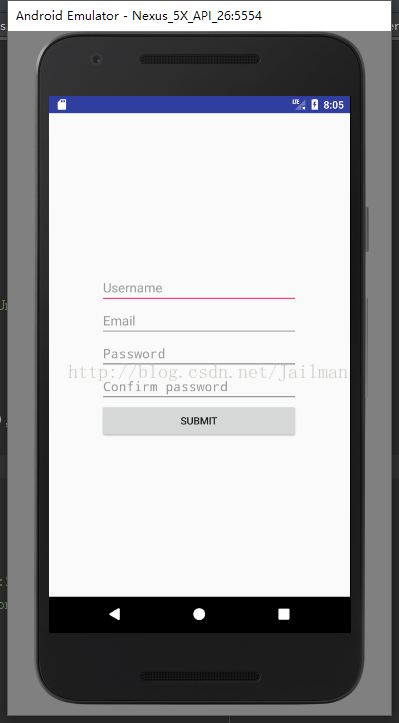
register.xml
<?xml version="1.0" encoding="utf-8"?>
<LinearLayout xmlns:android="http://schemas.android.com/apk/res/android"
 android:layout_width="match_parent"
 android:layout_height="match_parent">
 <LinearLayout
 android:layout_width="match_parent"
 android:layout_height="match_parent"
 android:gravity="center_vertical|center_horizontal"
 android:orientation="vertical">
 <EditText
  android:id="@+id/editText5"
  android:layout_width="270dp"
  android:layout_height="wrap_content"
  android:ems="10"
  android:hint="Username"
  android:inputType="textPersonName" />
 <EditText
  android:id="@+id/editText6"
  android:layout_width="270dp"
  android:layout_height="wrap_content"
  android:ems="10"
  android:hint="Email"
  android:inputType="textPersonName" />
 <EditText
  android:id="@+id/editText7"
  android:layout_width="270dp"
  android:layout_height="wrap_content"
  android:ems="10"
  android:hint="Password"
  android:inputType="textPassword" />
 <EditText
  android:id="@+id/editText8"
  android:layout_width="270dp"
  android:layout_height="wrap_content"
  android:ems="10"
  android:hint="Confirm password"
  android:inputType="textPassword" />
 <Button
  android:id="@+id/button3"
  android:layout_width="270dp"
  android:layout_height="wrap_content"
  android:text="Submit" />
 </LinearLayout>
</LinearLayout>
strings.xml
<resources>
 <string name="app_name">LayoutLearn</string>
 <string name="login">Login</string>
 <string name="register">Register</string>
 <string name="username">Username</string>
 <string name="password">Password</string>
 <string name="great_you_ve_login">Great, you\'ve logged in!</string>
</resources>
build.gradle
apply plugin: 'com.android.application'
android {
 compileSdkVersion 25
 buildToolsVersion "25.0.3"
 defaultConfig {
 applicationId "online.geekgalaxy.layoutlearn"
 minSdkVersion 19
 targetSdkVersion 25
 versionCode 1
 versionName "1.0"
 testInstrumentationRunner "android.support.test.runner.AndroidJUnitRunner"
 }
 buildTypes {
 release {
  minifyEnabled false
  proguardFiles getDefaultProguardFile('proguard-android.txt'), 'proguard-rules.pro'
 }
 }
}
dependencies {
 compile fileTree(dir: 'libs', include: ['*.jar'])
 androidTestCompile('com.android.support.test.espresso:espresso-core:2.2.2', {
 exclude group: 'com.android.support', module: 'support-annotations'
 })
 compile 'com.android.support:appcompat-v7:25.3.1'
 compile 'com.android.support.constraint:constraint-layout:1.0.2'
 testCompile 'junit:junit:4.12'
}
您可能感兴趣的文章:
- Android实现闪屏及注册和登录界面之间的切换效果
- Android设计登录界面、找回密码、注册功能
- Android开发之注册登录方法示例
- Android注册登录实时自动获取短信验证码
- Android手机注册登录时获取验证码之后倒计时功能(知识点总结)
- Android QQ登录界面绘制代码
- Android用户注册界面简单设计
- Android用户注册界面
赞 (0)

