Python如何生成树形图案
本文实例为大家分享了Python生成树形图案的具体代码,供大家参考,具体内容如下
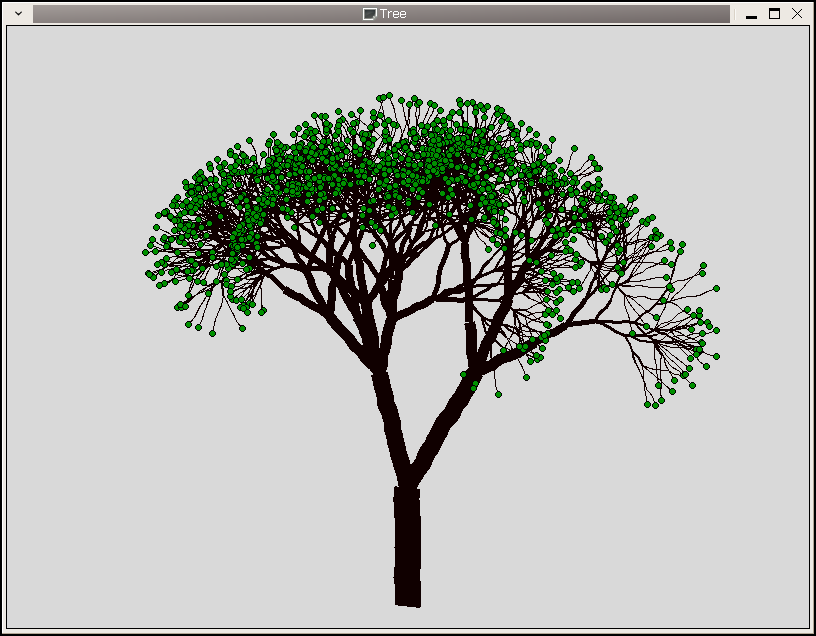
先看一下效果,见下图。

上面这颗大树是使用Python + Tkinter绘制的,主要原理为使用分形画树干、树枝,最终叶节点上画上绿色圆圈代表树叶。当然,为了看起来更真实,绘制过程中也加入了一些随机变化,比如树枝会稍微有些扭曲而不是一条直线,分叉的角度、长短等都会随机地作一些偏移等。
以下是完整源代码:
# -*- coding: utf-8 -*-

import Tkinter
import sys, random, math

class Point(object):
  def __init__(self, x, y):
    self.x = x
    self.y = y

  def __str__(self):
    return "<Point>: (%f, %f)" % (self.x, self.y)

class Branch(object):
  def __init__(self, bottom, top, branches, level = 0):
    self.bottom = bottom
    self.top = top
    self.level = level
    self.branches = branches
    self.children = []

  def __str__(self):
    s = "Top: %s, Bottom: %s, Children Count: %d" % /
      (self.top, self.bottom, len(self.children))
    return s

  def nextGen(self, n = -1, rnd = 1):
    if n <= 0: n = self.branches
    if rnd == 1:
      n = random.randint(n / 2, n * 2)
      if n <= 0: n = 1
    dx = self.top.x - self.bottom.x
    dy = self.top.y - self.bottom.y
    r = 0.20 + random.random() * 0.2
    if self.top.x == self.bottom.x:
      # 如果是一条竖线
      x = self.top.x
      y = dy * r + self.bottom.y
    elif self.top.y == self.bottom.y:
      # 如果是一条横线
      x = dx * r + self.bottom.x
      y = self.top.y
    else:
      x = dx * r
      y = x * dy / dx
      x += self.bottom.x
      y += self.bottom.y
    oldTop = self.top
    self.top = Point(x, y)
    a = math.pi / (2 * n)
    for i in range(n):
      a2 = -a * (n - 1) / 2 + a * i - math.pi
      a2 *= 0.9 + random.random() * 0.2
      self.children.append(self.mkNewBranch(self.top, oldTop, a2))

  def mkNewBranch(self, bottom, top, a):
    dx1 = top.x - bottom.x
    dy1 = top.y - bottom.y
    r = 0.9 + random.random() * 0.2
    c = math.sqrt(dx1 ** 2 + dy1 ** 2) * r
    if dx1 == 0:
      a2 = math.pi / 2
    else:
      a2 = math.atan(dy1 / dx1)
      if (a2 < 0 and bottom.y > top.y) /
        or (a2 > 0 and bottom.y < top.y) /
        :
        a2 += math.pi
    b = a2 - a
    dx2 = c * math.cos(b)
    dy2 = c * math.sin(b)
    newTop = Point(dx2 + bottom.x, dy2 + bottom.y)
    return Branch(bottom, newTop, self.branches, self.level + 1)

class Tree(object):
  def __init__(self, root, canvas, bottom, top, branches = 3, depth = 3):
    self.root = root
    self.canvas = canvas
    self.bottom = bottom
    self.top = top
    self.branches = branches
    self.depth = depth
    self.new()

  def gen(self, n = 1):
    for i in range(n):
      self.getLeaves()
      for node in self.leaves:
        node.nextGen()
    self.show()

  def new(self):
    self.leavesCount = 0
    self.branch = Branch(self.bottom, self.top, self.branches)
    self.gen(self.depth)
    print "leaves count: %d" % self.leavesCount

  def chgDepth(self, d):
    self.depth += d
    if self.depth < 0: self.depth = 0
    if self.depth > 10: self.depth = 10
    self.new()

  def chgBranch(self, d):
    self.branches += d
    if self.branches < 1: self.branches = 1
    if self.branches > 10: self.branches = 10
    self.new()

  def getLeaves(self):
    self.leaves = []
    self.map(self.findLeaf)

  def findLeaf(self, node):
    if len(node.children) == 0:
      self.leaves.append(node)

  def show(self):
    for i in self.canvas.find_all():
      self.canvas.delete(i)
    self.map(self.drawNode)
    self.canvas.tag_raise("leaf")

  def exit(self, evt):
    sys.exit(0)

  def map(self, func = lambda node: node):
    # 遍历树
    children = [self.branch]
    while len(children) != 0:
      newChildren = []
      for node in children:
        func(node)
        newChildren.extend(node.children)
      children = newChildren

  def drawNode(self, node):
    self.line2(
#    self.canvas.create_line(
        node.bottom.x,
        node.bottom.y,
        node.top.x,
        node.top.y,
        fill = "#100",
        width = 1.5 ** (self.depth - node.level),
        tags = "branch level_%d" % node.level,
      )

    if len(node.children) == 0:
      # 画叶子
      self.leavesCount += 1
      self.canvas.create_oval(
          node.top.x - 3,
          node.top.y - 3,
          node.top.x + 3,
          node.top.y + 3,
          fill = "#090",
          tag = "leaf",
        )

    self.canvas.update()

  def line2(self, x0, y0, x1, y1, width = 1, fill = "#000", minDist = 10, tags = ""):
    dots = midDots(x0, y0, x1, y1, minDist)
    dots2 = []
    for i in range(len(dots) - 1):
      dots2.extend([dots[i].x,
        dots[i].y,
        dots[i + 1].x,
        dots[i + 1].y])
    self.canvas.create_line(
        dots2,
        fill = fill,
        width = width,
        smooth = True,
        tags = tags,
      )

def midDots(x0, y0, x1, y1, d):
  dots = []
  dx, dy, r = x1 - x0, y1 - y0, 0
  if dx != 0:
    r = float(dy) / dx
  c = math.sqrt(dx ** 2 + dy ** 2)
  n = int(c / d) + 1
  for i in range(n):
    if dx != 0:
      x = dx * i / n
      y = x * r
    else:
      x = dx
      y = dy * i / n
    if i > 0:
      x += d * (0.5 - random.random()) * 0.25
      y += d * (0.5 - random.random()) * 0.25
    x += x0
    y += y0
    dots.append(Point(x, y))
  dots.append(Point(x1, y1))
  return dots

if __name__ == "__main__":
  root = Tkinter.Tk()
  root.title("Tree")
  gw, gh = 800, 600
  canvas = Tkinter.Canvas(root,
      width = gw,
      height = gh,
    )
  canvas.pack()
  tree = Tree(root, canvas, Point(gw / 2, gh - 20), Point(gw / 2, gh * 0.2), /
    branches = 2, depth = 8)
  root.bind("n", lambda evt: tree.new())
  root.bind("=", lambda evt: tree.chgDepth(1))
  root.bind("+", lambda evt: tree.chgDepth(1))
  root.bind("-", lambda evt: tree.chgDepth(-1))
  root.bind("b", lambda evt: tree.chgBranch(1))
  root.bind("c", lambda evt: tree.chgBranch(-1))
  root.bind("q", tree.exit)
  root.mainloop()
因为每次生成的树都是随机的,所以你生成的树和上图会不太一样,可能会更为枝繁叶茂,也可能会看起来才刚刚发芽。程序中绑定了若干快捷键,比如“n”是随机产生一颗新的树,“q”是退出程序。另外还有一些不太常用的快捷键,如“+”/“-”是增加/减少树的深度,“b”/“c”分别代表更多/更少的分叉,需要注意的是,增加深度或分叉可能需要更多的计算时间。
从这次树形图案的绘制过程中,我也有一些有趣的发现,比如,树枝上某一处的横截面宽度与它与树根之间的距离似乎呈一种指数函数的关系。如用H表示树的总高度,h表示树枝上某一点的高度,w表示这一点横截面的宽度,那么w与h之间似乎存在这样一种关系:w = a * b ^ (H - h) + c,这儿a、b、c都是常数。当然,这只是一个猜测,因为绘制的过程中我发现当w与h满足这样关系时画出来的图案看起来最“自然”,这个问题或许下次可以再深入研究一下。
以上就是本文的全部内容,希望对大家的学习有所帮助,也希望大家多多支持我们。
赞 (0)

