C++ ffmpeg硬件解码的实现方法
目录
- 什么是硬件解码
- 为什么要使用硬件解码
- 怎样使用硬件解码
- 注意事项
- 关键函数解析
什么是硬件解码
普通解码是利用cpu去解码也就是软件解码 硬件解码就是利用gpu去解码
为什么要使用硬件解码
首先最大的好处 快硬解播放出来的视频较为流畅,并且能够延长移动设备播放视频的时间; 而软解由于软解加大CPU工作负荷,会占用过多的移动CPU资源,如果CPU能力不足,则软件也将受到影响 最主要就是一个字 快
怎样使用硬件解码
ffmpeg内部为我们提供了友好的接口去实现硬件解码
注意事项
ffmpeg内部有很多编解码器 并不是所有的编解码器都支持硬件解码 并且就算支持硬件解码的编解码器也不一定能支持你的显卡 也就是说在使用硬件解码时我们首先要去判断这个解码器是否支持在这个平台对这个显卡进行硬件编解码 不然是无法使用的
对显卡厂家SDK进行封装和集成,实现部分的硬件编解码

其次在ffmpeg中软件编解码器可以实现相关硬解加速。如在h264解码器中可以使用cuda 加速,qsv加速,dxva2 加速,d3d11va加速,opencl加速等。cuda qsv等就是不同公司推出的针对gpu编程的工具包

AV_CODEC_ID_H264;代表是h264编解码器。而name代表某一个编码器或解码器。通常我们使用avcodec_find_decoder(ID)和avcodec_find_encoder(ID)来解码器和编码器。默认采用的软件编解码。如果我们需要使用硬件编解码,采用avcodec_find_encoder_by_name(name)和avcodec_find_decoder_by_name(name)来指定编码器。其他代码流程与软件编解码一致。
	//codec = avcodec_find_decoder(AV_CODEC_ID_H264);
	codec = avcodec_find_decoder_by_name("h264_cuvid");
	if (!codec) {
		fprintf(stderr, "Codec not found\n");
		exit(1);
	}
通过id找到的可能并不是你预期中的编解码器 通过name找到的一定是你想要的
下面是ffmpeg官方的硬件解码例子 我加上了中文注释方便理解
#include <stdio.h>
#include <libavcodec/avcodec.h>
#include <libavformat/avformat.h>
#include <libavutil/pixdesc.h>
#include <libavutil/hwcontext.h>
#include <libavutil/opt.h>
#include <libavutil/avassert.h>
#include <libavutil/imgutils.h>
static AVBufferRef *hw_device_ctx = NULL;
static enum AVPixelFormat hw_pix_fmt;
static FILE *output_file = NULL;
static int hw_decoder_init(AVCodecContext *ctx, const enum AVHWDeviceType type)
{
	int err = 0;
	//创建硬件设备信息上下文
	if ((err = av_hwdevice_ctx_create(&hw_device_ctx, type,
		NULL, NULL, 0)) < 0) {
		fprintf(stderr, "Failed to create specified HW device.\n");
		return err;
	}
	//绑定编解码器上下文和硬件设备信息上下文
	ctx->hw_device_ctx = av_buffer_ref(hw_device_ctx);
	return err;
}
static enum AVPixelFormat get_hw_format(AVCodecContext *ctx,
	const enum AVPixelFormat *pix_fmts)
{
	const enum AVPixelFormat *p;
	for (p = pix_fmts; *p != -1; p++) {
		if (*p == hw_pix_fmt)
			return *p;
	}
	fprintf(stderr, "Failed to get HW surface format.\n");
	return AV_PIX_FMT_NONE;
}
static int decode_write(AVCodecContext *avctx, AVPacket *packet)
{
	AVFrame *frame = NULL, *sw_frame = NULL;
	AVFrame *tmp_frame = NULL;
	uint8_t *buffer = NULL;
	int size;
	int ret = 0;
	ret = avcodec_send_packet(avctx, packet);
	if (ret < 0) {
		fprintf(stderr, "Error during decoding\n");
		return ret;
	}
	while (1) {
		if (!(frame = av_frame_alloc()) || !(sw_frame = av_frame_alloc())) {
			fprintf(stderr, "Can not alloc frame\n");
			ret = AVERROR(ENOMEM);
			goto fail;
		}
		ret = avcodec_receive_frame(avctx, frame);
		if (ret == AVERROR(EAGAIN) || ret == AVERROR_EOF) {
			av_frame_free(&frame);
			av_frame_free(&sw_frame);
			return 0;
		}
		else if (ret < 0) {
			fprintf(stderr, "Error while decoding\n");
			goto fail;
		}
		if (frame->format == hw_pix_fmt) {
			/* retrieve data from GPU to CPU */
			if ((ret = av_hwframe_transfer_data(sw_frame, frame, 0)) < 0) {
				fprintf(stderr, "Error transferring the data to system memory\n");
				goto fail;
			}
			tmp_frame = sw_frame;
		}
		else
			tmp_frame = frame;
		size = av_image_get_buffer_size(tmp_frame->format, tmp_frame->width,
			tmp_frame->height, 1);
		buffer = av_malloc(size);
		if (!buffer) {
			fprintf(stderr, "Can not alloc buffer\n");
			ret = AVERROR(ENOMEM);
			goto fail;
		}
		ret = av_image_copy_to_buffer(buffer, size,
			(const uint8_t * const *)tmp_frame->data,
			(const int *)tmp_frame->linesize, tmp_frame->format,
			tmp_frame->width, tmp_frame->height, 1);
		if (ret < 0) {
			fprintf(stderr, "Can not copy image to buffer\n");
			goto fail;
		}
		if ((ret = fwrite(buffer, 1, size, output_file)) < 0) {
			fprintf(stderr, "Failed to dump raw data.\n");
			goto fail;
		}
	fail:
		av_frame_free(&frame);
		av_frame_free(&sw_frame);
		av_freep(&buffer);
		if (ret < 0)
			return ret;
	}
}
int main(int argc, char *argv[])
{
	AVFormatContext *input_ctx = NULL;
	int video_stream, ret;
	AVStream *video = NULL;
	AVCodecContext *decoder_ctx = NULL;
	AVCodec *decoder = NULL;
	AVPacket packet;
	enum AVHWDeviceType type;
	int i;
	if (argc < 4) {
		fprintf(stderr, "Usage: %s <device type> <input file> <output file>\n", argv[0]);
		return -1;
	}
	//通过你传入的名字来找到对应的硬件解码类型
	type = av_hwdevice_find_type_by_name(argv[1]);
	if (type == AV_HWDEVICE_TYPE_NONE) {
		fprintf(stderr, "Device type %s is not supported.\n", argv[1]);
		fprintf(stderr, "Available device types:");
		while ((type = av_hwdevice_iterate_types(type)) != AV_HWDEVICE_TYPE_NONE)
			fprintf(stderr, " %s", av_hwdevice_get_type_name(type));
		fprintf(stderr, "\n");
		return -1;
	}
	/* open the input file */
	if (avformat_open_input(&input_ctx, argv[2], NULL, NULL) != 0) {
		fprintf(stderr, "Cannot open input file '%s'\n", argv[2]);
		return -1;
	}
	if (avformat_find_stream_info(input_ctx, NULL) < 0) {
		fprintf(stderr, "Cannot find input stream information.\n");
		return -1;
	}
	/* find the video stream information */
	ret = av_find_best_stream(input_ctx, AVMEDIA_TYPE_VIDEO, -1, -1, &decoder, 0);
	if (ret < 0) {
		fprintf(stderr, "Cannot find a video stream in the input file\n");
		return -1;
	}
	video_stream = ret;
	//去遍历所有编解码器支持的硬件解码配置 如果和之前你指定的是一样的 那么就可以继续执行了 不然就找不到
	for (i = 0;; i++) {
		const AVCodecHWConfig *config = avcodec_get_hw_config(decoder, i);
		if (!config) {
			fprintf(stderr, "Decoder %s does not support device type %s.\n",
				decoder->name, av_hwdevice_get_type_name(type));
			return -1;
		}
		if (config->methods & AV_CODEC_HW_CONFIG_METHOD_HW_DEVICE_CTX &&
			config->device_type == type) {
			//把硬件支持的像素格式设置进去
			hw_pix_fmt = config->pix_fmt;
			break;
		}
	}
	if (!(decoder_ctx = avcodec_alloc_context3(decoder)))
		return AVERROR(ENOMEM);
	video = input_ctx->streams[video_stream];
	if (avcodec_parameters_to_context(decoder_ctx, video->codecpar) < 0)
		return -1;
	//填入回调函数 通过这个函数 编解码器能够知道显卡支持的像素格式
	decoder_ctx->get_format = get_hw_format;
	if (hw_decoder_init(decoder_ctx, type) < 0)
		return -1;
   //绑定完成后 打开编解码器
	if ((ret = avcodec_open2(decoder_ctx, decoder, NULL)) < 0) {
		fprintf(stderr, "Failed to open codec for stream #%u\n", video_stream);
		return -1;
	}
	/* open the file to dump raw data */
	output_file = fopen(argv[3], "w+");
	/* actual decoding and dump the raw data */
	while (ret >= 0) {
		if ((ret = av_read_frame(input_ctx, &packet)) < 0)
			break;
		if (video_stream == packet.stream_index)
			ret = decode_write(decoder_ctx, &packet);
		av_packet_unref(&packet);
	}
	/* flush the decoder */
	packet.data = NULL;
	packet.size = 0;
	ret = decode_write(decoder_ctx, &packet);
	av_packet_unref(&packet);
	if (output_file)
		fclose(output_file);
	avcodec_free_context(&decoder_ctx);
	avformat_close_input(&input_ctx);
	av_buffer_unref(&hw_device_ctx);
	return 0;
}
关键函数解析
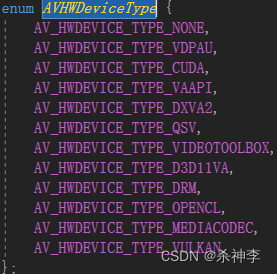
enum AVHWDeviceType av_hwdevice_find_type_by_name(const char *name);
通过传入的参数查找对应的硬件类型 其中 AVHWDeviceType值如下

const AVCodecHWConfig *avcodec_get_hw_config(const AVCodec *codec, int index);
拿到编解码器支持的硬件配置比如硬件支持的像素格式等等

static enum AVPixelFormat get_hw_format(AVCodecContext *ctx,
	const enum AVPixelFormat *pix_fmts)
{
	const enum AVPixelFormat *p;
	for (p = pix_fmts; *p != -1; p++) {
		if (*p == hw_pix_fmt)
			return *p;
	}
	fprintf(stderr, "Failed to get HW surface format.\n");
	return AV_PIX_FMT_NONE;
}
这是一个回调函数,它的作用就是告诉解码器codec自己的目标像素格式是什么。在上一步骤获取到了硬解码器codec可以支持的目标格式之后,就通过这个回调函数告知给codec
- fmt是这个解码器codec支持的像素格式,且按照质量优劣进行排序;
- 如果没有特别的需要,这个步骤是可以省略的。内部默认会使用“native”的格式。
int av_hwdevice_ctx_create(AVBufferRef **pdevice_ref, enum AVHWDeviceType type, const char *device, AVDictionary *opts, int flags)
这个函数的作用是,创建硬件设备相关的上下文信息AVHWDeviceContext,包括分配内存资源、对硬件设备进行初始化。
准备好硬件设备上下文AVHWDeviceContext后,需要把这个信息绑定到AVCodecContext,就可以像软解一样的流程执行解码操作了。绑定操作如下

注意这里硬件设备信息上下文是通过AVBuffer来存储的引用 并不是实体
int av_hwframe_transfer_data(AVFrame *dst, const AVFrame *src, int flags)
这个函数是负责在cpu内存和硬件内存(原文是hw surface)之间做数据交换的。也就是说,它不但可以把数据从硬件surface上搬回系统内存,反向操作也支持;甚至可以直接在硬件内存之间做数据交互。
到此这篇关于C++ ffmpeg硬件解码的实现方法的文章就介绍到这了,更多相关C++ ffmpeg硬件解码内容请搜索我们以前的文章或继续浏览下面的相关文章希望大家以后多多支持我们!

