SpringBoot web开发源码深入分析
目录
- 一、MVC自动配置
- 1、默认支持的功能
- 2、静态资源与首页相关源码解析
- 3、Rest映射及源码分析
- 4、请求映射原理
一、MVC自动配置
1、默认支持的功能
Spring Boot为Spring MVC提供了自动配置,默认支持以下功能
- ContentNegotiatingViewResolver和BeanNameViewResolver视图解析器
- 支持静态资源,包括webjars
- 转换器的自动注册、自定义转换器GenericConverter与格式化
- 支持http消息转换(请求与响应)
- MessageCodesResolver错误消息
- 首页映射
- 图标自定义
- 自动使用ConfigurableWebBindingInitializer,博主百度了一下,它的主要作用就是初始化WebDataBinder,将请求的参数转化为对应的JavaBean,并且会结合类型、格式转换等API一起使用
2、静态资源与首页相关源码解析
SpringBoot启动时会默认加载 xxxAutoConfiguration 类(自动配置类),SpringMVC功能的自动配置类为 WebMvcAutoConfiguration
@AutoConfiguration(
    after = {DispatcherServletAutoConfiguration.class, TaskExecutionAutoConfiguration.class, ValidationAutoConfiguration.class}
)
@ConditionalOnWebApplication(
    type = Type.SERVLET
)
@ConditionalOnClass({Servlet.class, DispatcherServlet.class, WebMvcConfigurer.class})
@ConditionalOnMissingBean({WebMvcConfigurationSupport.class})
@AutoConfigureOrder(-2147483638)
public class WebMvcAutoConfiguration {
	...
}
然后我们可以看到他有一个静态内部类WebMvcAutoConfigurationAdapter,可以看到这是一个配置类
@Configuration(
    proxyBeanMethods = false
)
@Import({WebMvcAutoConfiguration.EnableWebMvcConfiguration.class})
// 将配置文件的相关属性和括号中的两个类进行了绑定,然后注册到容器中。WebMvcProperties和spring.mvc开头的配置、WebProperties和spring.web开头的配置
@EnableConfigurationProperties({WebMvcProperties.class, WebProperties.class})
@Order(0)
public static class WebMvcAutoConfigurationAdapter implements WebMvcConfigurer, ServletContextAware {
	...
}
然后我们发现,这个配置类只有一个有参构造器,在这种情况下,我们默认有参构造器所有参数的值都会从容器中获取
// 这里的WebProperties 和WebMvcProperties都在上面和配置进行绑定过了,如果我们没有配置该配置项,那就去类中取默认配置的值
// ListableBeanFactory beanFactory Spring的beanFactory
// 其他的可以自己去了解下,博主这里没有特地去搜了
public WebMvcAutoConfigurationAdapter(WebProperties webProperties, WebMvcProperties mvcProperties, ListableBeanFactory beanFactory, ObjectProvider<HttpMessageConverters> messageConvertersProvider, ObjectProvider<WebMvcAutoConfiguration.ResourceHandlerRegistrationCustomizer> resourceHandlerRegistrationCustomizerProvider, ObjectProvider<DispatcherServletPath> dispatcherServletPath, ObjectProvider<ServletRegistrationBean<?>> servletRegistrations) {
	this.resourceProperties = webProperties.getResources();
	this.mvcProperties = mvcProperties;
	this.beanFactory = beanFactory;
	this.messageConvertersProvider = messageConvertersProvider;
	this.resourceHandlerRegistrationCustomizer = (WebMvcAutoConfiguration.ResourceHandlerRegistrationCustomizer)resourceHandlerRegistrationCustomizerProvider.getIfAvailable();
	this.dispatcherServletPath = dispatcherServletPath;
	this.servletRegistrations = servletRegistrations;
	this.mvcProperties.checkConfiguration();
}
那么我们的静态资源映射以及webjars都是在哪里进行配置的呢,我们往下看找到一个方法
public void addResourceHandlers(ResourceHandlerRegistry registry) {
	// 判断这个isAddMappings属性是否为false,默认值是true,如果我们在yaml文件或者properties中改为false,那么就会进这个条件语句,后面的静态资源路径以及webjars都不会生效了
    if (!this.resourceProperties.isAddMappings()) {
        logger.debug("Default resource handling disabled");
    } else {
    	// webjars的规则
        this.addResourceHandler(registry, "/webjars/**", "classpath:/META-INF/resources/webjars/");
        // 默认静态资源地址的处理规则
        this.addResourceHandler(registry, this.mvcProperties.getStaticPathPattern(), (registration) -> {
            registration.addResourceLocations(this.resourceProperties.getStaticLocations());
            if (this.servletContext != null) {
                ServletContextResource resource = new ServletContextResource(this.servletContext, "/");
                registration.addResourceLocations(new Resource[]{resource});
            }
        });
    }
}
那我们欢迎页是在哪里配置的呢?
我们发现,在这个WebMvcAutoConfiguration下面还有一个静态内部类EnableWebMvcConfiguration,它也是一个配置类
这里面有一个方法welcomePageHandlerMapping()
HandlerMapping(处理映射器):根据URL找到对应的处理器
@Bean
public WelcomePageHandlerMapping welcomePageHandlerMapping(ApplicationContext applicationContext, FormattingConversionService mvcConversionService, ResourceUrlProvider mvcResourceUrlProvider) {
    WelcomePageHandlerMapping welcomePageHandlerMapping = new WelcomePageHandlerMapping(new TemplateAvailabilityProviders(applicationContext), applicationContext, this.getWelcomePage(), this.mvcProperties.getStaticPathPattern());
    welcomePageHandlerMapping.setInterceptors(this.getInterceptors(mvcConversionService, mvcResourceUrlProvider));
    welcomePageHandlerMapping.setCorsConfigurations(this.getCorsConfigurations());
    return welcomePageHandlerMapping;
}
点进WelcomePageHandlerMapping的构造方法可以看到,它的逻辑大体上为,如果welcomePage不等于null,而且staticPathPattern是默认的/**,就会去我们的静态资源文件夹找index.html,否则就去找有没有能处理/index接口的映射器
这里的staticPathPattern和spring.mvc.static-path-pattern是绑定在一起的
WelcomePageHandlerMapping(TemplateAvailabilityProviders templateAvailabilityProviders, ApplicationContext applicationContext, Resource welcomePage, String staticPathPattern) {
    if (welcomePage != null && "/**".equals(staticPathPattern)) {
        logger.info("Adding welcome page: " + welcomePage);
        this.setRootViewName("forward:index.html");
    } else if (this.welcomeTemplateExists(templateAvailabilityProviders, applicationContext)) {
        logger.info("Adding welcome page template: index");
        this.setRootViewName("index");
    }
}
3、Rest映射及源码分析
Rest风格支持:使用HTTP请求方式动词来表示对资源的操作
具体的可以看我之前的 【SpringMVC】Restful风格及中文乱码问题
- 原来获取用户信息–/getUSer、删除用户–/deleteUser、修改用户–editUser、保存用户/saveUser
- 使用REST风格获取用户信息–GET、删除用户–DELETE、修改用户–PUT、保存用户POST
核心源码部分:WebMvcAutoConfiguration类下的hiddenHttpMethodFilter()方法
核心配置:如果要从页面发起PUT、DELETE请求,需要在yaml文件中将spring.mvc.hiddenmethod.filter.enabled设置为true,如果是客户端工具如postman发起,则无需开启
@Bean
@ConditionalOnMissingBean({HiddenHttpMethodFilter.class})
@ConditionalOnProperty(
    prefix = "spring.mvc.hiddenmethod.filter",
    name = {"enabled"}
)
public OrderedHiddenHttpMethodFilter hiddenHttpMethodFilter() {
    return new OrderedHiddenHttpMethodFilter();
}
我们点开OrderedHiddenHttpMethodFilter可以看到它继承了HiddenHttpMethodFilter这个类
我们接着跟进去 发现里面有一个doFilterInternal()方法,请求进来都会被这个方法拦截
package org.springframework.web.filter;
import java.io.IOException;
import java.util.Arrays;
import java.util.Collections;
import java.util.List;
import java.util.Locale;
import javax.servlet.FilterChain;
import javax.servlet.ServletException;
import javax.servlet.ServletRequest;
import javax.servlet.http.HttpServletRequest;
import javax.servlet.http.HttpServletRequestWrapper;
import javax.servlet.http.HttpServletResponse;
import org.springframework.http.HttpMethod;
import org.springframework.util.Assert;
import org.springframework.util.StringUtils;
public class HiddenHttpMethodFilter extends OncePerRequestFilter {
    private static final List<String> ALLOWED_METHODS;
    public static final String DEFAULT_METHOD_PARAM = "_method";
    private String methodParam = "_method";
    public HiddenHttpMethodFilter() {
    }
    public void setMethodParam(String methodParam) {
        Assert.hasText(methodParam, "'methodParam' must not be empty");
        this.methodParam = methodParam;
    }
	// 它会对请求方法进行判断
    protected void doFilterInternal(HttpServletRequest request, HttpServletResponse response, FilterChain filterChain) throws ServletException, IOException {
        HttpServletRequest requestToUse = request;
        // 如果是表单是post请求且请求正常,那么它会判断请求参数里面是否存在_method这个参数
        if ("POST".equals(request.getMethod()) && request.getAttribute("javax.servlet.error.exception") == null) {
            String paramValue = request.getParameter(this.methodParam);
            // 判断_method参数是否为空
            if (StringUtils.hasLength(paramValue)) {
            	// 将参数转成大写
                String method = paramValue.toUpperCase(Locale.ENGLISH);
                // 判断_method参数是否是PUT、DELETE、PATCH其中的一个,如果满足就使用requesWrapper重写了HttpServletRequest的getMethod方法,返回的是传入的值
                if (ALLOWED_METHODS.contains(method)) {
                    requestToUse = new HiddenHttpMethodFilter.HttpMethodRequestWrapper(request, method);
                }
            }
        }
		// 这里过滤器放行时的request是处理后得到的HttpMethodRequestWrapper
        filterChain.doFilter((ServletRequest)requestToUse, response);
    }
    static {
        ALLOWED_METHODS = Collections.unmodifiableList(Arrays.asList(HttpMethod.PUT.name(), HttpMethod.DELETE.name(), HttpMethod.PATCH.name()));
    }
	// HttpServletRequestWrapper类还是实现了HttpServletRequest接口
    private static class HttpMethodRequestWrapper extends HttpServletRequestWrapper {
        private final String method;
        public HttpMethodRequestWrapper(HttpServletRequest request, String method) {
            super(request);
            this.method = method;
        }
        public String getMethod() {
            return this.method;
        }
    }
}
我们可以写一个html页面还有一个控制器测试一下
<!DOCTYPE html>
<html lang="en">
<head>
    <meta charset="UTF-8">
    <title>Title</title>
</head>
<body>
Hello World!
<form action="/test/user" method="get">
    <input type="submit" value="REST-GET">
</form>
<form action="/test/user" method="post">
    <input type="submit" value="REST-POST">
</form>
<form action="/test/user" method="post">
    <input name="_method" type="hidden" value="PUT">
    <input type="submit" value="REST-PUT">
</form>
<form action="/test/user" method="post">
    <input name="_method" type="hidden" value="DELETE">
    <input type="submit" value="REST-DELETE">
</form>
</body>
</html>
package com.decade.controller;
import org.springframework.stereotype.Controller;
import org.springframework.web.bind.annotation.RequestMapping;
import org.springframework.web.bind.annotation.RequestMethod;
import org.springframework.web.bind.annotation.ResponseBody;
@Controller
@RequestMapping(value = "/test")
public class TestController {
    @RequestMapping(value = "/user", method = RequestMethod.GET)
    @ResponseBody
    public String queryUser() {
        return "get查询用户的信息";
    }
    @RequestMapping(value = "/user", method = RequestMethod.POST)
    @ResponseBody
    public String editUser() {
        return "post保存用户的信息";
    }
    @RequestMapping(value = "/user", method = RequestMethod.DELETE)
    @ResponseBody
    public String deleteUser() {
        return "delete删除用户的信息";
    }
    @RequestMapping(value = "/user", method = RequestMethod.PUT)
    @ResponseBody
    public String saveUser() {
        return "put编辑用户的信息";
    }
}
验证的时候遇到一个问题,那就是如果引入了spring-boot-starter-security这个依赖
那么调用POST、PUT和DELETE接口时就会出错
博主查了一下,这是因为Spring Boot 与 SpringSecurity整合后,为了防御csrf攻击,只有GET|OPTIONS|HEAD|TRACE|CONNECTION可以通过
其他方法请求时,需要有token
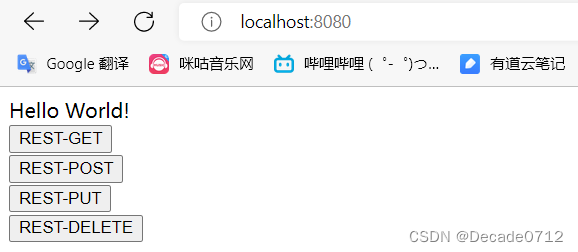
我将SpringSecurity的依赖注掉之后,验证就通过了
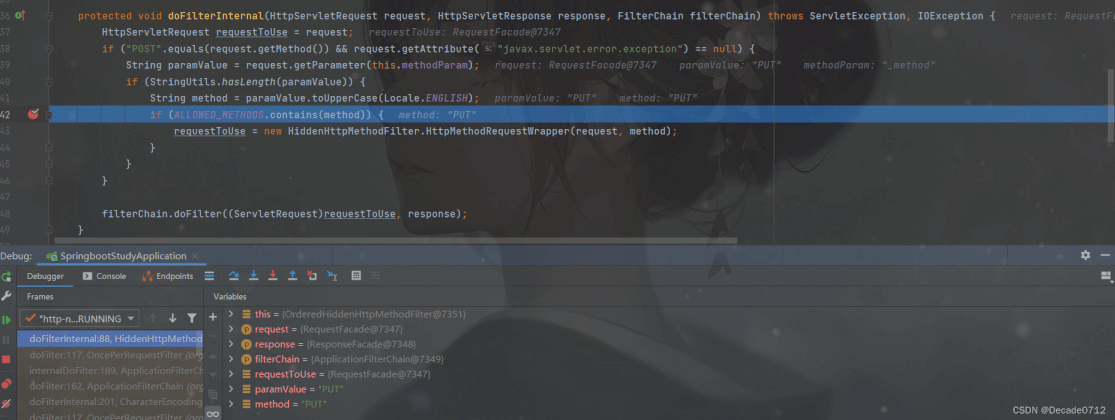
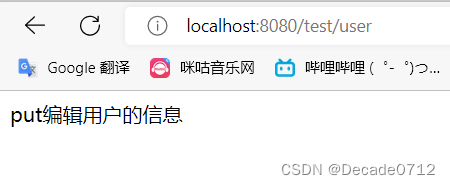
拓展:如果我们要修改HiddenHttpMethodFilter里过滤方法中判断的参数名称,我们可以自己写一个配置类,例如我们想将它由_method改为_m,那可以这么写
package com.decade.config;
import org.springframework.context.annotation.Bean;
import org.springframework.context.annotation.Configuration;
import org.springframework.web.filter.HiddenHttpMethodFilter;
@Configuration(proxyBeanMethods = false)
public class MyMvcConfig {
    @Bean
    public HiddenHttpMethodFilter createHiddenHttpMethodFilter() {
        HiddenHttpMethodFilter hiddenHttpMethodFilter = new HiddenHttpMethodFilter();
        // 利用setMethodParam设置自己想要的参数名
        hiddenHttpMethodFilter.setMethodParam("_m");
        return hiddenHttpMethodFilter;
    }
}
4、请求映射原理
1)接下来我们研究一下,Spring Boot是怎么将一个个请求匹配到对应的处理器(即controller)的
根据我们之前SpringMVC的学习 我们可以知道 所有的请求都会被DispatcherServlet拦截,我们一直跟下去可以发现,DispatcherServlet实际上也是继承了HttpServlet
我们着重分析一下DispatcherServlet中的doDispatch()方法,我们发现有一个getHandler()方法
protected void doDispatch(HttpServletRequest request, HttpServletResponse response) throws Exception {
    HttpServletRequest processedRequest = request;
    HandlerExecutionChain mappedHandler = null;
    boolean multipartRequestParsed = false;
    WebAsyncManager asyncManager = WebAsyncUtils.getAsyncManager(request);
    try {
        try {
            ModelAndView mv = null;
            Object dispatchException = null;
            try {
            	// 检查是否是文件上传请求
                processedRequest = this.checkMultipart(request);
                multipartRequestParsed = processedRequest != request;
                // 决定是哪个handler处理当前请求,HandlerMapping(处理映射器):根据URL找到对应的处理器
                mappedHandler = this.getHandler(processedRequest);
                if (mappedHandler == null) {
                    this.noHandlerFound(processedRequest, response);
                    return;
                }
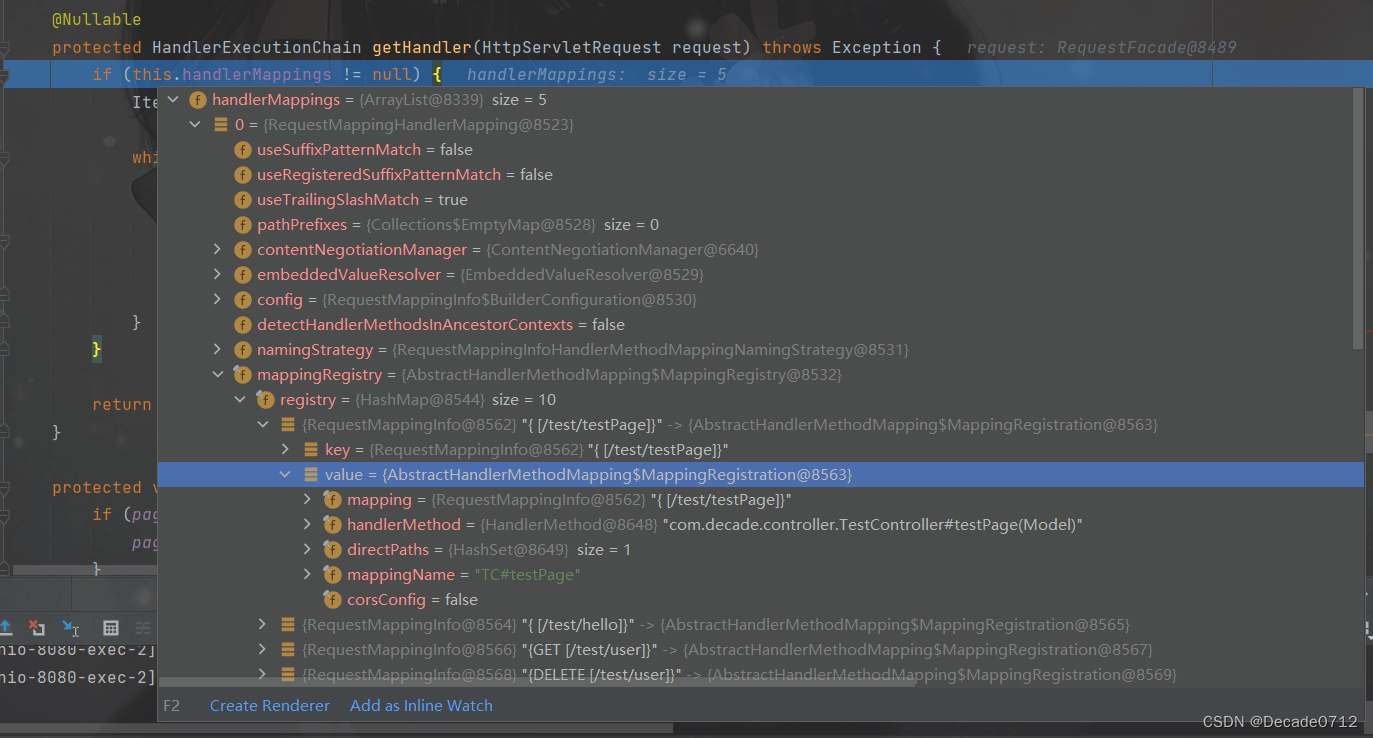
我们尝试发起一个请求,使用debug模式可以发现,这个getHandler()方法就是对容器中的handlerMapping进行一个遍历,查看哪个处理映射器能处理这个请求
我们可以看到这里有WelcomePageHandlerMapping(与首页相关的)等映射器
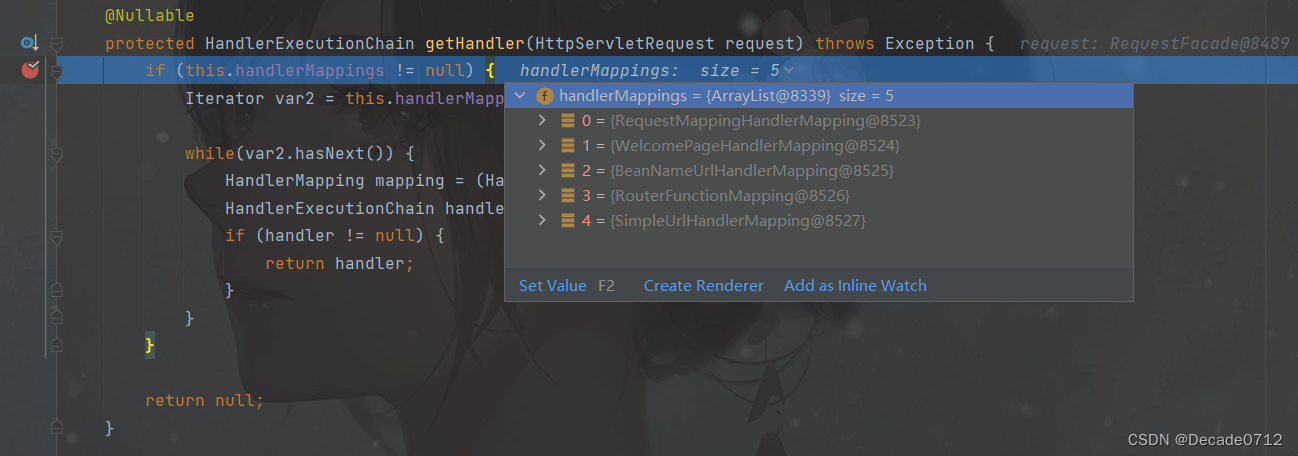
通过分析RequestMappingHandlerMapping,我们可以发现,他这里面保存了所有@RequestMapping 路径和与之对应控制器类下的方法的映射规则
我们继续深入到AbstractHandlerMapping这个类下的getHandler()---->getHandlerInternal()方法
然后AbstractHandlerMethodMapping这个类继承了AbstractHandlerMapping,并完成了关于getHandlerInternal()的重写,接着就是lookupHandlerMethod()----->addMatchingMappings()
------>getMatchingMapping()
然后又跟到getMatchingMapping()------->RequestMappingInfo.getMatchingCondition()
最后,我们发现在RequestMappingInfo这个类中,getMatchingCondition()这个方法会对请求类型做一个筛选,这样就能将相同路径不同请求方法的接口区分开来,如果存在相同请求类型且请求路径也相同,那么系统就会报错
同样的,如果我们需要自定义映射处理,我们也可以自己给容器中放HandlerMapping
2)问题:那么我们还可以思考一下,我们最开始遍历的那些handlerMapping是从哪里来的呢?
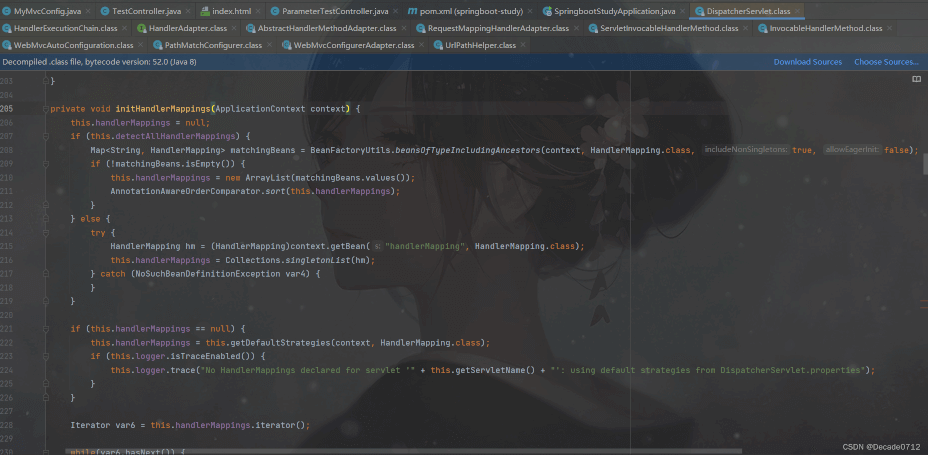
我们的目光还是回到DispatcherServlet,这里面有一个initHandlerMappings()
这里他会从容器中获取实现了HandlerMapping接口的处理映射器
这样 我们就基本完成了spring boot关于web开发的源码分析
到此这篇关于SpringBoot web开发源码深入分析的文章就介绍到这了,更多相关SpringBoot web开发内容请搜索我们以前的文章或继续浏览下面的相关文章希望大家以后多多支持我们!

